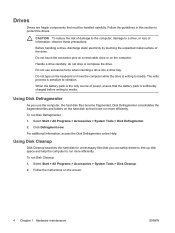
Drives
Page 4
...removing the drive from one location to a medium. The write process is sensitive to vibration. ■ When the battery pack is the only source of power, ensure that check carry-on luggage, such as conveyor belts, use excessive force when inserting a drive into a drive bay. ■ Do not type on the keyboard... drive, discharge static electricity by touching the unpainted metal surface of the drive. ■ Do not touch the drive connector pins on a removable drive or on , and then shut it with magnetic fields include airport walk-through the operating system. ■ Do not use x-rays ...
...removing the drive from one location to a medium. The write process is sensitive to vibration. ■ When the battery pack is the only source of power, ensure that check carry-on luggage, such as conveyor belts, use excessive force when inserting a drive into a drive bay. ■ Do not type on the keyboard... drive, discharge static electricity by touching the unpainted metal surface of the drive. ■ Do not touch the drive connector pins on a removable drive or on , and then shut it with magnetic fields include airport walk-through the operating system. ■ Do not use x-rays ...

Drives - Windows Vista
Page 4
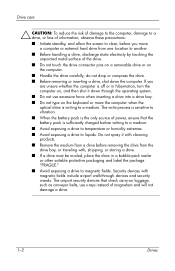
... must be mailed, place the drive in Hibernation, turn the computer on, and then shut it with cleaning products. ■ Remove media from a drive before removing the drive from one location to another. ■ Before handling a drive, discharge static electricity by touching the unpainted metal surface of... the drive. ■ Do not touch the drive connector pins on a removable drive or on the keyboard or move a computer or external hard drive from the drive bay, or traveling with magnetic fields include airport walk-through the...
... must be mailed, place the drive in Hibernation, turn the computer on, and then shut it with cleaning products. ■ Remove media from a drive before removing the drive from one location to another. ■ Before handling a drive, discharge static electricity by touching the unpainted metal surface of... the drive. ■ Do not touch the drive connector pins on a removable drive or on the keyboard or move a computer or external hard drive from the drive bay, or traveling with magnetic fields include airport walk-through the...
Memory Modules
Page 3
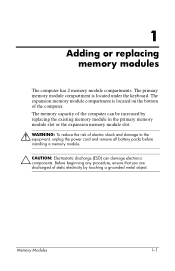
...The primary memory module compartment is located on the bottom of electric shock and damage to the equipment, unplug the power cord and remove all battery packs before installing a memory module. Ä CAUTION: Electrostatic discharge (ESD) can be increased by touching a grounded metal... object. Memory Modules 1-1 The expansion memory module compartment is located under the keyboard. Before beginning any procedure, ensure that you are discharged of static electricity by replacing the existing memory module in the primary memory ...
...The primary memory module compartment is located on the bottom of electric shock and damage to the equipment, unplug the power cord and remove all battery packs before installing a memory module. Ä CAUTION: Electrostatic discharge (ESD) can be increased by touching a grounded metal... object. Memory Modules 1-1 The expansion memory module compartment is located under the keyboard. Before beginning any procedure, ensure that you are discharged of static electricity by replacing the existing memory module in the primary memory ...
Memory Modules
Page 10
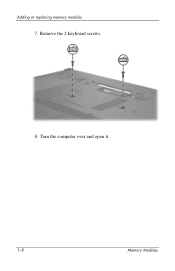
Turn the computer over and open it. 1-8 Memory Modules Remove the 2 keyboard screws. 8. Adding or replacing memory modules 7.
Turn the computer over and open it. 1-8 Memory Modules Remove the 2 keyboard screws. 8. Adding or replacing memory modules 7.
Memory Modules - Windows Vista
Page 3
The expansion memory module compartment is located under the keyboard. Memory Modules 1 The primary memory module compartment is located on the bottom of the computer. The memory capacity of electric shock and damage to the equipment, unplug the power cord and remove all batteries before installing a memory module. Ä CAUTION: Electrostatic discharge (ESD...
The expansion memory module compartment is located under the keyboard. Memory Modules 1 The primary memory module compartment is located on the bottom of the computer. The memory capacity of electric shock and damage to the equipment, unplug the power cord and remove all batteries before installing a memory module. Ä CAUTION: Electrostatic discharge (ESD...

Memory Modules - Windows Vista
Page 10
Remove the 2 keyboard screws. 9. Turn the computer over and open it. 8 Memory Modules Adding or replacing memory modules 8.
Remove the 2 keyboard screws. 9. Turn the computer over and open it. 8 Memory Modules Adding or replacing memory modules 8.

Pointing Devices and Keyboard
Page 14
... to display information about the ambient light sensor, refer to "Setting the ambient light sensor," in decimal format. Keyboard Decrease screen brightness (fn+f9) Press fn+f9 to increase the screen brightness. Hold down the hotkey to decrease...the brightness level incrementally. The BIOS date is sometimes called the system ROM version number. 2-6 Pointing Devices and Keyboard Press fn+esc a second time to turn on and off the ambient light sensor. Hold down the hotkey to.... Activate the ambient light sensor (fn+f11) Press fn+f11 to remove the system information from the screen.
... to display information about the ambient light sensor, refer to "Setting the ambient light sensor," in decimal format. Keyboard Decrease screen brightness (fn+f9) Press fn+f9 to increase the screen brightness. Hold down the hotkey to decrease...the brightness level incrementally. The BIOS date is sometimes called the system ROM version number. 2-6 Pointing Devices and Keyboard Press fn+esc a second time to turn on and off the ambient light sensor. Hold down the hotkey to.... Activate the ambient light sensor (fn+f11) Press fn+f11 to remove the system information from the screen.

Pointing Devices and Keyboard
Page 18
...or disabling quick switch. ❏ Enabling or disabling the display resolution change detection feature. Keyboard HP Quick Launch Buttons control panel ✎ Some of the window. You can use the HP Quick Launch Buttons control panel to modify button assignments for setting preferences within the control ...■ Program the presentation button and the Info Center button, and change the settings for each button. ■ Add, modify, and remove items on the Q Menu. ■ Set preferences for tiling windows on the Windows desktop. ■ Adjust operating system and application font ...
...or disabling quick switch. ❏ Enabling or disabling the display resolution change detection feature. Keyboard HP Quick Launch Buttons control panel ✎ Some of the window. You can use the HP Quick Launch Buttons control panel to modify button assignments for setting preferences within the control ...■ Program the presentation button and the Info Center button, and change the settings for each button. ■ Add, modify, and remove items on the Q Menu. ■ Set preferences for tiling windows on the Windows desktop. ■ Adjust operating system and application font ...

Pointing Devices and Keyboard
Page 21
...choose to display these items or choose not to display them. Pointing Devices and Keyboard 2-13 To display the Q Menu on most computers. The items on Q Menu list. Removing a Q Menu item To remove an item from the Items to remove. 3. On the Items to display on Q Menu list, clear the check...to display on the Q Menu are displayed by default. In the HP Quick Launch Buttons control panel, click the Q Menu tab. 2. To save your preferences and close the control panel, click Apply and then click OK. Keyboard ❏ To turn off the welcome screen when the presentation button ...
...choose to display these items or choose not to display them. Pointing Devices and Keyboard 2-13 To display the Q Menu on most computers. The items on Q Menu list. Removing a Q Menu item To remove an item from the Items to remove. 3. On the Items to display on Q Menu list, clear the check...to display on the Q Menu are displayed by default. In the HP Quick Launch Buttons control panel, click the Q Menu tab. 2. To save your preferences and close the control panel, click Apply and then click OK. Keyboard ❏ To turn off the welcome screen when the presentation button ...

Pointing Devices and Keyboard
Page 24
To save your preferences and close the control panel, click OK. 2-16 Pointing Devices and Keyboard In the HP Quick Launch Buttons control panel, click the Q Menu tab. 2. Click Remove. 4. In the HP Quick Launch Buttons control panel, click the Q Menu tab. 2. Then ❏ To move the item up ...-defined item: 1. Select the item on the Items to display on Q Menu list. Removing an item from the Items to display on Q Menu list System-defined items cannot be removed from the Items to remove. 3. Keyboard Repositioning a Q Menu item To change the location of an item on the Q Menu:...
To save your preferences and close the control panel, click OK. 2-16 Pointing Devices and Keyboard In the HP Quick Launch Buttons control panel, click the Q Menu tab. 2. Click Remove. 4. In the HP Quick Launch Buttons control panel, click the Q Menu tab. 2. Then ❏ To move the item up ...-defined item: 1. Select the item on the Items to display on Q Menu list. Removing an item from the Items to display on Q Menu list System-defined items cannot be removed from the Items to remove. 3. Keyboard Repositioning a Q Menu item To change the location of an item on the Q Menu:...

Pointing Devices and Keyboard
Page 33
Index keys fn 3-1 function 2-2 hotkeys 2-2 num lock 3-2 shift 3-3 L lights, num lock 3-1 N num lock disabling 3-3, 3-4 enabling 3-3, 3-4 num lock key 3-2 num lock light 3-1 P pointing stick 1-2 presentation button 2-8, 2-9 Q Q Menu displaying 2-13 preferences 2-13 removing 2-13 repositioning 2-16 user-defined item 2-14 Quick Launch buttons 2-7 S scrolling regions, TouchPad 1-2 shift key 3-3 system information, displaying 2-6 T tiling, setting preferences 2-17 TouchPad described 1-3 setting preferences 1-5 Z zoom preferences 2-17 Index-2 Pointing Devices and Keyboard
Index keys fn 3-1 function 2-2 hotkeys 2-2 num lock 3-2 shift 3-3 L lights, num lock 3-1 N num lock disabling 3-3, 3-4 enabling 3-3, 3-4 num lock key 3-2 num lock light 3-1 P pointing stick 1-2 presentation button 2-8, 2-9 Q Q Menu displaying 2-13 preferences 2-13 removing 2-13 repositioning 2-16 user-defined item 2-14 Quick Launch buttons 2-7 S scrolling regions, TouchPad 1-2 shift key 3-3 system information, displaying 2-6 T tiling, setting preferences 2-17 TouchPad described 1-3 setting preferences 1-5 Z zoom preferences 2-17 Index-2 Pointing Devices and Keyboard

Pointing Devices and Keyboard - Windows Vista
Page 14
...+esc display, the version of the system BIOS (basic input-output system) is sometimes called the system ROM version number. 2-6 Pointing Devices and Keyboard Press fn+esc a second time to turn on and off the ambient light sensor. Activate the ambient light sensor (fn+f11) Press fn+f11... to remove the system information from the screen. The BIOS date is displayed as the BIOS date. Hold down the hotkey to increase the screen brightness. Keyboard Decrease screen brightness (fn+f9) Press fn+f9 to display information about...
...+esc display, the version of the system BIOS (basic input-output system) is sometimes called the system ROM version number. 2-6 Pointing Devices and Keyboard Press fn+esc a second time to turn on and off the ambient light sensor. Activate the ambient light sensor (fn+f11) Press fn+f11... to remove the system information from the screen. The BIOS date is displayed as the BIOS date. Hold down the hotkey to increase the screen brightness. Keyboard Decrease screen brightness (fn+f9) Press fn+f9 to display information about...

Pointing Devices and Keyboard - Windows Vista
Page 18
..., modify, and remove items on the Q Menu. ■ Set preferences for tiling windows on the control panel, select the Help button in the upper-right corner of the preferences listed in the HP Quick Launch Buttons control panel may not be supported by the computer. Keyboard HP Quick Launch Buttons ...control panel ✎ Some of the window. 2-10 Pointing Devices and Keyboard You can use the HP Quick Launch Buttons control panel to ■...
..., modify, and remove items on the Q Menu. ■ Set preferences for tiling windows on the control panel, select the Help button in the upper-right corner of the preferences listed in the HP Quick Launch Buttons control panel may not be supported by the computer. Keyboard HP Quick Launch Buttons ...control panel ✎ Some of the window. 2-10 Pointing Devices and Keyboard You can use the HP Quick Launch Buttons control panel to ■...

Pointing Devices and Keyboard - Windows Vista
Page 21
Removing a Q Menu item To remove an item from the Items to display on Q Menu list. To save your preferences and close the control panel, click Apply, and then click OK. Pointing Devices and Keyboard 2-13 Keyboard Setting Q Menu preferences The Q Menu can display up to 40 items. Several system-defined items ...control panel, click the Q Menu tab. 2. To save your preferences and close the control panel, click Apply, and then click OK. In the HP Quick Launch Buttons control panel, click the Q Menu tab. 2. Select the check box for each item you want to the Q Menu To add an...
Removing a Q Menu item To remove an item from the Items to display on Q Menu list. To save your preferences and close the control panel, click Apply, and then click OK. Pointing Devices and Keyboard 2-13 Keyboard Setting Q Menu preferences The Q Menu can display up to 40 items. Several system-defined items ...control panel, click the Q Menu tab. 2. To save your preferences and close the control panel, click Apply, and then click OK. In the HP Quick Launch Buttons control panel, click the Q Menu tab. 2. Select the check box for each item you want to the Q Menu To add an...

Pointing Devices and Keyboard - Windows Vista
Page 24
... Vertical Tile or Horizontal Tile, and then click the programs you want to remove. 3. Keyboard Removing an item from the Items to display on Q Menu list System-defined items cannot be tiled in the Applications currently running box. 3. In the HP Quick Launch Buttons control panel, click the Q Menu tab. 2. Setting tiling preferences To...
... Vertical Tile or Horizontal Tile, and then click the programs you want to remove. 3. Keyboard Removing an item from the Items to display on Q Menu list System-defined items cannot be tiled in the Applications currently running box. 3. In the HP Quick Launch Buttons control panel, click the Q Menu tab. 2. Setting tiling preferences To...

Pointing Devices and Keyboard - Windows Vista
Page 32
Index keys fn 3-1 function 2-2 hotkeys 2-2 num lock 3-2 shift 3-3 L lights, num lock 3-1 N num lock disabling 3-3, 3-4 enabling 3-3, 3-4 num lock key 3-2 num lock light 3-1 P pointing stick 1-2 presentation button 2-8, 2-9 Q Q Menu displaying 2-12 preferences 2-13 removing 2-13 repositioning 2-15 user-defined item 2-13 Quick Launch buttons 2-7 S scrolling regions, TouchPad 1-2 shift key 3-3 system information, displaying 2-6 T tiling, setting preferences 2-16 TouchPad described 1-3 setting preferences 1-5 Index-2 Pointing Devices and Keyboard
Index keys fn 3-1 function 2-2 hotkeys 2-2 num lock 3-2 shift 3-3 L lights, num lock 3-1 N num lock disabling 3-3, 3-4 enabling 3-3, 3-4 num lock key 3-2 num lock light 3-1 P pointing stick 1-2 presentation button 2-8, 2-9 Q Q Menu displaying 2-12 preferences 2-13 removing 2-13 repositioning 2-15 user-defined item 2-13 Quick Launch buttons 2-7 S scrolling regions, TouchPad 1-2 shift key 3-3 system information, displaying 2-6 T tiling, setting preferences 2-16 TouchPad described 1-3 setting preferences 1-5 Index-2 Pointing Devices and Keyboard

Routine Care - Windows Vista
Page 7
...pointer to jump around and under the keys to loosen and remove debris. A can of electric shock or damage to internal components, do not use premoistened antistatic wipes or an antistatic screen cleaner. ENWW TouchPad and keyboard 3 If the screen requires additional cleaning, use a vacuum cleaner...you may need to blow air around on the screen. CAUTION To prevent permanent damage to clean the keyboard. WARNING! Clean the keyboard regularly to prevent keys from sticking and to remove dust, lint, and particles that can be used to periodically clean or change the replacement cap. (...
...pointer to jump around and under the keys to loosen and remove debris. A can of electric shock or damage to internal components, do not use premoistened antistatic wipes or an antistatic screen cleaner. ENWW TouchPad and keyboard 3 If the screen requires additional cleaning, use a vacuum cleaner...you may need to blow air around on the screen. CAUTION To prevent permanent damage to clean the keyboard. WARNING! Clean the keyboard regularly to prevent keys from sticking and to remove dust, lint, and particles that can be used to periodically clean or change the replacement cap. (...
Routine Care - Windows Vista
Page 8
... fragmented. When the battery pack is the only source of the drive. To run more efficiently. Do not touch the connector pins on a removable drive or on the keyboard or move the computer while the drive is sensitive to protect the drives. The write process is writing to run Disk Cleanup: 1. Using...
... fragmented. When the battery pack is the only source of the drive. To run more efficiently. Do not touch the connector pins on a removable drive or on the keyboard or move the computer while the drive is sensitive to protect the drives. The write process is writing to run Disk Cleanup: 1. Using...


