
HP USB Digital Drive
Page 9
Select the Digital Drive and wait until the "Safe to remove the Digital Drive when the status light on the Digital Drive is in the extended position, return it on its track for safe storage. 8 User Guide Gently unplug the Digital Drive from the USB port. ✎ If the USB connector cable is flashing. 1. Select the "Safely Remove Hardware" icon on your screen. 3. A dialog box displays a list of connected devices. 2. Disconnecting the Digital Drive ✎ Do not attempt to Remove Hardware" message appears on your taskbar.
Select the Digital Drive and wait until the "Safe to remove the Digital Drive when the status light on the Digital Drive is in the extended position, return it on its track for safe storage. 8 User Guide Gently unplug the Digital Drive from the USB port. ✎ If the USB connector cable is flashing. 1. Select the "Safely Remove Hardware" icon on your screen. 3. A dialog box displays a list of connected devices. 2. Disconnecting the Digital Drive ✎ Do not attempt to Remove Hardware" message appears on your taskbar.
HP Client Manager 6.1
Page 7
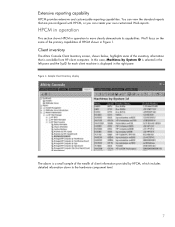
... HPCM in the right pane. Figure 4. Client inventory The Altiris Console Client Inventory screen, shown below, highlights some of the primary capabilities of HPCM shown in the left pane and the SysID for each client machine is available from HP client computers. In this case, Machines by HPCM, which includes detailed information...
... HPCM in the right pane. Figure 4. Client inventory The Altiris Console Client Inventory screen, shown below, highlights some of the primary capabilities of HPCM shown in the left pane and the SysID for each client machine is available from HP client computers. In this case, Machines by HPCM, which includes detailed information...
HP Client Manager 6.1
Page 8
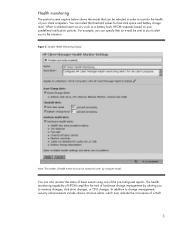
... monitor the health of health events that can be selected in order to memory changes, disk drive changes, or CPU changes. Health monitoring The partial screen capture below shows the events that can select the threshold values for free disk space and battery charge level. You can be monitored varies by...
... monitor the health of health events that can be selected in order to memory changes, disk drive changes, or CPU changes. Health monitoring The partial screen capture below shows the events that can select the threshold values for free disk space and battery charge level. You can be monitored varies by...
HP Client Manager 6.1
Page 9
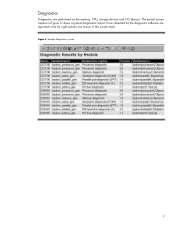
The partial screen capture in this screen shot). Errors detected by the diagnostic software are performed on the memory, CPU, storage devices and I/O devices. Figure 6. Diagnostics Diagnostics are reported in the far right column (not shown in Figure 6 shows a typical diagnostics report. Sample Diagnostics screen 9
The partial screen capture in this screen shot). Errors detected by the diagnostic software are performed on the memory, CPU, storage devices and I/O devices. Figure 6. Diagnostics Diagnostics are reported in the far right column (not shown in Figure 6 shows a typical diagnostics report. Sample Diagnostics screen 9
HP Client Manager 6.1
Page 10
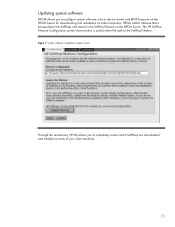
System software installation sample screen Through this mechanism, HPCM allows you to configure system software such as device drivers and BIOS firmware on the HPCM Server for downloading and installation ... SoftPaq Filestore. Updating system software HPCM allows you to completely control which SoftPaqs are downloaded and installed on each of your client machines. 10 The HP SoftPaq Filestore Configuration screen shown below is encapsulated into SoftPaqs and stored in the SoftPaq Filestore on the HPCM Server.
System software installation sample screen Through this mechanism, HPCM allows you to configure system software such as device drivers and BIOS firmware on the HPCM Server for downloading and installation ... SoftPaq Filestore. Updating system software HPCM allows you to completely control which SoftPaqs are downloaded and installed on each of your client machines. 10 The HP SoftPaq Filestore Configuration screen shown below is encapsulated into SoftPaqs and stored in the SoftPaq Filestore on the HPCM Server.
Wireless Security
Page 6
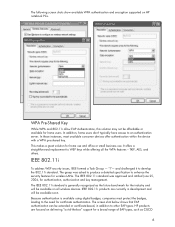
...wireless LANs. The IEEE 802.11i standard was asked to produce a detailed specification to the need for home use and office or small business use. IEEE 802.11i products are focused on delivering "out-of-the-box" support for a broad range of EAP types, such ...as the future benchmark for home users. The following screen shots show available WPA authentication and encryption supported on all the WPA features - The screen shot below shows that EAP authentication can be available on HP notebook PCs. "I"- In addition, home users don't typically have access...
...wireless LANs. The IEEE 802.11i standard was asked to produce a detailed specification to the need for home use and office or small business use. IEEE 802.11i products are focused on delivering "out-of-the-box" support for a broad range of EAP types, such ...as the future benchmark for home users. The following screen shots show available WPA authentication and encryption supported on all the WPA features - The screen shot below shows that EAP authentication can be available on HP notebook PCs. "I"- In addition, home users don't typically have access...
Wireless Security
Page 8
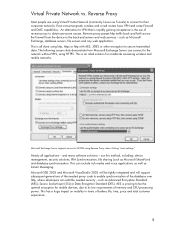
..., file sharing (such as Advanced Encryption Standard (AES), Secure Socket layer (SSL) or Data Encryption Standard (DES). The following screen shots demonstrate how Microsoft Exchange Server can include rich media and voice applications as well as Microsoft Exchange, database servers, file servers and...life, time, price and total customer experience. 8 Microsoft SQL 2005 and Microsoft VisualStudio 2005 will be the optimal encryption for notebooks accessing wireless and mobile networks. AES is an ideal solution for mobile devices, due to its low requirements of reverse proxy ...
..., file sharing (such as Advanced Encryption Standard (AES), Secure Socket layer (SSL) or Data Encryption Standard (DES). The following screen shots demonstrate how Microsoft Exchange Server can include rich media and voice applications as well as Microsoft Exchange, database servers, file servers and...life, time, price and total customer experience. 8 Microsoft SQL 2005 and Microsoft VisualStudio 2005 will be the optimal encryption for notebooks accessing wireless and mobile networks. AES is an ideal solution for mobile devices, due to its low requirements of reverse proxy ...

Hard Drive White Paper
Page 2
...reduce the risk of hard drive performance issues that HP is providing to its customers to the hard drive on and the hard drive is in symptoms such as blue screens and continuous reboots. The hard drive in the notebook is reading or writing data (operational shock). Typically,... of hard drives, the manufacturers have to seek the data from a significant bump or drop that occurs • While the notebook is file corruption, because of the following measures. 2 HP addresses these issues with the following errors to complete servo, and/or an inaccessible boot device. Introduction...
...reduce the risk of hard drive performance issues that HP is providing to its customers to the hard drive on and the hard drive is in symptoms such as blue screens and continuous reboots. The hard drive in the notebook is reading or writing data (operational shock). Typically,... of hard drives, the manufacturers have to seek the data from a significant bump or drop that occurs • While the notebook is file corruption, because of the following measures. 2 HP addresses these issues with the following errors to complete servo, and/or an inaccessible boot device. Introduction...
Installing Microsoft Windows XP Service Pack 2 on HP Compaq Business Notebooks
Page 5
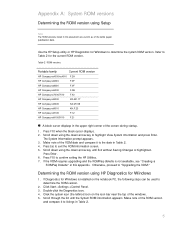
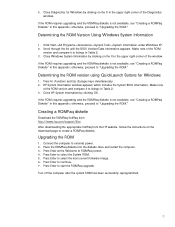
.... Double-click the Diagnostics icon. 4. Click the system icon (the leftmost icon on the notebook PC, the following steps can be used to "Upgrading the ROM." Refer to listings in ...HP Compaq nc4000/nc4010 F.2A HP Compaq nc6000 F.0F HP Compaq nc8000 F.0F HP Compaq nx5000 F.0B HP Compaq nx7000/7010 F.42 HP Compaq nx9000 KG.M1.17 HP Compaq nx9005 KA.M1.59 HP Compaq nx9010 KH.F.23 HP Compaq nx9105 F.12 HP Compaq nx9100/9110 F.21 ! Press Enter. 6. Determining the ROM version using HP Diagnostics for Windows to determine the system ROM version. Make note of the screen...
.... Double-click the Diagnostics icon. 4. Click the system icon (the leftmost icon on the notebook PC, the following steps can be used to "Upgrading the ROM." Refer to listings in ...HP Compaq nc4000/nc4010 F.2A HP Compaq nc6000 F.0F HP Compaq nc8000 F.0F HP Compaq nx5000 F.0B HP Compaq nx7000/7010 F.42 HP Compaq nx9000 KG.M1.17 HP Compaq nx9005 KA.M1.59 HP Compaq nx9010 KH.F.23 HP Compaq nx9105 F.12 HP Compaq nx9100/9110 F.21 ! Press Enter. 6. Determining the ROM version using HP Diagnostics for Windows to determine the system ROM version. Make note of the screen...
Installing Microsoft Windows XP Service Pack 2 on HP Compaq Business Notebooks
Page 6
...to ROMPaq screen. 4. Press Enter at the Welcome to external power. 2. Press Enter to "Upgrading the ROM." otherwise, proceed to continue. 7. Determining the ROM Version Using Windows System Information 1. otherwise, proceed to start the ROMPaq upgrade. Close Windows System Information by clicking OK. HP System ...and compare it to listings in Table 2. 3. Place the ROMPaq diskette into the diskette drive and restart the computer. 3. Close HP System Information by clicking on the X in the upper right corner of the ROM version and compare it to listings in this appendix...
...to ROMPaq screen. 4. Press Enter at the Welcome to external power. 2. Press Enter to "Upgrading the ROM." otherwise, proceed to continue. 7. Determining the ROM Version Using Windows System Information 1. otherwise, proceed to start the ROMPaq upgrade. Close Windows System Information by clicking OK. HP System ...and compare it to listings in Table 2. 3. Place the ROMPaq diskette into the diskette drive and restart the computer. 3. Close HP System Information by clicking on the X in the upper right corner of the ROM version and compare it to listings in this appendix...
Installing Microsoft Windows XP Service Pack 2 on HP Compaq Business Notebooks
Page 7
...HP WLAN W400-W500 Atheros Client Utility Description Allows users to unpack in select models. Enables integrated modem devices select models. Descriptions of hardware-enabling operating system enhancements and fixes. Enables the integrated Audio hardware. Enables integrated WLAN in silent mode skipping the welcome, license and directory screens... features. Enables integrated NIC devices select models. System Firmware Enables the Quick Launch Buttons on HP Compaq notebook PCs are listed in Table 3. Enables the integrated video software. Utility for the touchpad device...
...HP WLAN W400-W500 Atheros Client Utility Description Allows users to unpack in select models. Enables integrated modem devices select models. Descriptions of hardware-enabling operating system enhancements and fixes. Enables the integrated Audio hardware. Enables integrated WLAN in silent mode skipping the welcome, license and directory screens... features. Enables integrated NIC devices select models. System Firmware Enables the Quick Launch Buttons on HP Compaq notebook PCs are listed in Table 3. Enables the integrated video software. Utility for the touchpad device...
Hardware Guide
Page 3
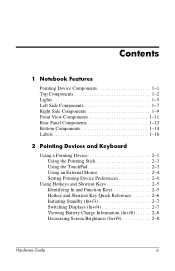
Contents 1 Notebook Features Pointing Device Components 1-1 Top Components 1-2 Lights 1-5 Left Side Components 1-7 Right Side Components 1-9 Front View Components 1-11 Rear Panel Components 1-12 Bottom Components 1-14 Labels 1-... fn and Function Keys 2-5 Hotkey and Shortcut Key Quick Reference 2-6 Initiating Standby (fn+f3 2-7 Switching Displays (fn+f4 2-7 Viewing Battery Charge Information (fn+f8 2-8 Decreasing Screen Brightness (fn+f9 2-8 Hardware Guide iii
Contents 1 Notebook Features Pointing Device Components 1-1 Top Components 1-2 Lights 1-5 Left Side Components 1-7 Right Side Components 1-9 Front View Components 1-11 Rear Panel Components 1-12 Bottom Components 1-14 Labels 1-... fn and Function Keys 2-5 Hotkey and Shortcut Key Quick Reference 2-6 Initiating Standby (fn+f3 2-7 Switching Displays (fn+f4 2-7 Viewing Battery Charge Information (fn+f8 2-8 Decreasing Screen Brightness (fn+f9 2-8 Hardware Guide iii
Hardware Guide
Page 4
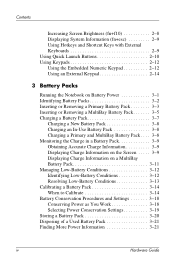
...Screen Brightness (fn+f10 2-8 Displaying System Information (fn+esc 2-9 Using Hotkeys and Shortcut Keys with External Keyboards 2-9 Using Quick Launch Buttons 2-10 Using Keypads 2-12 Using the Embedded Numeric Keypad 2-12 Using an External Keypad 2-14 3 Battery Packs Running the Notebook...Battery Pack . . . . 3-8 Monitoring the Charge in a Battery Pack 3-9 Obtaining Accurate Charge Information 3-9 Displaying Charge Information on the Screen . . . . . 3-9 Displaying Charge Information on a MultiBay Battery Pack 3-11 Managing Low-Battery Conditions 3-12 Identifying Low-Battery ...
...Screen Brightness (fn+f10 2-8 Displaying System Information (fn+esc 2-9 Using Hotkeys and Shortcut Keys with External Keyboards 2-9 Using Quick Launch Buttons 2-10 Using Keypads 2-12 Using the Embedded Numeric Keypad 2-12 Using an External Keypad 2-14 3 Battery Packs Running the Notebook...Battery Pack . . . . 3-8 Monitoring the Charge in a Battery Pack 3-9 Obtaining Accurate Charge Information 3-9 Displaying Charge Information on the Screen . . . . . 3-9 Displaying Charge Information on a MultiBay Battery Pack 3-11 Managing Low-Battery Conditions 3-12 Identifying Low-Battery ...

Hardware Guide
Page 7
Function like the left and right buttons on an external mouse. Hardware Guide 1-1 1 Notebook Features Pointing Device Components Component 1 Pointing stick 2 Left and right pointing stick buttons 3 TouchPad 4 Left and right TouchPad buttons Description Moves the pointer and selects or activates items on the screen. Moves the pointer and selects or activates items on the screen. Function like the left and right buttons on an external mouse. Can be set to perform other mouse functions, such as scrolling and double-clicking.
Function like the left and right buttons on an external mouse. Hardware Guide 1-1 1 Notebook Features Pointing Device Components Component 1 Pointing stick 2 Left and right pointing stick buttons 3 TouchPad 4 Left and right TouchPad buttons Description Moves the pointer and selects or activates items on the screen. Moves the pointer and selects or activates items on the screen. Function like the left and right buttons on an external mouse. Can be set to perform other mouse functions, such as scrolling and double-clicking.
Hardware Guide
Page 24
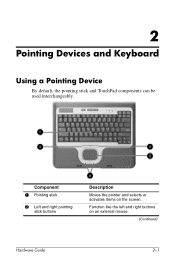
2 Pointing Devices and Keyboard Using a Pointing Device By default, the pointing stick and TouchPad components can be used interchangeably. I Component 1 Pointing stick 2 Left and right pointing stick buttons Description Moves the pointer and selects or activates items on an external mouse. (Continued) Hardware Guide 2-1 Function like the left and right buttons on the screen.
2 Pointing Devices and Keyboard Using a Pointing Device By default, the pointing stick and TouchPad components can be used interchangeably. I Component 1 Pointing stick 2 Left and right pointing stick buttons Description Moves the pointer and selects or activates items on an external mouse. (Continued) Hardware Guide 2-1 Function like the left and right buttons on the screen.

Hardware Guide
Page 25
Pointing Devices and Keyboard Component 3 TouchPad 4 Left and right TouchPad buttons Description Moves the pointer and selects or activates items on an external mouse. 2-2 Hardware Guide Function like the left and right buttons on the screen. Can be set to perform other mouse functions, such as scrolling and double-clicking.
Pointing Devices and Keyboard Component 3 TouchPad 4 Left and right TouchPad buttons Description Moves the pointer and selects or activates items on an external mouse. 2-2 Hardware Guide Function like the left and right buttons on the screen. Can be set to perform other mouse functions, such as scrolling and double-clicking.

Hardware Guide
Page 29
Pointing Devices and Keyboard Hotkey and Shortcut Key Quick Reference Function Key Combination to Activate Function Initiate Standby fn+f3 Switch between fn+f4 notebook display and external display View battery information fn+f8 Decrease the screen fn+f9 brightness Increase the screen fn+f10 brightness Display system information fn+esc Key Combination to Deactivate Function Press power button fn+f4 fn+f8 N/A N/A fn+esc 2-6 Hardware Guide
Pointing Devices and Keyboard Hotkey and Shortcut Key Quick Reference Function Key Combination to Activate Function Initiate Standby fn+f3 Switch between fn+f4 notebook display and external display View battery information fn+f8 Decrease the screen fn+f9 brightness Increase the screen fn+f10 brightness Display system information fn+esc Key Combination to Deactivate Function Press power button fn+f4 fn+f8 N/A N/A fn+esc 2-6 Hardware Guide
Hardware Guide
Page 30
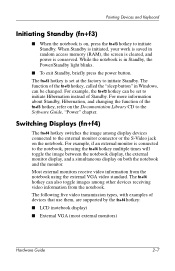
... image among other devices receiving video information from the notebook using the external VGA video standard. Most external monitors receive video information from the notebook. When Standby is initiated, your work is saved in random access memory (RAM), the screen is cleared, and power is in Windows, can ...be set at the factory to initiate Standby. The fn+f3 hotkey is set to the Software Guide, "Power" chapter. Pointing Devices and Keyboard Initiating Standby (fn+f3) ■ When the notebook is on, press the...
... image among other devices receiving video information from the notebook using the external VGA video standard. Most external monitors receive video information from the notebook. When Standby is initiated, your work is saved in random access memory (RAM), the screen is cleared, and power is in Windows, can ...be set at the factory to initiate Standby. The fn+f3 hotkey is set to the Software Guide, "Power" chapter. Pointing Devices and Keyboard Initiating Standby (fn+f3) ■ When the notebook is on, press the...

Hardware Guide
Page 31
...) ✎ Composite video and DVI-D devices can only be connected to the notebook when it is the MultiBay battery pack. Increasing Screen Brightness (fn+f10) Press fn+f10 to decrease screen brightness. Hold down the hotkey to change the brightness level incrementally. 2-8 Hardware Guide...9632; Location 1 is the primary battery pack. ■ Location 2 is docked in each battery pack. Decreasing Screen Brightness (fn+f9) Press fn+f9 to increase screen brightness. Viewing Battery Charge Information (fn+f8) Press the fn+f8 hotkey to change the brightness level incrementally....
...) ✎ Composite video and DVI-D devices can only be connected to the notebook when it is the MultiBay battery pack. Increasing Screen Brightness (fn+f10) Press fn+f10 to decrease screen brightness. Hold down the hotkey to change the brightness level incrementally. 2-8 Hardware Guide...9632; Location 1 is the primary battery pack. ■ Location 2 is docked in each battery pack. Decreasing Screen Brightness (fn+f9) Press fn+f9 to increase screen brightness. Viewing Battery Charge Information (fn+f8) Press the fn+f8 hotkey to change the brightness level incrementally....
Hardware Guide
Page 32
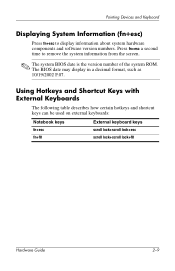
...hardware components and software version numbers. Pointing Devices and Keyboard Displaying System Information (fn+esc) Press fn+esc to remove the system information from the screen. ✎ The system BIOS date is the version number of the system ROM. The BIOS date may display in a decimal format, such as... Hotkeys and Shortcut Keys with External Keyboards The following table describes how certain hotkeys and shortcut keys can be used on external keyboards: Notebook keys External keyboard keys fn+esc fn+f8 scroll lock+scroll lock+esc scroll lock+scroll lock+f8 Hardware Guide 2-9
...hardware components and software version numbers. Pointing Devices and Keyboard Displaying System Information (fn+esc) Press fn+esc to remove the system information from the screen. ✎ The system BIOS date is the version number of the system ROM. The BIOS date may display in a decimal format, such as... Hotkeys and Shortcut Keys with External Keyboards The following table describes how certain hotkeys and shortcut keys can be used on external keyboards: Notebook keys External keyboard keys fn+esc fn+f8 scroll lock+scroll lock+esc scroll lock+scroll lock+f8 Hardware Guide 2-9


