
HP USB Digital Drive
Page 2
The HP USB Digital Drive 1 is running Microsoft Windows XP Home, Windows XP Pro, or Windows 2000. However, you will need an SD memory card to operate the Digital Drive. An SD memory card 2 may not be used with any HP authorized reseller. You can be included. User Guide 1 The Digital Drive can purchase one (in various storage capacities) from any computer that is a pocket-sized SD (Secure Digital) memory drive for storing and transferring files such as digital pictures, music, video, and data.
The HP USB Digital Drive 1 is running Microsoft Windows XP Home, Windows XP Pro, or Windows 2000. However, you will need an SD memory card to operate the Digital Drive. An SD memory card 2 may not be used with any HP authorized reseller. You can be included. User Guide 1 The Digital Drive can purchase one (in various storage capacities) from any computer that is a pocket-sized SD (Secure Digital) memory drive for storing and transferring files such as digital pictures, music, video, and data.

HP USB Digital Drive
Page 112
© 2003 Hewlett-Packard Development Company, L.P. Microsoft and Windows are set forth in the U.S. The information contained herein is a trademark. User Guide HP USB Digital Drive First Edition July 2003 The warranties for technical or editorial errors or omissions contained herein. SD Logo is subject to change without notice. and/or other countries. HP shall not be liable for HP products and services are trademarks of Microsoft Corporation in the express warranty statements accompanying such products and services.
© 2003 Hewlett-Packard Development Company, L.P. Microsoft and Windows are set forth in the U.S. The information contained herein is a trademark. User Guide HP USB Digital Drive First Edition July 2003 The warranties for technical or editorial errors or omissions contained herein. SD Logo is subject to change without notice. and/or other countries. HP shall not be liable for HP products and services are trademarks of Microsoft Corporation in the express warranty statements accompanying such products and services.
Bluetooth Wireless Technology Basics
Page 6
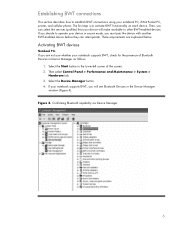
...in Device Manager as follows: 1. Select the Start button in the lower-left corner of Bluetooth Devices in the Device Manager window (Figure 4). If your notebook supports BWT, you will make available to operate your device in secure mode, you can interoperate. The first step is to... establish BWT connections using your notebook supports BWT, check for the presence of the screen. 2. If you are explained below. Then select Control Panel > Performance and Maintenance > System...
...in Device Manager as follows: 1. Select the Start button in the lower-left corner of Bluetooth Devices in the Device Manager window (Figure 4). If your notebook supports BWT, you will make available to operate your device in secure mode, you can interoperate. The first step is to... establish BWT connections using your notebook supports BWT, check for the presence of the screen. 2. If you are explained below. Then select Control Panel > Performance and Maintenance > System...

Bluetooth Wireless Technology Basics
Page 7
...on the wireless device for installation, and then select Next. 4. When the Software Setup Welcome window is enabled, a Bluetooth icon will change from red to load the BWT driver. The following 3 steps activate your notebook user documentation if you must install the software as follows: 1. The Bluetooth icon provides easy ...computer. Bluetooth status Disabled Enabled Connected Blue with red logo Blue with white logo Blue with green logo If BWT is off, turn on HP notebook PCs; The logo will appear in the Windows System Tray located in the same box as follows: 1.
...on the wireless device for installation, and then select Next. 4. When the Software Setup Welcome window is enabled, a Bluetooth icon will change from red to load the BWT driver. The following 3 steps activate your notebook user documentation if you must install the software as follows: 1. The Bluetooth icon provides easy ...computer. Bluetooth status Disabled Enabled Connected Blue with red logo Blue with white logo Blue with green logo If BWT is off, turn on HP notebook PCs; The logo will appear in the Windows System Tray located in the same box as follows: 1.
Using LightScribe (Select Models Only)
Page 9
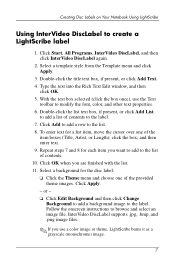
Type the text into the Rich Text Edit window, and then click OK. 5. Double-click the list text box, if present, or click Add List to add a list of contents. 10. Click Apply. - Click ... the label. 7. InterVideo DiscLabel supports .jpg, .bmp, and .png image files. ✎ If you are finished with the list. 11. Creating Disc Labels on Your Notebook Using LightScribe Using InterVideo DiscLabel to the label. With the text box selected (click the box once), use a color image or theme, LightScribe burns it...
Type the text into the Rich Text Edit window, and then click OK. 5. Double-click the list text box, if present, or click Add List to add a list of contents. 10. Click Apply. - Click ... the label. 7. InterVideo DiscLabel supports .jpg, .bmp, and .png image files. ✎ If you are finished with the list. 11. Creating Disc Labels on Your Notebook Using LightScribe Using InterVideo DiscLabel to the label. With the text box selected (click the box once), use a color image or theme, LightScribe burns it...
Using LightScribe (Select Models Only)
Page 12
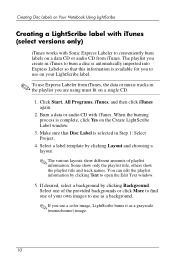
...You can edit the playlist information by clicking Background. Make sure that this information is complete, click Yes on the Create LightScribe Label window. 3. Some show only the playlist title, others show different amounts of your LightScribe label. ✎ To use on your own ...images to open the Edit Text window. 5. Creating Disc Labels on Your Notebook Using LightScribe Creating a LightScribe label with iTunes (select versions only) iTunes works with iTunes. When the burning process is...
...You can edit the playlist information by clicking Background. Make sure that this information is complete, click Yes on the Create LightScribe Label window. 3. Some show only the playlist title, others show different amounts of your LightScribe label. ✎ To use on your own ...images to open the Edit Text window. 5. Creating Disc Labels on Your Notebook Using LightScribe Creating a LightScribe label with iTunes (select versions only) iTunes works with iTunes. When the burning process is...

Hardware and Software Guide
Page 2
...as constituting an additional warranty. Hardware and Software Guide HP Compaq Notebook Series Second Edition June 2005 First Edition April 2005 Document Part Number: 393677-002 The information contained herein is a trademark owned by its proprietor. Microsoft and Windows are set forth in the express warranty statements accompanying ...of Microsoft Corporation. The only warranties for technical or editorial errors or omissions contained herein. Nothing herein should be liable for HP products and services are U.S. © Copyright 2005 Hewlett-Packard Development Company, L.P.
...as constituting an additional warranty. Hardware and Software Guide HP Compaq Notebook Series Second Edition June 2005 First Edition April 2005 Document Part Number: 393677-002 The information contained herein is a trademark owned by its proprietor. Microsoft and Windows are set forth in the express warranty statements accompanying ...of Microsoft Corporation. The only warranties for technical or editorial errors or omissions contained herein. Nothing herein should be liable for HP products and services are U.S. © Copyright 2005 Hewlett-Packard Development Company, L.P.

Hardware and Software Guide
Page 5
... (Select Models Only 4-6 Using the S-Video-out Jack 4-7 Connecting a Monitor or Projector 4-8 Multimedia Software 4-9 Observing the Copyright Warning 4-9 Installing Software 4-10 Enabling AutoPlay 4-11 Using Windows Media Player 4-11 Using WinDVD Player 4-12 Hardware and Software Guide vii
... (Select Models Only 4-6 Using the S-Video-out Jack 4-7 Connecting a Monitor or Projector 4-8 Multimedia Software 4-9 Observing the Copyright Warning 4-9 Installing Software 4-10 Enabling AutoPlay 4-11 Using Windows Media Player 4-11 Using WinDVD Player 4-12 Hardware and Software Guide vii
Hardware and Software Guide
Page 8
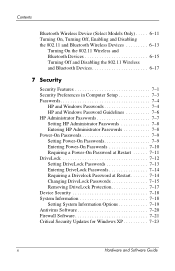
...11 Wireless and Bluetooth Devices 6-17 7 Security Security Features 7-1 Security Preferences in Computer Setup 7-3 Passwords 7-4 HP and Windows Passwords 7-4 HP and Windows Password Guidelines 7-6 HP Administrator Passwords 7-7 Setting HP Administrator Passwords 7-8 Entering HP Administrator Passwords 7-8 Power-On Passwords 7-9 Setting Power-On Passwords 7-9 Entering Power-On Passwords 7-10 Requiring a... 7-18 Setting System Information Options 7-19 Antivirus Software 7-20 Firewall Software 7-21 Critical Security Updates for Windows XP 7-23 x Hardware and Software Guide
...11 Wireless and Bluetooth Devices 6-17 7 Security Security Features 7-1 Security Preferences in Computer Setup 7-3 Passwords 7-4 HP and Windows Passwords 7-4 HP and Windows Password Guidelines 7-6 HP Administrator Passwords 7-7 Setting HP Administrator Passwords 7-8 Entering HP Administrator Passwords 7-8 Power-On Passwords 7-9 Setting Power-On Passwords 7-9 Entering Power-On Passwords 7-10 Requiring a... 7-18 Setting System Information Options 7-19 Antivirus Software 7-20 Firewall Software 7-21 Critical Security Updates for Windows XP 7-23 x Hardware and Software Guide

Hardware and Software Guide
Page 18
...: ■ Off, press the button to turn off the notebook. (Continued) 1-8 Hardware and Software Guide If the notebook has stopped responding and Microsoft® Windows® shutdown procedures cannot be used, press the power/standby button and hold for 5 seconds to turn on the notebook. ■ In standby, briefly press the button to exit...
...: ■ Off, press the button to turn off the notebook. (Continued) 1-8 Hardware and Software Guide If the notebook has stopped responding and Microsoft® Windows® shutdown procedures cannot be used, press the power/standby button and hold for 5 seconds to turn on the notebook. ■ In standby, briefly press the button to exit...

Hardware and Software Guide
Page 19
..."Info Center (Select Models Only)" in Chapter 4, "Multimedia" for more information about establishing a wireless connection from Windows, visit http://www.hp.com/go/wireless. For information about changing the functions of wireless features, see the "Power Options" section in ...standby if the display is closed while the notebook is turned on. Notebook Features Component 2 Display switch 3 Info Center button 4 Wireless button* Description Puts the notebook...
..."Info Center (Select Models Only)" in Chapter 4, "Multimedia" for more information about establishing a wireless connection from Windows, visit http://www.hp.com/go/wireless. For information about changing the functions of wireless features, see the "Power Options" section in ...standby if the display is closed while the notebook is turned on. Notebook Features Component 2 Display switch 3 Info Center button 4 Wireless button* Description Puts the notebook...

Hardware and Software Guide
Page 20
If the notebook has stopped responding and Microsoft Windows shutdown procedures cannot be used, press the power/standby button and hold for 5 seconds to exit hibernation. Notebook Features Component 1 Power/standby button* Description When the notebook is: ■ Off, press the button to turn on the notebook. ■ In standby, briefly press the button to exit standby. ■ In hibernation, briefly press the button to turn off the notebook. (Continued) 1-10 Hardware and Software Guide
If the notebook has stopped responding and Microsoft Windows shutdown procedures cannot be used, press the power/standby button and hold for 5 seconds to exit hibernation. Notebook Features Component 1 Power/standby button* Description When the notebook is: ■ Off, press the button to turn on the notebook. ■ In standby, briefly press the button to exit standby. ■ In hibernation, briefly press the button to turn off the notebook. (Continued) 1-10 Hardware and Software Guide

Hardware and Software Guide
Page 21
... information about establishing a wireless connection from Windows, visit http://www.hp.com/go/wireless. *This table describes default settings. For more information about changing the functions of wireless features, see the "Power Options" section in standby if the display is closed while the notebook is turned on or off, but does.... For information about changing the functions of power features, see Chapter 6 , "Wireless." Hardware and Software Guide 1-11 Turns the wireless functionality on . Notebook Features Component 2 Display switch 3 Wireless button* Description Puts the...
... information about establishing a wireless connection from Windows, visit http://www.hp.com/go/wireless. *This table describes default settings. For more information about changing the functions of wireless features, see the "Power Options" section in standby if the display is closed while the notebook is turned on or off, but does.... For information about changing the functions of power features, see Chapter 6 , "Wireless." Hardware and Software Guide 1-11 Turns the wireless functionality on . Notebook Features Component 2 Display switch 3 Wireless button* Description Puts the...

Hardware and Software Guide
Page 22
... in combination with the fn key. Executes frequently used like the keys on an external numeric keypad. 1-12 Hardware and Software Guide Displays the Microsoft Windows Start menu. Can be used system functions when pressed in combination with a function key or the esc key. Displays a shortcut menu for items beneath the...
... in combination with the fn key. Executes frequently used like the keys on an external numeric keypad. 1-12 Hardware and Software Guide Displays the Microsoft Windows Start menu. Can be used system functions when pressed in combination with a function key or the esc key. Displays a shortcut menu for items beneath the...

Hardware and Software Guide
Page 37
... need when you contact Customer Care. The information on the Service Tag is affixed to the bottom of the notebook. Wireless certification labels are affixed to the bottom of Authenticity-Contains the Microsoft Windows Product Key. You may need this information when traveling internationally. You may need this information when traveling internationally...
... need when you contact Customer Care. The information on the Service Tag is affixed to the bottom of the notebook. Wireless certification labels are affixed to the bottom of Authenticity-Contains the Microsoft Windows Product Key. You may need this information when traveling internationally. You may need this information when traveling internationally...

Hardware and Software Guide
Page 39
...: ■ Off, press the button to turn off or in standby mode. Off: The notebook is off the notebook. (Continued) 2-2 Hardware and Software Guide If the notebook has stopped responding and Microsoft Windows shutdown procedures cannot be used, press the power/standby button and hold for at least 5 seconds to turn on . Power Component...
...: ■ Off, press the button to turn off or in standby mode. Off: The notebook is off the notebook. (Continued) 2-2 Hardware and Software Guide If the notebook has stopped responding and Microsoft Windows shutdown procedures cannot be used, press the power/standby button and hold for at least 5 seconds to turn on . Power Component...

Hardware and Software Guide
Page 43
... password has been set the time interval after which the system initiates hibernation: 1. You must be possible. Click one of the notebook is changed during hibernation, resuming from hibernation may not be entered to restore from hibernation. Make sure that the Enable hibernation check ... initiated. When you restore from hibernation, your work returns to the screen where you left off. In the Power Options window, hibernation is in the Power Options window. Select Start > Control Panel > Performance and Maintenance > Power Options. 2. Power Hibernation Ä CAUTION: If the ...
... password has been set the time interval after which the system initiates hibernation: 1. You must be possible. Click one of the notebook is changed during hibernation, resuming from hibernation may not be entered to restore from hibernation. Make sure that the Enable hibernation check ... initiated. When you restore from hibernation, your work returns to the screen where you left off. In the Power Options window, hibernation is in the Power Options window. Select Start > Control Panel > Performance and Maintenance > Power Options. 2. Power Hibernation Ä CAUTION: If the ...

Hardware and Software Guide
Page 47
...off the display while the power is unresponsive and you are turned on your work and close all open ■ The power/standby notebook.* applications. or - ■ Shut down the Save your network connections, the Turn Off Computer button may be called Shut Down ...button. 2-10 Hardware and Software Guide Closing the notebook activates the display switch, which initiates standby. *If the system is on the notebook. Shut down the notebook through the operating system. ❐ In Windows XP Home, select Start > Turn Off Computer > Turn Off. ❐...
...off the display while the power is unresponsive and you are turned on your work and close all open ■ The power/standby notebook.* applications. or - ■ Shut down the Save your network connections, the Turn Off Computer button may be called Shut Down ...button. 2-10 Hardware and Software Guide Closing the notebook activates the display switch, which initiates standby. *If the system is on the notebook. Shut down the notebook through the operating system. ❐ In Windows XP Home, select Start > Turn Off Computer > Turn Off. ❐...

Hardware and Software Guide
Page 48
...list, and then click OK.)* ■ Close the notebook lid. or systeminitiated standby. ■ If the display was closed while the notebook was in the Power Options window. Hardware and Software Guide 2-11 lights blink. ❐ In Windows XP Home, select Start > Turn Off Computer > ...Stand by. ■ The screen clears. ❐ In Windows XP Professional, select Start > Turn Off ...
...list, and then click OK.)* ■ Close the notebook lid. or systeminitiated standby. ■ If the display was closed while the notebook was in the Power Options window. Hardware and Software Guide 2-11 lights blink. ❐ In Windows XP Home, select Start > Turn Off Computer > ...Stand by. ■ The screen clears. ❐ In Windows XP Professional, select Start > Turn Off ...

Hardware and Software Guide
Page 49
...shift as you select Hibernate. ■ The power/standby lights are turned off. ■ The screen clears. ■ In Windows XP Professional, select Start > Turn Off Computer. Task Initiate hibernation. Power Initiating or Restoring from the list, and then click OK... remains enabled: » Select Start > Control Panel > Performance and Maintenance > Power Options > Hibernate tab. Procedure Result ■ In Windows XP Home, select Start > Turn Off Computer. Hibernation is selected. Then, hold down arrow, select Hibernate from Hibernation Hibernation cannot be initiated...
...shift as you select Hibernate. ■ The power/standby lights are turned off. ■ The screen clears. ■ In Windows XP Professional, select Start > Turn Off Computer. Task Initiate hibernation. Power Initiating or Restoring from the list, and then click OK... remains enabled: » Select Start > Control Panel > Performance and Maintenance > Power Options > Hibernate tab. Procedure Result ■ In Windows XP Home, select Start > Turn Off Computer. Hibernation is selected. Then, hold down arrow, select Hibernate from Hibernation Hibernation cannot be initiated...


