Limited Warranty and Technical Support
Page 1
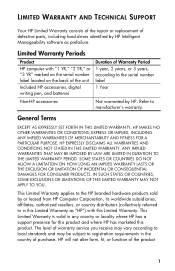
... WARRANTY MAY NOT APPLY TO YOU. LIMITED WARRANTY AND TECHNICAL SUPPORT Your HP Limited Warranty consists of the repair or replacement of defective parts, including hard drives identified by HP Intelligent Manageability software as "HP") with "1 YR," "2 YR," or "3 YR" marked on the... serial number label located on the back of the unit Included HP accessories, digital writing pen, and batteries ...
... WARRANTY MAY NOT APPLY TO YOU. LIMITED WARRANTY AND TECHNICAL SUPPORT Your HP Limited Warranty consists of the repair or replacement of defective parts, including hard drives identified by HP Intelligent Manageability software as "HP") with "1 YR," "2 YR," or "3 YR" marked on the... serial number label located on the back of the unit Included HP accessories, digital writing pen, and batteries ...
Limited Warranty and Technical Support
Page 2
...during the Limited Warranty Period. You are warranted to the terms and conditions of this Limited Warranty become the property of a replacement. Your dated sales or delivery receipt, showing the date of purchase or lease of the product that is required within the Limited Warranty... ninety (90) day limited warranty of the HP hardware product in performance and reliability. Spare parts are entitled to warranty service according to be free from HP. YOU SHOULD MAKE PERIODIC BACKUP COPIES OF THE DATA STORED ON YOUR HARD DRIVE OR OTHER STORAGE DEVICES AS A PRECAUTION AGAINST POSSIBLE...
...during the Limited Warranty Period. You are warranted to the terms and conditions of this Limited Warranty become the property of a replacement. Your dated sales or delivery receipt, showing the date of purchase or lease of the product that is required within the Limited Warranty... ninety (90) day limited warranty of the HP hardware product in performance and reliability. Spare parts are entitled to warranty service according to be free from HP. YOU SHOULD MAKE PERIODIC BACKUP COPIES OF THE DATA STORED ON YOUR HARD DRIVE OR OTHER STORAGE DEVICES AS A PRECAUTION AGAINST POSSIBLE...
Hard Drive White Paper
Page 4
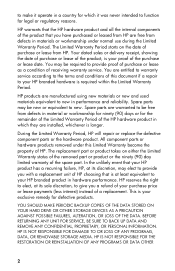
... one or more of the hard drive mounting screws are missing from one or more hard drive mounting screws, which are designed to obtain the hard drive mounting screws. 4 Minimum System BIOS Required Notebook Platform HP Compaq Business nc8000 HP Compaq Business nw8000 HP Compaq Business nc6000 HP Compaq Business nc4000 Series HP Compaq Business nx9000 Series HP Compaq Business nx5000 Compaq Evo N620c Compaq Evo N610c/v Compaq Evo N600c Compaq Evo N800c Compaq Evo N410c Compaq Evo N400c BIOS Version F.0A...
... one or more of the hard drive mounting screws are missing from one or more hard drive mounting screws, which are designed to obtain the hard drive mounting screws. 4 Minimum System BIOS Required Notebook Platform HP Compaq Business nc8000 HP Compaq Business nw8000 HP Compaq Business nc6000 HP Compaq Business nc4000 Series HP Compaq Business nx9000 Series HP Compaq Business nx5000 Compaq Evo N620c Compaq Evo N610c/v Compaq Evo N600c Compaq Evo N800c Compaq Evo N410c Compaq Evo N400c BIOS Version F.0A...
HP Compaq nc6000 Notebook PC - Maintenance and Service Guide
Page 32
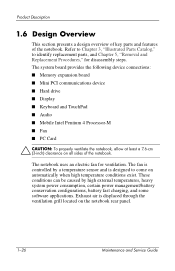
...Hard drive ■ Display ■ Keyboard and TouchPad ■ Audio ■ Mobile Intel Pentium 4 Processor-M ■ Fan ■ PC Card Ä CAUTION: To properly ventilate the notebook, allow at least a 7.6-cm (3-inch) clearance on all sides of the notebook. Exhaust air is designed to identify replacement... parts, and Chapter 5, "Removal and Replacement Procedures," for ventilation. These conditions can be...
...Hard drive ■ Display ■ Keyboard and TouchPad ■ Audio ■ Mobile Intel Pentium 4 Processor-M ■ Fan ■ PC Card Ä CAUTION: To properly ventilate the notebook, allow at least a 7.6-cm (3-inch) clearance on all sides of the notebook. Exhaust air is designed to identify replacement... parts, and Chapter 5, "Removal and Replacement Procedures," for ventilation. These conditions can be...

HP Compaq nc6000 Notebook PC - Maintenance and Service Guide
Page 53
... Loading, Hard Drive, Part 3" N Hard drive partitioned? N Run FDISK. Y Done Go to a bootable C:\ prompt. Y Notebook booted? Go to "Flowchart 2.13-No OS Loading, Diskette Drive" N Hard drive accessible? Replace hard drive. 2. Replace system board. Y Go to "Flowchart 2.12-No OS Loading, Hard Drive, Part 3" Maintenance and Service Guide 2-21 Reseat hard drive. Done Y Boot from diskette drive? N Done N Boot from hard drive? Troubleshooting Flowchart 2.11-No OS Loading, Hard Drive, Part...
... Loading, Hard Drive, Part 3" N Hard drive partitioned? N Run FDISK. Y Done Go to a bootable C:\ prompt. Y Notebook booted? Go to "Flowchart 2.13-No OS Loading, Diskette Drive" N Hard drive accessible? Replace hard drive. 2. Replace system board. Y Go to "Flowchart 2.12-No OS Loading, Hard Drive, Part 3" Maintenance and Service Guide 2-21 Reseat hard drive. Done Y Boot from diskette drive? N Done N Boot from hard drive? Troubleshooting Flowchart 2.11-No OS Loading, Hard Drive, Part...
HP Compaq nc6000 Notebook PC - Maintenance and Service Guide
Page 54
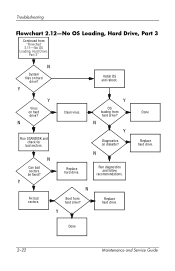
Replace hard drive. N Y Diagnostics on hard drive? Y Done Replace hard drive. N Run SCANDISK and check for bad sectors. N Run diagnostics and follow recommendations. Replace hard drive. Y OS loading from "Flowchart 2.11-No OS Loading, Hard Drive, Part 2" N System files on hard drive? Done 2-22 Maintenance and Service Guide N Can bad sectors be fixed? N Fix bad sectors. Y Virus on diskette? Troubleshooting Flowchart 2.12-No OS Loading, Hard Drive, Part 3 Continued from hard drive? Y Install OS and reboot. Boot from hard drive? Y Clean virus.
Replace hard drive. N Y Diagnostics on hard drive? Y Done Replace hard drive. N Run SCANDISK and check for bad sectors. N Run diagnostics and follow recommendations. Replace hard drive. Y OS loading from "Flowchart 2.11-No OS Loading, Hard Drive, Part 2" N System files on hard drive? Done 2-22 Maintenance and Service Guide N Can bad sectors be fixed? N Fix bad sectors. Y Virus on diskette? Troubleshooting Flowchart 2.12-No OS Loading, Hard Drive, Part 3 Continued from hard drive? Y Install OS and reboot. Boot from hard drive? Y Clean virus.
HP Compaq nc6000 Notebook PC - Maintenance and Service Guide
Page 59
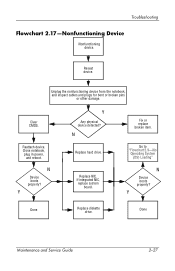
Reattach device. N Replace hard drive. Go to "Flowchart 2.9-No Operating System (OS) Loading" N Device boots properly? Reseat device. Replace NIC. Clear CMOS. If integrated NIC, replace system board. Y Done Replace diskette drive. Close notebook, plug in power, and reboot. Unplug the nonfunctioning device from the notebook, and inspect cables and plugs for bent or broken pins or other damage. Done...
Reattach device. N Replace hard drive. Go to "Flowchart 2.9-No Operating System (OS) Loading" N Device boots properly? Reseat device. Replace NIC. Clear CMOS. If integrated NIC, replace system board. Y Done Replace diskette drive. Close notebook, plug in power, and reboot. Unplug the nonfunctioning device from the notebook, and inspect cables and plugs for bent or broken pins or other damage. Done...
HP Compaq nc6000 Notebook PC - Maintenance and Service Guide
Page 81
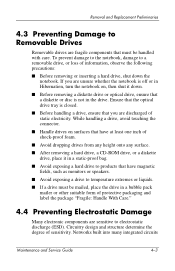
...; Avoid exposing a hard drive to products that have magnetic fields, such as monitors or speakers. ■ Avoid exposing a drive to temperature extremes or liquids. ■ If a drive must be handled with care. To prevent damage to the notebook, damage to a removable drive, or loss of sensitivity. Removal and Replacement Preliminaries 4.3 Preventing Damage to Removable Drives Removable drives are sensitive...
...; Avoid exposing a hard drive to products that have magnetic fields, such as monitors or speakers. ■ Avoid exposing a drive to temperature extremes or liquids. ■ If a drive must be handled with care. To prevent damage to the notebook, damage to a removable drive, or loss of sensitivity. Removal and Replacement Preliminaries 4.3 Preventing Damage to Removable Drives Removable drives are sensitive...
HP Compaq nc6000 Notebook PC - Maintenance and Service Guide
Page 89
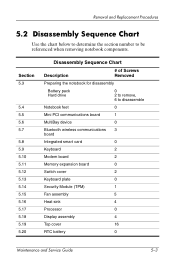
Removal and Replacement Procedures 5.2 Disassembly Sequence Chart Use the chart below to determine the section number to disassemble Notebook feet 0 Mini PCI communications board 1 MultiBay device 0 Bluetooth wireless communications 3 board Integrated smart card 0 Keyboard 2 Modem board 2 Memory expansion board 0 ... 5.3 5.4 5.5 5.6 5.7 5.8 5.9 5.10 5.11 5.12 5.13 5.14 5.15 5.16 5.17 5.18 5.19 5.20 Disassembly Sequence Chart Description # of Screws Removed Preparing the notebook for disassembly Battery pack Hard drive 0 2 to remove, 6 to be referenced when removing...
Removal and Replacement Procedures 5.2 Disassembly Sequence Chart Use the chart below to determine the section number to disassemble Notebook feet 0 Mini PCI communications board 1 MultiBay device 0 Bluetooth wireless communications 3 board Integrated smart card 0 Keyboard 2 Modem board 2 Memory expansion board 0 ... 5.3 5.4 5.5 5.6 5.7 5.8 5.9 5.10 5.11 5.12 5.13 5.14 5.15 5.16 5.17 5.18 5.19 5.20 Disassembly Sequence Chart Description # of Screws Removed Preparing the notebook for disassembly Battery pack Hard drive 0 2 to remove, 6 to be referenced when removing...

HP Compaq nc6000 Notebook PC - Maintenance and Service Guide
Page 94
..., with the rear panel facing you. Remove the T8M2.5×5.0 screw 1 that secures the hard drive to the notebook. Removing the Hard Drive Screws 5-8 Maintenance and Service Guide b. c. Remove the hard drive by following these steps: a. Removal and Replacement Procedures Spare Part Number Information Hard drives (include hard drive frame and connector) 80-GB (5400-rpm) 60-GB (7200-rpm) 60-GB...
..., with the rear panel facing you. Remove the T8M2.5×5.0 screw 1 that secures the hard drive to the notebook. Removing the Hard Drive Screws 5-8 Maintenance and Service Guide b. c. Remove the hard drive by following these steps: a. Removal and Replacement Procedures Spare Part Number Information Hard drives (include hard drive frame and connector) 80-GB (5400-rpm) 60-GB (7200-rpm) 60-GB...

HP Compaq nc6000 Notebook PC - Maintenance and Service Guide
Page 95
f. e. Removing the Hard Drive Maintenance and Service Guide 5-9 Use the Mylar tab 2 to slide the hard drive to the left 3 to disconnect it back 1. Lift the hard drive cover up and swing it from the system board. Remove the hard drive. Removal and Replacement Procedures d.
f. e. Removing the Hard Drive Maintenance and Service Guide 5-9 Use the Mylar tab 2 to slide the hard drive to the left 3 to disconnect it back 1. Lift the hard drive cover up and swing it from the system board. Remove the hard drive. Removal and Replacement Procedures d.
HP Compaq nc6000 Notebook PC - Maintenance and Service Guide
Page 96
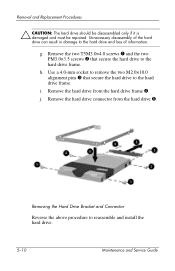
Remove the hard drive from the hard drive 5. Removal and Replacement Procedures Ä CAUTION: The hard drive should be disassembled only if it is damaged and must be repaired. Unnecessary disassembly of the hard drive can result in damage to reassemble and install the hard drive. 5-10 Maintenance and Service Guide g. Use a 4.0-mm socket to remove the two M2.0×10.0 alignment...
Remove the hard drive from the hard drive 5. Removal and Replacement Procedures Ä CAUTION: The hard drive should be disassembled only if it is damaged and must be repaired. Unnecessary disassembly of the hard drive can result in damage to reassemble and install the hard drive. 5-10 Maintenance and Service Guide g. Use a 4.0-mm socket to remove the two M2.0×10.0 alignment...
HP Compaq nc6000 Notebook PC - Maintenance and Service Guide
Page 131
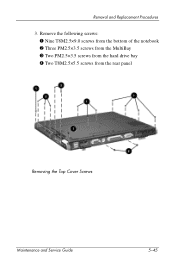
Remove the following screws: 1 Nine T8M2.5×9.0 screws from the bottom of the notebook 2 Three PM2.5×3.5 screws from the MultiBay 3 Two PM2.5×3.5 screws from the hard drive bay 4 Two T8M2.5×5.5 screws from the rear panel Removing the Top Cover Screws Maintenance and Service Guide 5-45 Removal and Replacement Procedures 3.
Remove the following screws: 1 Nine T8M2.5×9.0 screws from the bottom of the notebook 2 Three PM2.5×3.5 screws from the MultiBay 3 Two PM2.5×3.5 screws from the hard drive bay 4 Two T8M2.5×5.5 screws from the rear panel Removing the Top Cover Screws Maintenance and Service Guide 5-45 Removal and Replacement Procedures 3.
HP Compaq nc6000 Notebook PC - Maintenance and Service Guide
Page 195
... CD-RW Combo drive 6-11 DVD/CD-RW combo drive 6-9 DVD-ROM drive 6-11 hard drive 6-5 I/O addresses 6-14 interrupts 6-13 notebook 6-1 static shielding materials 4-8 stereo speakers, location 1-15 S-Video connector location 1-17 pin assignments A-3 switch cover illustrated 3-2 removal 5-28 spare part number 3-3, 5-28 system board illustrated 3-6 removal 5-53 spare part numbers 3-7, 5-53 T thermal grease, replacement 5-37 tools...
... CD-RW Combo drive 6-11 DVD/CD-RW combo drive 6-9 DVD-ROM drive 6-11 hard drive 6-5 I/O addresses 6-14 interrupts 6-13 notebook 6-1 static shielding materials 4-8 stereo speakers, location 1-15 S-Video connector location 1-17 pin assignments A-3 switch cover illustrated 3-2 removal 5-28 spare part number 3-3, 5-28 system board illustrated 3-6 removal 5-53 spare part numbers 3-7, 5-53 T thermal grease, replacement 5-37 tools...
Hardware Guide
Page 5
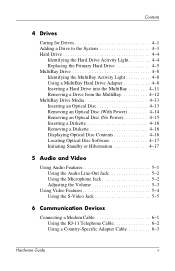
Contents 4 Drives Caring for Drives 4-1 Adding a Drive to the System 4-3 Hard Drive 4-4 Identifying the Hard Drive Activity Light 4-4 Replacing the Primary Hard Drive 4-5 MultiBay Drive 4-8 Identifying the MultiBay Activity Light 4-8 Using a MultiBay Hard Drive Adapter 4-8 Inserting a Hard Drive into the MultiBay 4-11 Removing a Drive from the MultiBay 4-12 MultiBay Drive Media 4-13 Inserting an Optical Disc 4-13 Removing an Optical Disc (With Power 4-14 Removing an Optical Disc...
Contents 4 Drives Caring for Drives 4-1 Adding a Drive to the System 4-3 Hard Drive 4-4 Identifying the Hard Drive Activity Light 4-4 Replacing the Primary Hard Drive 4-5 MultiBay Drive 4-8 Identifying the MultiBay Activity Light 4-8 Using a MultiBay Hard Drive Adapter 4-8 Inserting a Hard Drive into the MultiBay 4-11 Removing a Drive from the MultiBay 4-12 MultiBay Drive Media 4-13 Inserting an Optical Disc 4-13 Removing an Optical Disc (With Power 4-14 Removing an Optical Disc...
Hardware Guide
Page 59
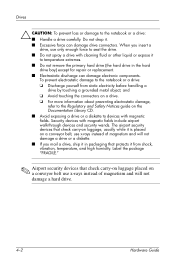
...drop it from static electricity before handling a drive by touching a grounded metal object; Drives Ä CAUTION: To prevent loss or damage to temperature extremes. ■ Do not remove the primary hard drive (the hard drive in packaging that check carry-on luggage placed ... drive, use x-rays instead of magnetism and will not damage a hard drive. 4-2 Hardware Guide When you mail a drive, ship it to the notebook or a drive: ■ Handle a drive carefully. Security devices with cleaning fluid or other liquid or expose it in the hard drive bay) except for repair or replacement....
...drop it from static electricity before handling a drive by touching a grounded metal object; Drives Ä CAUTION: To prevent loss or damage to temperature extremes. ■ Do not remove the primary hard drive (the hard drive in packaging that check carry-on luggage placed ... drive, use x-rays instead of magnetism and will not damage a hard drive. 4-2 Hardware Guide When you mail a drive, ship it to the notebook or a drive: ■ Handle a drive carefully. Security devices with cleaning fluid or other liquid or expose it in the hard drive bay) except for repair or replacement....

Hardware Guide
Page 62
To remove the primary hard drive: 1. Save your work. 2. Remove the hard drive security screw 1. 5. Turn the notebook bottom side up. 4. Do not remove the hard drive while the notebook is on by pressing the power button. Drives Replacing the Primary Hard Drive The hard drive that is in the hard drive bay is in Hibernation, turn the notebook on , in Standby, or in Hibernation. ■ If you...
To remove the primary hard drive: 1. Save your work. 2. Remove the hard drive security screw 1. 5. Turn the notebook bottom side up. 4. Do not remove the hard drive while the notebook is on by pressing the power button. Drives Replacing the Primary Hard Drive The hard drive that is in the hard drive bay is in Hibernation, turn the notebook on , in Standby, or in Hibernation. ■ If you...
Hardware Guide
Page 64
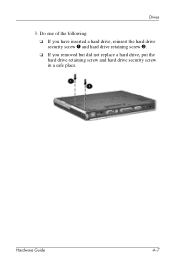
Hardware Guide 4-7 Drives 3. Do one of the following: ❏ If you have inserted a hard drive, reinsert the hard drive security screw 1 and hard drive retaining screw 2. ❏ If you removed but did not replace a hard drive, put the hard drive retaining screw and hard drive security screw in a safe place.
Hardware Guide 4-7 Drives 3. Do one of the following: ❏ If you have inserted a hard drive, reinsert the hard drive security screw 1 and hard drive retaining screw 2. ❏ If you removed but did not replace a hard drive, put the hard drive retaining screw and hard drive security screw in a safe place.
Hardware Guide
Page 107
... network 6-4 security 7-6 calibration, battery 3-13 cap, replacing pointing stick 2-3 caps lock light 1-6 card and socket services, PC Card 8-2 CD displaying contents 4-16 inserting 4-13 removing 4-15 CD drive inserting CD 4-13 inserting into MultiBay 4-11 locations supported...drive 4-2 external monitor 1-13 External MultiBay 1-13 USB 1-13 country-specific modem cable adapter 6-3 critical low-battery condition identifying 3-11 restoring from 3-12 D device drivers external devices 7-1 PC Card 8-2 digital vs. external diskette drive bay; hard drive, bay; analog line 6-1 dimensions, notebook...
... network 6-4 security 7-6 calibration, battery 3-13 cap, replacing pointing stick 2-3 caps lock light 1-6 card and socket services, PC Card 8-2 CD displaying contents 4-16 inserting 4-13 removing 4-15 CD drive inserting CD 4-13 inserting into MultiBay 4-11 locations supported...drive 4-2 external monitor 1-13 External MultiBay 1-13 USB 1-13 country-specific modem cable adapter 6-3 critical low-battery condition identifying 3-11 restoring from 3-12 D device drivers external devices 7-1 PC Card 8-2 digital vs. external diskette drive bay; hard drive, bay; analog line 6-1 dimensions, notebook...
Hardware Guide
Page 111
battery power primary hard drive, defined 4-3 See also drives; hard drive projector connecting 7-1 switching display 2-7 Q Quick Launch buttons 1-4, 2-9 R RAM (random access memory) 8-11 regulatory information 9-3 release ... and disconnecting 7-1 pointing device (dual pointing stick/TouchPad models) 1-2 pointing device (TouchPad models) 1-1 pointing device preferences 2-4 pointing stick buttons 2-1 cap, replacing 2-3 location 2-1 using 2-3 Port Replicator docking connecter 1-15 external device connections 2-4 port, infrared 6-5 power rated input 9-3 switching between AC and battery 3-1...
battery power primary hard drive, defined 4-3 See also drives; hard drive projector connecting 7-1 switching display 2-7 Q Quick Launch buttons 1-4, 2-9 R RAM (random access memory) 8-11 regulatory information 9-3 release ... and disconnecting 7-1 pointing device (dual pointing stick/TouchPad models) 1-2 pointing device (TouchPad models) 1-1 pointing device preferences 2-4 pointing stick buttons 2-1 cap, replacing 2-3 location 2-1 using 2-3 Port Replicator docking connecter 1-15 external device connections 2-4 port, infrared 6-5 power rated input 9-3 switching between AC and battery 3-1...


