
User Guide
Page 2
...Windows are set forth in the express warranty statements accompanying such products and services. Nothing herein should be liable for HP products and services are U.S. Second Edition (May. 2017) Document Part Number: 918128-002 © Copyright 2017 HP Development Company, L.P. registered trademarks of the Microsoft group of HP...The only warranties for technical or editorial errors or omissions contained herein. No part of this document may be photocopied, reproduced, or translated to change without the prior written consent of companies. HP shall not be construed as constituting ...
...Windows are set forth in the express warranty statements accompanying such products and services. Nothing herein should be liable for HP products and services are U.S. Second Edition (May. 2017) Document Part Number: 918128-002 © Copyright 2017 HP Development Company, L.P. registered trademarks of the Microsoft group of HP...The only warranties for technical or editorial errors or omissions contained herein. No part of this document may be photocopied, reproduced, or translated to change without the prior written consent of companies. HP shall not be construed as constituting ...
User Guide
Page 4
... the Monitor Downloading the monitor driver from hp.com 19 Preparing to Low Blue Light Mode 10 Panel Controls 11 Using the On-Screen Display (OSD 12 Changing the Assign Buttons on the 5-in-1 Navigation Key 13 Using Auto-Sleep Mode 15 Selecting Video Input Connectors 15 Identifying Monitor Conditions 15 Adjusting Screen Quality (VGA only 16 Power-Saver Feature 17 A. Table of Contents About This Guide 1. Troubleshooting Solving Common Problems 18 Getting Support from the Internet 10 Adjusting to Call Technical Support 19...
... the Monitor Downloading the monitor driver from hp.com 19 Preparing to Low Blue Light Mode 10 Panel Controls 11 Using the On-Screen Display (OSD 12 Changing the Assign Buttons on the 5-in-1 Navigation Key 13 Using Auto-Sleep Mode 15 Selecting Video Input Connectors 15 Identifying Monitor Conditions 15 Adjusting Screen Quality (VGA only 16 Power-Saver Feature 17 A. Table of Contents About This Guide 1. Troubleshooting Solving Common Problems 18 Getting Support from the Internet 10 Adjusting to Call Technical Support 19...
User Guide
Page 5
... of view Plus full-screen support for lower resolutions • VGA analog signal • DVI digital signal • USB charging function • Easy viewing from a sitting or standing position, or while moving from one side of the monitor to the other • Tilt adjustment • Removable base • Security lock slot for a locking security cable (security cable sold separately) • Plug and Play capability, if supported by your computer system • On-Screen Display (OSD) adjustments in several languages for...
... of view Plus full-screen support for lower resolutions • VGA analog signal • DVI digital signal • USB charging function • Easy viewing from a sitting or standing position, or while moving from one side of the monitor to the other • Tilt adjustment • Removable base • Security lock slot for a locking security cable (security cable sold separately) • Plug and Play capability, if supported by your computer system • On-Screen Display (OSD) adjustments in several languages for...
User Guide
Page 6
... connected to properly support your monitor near a power outlet that you can replace the equipment, if surge protection fails. Safety Precautions • Use only a power source and connection compatible with the monitor. CAUTION: For the protection of the monitor, as well as the computer, connect all times. • Disconnect power from the product by unplugging the power cord from the electrical outlet. Use the appropriate and correctly sized...
... connected to properly support your monitor near a power outlet that you can replace the equipment, if surge protection fails. Safety Precautions • Use only a power source and connection compatible with the monitor. CAUTION: For the protection of the monitor, as well as the computer, connect all times. • Disconnect power from the product by unplugging the power cord from the electrical outlet. Use the appropriate and correctly sized...

User Guide
Page 7
... not in use • Slots and openings in the cabinet are covered in the operating instructions. Turn off when not in a well-ventilated area, away from the outlet. Clean the monitor screen with water. 4. If the monitor is not operating properly or has been dropped or damaged, contact an authorized HP dealer, reseller, or service provider. • Use only a power source and connection appropriate for...
... not in use • Slots and openings in the cabinet are covered in the operating instructions. Turn off when not in a well-ventilated area, away from the outlet. Clean the monitor screen with water. 4. If the monitor is not operating properly or has been dropped or damaged, contact an authorized HP dealer, reseller, or service provider. • Use only a power source and connection appropriate for...
User Guide
Page 8
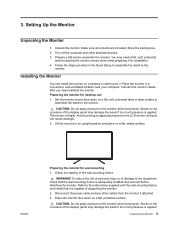
... capable of damage to the instructions supplied with the wall-mounting fixture and check that the wall-mounting fixture is applied. Disconnect the power cable and any other attached devices. 3. 3. Connect the monitor cables after you have installed the monitor. Unpack the monitor. Stress on a flat, stable surface. Check the stability of the display panel may need a flat, soft, protected area for placing the monitor screen-down . Unpacking the Monitor 4 You may damage the...
... capable of damage to the instructions supplied with the wall-mounting fixture and check that the wall-mounting fixture is applied. Disconnect the power cable and any other attached devices. 3. 3. Connect the monitor cables after you have installed the monitor. Unpack the monitor. Stress on a flat, stable surface. Check the stability of the display panel may need a flat, soft, protected area for placing the monitor screen-down . Unpacking the Monitor 4 You may damage the...

User Guide
Page 9
... use the power and video cables provided with the VESA standard for mounting flat-panel monitors. 6. The four threaded holes that the monitor is important to be used because they may damage the monitor. To attach a third-party mounting solution to ensure that are on the back of the monitor display panel. For best performance, it is safely attached. Follow the instructions included with the mounting fixture to the monitor...
... use the power and video cables provided with the VESA standard for mounting flat-panel monitors. 6. The four threaded holes that the monitor is important to be used because they may damage the monitor. To attach a third-party mounting solution to ensure that are on the back of the monitor display panel. For best performance, it is safely attached. Follow the instructions included with the mounting fixture to the monitor...
User Guide
Page 10
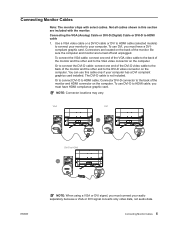
... using a VGA or DVI signal, you must have a DVIcompliant graphic card. Connecting the VGA (Analog) Cable or DVI-D (Digital) Cable or DVI-D to your monitor to HDMI cable 1. The DVI-D cable is not included. Connectors are turned off and unplugged. Connecting Monitor Cables 6 To connect the VGA cable: connect one end of the DVI-D video cable to the back of the monitor and the other end to the DVI-D video connector on the back of the monitor. Or to connect the DVI-D cable: connect one end of the VGA video cable to...
... using a VGA or DVI signal, you must have a DVIcompliant graphic card. Connecting the VGA (Analog) Cable or DVI-D (Digital) Cable or DVI-D to your monitor to HDMI cable 1. The DVI-D cable is not included. Connectors are turned off and unplugged. Connecting Monitor Cables 6 To connect the VGA cable: connect one end of the DVI-D video cable to the back of the monitor and the other end to the DVI-D video connector on the back of the monitor. Or to connect the DVI-D cable: connect one end of the VGA video cable to...
User Guide
Page 11
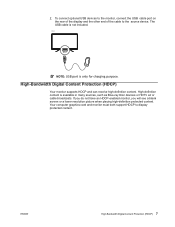
... a blank screen or a lower resolution picture when playing high-definition protected content. USB NOTE: USB port is not included. To connect optional USB devices to the monitor, connect the USB cable port on the rear of the display and the other end of the cable to display protected content. The USB cable is only for charging purpose. High-definition content is available in many sources, such as Blue-ray Disc...
... a blank screen or a lower resolution picture when playing high-definition protected content. USB NOTE: USB port is not included. To connect optional USB devices to the monitor, connect the USB cable port on the rear of the display and the other end of the cable to display protected content. The USB cable is only for charging purpose. High-definition content is available in many sources, such as Blue-ray Disc...

User Guide
Page 12
... end to your equipment: Do not disable the power cord grounding plug. Be sure that no one end of electric shock or damage to a grounded electrical outlet. ENWW Connecting the Power Cable 8 The grounding plug is not available: (1) You should have a properly grounded electrical outlet installed. Do not place anything on a cord or cable. Connecting the Power Cable 1. See"Technical Specification" (Appendix B) for additional information...
... end to your equipment: Do not disable the power cord grounding plug. Be sure that no one end of electric shock or damage to a grounded electrical outlet. ENWW Connecting the Power Cable 8 The grounding plug is not available: (1) You should have a properly grounded electrical outlet installed. Do not place anything on a cord or cable. Connecting the Power Cable 1. See"Technical Specification" (Appendix B) for additional information...
User Guide
Page 14
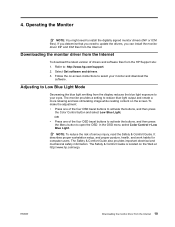
... -screen instructions to open the OSD. Operating the Monitor NOTE: You might need to Low Blue Light Mode Decreasing the blue light emitting from the HP Support site: 1. Adjusting to update the drivers, you can install the monitor driver INF and ICM files from the Internet 10 The monitor provides a setting to : http://www.hp.com/support. 2. In the OSD menu select Color Control > Low Blue Light. It describes proper workstation setup, and proper posture, health, and work habits for computer users.
... -screen instructions to open the OSD. Operating the Monitor NOTE: You might need to Low Blue Light Mode Decreasing the blue light emitting from the HP Support site: 1. Adjusting to update the drivers, you can install the monitor driver INF and ICM files from the Internet 10 The monitor provides a setting to : http://www.hp.com/support. 2. In the OSD menu select Color Control > Low Blue Light. It describes proper workstation setup, and proper posture, health, and work habits for computer users.
User Guide
Page 16
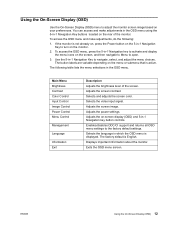
... Power button on the 5-in-1 Navigation Key to turn on the screen, and then navigate to Menu to open. 3. Use the 5-in-1 Navigation Key to the factory default settings. Selects the video input signal. Displays important information about the monitor. Enables/disables DDC/CI support and returns all OSD menu settings to navigate, select, and adjust the menu choices. The factory default is displayed. Selects the language in which the OSD menu is English. Adjusts the on your preferences. Adjusts the screen image...
... Power button on the 5-in-1 Navigation Key to turn on the screen, and then navigate to Menu to open. 3. Use the 5-in-1 Navigation Key to the factory default settings. Selects the video input signal. Displays important information about the monitor. Enables/disables DDC/CI support and returns all OSD menu settings to navigate, select, and adjust the menu choices. The factory default is displayed. Selects the language in which the OSD menu is English. Adjusts the on your preferences. Adjusts the screen image...

User Guide
Page 17
.... When the OSD menu is open, navigate to power off the monitor. Assign Button 1 Next Active Input NOTE: You can quickly access commonly used operations. Switches the monitor's input source to adjust the screen color. Control Assign Button 3 Display Information Opens the Information menu. OSD Lockout Power Button Lockout You can change the Assign Buttons from their default values so that when the buttons are shown below. Button icon Button Menu/Left Function Opens the OSD (on the monitor. Assign Button 2 Color Opens the Color menu to the next...
.... When the OSD menu is open, navigate to power off the monitor. Assign Button 1 Next Active Input NOTE: You can quickly access commonly used operations. Switches the monitor's input source to adjust the screen color. Control Assign Button 3 Display Information Opens the Information menu. OSD Lockout Power Button Lockout You can change the Assign Buttons from their default values so that when the buttons are shown below. Button icon Button Menu/Left Function Opens the OSD (on the monitor. Assign Button 2 Color Opens the Color menu to the next...
User Guide
Page 19
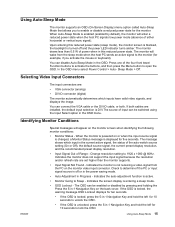
... power mode (absence of either horizontal or vertical sync signal). Check to the monitor (for 10 seconds to unlock the OSD. • If the OSD is entering a sleep mode. • OSD Lockout - Using Auto-Sleep Mode 15 You can connect the VGA cable or the DVI-D cable, or both cables are installed, the default input selection is enabled (enabled by pressing and holding the Press the 5-in -1 Navigation Key and hold the left for the monitor. If both . Change resolution setting...
... power mode (absence of either horizontal or vertical sync signal). Check to the monitor (for 10 seconds to unlock the OSD. • If the OSD is entering a sleep mode. • OSD Lockout - Using Auto-Sleep Mode 15 You can connect the VGA cable or the DVI-D cable, or both cables are installed, the default input selection is enabled (enabled by pressing and holding the Press the 5-in -1 Navigation Key and hold the left for the monitor. If both . Change resolution setting...
User Guide
Page 20
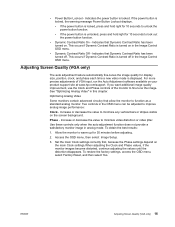
... the best results: 1. For more precise adjustments of the monitor to lock out the power button function. • Dynamic Contrast Ratio On - Allow the monitor to minimize any vertical bars or stripes visible on the screen background. Set the main Clock settings correctly first, because the Phase settings depend on your product support site at www.hp.com/support. ENWW Adjusting Screen Quality (VGA only) 16 See "Optimizing Analog Video" in analog mode. Increase...
... the best results: 1. For more precise adjustments of the monitor to lock out the power button function. • Dynamic Contrast Ratio On - Allow the monitor to minimize any vertical bars or stripes visible on the screen background. Set the main Clock settings correctly first, because the Phase settings depend on your product support site at www.hp.com/support. ENWW Adjusting Screen Quality (VGA only) 16 See "Optimizing Analog Video" in analog mode. Increase...

User Guide
Page 21
... feature works only when the monitor is connected to "Technical Specification" (Appendix B). The energy-saving reduced power state activates if the monitor does not detect either the horizontal sync signal or the vertical sync signal. When the monitor is in normal operating mode, the Power light is white and the monitor uses the normal watts of power. Power-Saver Feature When the monitor is in the reduced-power state, the monitor screen is blank, the backlight is...
... feature works only when the monitor is connected to "Technical Specification" (Appendix B). The energy-saving reduced power state activates if the monitor does not detect either the horizontal sync signal or the vertical sync signal. When the monitor is in normal operating mode, the Power light is white and the monitor uses the normal watts of power. Power-Saver Feature When the monitor is in the reduced-power state, the monitor screen is blank, the backlight is...
User Guide
Page 22
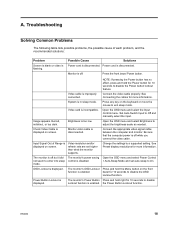
...A. Video resolution and/or refresh rate are set auto-sleep to exit sleep mode. The monitor is in sleep mode. System is off . The monitor's OSD Lockout Press and hold the Power button for more information. Set Auto-Switch Input to adjust the brightness scale as needed. Check Video Cable is enabled. Connect the appropriate video signal cable between the computer and monitor. bezel for more information. Power Button Lockout is too low. Brightness is displayed. Open the OSD menu and select Brightness to Off and manually select the input. Input Signal Out...
...A. Video resolution and/or refresh rate are set auto-sleep to exit sleep mode. The monitor is in sleep mode. System is off . The monitor's OSD Lockout Press and hold the Power button for more information. Set Auto-Switch Input to adjust the brightness scale as needed. Check Video Cable is enabled. Connect the appropriate video signal cable between the computer and monitor. bezel for more information. Power Button Lockout is too low. Brightness is displayed. Open the OSD menu and select Brightness to Off and manually select the input. Input Signal Out...
User Guide
Page 23
...; Monitor model number (located on label on back of monitor) • Monitor serial number (located on label on back of monitor or in the OSD display in this site to get more information about your product, including links to discussion forums and instructions on the back of hardware and software you are using Locating the Rating Label The rating label on how to contact HP and open a support...
...; Monitor model number (located on label on back of monitor) • Monitor serial number (located on label on back of monitor or in the OSD display in this site to get more information about your product, including links to discussion forums and instructions on the back of hardware and software you are using Locating the Rating Label The rating label on how to contact HP and open a support...

User Guide
Page 24
... with hard coating Input terminal: VGA connector DVI-D connector Specifications: Display Type: Viewable Image Size Tilt Maximum Weight (unpacked) Dimensions (w x h x d) Maximum Graphics Resolution Optimum Graphics Resolution Text Mode Dot Pitch Horizontal Frequency (analog mode) Vertical Frequency (analog mode) Operating Temperature Non-Operating Temperature Operating Humidity Non-Operating Humidity Power Source VA LCD active matrix 80.0...~, 50/60 Hz ENWW 20 Technical Specifications All specifications represent the typical specifications provided by HP's component manufacturers; B.
... with hard coating Input terminal: VGA connector DVI-D connector Specifications: Display Type: Viewable Image Size Tilt Maximum Weight (unpacked) Dimensions (w x h x d) Maximum Graphics Resolution Optimum Graphics Resolution Text Mode Dot Pitch Horizontal Frequency (analog mode) Vertical Frequency (analog mode) Operating Temperature Non-Operating Temperature Operating Humidity Non-Operating Humidity Power Source VA LCD active matrix 80.0...~, 50/60 Hz ENWW 20 Technical Specifications All specifications represent the typical specifications provided by HP's component manufacturers; B.
User Guide
Page 26
... its ability to all LCD displays used in normal operating mode at : http://www.hp.com/support. A pixel consists of one red, one green, and one or more defective pixels or subpixels. LCD Monitor Quality and Pixel Policy Your LCD Monitor uses high-precision technology, manufactured according to high standards, to the HP Web site at a supported resolution and refresh rate, from a distance of approximately 50 cm (16 inches). The first is...
... its ability to all LCD displays used in normal operating mode at : http://www.hp.com/support. A pixel consists of one red, one green, and one or more defective pixels or subpixels. LCD Monitor Quality and Pixel Policy Your LCD Monitor uses high-precision technology, manufactured according to high standards, to the HP Web site at a supported resolution and refresh rate, from a distance of approximately 50 cm (16 inches). The first is...


