
Getting Started - Windows 7
Page 5
... ...5 TouchPad ...5 Lights ...6 Keys ...7 Front ...8 Right side ...9 Left side ...11 Display ...12 Bottom ...13 3 HP QuickWeb ...14 Enabling HP QuickWeb ...15 Starting HP QuickWeb ...16 Identifying the QuickWeb LaunchBar 17 Identifying the QuickWeb control icons 17 Identifying the QuickWeb LaunchBar icons 17 Identifying the ...QuickWeb notification icons 18 Configuring the network ...20 Starting Microsoft Windows ...21 Turning HP QuickWeb on and off ...22 4 Networking ...23 Using an Internet service provider (ISP 24 Connecting to a wireless...
... ...5 TouchPad ...5 Lights ...6 Keys ...7 Front ...8 Right side ...9 Left side ...11 Display ...12 Bottom ...13 3 HP QuickWeb ...14 Enabling HP QuickWeb ...15 Starting HP QuickWeb ...16 Identifying the QuickWeb LaunchBar 17 Identifying the QuickWeb control icons 17 Identifying the QuickWeb LaunchBar icons 17 Identifying the ...QuickWeb notification icons 18 Configuring the network ...20 Starting Microsoft Windows ...21 Turning HP QuickWeb on and off ...22 4 Networking ...23 Using an Internet service provider (ISP 24 Connecting to a wireless...
Getting Started - Windows 7
Page 6
... Identifying the hotkey ...29 Identifying the action keys 30 Using keypads ...31 Using pointing devices ...32 Setting pointing device preferences 32 Using the TouchPad ...32 Turning the TouchPad on and off 32 Navigating ...33 Selecting ...33 Using TouchPad gestures 33 Scrolling 35 Pinching/Zooming 35 Rotating 36 6 Maintenance ...37 Replacing the...
... Identifying the hotkey ...29 Identifying the action keys 30 Using keypads ...31 Using pointing devices ...32 Setting pointing device preferences 32 Using the TouchPad ...32 Turning the TouchPad on and off 32 Navigating ...33 Selecting ...33 Using TouchPad gestures 33 Scrolling 35 Pinching/Zooming 35 Rotating 36 6 Maintenance ...37 Replacing the...

Getting Started - Windows 7
Page 13
Top TouchPad Component (1) TouchPad light (2) Left TouchPad button (3) Right TouchPad button (4) TouchPad zone Description Turns the TouchPad on and off . Moves the pointer and selects or activates items on an external mouse. Functions like the right button on and off . Top 5 Quickly double-tap the TouchPad light to turn the TouchPad on an external mouse. Functions like the left button on the screen.
Top TouchPad Component (1) TouchPad light (2) Left TouchPad button (3) Right TouchPad button (4) TouchPad zone Description Turns the TouchPad on and off . Moves the pointer and selects or activates items on an external mouse. Functions like the right button on and off . Top 5 Quickly double-tap the TouchPad light to turn the TouchPad on an external mouse. Functions like the left button on the screen.
Getting Started - Windows 7
Page 17
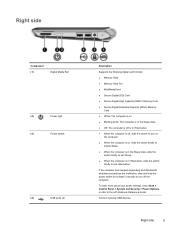
... the computer has stopped responding and Windows® shutdown procedures are ineffective, slide and hold the power switch for at least 5 seconds to turn on the computer. ● When the computer is on . ● Blinking white: The computer is in the Sleep state. ● ... USB devices. To learn more about your power settings, select Start > Control Panel > System and Security > Power Options, or refer to the HP Notebook Reference Guide. Right side Component (1) Digital Media Slot (2) Power light (3) Power switch (4) USB ports (2) Description Supports the following digital card ...
... the computer has stopped responding and Windows® shutdown procedures are ineffective, slide and hold the power switch for at least 5 seconds to turn on the computer. ● When the computer is on . ● Blinking white: The computer is in the Sleep state. ● ... USB devices. To learn more about your power settings, select Start > Control Panel > System and Security > Power Options, or refer to the HP Notebook Reference Guide. Right side Component (1) Digital Media Slot (2) Power light (3) Power switch (4) USB ports (2) Description Supports the following digital card ...

Getting Started - Windows 7
Page 22
... ● Identifying the QuickWeb LaunchBar ● Configuring the network ● Starting Microsoft Windows ● Turning HP QuickWeb on and off After completing the Windows setup the first time you to access the following applications without the need to first start Windows: &#... e-mail ● Web calendar ● Music Player ● Photo Viewer NOTE: For additional information about using QuickWeb, refer to the QuickWeb software Help. 14 Chapter 3 HP QuickWeb HP QuickWeb is an optional, instant-on environment that is separate from the main operating system.
... ● Identifying the QuickWeb LaunchBar ● Configuring the network ● Starting Microsoft Windows ● Turning HP QuickWeb on and off After completing the Windows setup the first time you to access the following applications without the need to first start Windows: &#... e-mail ● Web calendar ● Music Player ● Photo Viewer NOTE: For additional information about using QuickWeb, refer to the QuickWeb software Help. 14 Chapter 3 HP QuickWeb HP QuickWeb is an optional, instant-on environment that is separate from the main operating system.

Getting Started - Windows 7
Page 23
Enabling HP QuickWeb 15 After you have enabled QuickWeb, the QuickWeb Home screen appears whenever you turn off HP QuickWeb, refer to enable QuickWeb. Enabling HP QuickWeb Follow the on-screen instructions to the section Turning HP QuickWeb on and off on the computer. NOTE: To turn on or turn on page 22.
Enabling HP QuickWeb 15 After you have enabled QuickWeb, the QuickWeb Home screen appears whenever you turn off HP QuickWeb, refer to enable QuickWeb. Enabling HP QuickWeb Follow the on-screen instructions to the section Turning HP QuickWeb on and off on the computer. NOTE: To turn on or turn on page 22.

Getting Started - Windows 7
Page 24
NOTE: When the HP QuickWeb Home screen first appears, it displays an automatic timer above the Start Windows icon. Turn on the QuickWeb timer and changing the timer settings, refer to launch an application. The HP QuickWeb Home screen appears. 2. For more information on the computer. Click an icon on the QuickWeb Home screen to the HP QuickWeb software Help. 16 Chapter 3 HP QuickWeb Starting HP QuickWeb 1. If you do not move your mouse, or press a key within 15 seconds, the computer starts Microsoft Windows.
NOTE: When the HP QuickWeb Home screen first appears, it displays an automatic timer above the Start Windows icon. Turn on the QuickWeb timer and changing the timer settings, refer to launch an application. The HP QuickWeb Home screen appears. 2. For more information on the computer. Click an icon on the QuickWeb Home screen to the HP QuickWeb software Help. 16 Chapter 3 HP QuickWeb Starting HP QuickWeb 1. If you do not move your mouse, or press a key within 15 seconds, the computer starts Microsoft Windows.

Getting Started - Windows 7
Page 29
... sure you want to the HP QuickWeb software Help. 1. For more information on page 22. Starting Microsoft Windows NOTE: If QuickWeb has been activated, it will start every time you turn on QuickWeb, refer to Turning HP QuickWeb on and off QuickWeb. The HP QuickWeb Home screen appears. 2.... Click Yes. Starting Microsoft Windows 21 Do not move your computer. Turn on the computer. NOTE: Clicking Make Windows your default...
... sure you want to the HP QuickWeb software Help. 1. For more information on page 22. Starting Microsoft Windows NOTE: If QuickWeb has been activated, it will start every time you turn on QuickWeb, refer to Turning HP QuickWeb on and off QuickWeb. The HP QuickWeb Home screen appears. 2.... Click Yes. Starting Microsoft Windows 21 Do not move your computer. Turn on the computer. NOTE: Clicking Make Windows your default...

Getting Started - Windows 7
Page 30
Turning HP QuickWeb on or turn off 1. Click OK. 22 Chapter 3 HP QuickWeb Select the Enable or Disable check box to turn on and off QuickWeb. 4. Select the Status tab. 3. The QuickWeb dialog box is displayed. 2. Select Start > All Programs > HP QuickWeb > HP QuickWeb Configuration Tool.
Turning HP QuickWeb on or turn off 1. Click OK. 22 Chapter 3 HP QuickWeb Select the Enable or Disable check box to turn on and off QuickWeb. 4. Select the Status tab. 3. The QuickWeb dialog box is displayed. 2. Select Start > All Programs > HP QuickWeb > HP QuickWeb Configuration Tool.
Getting Started - Windows 7
Page 33
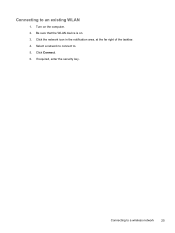
If required, enter the security key. Click Connect. 6. Turn on . 3. Select a network to connect to an existing WLAN 1. Connecting to . 5. Connecting to a wireless network 25 Click the network icon in the notification area, at the far right of the taskbar. 4. Be sure that the WLAN device is on the computer. 2.
If required, enter the security key. Click Connect. 6. Turn on . 3. Select a network to connect to an existing WLAN 1. Connecting to . 5. Connecting to a wireless network 25 Click the network icon in the notification area, at the far right of the taskbar. 4. Be sure that the WLAN device is on the computer. 2.

Getting Started - Windows 7
Page 35
... your network from unauthorized access. When the computer successfully connects to the router by your router manufacturer or your ISP. Connecting to the HP Notebook Reference Guide. NOTE: It is recommended that you initially connect your new wireless computer to the Internet, you set up your wireless... wireless network 27 The Windows operating system also provides tools to help in setting up a WLAN or access an existing WLAN, always turn on security features to the information provided by using the network cable provided with the router. For information on -screen instructions.
... your network from unauthorized access. When the computer successfully connects to the router by your router manufacturer or your ISP. Connecting to the HP Notebook Reference Guide. NOTE: It is recommended that you initially connect your new wireless computer to the Internet, you set up your wireless... wireless network 27 The Windows operating system also provides tools to help in setting up a WLAN or access an existing WLAN, always turn on security features to the information provided by using the network cable provided with the router. For information on -screen instructions.

Getting Started - Windows 7
Page 38
... information from the computer. The f4 action key can also alternate images among display devices connected to simultaneous display on or off. Increases speaker volume. Turns the wireless feature on both the computer and the monitor. Identifying the action keys Action keys, located at the top of a DVD. Increases the screen...
... information from the computer. The f4 action key can also alternate images among display devices connected to simultaneous display on or off. Increases speaker volume. Turns the wireless feature on both the computer and the monitor. Identifying the action keys Action keys, located at the top of a DVD. Increases the screen...
Getting Started - Windows 7
Page 40
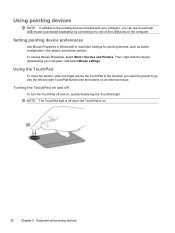
... representing your computer, you want the pointer to customize settings for pointing devices, such as button configuration, click speed, and pointer options. Turning the TouchPad on and off To turn the TouchPad off when the TouchPad is on , quickly double-tap the TouchPad light. Setting pointing device preferences Use Mouse Properties in...
... representing your computer, you want the pointer to customize settings for pointing devices, such as button configuration, click speed, and pointer options. Turning the TouchPad on and off To turn the TouchPad off when the TouchPad is on , quickly double-tap the TouchPad light. Setting pointing device preferences Use Mouse Properties in...

Getting Started - Windows 7
Page 41
... right TouchPad buttons like the corresponding buttons on and off: 1. Double-click the Synaptics icon in the direction you want the pointer to go. To turn the gestures on an external mouse. To use TouchPad gestures, place two fingers on the TouchPad at the far right of gestures. Using TouchPad gestures...
... right TouchPad buttons like the corresponding buttons on and off: 1. Double-click the Synaptics icon in the direction you want the pointer to go. To turn the gestures on an external mouse. To use TouchPad gestures, place two fingers on the TouchPad at the far right of gestures. Using TouchPad gestures...
Getting Started - Windows 7
Page 42
Select the gesture that you want to turn on or off. 4. NOTE: The computer also supports additional TouchPad features. Click Pointer Device Properties, and then click the Device Settings tab. 3. Click Apply, and then click OK. Select the device, and then click Settings. 34 Chapter 5 Keyboard and pointing devices To view and turn on these features, click the Synaptics icon in the notification area, at the far right of the taskbar.
Select the gesture that you want to turn on or off. 4. NOTE: The computer also supports additional TouchPad features. Click Pointer Device Properties, and then click the Device Settings tab. 3. Click Apply, and then click OK. Select the device, and then click Settings. 34 Chapter 5 Keyboard and pointing devices To view and turn on these features, click the Synaptics icon in the notification area, at the far right of the taskbar.

Getting Started - Windows 7
Page 48
.... Remove the battery (1) (see Removing the battery on the front edge of the vanity cover, and then remove it snaps into the 4 slots in Hibernation, turn the computer on by pressing the power button. Lift the bottom edge (3) of the vanity cover into place. 40 Chapter 6 Maintenance To remove the vanity...
.... Remove the battery (1) (see Removing the battery on the front edge of the vanity cover, and then remove it snaps into the 4 slots in Hibernation, turn the computer on by pressing the power button. Lift the bottom edge (3) of the vanity cover into place. 40 Chapter 6 Maintenance To remove the vanity...

Getting Started - Windows 7
Page 51
Grasp the tab on the computer. Replace the vanity cover (see Inserting the battery on page 40). 6. Replacing the hard drive 43 Replace the battery (see Replacing the vanity cover on page 38). 7. 4. Reconnect external power and external devices. 8. Turn on the hard drive cable connector (3), and then carefully press the hard drive cable connector onto the system board until it snaps into place. 5.
Grasp the tab on the computer. Replace the vanity cover (see Inserting the battery on page 40). 6. Replacing the hard drive 43 Replace the battery (see Replacing the vanity cover on page 38). 7. 4. Reconnect external power and external devices. 8. Turn on the hard drive cable connector (3), and then carefully press the hard drive cable connector onto the system board until it snaps into place. 5.

Getting Started - Windows 7
Page 53
... pressure to the memory module, hold the memory module by the edges only. Replace the battery (see Replacing the vanity cover on the memory module. Turn on page 38). 7. Replace the vanity cover (see Inserting the battery on the computer. Replacing the memory module 45 c. CAUTION: To prevent damage to both...
... pressure to the memory module, hold the memory module by the edges only. Replace the battery (see Replacing the vanity cover on the memory module. Turn on page 38). 7. Replace the vanity cover (see Inserting the battery on the computer. Replacing the memory module 45 c. CAUTION: To prevent damage to both...
Getting Started - Windows 7
Page 57
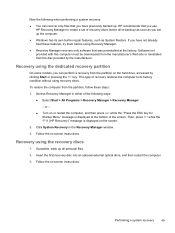
...from the disc provided by clicking Start or pressing the f11 key. Then, press f11 while the "F11 (HP Recovery)" message is displayed at the factory. HP recommends that you have not already tried these steps: 1. Follow the on or restart the computer, and then..., accessed by the manufacturer. Insert the first recovery disc into an optional external optical drive, and then restart the computer. 3. or - ● Turn on -screen instructions. Note the following ways: ● Select Start > All Programs > Recovery Manager > Recovery Manager. - Access Recovery Manager in the...
...from the disc provided by clicking Start or pressing the f11 key. Then, press f11 while the "F11 (HP Recovery)" message is displayed at the factory. HP recommends that you have not already tried these steps: 1. Follow the on or restart the computer, and then..., accessed by the manufacturer. Insert the first recovery disc into an optional external optical drive, and then restart the computer. 3. or - ● Turn on -screen instructions. Note the following ways: ● Select Start > All Programs > Recovery Manager > Recovery Manager. - Access Recovery Manager in the...
Getting Started - Windows 7
Page 67
... power connector, identifying 11 power light, identifying 9 power switch, identifying 9 Product Key 54 product name and number, computer 54 programs and drivers, updating 46 turn off 22 turn on 22 QuickWeb software 14 R recovering a program or driver 47 recovery discs 47, 48 Recovery Manager 47, 48 recovery partition 47 recovery, system 48...
... power connector, identifying 11 power light, identifying 9 power switch, identifying 9 Product Key 54 product name and number, computer 54 programs and drivers, updating 46 turn off 22 turn on 22 QuickWeb software 14 R recovering a program or driver 47 recovery discs 47, 48 Recovery Manager 47, 48 recovery partition 47 recovery, system 48...


