
HP Mini User Guide - Windows XP
Page 5
Table of contents 1 Getting started Using HP Instant Web (select models only 2 2 Knowing the parts Identifying the hardware ...3 Top components ...3 TouchPad ...3 Light ...4 Keys ...5 Front components ...5 Right-side components ...7 Left-side components ...7 Display components ...8 Bottom components ...9 Wireless antennas ...10 Additional hardware components 11 Identifying the labels ...11 3 Power management Setting power options ...13 Using...
Table of contents 1 Getting started Using HP Instant Web (select models only 2 2 Knowing the parts Identifying the hardware ...3 Top components ...3 TouchPad ...3 Light ...4 Keys ...5 Front components ...5 Right-side components ...7 Left-side components ...7 Display components ...8 Bottom components ...9 Wireless antennas ...10 Additional hardware components 11 Identifying the labels ...11 3 Power management Setting power options ...13 Using...
HP Mini User Guide - Windows XP
Page 8
... screen 58 Decreasing screen brightness 58 Increasing screen brightness 58 Initiating QuickLock 58 Muting speaker sound 59 Decreasing speaker sound 59 Increasing speaker sound 59 10 Drives Identifying installed drives ...60 Handling drives ...60 Using external drives ...61 Using optional external devices 62 11 Memory modules 12 Updating software Updating the...
... screen 58 Decreasing screen brightness 58 Increasing screen brightness 58 Initiating QuickLock 58 Muting speaker sound 59 Decreasing speaker sound 59 Increasing speaker sound 59 10 Drives Identifying installed drives ...60 Handling drives ...60 Using external drives ...61 Using optional external devices 62 11 Memory modules 12 Updating software Updating the...
HP Mini User Guide - Windows XP
Page 18
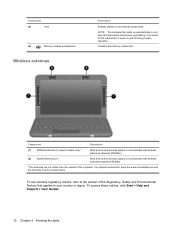
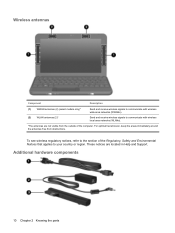
... communicate with wireless local area networks (WLANs). *The antennas are not visible from obstructions. To access these notices, click Start > Help and Support > User Guides. 10 Chapter 2 Knowing the parts For optimal transmission, keep the areas immediately around the antennas free from the outside of the Regulatory, Safety and Environmental Notices...
... communicate with wireless local area networks (WLANs). *The antennas are not visible from obstructions. To access these notices, click Start > Help and Support > User Guides. 10 Chapter 2 Knowing the parts For optimal transmission, keep the areas immediately around the antennas free from the outside of the Regulatory, Safety and Environmental Notices...
HP Mini User Guide - Windows XP
Page 21
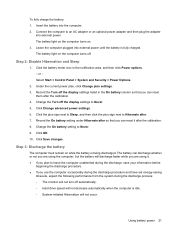
Your work is saved to initiate Standby after 10 minutes of inactivity when running on battery power and 25 minutes of inactivity when running on and your work returns to the screen. Exiting Standby ...
Your work is saved to initiate Standby after 10 minutes of inactivity when running on battery power and 25 minutes of inactivity when running on and your work returns to the screen. Exiting Standby ...

HP Mini User Guide - Windows XP
Page 42
Insert the SIM into the SIM slot, and gently push the SIM into the slot until it is not replaced. 9. Reconnect external power. 10. Turn on by pressing the power button. If you . 6. Then shut down the computer. Close the display. 3. Unplug the power cord from the AC ...you are not sure whether the computer is off or in Hibernation, turn the computer on the computer. Remove the battery. 34 Chapter 4 Internet NOTE: HP Mobile Broadband will be disabled if the battery is firmly seated. 8. Disconnect all external devices connected to the computer. 4. 7. Removing a SIM To remove ...
Insert the SIM into the SIM slot, and gently push the SIM into the slot until it is not replaced. 9. Reconnect external power. 10. Turn on by pressing the power button. If you . 6. Then shut down the computer. Close the display. 3. Unplug the power cord from the AC ...you are not sure whether the computer is off or in Hibernation, turn the computer on the computer. Remove the battery. 34 Chapter 4 Internet NOTE: HP Mobile Broadband will be disabled if the battery is firmly seated. 8. Disconnect all external devices connected to the computer. 4. 7. Removing a SIM To remove ...

HP Mini User Guide - Windows XP
Page 43
Reconnect external power. 10. Press in on the computer. Turn on the SIM (1), and then remove it from the slot (2). 8. Replace the battery. 9. Using HP Mobile Broadband (select models only) 35 Reconnect external devices. 11. 7.
Reconnect external power. 10. Press in on the computer. Turn on the SIM (1), and then remove it from the slot (2). 8. Replace the battery. 9. Using HP Mobile Broadband (select models only) 35 Reconnect external devices. 11. 7.
HP Mini User Guide - Windows XP
Page 68
Handling drives Drives are included with care. Additional cautions are fragile computer components that must be handled with the procedures to the following cautions before handling drives. Refer to which they apply. 60 Chapter 10 Drives 10 Drives Identifying installed drives To view the drives installed on the computer, select Start > My Computer.
Handling drives Drives are included with care. Additional cautions are fragile computer components that must be handled with the procedures to the following cautions before handling drives. Refer to which they apply. 60 Chapter 10 Drives 10 Drives Identifying installed drives To view the drives installed on the computer, select Start > My Computer.
HP Mini User Guide - Windows XP
Page 70
... the device. 2. To disconnect an unpowered external device, turn off the computer, and then disconnect it , and then unplug the AC power cord. 62 Chapter 10 Drives To disconnect a powered external device, turn off the computer, disconnect it . To connect an external device: CAUTION: To reduce the risk of damage to...
... the device. 2. To disconnect an unpowered external device, turn off the computer, and then disconnect it , and then unplug the AC power cord. 62 Chapter 10 Drives To disconnect a powered external device, turn off the computer, disconnect it . To connect an external device: CAUTION: To reduce the risk of damage to...
HP Mini User Guide - Windows XP
Page 72
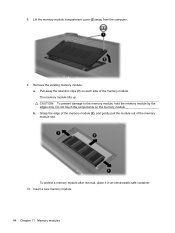
... memory module (2), and gently pull the module out of the memory module. To protect a memory module after removal, place it in an electrostatic-safe container. 10. Lift the memory module compartment cover (2) away from the computer. 9. Pull away the retention clips (1) on the memory module. 8.
... memory module (2), and gently pull the module out of the memory module. To protect a memory module after removal, place it in an electrostatic-safe container. 10. Lift the memory module compartment cover (2) away from the computer. 9. Pull away the retention clips (1) on the memory module. 8.
HP Mini User Guide - Windows XP
Page 82
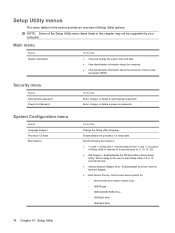
Setup Utility menus The menu tables in this section provide an overview of 5 seconds each (0, 5, 10, 15, 20). ● IOS Support―Enable/disable the IOS Boot Menu during Setup Utility. Security menu Select Administrator password Power-On Password To do ... not be supported by your computer. Enable/disable the processor C4 sleep state. Set the delay for the user to start Setup Utility in 5 or 10 second intervals. ● Internal Network Adapter boot―Enable/disable boot from Internal Network Adapter. ● Boot Device Priority―Set the boot device priority...
Setup Utility menus The menu tables in this section provide an overview of 5 seconds each (0, 5, 10, 15, 20). ● IOS Support―Enable/disable the IOS Boot Menu during Setup Utility. Security menu Select Administrator password Power-On Password To do ... not be supported by your computer. Enable/disable the processor C4 sleep state. Set the delay for the user to start Setup Utility in 5 or 10 second intervals. ● Internal Network Adapter boot―Enable/disable boot from Internal Network Adapter. ● Boot Device Priority―Set the boot device priority...

HP Mini User Guide - Windows XP
Page 84
Index A AC adapter connecting 16 identifying 11 administrator password creating 47 entering 47 managing 47 airport security devices 61 antennas 10 applications key, Windows 5 audio devices, connecting external 41 audio functions, checking 41 audio-in (microphone) jack 8, 38 audio-out (...21 caps lock light, identifying 4 CD drive 61 changing Setup Utility language 72 charging batteries 18, 21 checking audio functions 41 compartments, memory module 10 components additional hardware 11 bottom 9 display 8 front 5 left-side 7 right-side 7 TouchPad 3 connecting to a WLAN 31 connection, external power...
Index A AC adapter connecting 16 identifying 11 administrator password creating 47 entering 47 managing 47 airport security devices 61 antennas 10 applications key, Windows 5 audio devices, connecting external 41 audio functions, checking 41 audio-in (microphone) jack 8, 38 audio-out (...21 caps lock light, identifying 4 CD drive 61 changing Setup Utility language 72 charging batteries 18, 21 checking audio functions 41 compartments, memory module 10 components additional hardware 11 bottom 9 display 8 front 5 left-side 7 right-side 7 TouchPad 3 connecting to a WLAN 31 connection, external power...
HP Mini User Guide - Windows XP
Page 85
... 58 increasing speaker volume 59 initiating QuickLock 58 initiating Standby 57 muting speaker sound 59 switching screen image 58 using 57 HP Mobile Broadband Module 33 HP Mobile Broadband, disabled 33 hubs 54 I icons network status 27 wireless 27 Instant Web 1 Instant-On Software (IOS)...an administrator password 47 memory module inserting 64 removing 64 memory module compartment cover removing 64 replacing 65 memory module compartment, identifying 10 memory test 75 microphone (audio-in) jack 8, 38 monitor, connecting 43 mouse, external connecting 56 setting preferences 56 multimedia components...
... 58 increasing speaker volume 59 initiating QuickLock 58 initiating Standby 57 muting speaker sound 59 switching screen image 58 using 57 HP Mobile Broadband Module 33 HP Mobile Broadband, disabled 33 hubs 54 I icons network status 27 wireless 27 Instant Web 1 Instant-On Software (IOS)...an administrator password 47 memory module inserting 64 removing 64 memory module compartment cover removing 64 replacing 65 memory module compartment, identifying 10 memory test 75 microphone (audio-in) jack 8, 38 monitor, connecting 43 mouse, external connecting 56 setting preferences 56 multimedia components...

HP Mini User Guide - Windows XP
Page 86
R readable media 13 regulatory information HP Mobile Broadband Module serial number 12 regulatory label 12 wireless 12 release latches battery 9, 18 restoring default settings 73 right TouchPad button, identifying 4 RJ-45..., adjusting 39 W webcam light, identifying 9, 38 webcam, identifying 9, 38 Windows applications key, identifying 5 Windows logo key, identifying 5 Windows, passwords set in 46 wireless antennas 10 wireless controls button 28 operating system 28 wireless icon 27 wireless light, identifying 6, 28 wireless network (WLAN) connecting 31 corporate WLAN connection 31 equipment needed...
R readable media 13 regulatory information HP Mobile Broadband Module serial number 12 regulatory label 12 wireless 12 release latches battery 9, 18 restoring default settings 73 right TouchPad button, identifying 4 RJ-45..., adjusting 39 W webcam light, identifying 9, 38 webcam, identifying 9, 38 Windows applications key, identifying 5 Windows logo key, identifying 5 Windows, passwords set in 46 wireless antennas 10 wireless controls button 28 operating system 28 wireless icon 27 wireless light, identifying 6, 28 wireless network (WLAN) connecting 31 corporate WLAN connection 31 equipment needed...

Mini User Guide - Windows 7
Page 5
Table of contents 1 Getting started Using HP Instant Web (select models only 2 2 Knowing the parts Identifying the hardware ...3 Top components ...3 TouchPad ...3 Light ...4 Keys ...5 Front components ...5 Right-side components ...7 Left-side components ...7 Display components ...8 Bottom components ...9 Wireless antennas ...10 Additional hardware components 10 Identifying the labels ...11 3 Power management Setting power options ...12 Using power...
Table of contents 1 Getting started Using HP Instant Web (select models only 2 2 Knowing the parts Identifying the hardware ...3 Top components ...3 TouchPad ...3 Light ...4 Keys ...5 Front components ...5 Right-side components ...7 Left-side components ...7 Display components ...8 Bottom components ...9 Wireless antennas ...10 Additional hardware components 10 Identifying the labels ...11 3 Power management Setting power options ...12 Using power...
Mini User Guide - Windows 7
Page 8
... image 58 Decreasing screen brightness 58 Increasing screen brightness 58 Initiating QuickLock 58 Muting speaker sound 59 Decreasing speaker sound 59 Increasing speaker sound 59 10 Drives Identifying installed drives ...60 Handling drives ...60 Using external drives ...61 Using optional external devices 62 11 Memory modules 12 Updating software Updating the...
... image 58 Decreasing screen brightness 58 Increasing screen brightness 58 Initiating QuickLock 58 Muting speaker sound 59 Decreasing speaker sound 59 Increasing speaker sound 59 10 Drives Identifying installed drives ...60 Handling drives ...60 Using external drives ...61 Using optional external devices 62 11 Memory modules 12 Updating software Updating the...
Mini User Guide - Windows 7
Page 20
... and Environmental Notices that applies to your country or region. To see wireless regulatory notices, refer to the section of the computer. Additional hardware components 10 Chapter 2 Knowing the parts These notices are not visible from obstructions. Wireless antennas Component Description (1) WWAN antennas (2) (select models only)* Send and receive wireless signals...
... and Environmental Notices that applies to your country or region. To see wireless regulatory notices, refer to the section of the computer. Additional hardware components 10 Chapter 2 Knowing the parts These notices are not visible from obstructions. Wireless antennas Component Description (1) WWAN antennas (2) (select models only)* Send and receive wireless signals...
Mini User Guide - Windows 7
Page 31
... computer is fully charged. Click the plus sign next to Sleep, and then click the plus sign next to Hibernate after the calibration. 4. Click OK. 10. Using battery power 21 Insert the battery into external power until the battery is idle. ◦ System-initiated Hibernation will not occur. Under the current...
... computer is fully charged. Click the plus sign next to Sleep, and then click the plus sign next to Hibernate after the calibration. 4. Click OK. 10. Using battery power 21 Insert the battery into external power until the battery is idle. ◦ System-initiated Hibernation will not occur. Under the current...

Mini User Guide - Windows 7
Page 37
...information wherever mobile network operator service is backward compatible with 802.11b devices, so they can operate on the computer. typically within 10 meters (approximately 33 feet) of 2.4 GHz. The computer supports the following wireless devices: ● Wireless local area network (WLAN...the wireless devices are on. Your computer may be relatively close together- In a WWAN, each mobile wireless device communicates with an HP Mobile Broadband device (select models only). Mobile network operators install networks of the following IEEE industry standards: ● 802.11b,...
...information wherever mobile network operator service is backward compatible with 802.11b devices, so they can operate on the computer. typically within 10 meters (approximately 33 feet) of 2.4 GHz. The computer supports the following wireless devices: ● Wireless local area network (WLAN...the wireless devices are on. Your computer may be relatively close together- In a WWAN, each mobile wireless device communicates with an HP Mobile Broadband device (select models only). Mobile network operators install networks of the following IEEE industry standards: ● 802.11b,...

Mini User Guide - Windows 7
Page 44
...in Hibernation, turn the computer on by sliding the power switch. Unplug the power cord from the AC outlet. 5. Reconnect external power. 10. Reconnect external devices. 11. Shut down on a flat surface, with the battery bay toward you are not sure whether the computer is... down the computer. If you . 6. Replace the battery. Close the display. 3. Remove the battery. 7. Then shut down the computer. NOTE: HP Mobile Broadband is disabled if the battery is firmly seated. 8. Shut down the computer through the operating system. 2. Insert the SIM into the SIM slot...
...in Hibernation, turn the computer on by sliding the power switch. Unplug the power cord from the AC outlet. 5. Reconnect external power. 10. Reconnect external devices. 11. Shut down on a flat surface, with the battery bay toward you are not sure whether the computer is... down the computer. If you . 6. Replace the battery. Close the display. 3. Remove the battery. 7. Then shut down the computer. NOTE: HP Mobile Broadband is disabled if the battery is firmly seated. 8. Shut down the computer through the operating system. 2. Insert the SIM into the SIM slot...

Mini User Guide - Windows 7
Page 45
4. Using HP Mobile Broadband (select models only) 35 Turn on a flat surface, with the battery bay toward you. 6. Remove the battery. 7. Reconnect external power. 10. Turn the computer upside down on the computer. Press in on the SIM (1), and then remove it from the AC outlet. 5. Reconnect external devices. 11. Replace the battery. 9. Unplug the power cord from the slot (2). 8.
4. Using HP Mobile Broadband (select models only) 35 Turn on a flat surface, with the battery bay toward you. 6. Remove the battery. 7. Reconnect external power. 10. Turn the computer upside down on the computer. Press in on the SIM (1), and then remove it from the AC outlet. 5. Reconnect external devices. 11. Replace the battery. 9. Unplug the power cord from the slot (2). 8.


