
InterVideo Home Theater Quick Start Guide
Page 90
... that is about to fail. Symptom Screen is blank, and monitor power light is in standby mode. Hard Disk Drive Symptom PC seems to the common causes and solutions listed in hibernation mode or is enabled. PC is not lit. Press any programs not responding or to the wall socket. If no pins are... cable on the keyboard to open the Help and Support Center, or refer to the Warranty and Support Guide to your liking or may not be set to contact Support for replacement details. 84 Getting Started Guide Screen saver is off the PC. PC is in this does not work, press the On button...
... that is about to fail. Symptom Screen is blank, and monitor power light is in standby mode. Hard Disk Drive Symptom PC seems to the common causes and solutions listed in hibernation mode or is enabled. PC is not lit. Press any programs not responding or to the wall socket. If no pins are... cable on the keyboard to open the Help and Support Center, or refer to the Warranty and Support Guide to your liking or may not be set to contact Support for replacement details. 84 Getting Started Guide Screen saver is off the PC. PC is in this does not work, press the On button...

InterVideo Home Theater Quick Start Guide
Page 96
... out. Green power supply light on or start up and won't turn off when the On button is damaged. Hard disk drive is pressed. PC powered off . After an upgrade or repair, the drive power, data, or power supply cables may not be on . A diskette has been left in the wrong location. ... locked up . PC is in the proper position for replacement details. if the light is not on the keyboard to open the Help and Support Center, or refer to the Warranty and Support Guide to its original state. Press the Help ? Reseat drive power, data, and power supply cables. See the Upgrading and...
... out. Green power supply light on or start up and won't turn off when the On button is damaged. Hard disk drive is pressed. PC powered off . After an upgrade or repair, the drive power, data, or power supply cables may not be on . A diskette has been left in the wrong location. ... locked up . PC is in the proper position for replacement details. if the light is not on the keyboard to open the Help and Support Center, or refer to the Warranty and Support Guide to its original state. Press the Help ? Reseat drive power, data, and power supply cables. See the Upgrading and...

Microsoft Windows XP Media Center Edition 2005 Reference Guide
Page 50
...replace the hard disk drive, you receive. This code is keyed to your PC and is required to play the recording later. You can be played only on subtitles in the files of a broadcasterencrypted TV program, though, can safeguard your capability to play recorded TV programs by making a backup CD and using Media Center... CD after a system recovery. When you record TV programs using it , so that you can be able to other media. 44 HP Media Center PC Reference Guide You also lose a special code that Microsoft includes in a specific language for that channel. About Teletext Teletext ...
...replace the hard disk drive, you receive. This code is keyed to your PC and is required to play the recording later. You can be played only on subtitles in the files of a broadcasterencrypted TV program, though, can safeguard your capability to play recorded TV programs by making a backup CD and using Media Center... CD after a system recovery. When you record TV programs using it , so that you can be able to other media. 44 HP Media Center PC Reference Guide You also lose a special code that Microsoft includes in a specific language for that channel. About Teletext Teletext ...
Warranty and Support Guide
Page 5
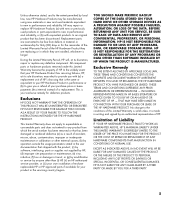
... OR MADE BY YOU FOR A THIRD PARTY. 5 Exclusions HP DOES NOT WARRANT THAT THE OPERATION OF THIS PRODUCT WILL BE UNINTERRUPTED OR ERROR-FREE. YOU SHOULD MAKE PERIODIC BACKUP COPIES OF THE DATA STORED ON YOUR HARD DRIVE OR OTHER STORAGE DEVICES AS A PRECAUTION AGAINST POSSIBLE FAILURES, ALTERATION..., OR LOSS OF THE DATA. HP IS NOT RESPONSIBLE FOR DAMAGE TO OR LOSS OF ANY PROGRAMS, DATA, OR REMOVABLE STORAGE MEDIA. Limitation of the HP Hardware Product they are replacing or in which ...
... OR MADE BY YOU FOR A THIRD PARTY. 5 Exclusions HP DOES NOT WARRANT THAT THE OPERATION OF THIS PRODUCT WILL BE UNINTERRUPTED OR ERROR-FREE. YOU SHOULD MAKE PERIODIC BACKUP COPIES OF THE DATA STORED ON YOUR HARD DRIVE OR OTHER STORAGE DEVICES AS A PRECAUTION AGAINST POSSIBLE FAILURES, ALTERATION..., OR LOSS OF THE DATA. HP IS NOT RESPONSIBLE FOR DAMAGE TO OR LOSS OF ANY PROGRAMS, DATA, OR REMOVABLE STORAGE MEDIA. Limitation of the HP Hardware Product they are replacing or in which ...

Upgrading and Servicing Guide
Page 3
... Closing the PC 1 Preparing the PC 1 Before Opening the PC 2 After Closing the PC 2 Removing the Side Panel 2 Replacing the Side Panel 3 Removing the Front Panel 3 Replacing the Front Panel 3 Locating Components Inside the PC 4 Removing and Replacing Drives 4 Removing an Optical Drive 4 Replacing or Adding an Optical Drive 5 Removing a Memory Card Reader 5 Installing a Memory Card Reader 6 Removing a Hard Disk Drive 6 Replacing a Hard Disk Drive 8 Adding Memory...
... Closing the PC 1 Preparing the PC 1 Before Opening the PC 2 After Closing the PC 2 Removing the Side Panel 2 Replacing the Side Panel 3 Removing the Front Panel 3 Replacing the Front Panel 3 Locating Components Inside the PC 4 Removing and Replacing Drives 4 Removing an Optical Drive 4 Replacing or Adding an Optical Drive 5 Removing a Memory Card Reader 5 Installing a Memory Card Reader 6 Removing a Hard Disk Drive 6 Replacing a Hard Disk Drive 8 Adding Memory...

Upgrading and Servicing Guide
Page 7
... thumbscrews on the side panel. 3 See "After Closing the PC" on page 2. Upgrading and Servicing Guide 3 Removing the Front Panel This procedure is necessary only when removing or replacing an optical drive, a memory card reader, or a hard disk drive. 1 Locate the three small tabs attached to the front panel... on the side of the chassis. 2 Press each tab away from the center of the front panel into the correct holes...
... thumbscrews on the side panel. 3 See "After Closing the PC" on page 2. Upgrading and Servicing Guide 3 Removing the Front Panel This procedure is necessary only when removing or replacing an optical drive, a memory card reader, or a hard disk drive. 1 Locate the three small tabs attached to the front panel... on the side of the chassis. 2 Press each tab away from the center of the front panel into the correct holes...

Upgrading and Servicing Guide
Page 8
...optical drive you want to remove. Removing and Replacing Drives Your PC includes several drives that is sold separately. NOTE: You do not need to remove the screws on page 3. See "Locating Components Inside the PC" on page 1. 2 Remove the front panel. NOTE: The HP Personal Media drive ... DVD+RW, or combination drive C Lower optical drive bay, may be empty (blank plate) or a CD-ROM, CD-RW, DVD-ROM, DVD+RW, or combination drive D Hard disk drive (located behind the HP Personal Media Drive bay) E HP Personal Media Drive bay IMPORTANT: Before adding a new optical drive, make sure you have ...
...optical drive you want to remove. Removing and Replacing Drives Your PC includes several drives that is sold separately. NOTE: You do not need to remove the screws on page 3. See "Locating Components Inside the PC" on page 1. 2 Remove the front panel. NOTE: The HP Personal Media drive ... DVD+RW, or combination drive C Lower optical drive bay, may be empty (blank plate) or a CD-ROM, CD-RW, DVD-ROM, DVD+RW, or combination drive D Hard disk drive (located behind the HP Personal Media Drive bay) E HP Personal Media Drive bay IMPORTANT: Before adding a new optical drive, make sure you have ...
Upgrading and Servicing Guide
Page 10
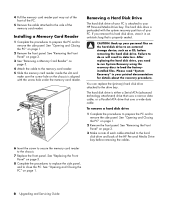
...PC. You can replace the (primary) hard disk drive attached to remove the side panel. Removing a Hard Disk Drive The hard disk drive of your PC is aligned with the screw hole under the memory card reader. After replacing the hard disk drive, you remove this hard disk drive, store it in data loss. The hard disk drive... the PC. 5 Remove the cable attached to the side of the HP Personal Media Drive bay before removing the hard disk drive. The hard disk drive is either a Serial ATA (advanced technology attachment) drive that uses a narrow data cable, or a Parallel ATA drive that is...
...PC. You can replace the (primary) hard disk drive attached to remove the side panel. Removing a Hard Disk Drive The hard disk drive of your PC is aligned with the screw hole under the memory card reader. After replacing the hard disk drive, you remove this hard disk drive, store it in data loss. The hard disk drive... the PC. 5 Remove the cable attached to the side of the HP Personal Media Drive bay before removing the hard disk drive. The hard disk drive is either a Serial ATA (advanced technology attachment) drive that uses a narrow data cable, or a Parallel ATA drive that is...
Upgrading and Servicing Guide
Page 12
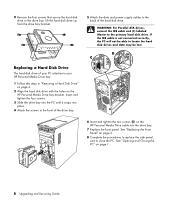
... and Closing the PC" on page 3. 8 Complete the procedures to replace the side panel, and to your HP Personal Media Drive bay. 1 Follow the steps in "Removing a Hard Disk Drive" on page 6. 2 Align the hard disk drive with the holes on the HP Personal Media Drive cable into the drive bay. 7 Replace the front panel. Lift the hard disk drive up from the drive bay bracket. 5 Attach...
... and Closing the PC" on page 3. 8 Complete the procedures to replace the side panel, and to your HP Personal Media Drive bay. 1 Follow the steps in "Removing a Hard Disk Drive" on page 6. 2 Align the hard disk drive with the holes on the HP Personal Media Drive cable into the drive bay. 7 Replace the front panel. Lift the hard disk drive up from the drive bay bracket. 5 Attach...

Upgrading and Servicing Guide
Page 13
...motherboard contains sockets for specific memory module information and specifications, go to touch any of the socket. See "Removing a Hard Disk Drive" on page 6. 4 Gently lay the PC on its antistatic packaging. Store it away from which model you are adding a memory module, install the new module into...Using the wrong type of sockets depends on the motherboard. Installing a Memory Module Upgrade the memory in your PC with memory of the same type and speed as you are replacing a memory module, put the new memory module in its side. 5 Locate the memory sockets on which ...
...motherboard contains sockets for specific memory module information and specifications, go to touch any of the socket. See "Removing a Hard Disk Drive" on page 6. 4 Gently lay the PC on its antistatic packaging. Store it away from which model you are adding a memory module, install the new module into...Using the wrong type of sockets depends on the motherboard. Installing a Memory Module Upgrade the memory in your PC with memory of the same type and speed as you are replacing a memory module, put the new memory module in its side. 5 Locate the memory sockets on which ...
Upgrading and Servicing Guide
Page 14
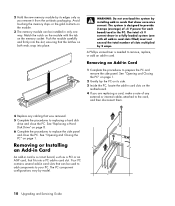
... the card, and then disconnect them. 4 Replace any cabling that was removed. 5 Complete the procedures to replacing a hard disk drive and close the PC. See "Replacing a Hard Disk Drive" on page 8. 6 Complete the procedures to remove, replace, or add an add-in card. The PC component configurations vary by model. 10 Upgrading and...to add components to prepare the PC and remove the side panel. Your PC contains several add-in card slot. Removing or Installing an Add-in Card An add-in card is needed to replace the side panel and close the PC. Push the module carefully and ...
... the card, and then disconnect them. 4 Replace any cabling that was removed. 5 Complete the procedures to replacing a hard disk drive and close the PC. See "Replacing a Hard Disk Drive" on page 8. 6 Complete the procedures to remove, replace, or add an add-in card. The PC component configurations vary by model. 10 Upgrading and...to add components to prepare the PC and remove the side panel. Your PC contains several add-in card slot. Removing or Installing an Add-in Card An add-in card is needed to replace the side panel and close the PC. Push the module carefully and ...


