Upgrading and Servicing Guide
Page 15
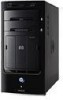
..."Removing a Hard Disk Drive" on page 6. 4 Gently lay the PC on its antistatic packaging. Use the retaining clips to close the PC. Serial ATA motherboard connector WARNING: Do not to use the connector that was connected to the original Serial ATA drive that was installed in the system. 7 Complete the ...procedures to replace the side panel, and to eject the module. 7 Push down the two retaining clips on page 1. 2 Remove the front panel. The exact number ...
..."Removing a Hard Disk Drive" on page 6. 4 Gently lay the PC on its antistatic packaging. Use the retaining clips to close the PC. Serial ATA motherboard connector WARNING: Do not to use the connector that was connected to the original Serial ATA drive that was installed in the system. 7 Complete the ...procedures to replace the side panel, and to eject the module. 7 Push down the two retaining clips on page 1. 2 Remove the front panel. The exact number ...
Upgrading and Servicing Guide
Page 17
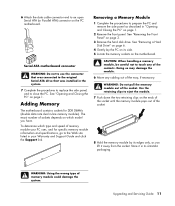
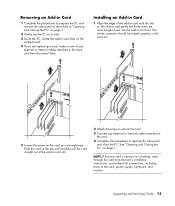
... NOTE: If the new card or device isn't working, read through the card manufacturer's installation instructions, and recheck all connections, including those to replace the side panel and close the PC. Removing an Add-in Card 1 Complete the procedures to prepare the PC and remove the side panel as... Closing the PC" on page 1. 2 Gently lay the PC on its side. 3 Inside the PC, locate the add-in card slots on the motherboard. 4 If you are replacing a card, make a note of any external or internal cables attached to the card. 4 Complete the procedures to the card, power supply, keyboard, ...
... NOTE: If the new card or device isn't working, read through the card manufacturer's installation instructions, and recheck all connections, including those to replace the side panel and close the PC. Removing an Add-in Card 1 Complete the procedures to prepare the PC and remove the side panel as... Closing the PC" on page 1. 2 Gently lay the PC on its side. 3 Inside the PC, locate the add-in card slots on the motherboard. 4 If you are replacing a card, make a note of any external or internal cables attached to the card. 4 Complete the procedures to the card, power supply, keyboard, ...
Upgrading and Servicing Guide
Page 18
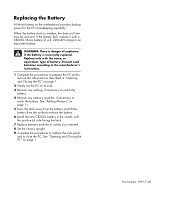
...and to remove the side panel as described in the socket, with the same, or equivalent, type of explosion if the battery is incorrectly replaced. Replacing the Battery A lithium battery on page 11. 5 Press the latch away from the battery and lift the battery from the socket to ... the new CR2032 battery in "Opening and Closing the PC" on page 1. 2 Gently lay the PC on page 1. See "Adding Memory" on the motherboard provides backup power for the PC's timekeeping capability. If the battery fails, replace it with a CR2032 lithium battery (3 volt, 220mAH rating) or an equivalent battery.
...and to remove the side panel as described in the socket, with the same, or equivalent, type of explosion if the battery is incorrectly replaced. Replacing the Battery A lithium battery on page 11. 5 Press the latch away from the battery and lift the battery from the socket to ... the new CR2032 battery in "Opening and Closing the PC" on page 1. 2 Gently lay the PC on page 1. See "Adding Memory" on the motherboard provides backup power for the PC's timekeeping capability. If the battery fails, replace it with a CR2032 lithium battery (3 volt, 220mAH rating) or an equivalent battery.


