Upgrading and Servicing Guide
Page 15
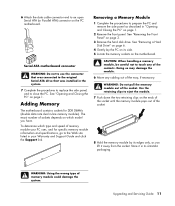
...memory module your Warranty and Support Guide and click the Support link. The exact number of the way, if necessary. Adding Memory The motherboard contains sockets for specific memory module information and specifications, go to an open Serial ATA (or Parallel ATA) connector on its antistatic packaging....not to use the connector that was connected to the original Serial ATA drive that was installed in the system. 7 Complete the procedures to replace the side panel, and to touch any cabling out of sockets depends on page 1. 2 Remove the front panel. Use the retaining clips ...
...memory module your Warranty and Support Guide and click the Support link. The exact number of the way, if necessary. Adding Memory The motherboard contains sockets for specific memory module information and specifications, go to an open Serial ATA (or Parallel ATA) connector on its antistatic packaging....not to use the connector that was connected to the original Serial ATA drive that was installed in the system. 7 Complete the procedures to replace the side panel, and to touch any cabling out of sockets depends on page 1. 2 Remove the front panel. Use the retaining clips ...
Upgrading and Servicing Guide
Page 17
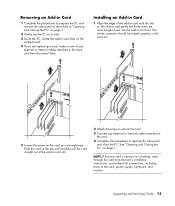
...'t working, read through the card manufacturer's installation instructions, and recheck all connections, including those to replace the side panel and close the PC. See "Opening and Closing the PC" on page 1....connector should be seated properly in the card slot. 5 Loosen the screw on the card you are replacing. Installing an Add-in Card 1 Align the edge of any external or internal cables attached to the ...the PC on its side. 3 Inside the PC, locate the add-in card slots on the motherboard. 4 If you are replacing a card, make a note of the add-in card with the slot on the chassis and ...
...'t working, read through the card manufacturer's installation instructions, and recheck all connections, including those to replace the side panel and close the PC. See "Opening and Closing the PC" on page 1....connector should be seated properly in the card slot. 5 Loosen the screw on the card you are replacing. Installing an Add-in Card 1 Align the edge of any external or internal cables attached to the ...the PC on its side. 3 Inside the PC, locate the add-in card slots on the motherboard. 4 If you are replacing a card, make a note of the add-in card with the slot on the chassis and ...
Upgrading and Servicing Guide
Page 18
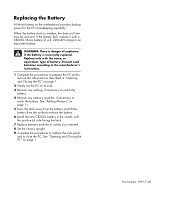
...side panel, and to close the PC. When the battery starts to weaken, the date and time may be incorrect. Part Number: 5991-7140 Replace only with a CR2032 lithium battery (3 volt, 220mAH rating) or an equivalent battery. See "Opening and Closing the PC" on its side. ...: There is danger of battery. If the battery fails, replace it with the same, or equivalent, type of explosion if the battery is incorrectly replaced. See "Adding Memory" on the motherboard provides backup power for the PC's timekeeping capability. Replacing the Battery A lithium battery on page 11. 5 Press the...
...side panel, and to close the PC. When the battery starts to weaken, the date and time may be incorrect. Part Number: 5991-7140 Replace only with a CR2032 lithium battery (3 volt, 220mAH rating) or an equivalent battery. See "Opening and Closing the PC" on its side. ...: There is danger of battery. If the battery fails, replace it with the same, or equivalent, type of explosion if the battery is incorrectly replaced. See "Adding Memory" on the motherboard provides backup power for the PC's timekeeping capability. Replacing the Battery A lithium battery on page 11. 5 Press the...


