

User Guide
Page 3
...language...5 Set the region...5 Set the date and time...5 Install and format an optional memory card 6 Install the software...6 Using your camera...7 2 Taking pictures and recording video clips Taking pictures...8 Recording video clips...9 Instant Review...9 Auto focus and exposure...9 Focusing on the ...subject...10 Optimizing focus...10 Using Focus Lock...11 Optimizing exposure...11 Using zoom...11 Optical zoom...12 Digital zoom...12 3 Setting options for taking pictures and recording video clips Setting the flash...13 Flash Setting-Red-Eye...13 Using the...
...language...5 Set the region...5 Set the date and time...5 Install and format an optional memory card 6 Install the software...6 Using your camera...7 2 Taking pictures and recording video clips Taking pictures...8 Recording video clips...9 Instant Review...9 Auto focus and exposure...9 Focusing on the ...subject...10 Optimizing focus...10 Using Focus Lock...11 Optimizing exposure...11 Using zoom...11 Optical zoom...12 Digital zoom...12 3 Setting options for taking pictures and recording video clips Setting the flash...13 Flash Setting-Red-Eye...13 Using the...
User Guide
Page 4
... images directly to a printer 27 7 Using HP Photosmart Express Using the Photosmart Express Menu 29 Marking images for printing...29 Buying prints online...30 Sharing images...31 Setting up online destinations in the camera 31 Sending images to online destinations 31 8 Using the Camera Setup Menu 33 9 Troubleshooting Resetting the camera...34 Problems and solutions...34...
... images directly to a printer 27 7 Using HP Photosmart Express Using the Photosmart Express Menu 29 Marking images for printing...29 Buying prints online...30 Sharing images...31 Setting up online destinations in the camera 31 Sending images to online destinations 31 8 Using the Camera Setup Menu 33 9 Troubleshooting Resetting the camera...34 Problems and solutions...34...
User Guide
Page 5
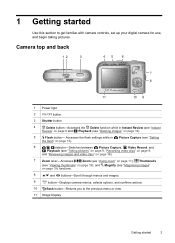
...the flash settings while in Instant Review (see "Instant Review" on page 9 and Playback (see "Magnifying images" on page 19). 5 Flash button- Camera top and back 12 3 45 6 7 8 11 10 9 1 Power light. 2 button. 3 Shutter button. 4 Delete button-Accesses the Delete ...19) functions. 8 and buttons-Scroll through menus and images. 9 button-Displays camera menus, selects options, and confirms actions. 10 Back button-Returns you to get familiar with camera controls, set up your digital camera for use, and begin taking pictures. 1 Getting started 3 Getting started Use ...
...the flash settings while in Instant Review (see "Instant Review" on page 9 and Playback (see "Magnifying images" on page 19). 5 Flash button- Camera top and back 12 3 45 6 7 8 11 10 9 1 Power light. 2 button. 3 Shutter button. 4 Delete button-Accesses the Delete ...19) functions. 8 and buttons-Scroll through menus and images. 9 button-Displays camera menus, selects options, and confirms actions. 10 Back button-Returns you to get familiar with camera controls, set up your digital camera for use, and begin taking pictures. 1 Getting started 3 Getting started Use ...
User Guide
Page 6
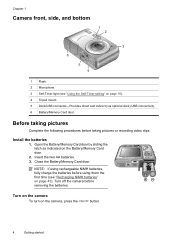
...(via optional dock) USB connectivity. 6 Battery/Memory Card door. Turn off the camera before taking pictures or recording video clips. Chapter 1 Camera front, side, and bottom 1 2 3 6 5 4 1 Flash. 2 Microphone. 3 Self-Timer light (see "Recharging NiMH batteries" on the camera, press the button. 4 Getting started Install the batteries 1. NOTE: If using ...Memory Card door. 2. Insert the two AA batteries. 3. Before taking pictures Complete the following procedures before removing the batteries. Turn on the camera To turn on page 43). Close the Battery/Memory Card door.
...(via optional dock) USB connectivity. 6 Battery/Memory Card door. Turn off the camera before taking pictures or recording video clips. Chapter 1 Camera front, side, and bottom 1 2 3 6 5 4 1 Flash. 2 Microphone. 3 Self-Timer light (see "Recharging NiMH batteries" on the camera, press the button. 4 Getting started Install the batteries 1. NOTE: If using ...Memory Card door. 2. Insert the two AA batteries. 3. Before taking pictures Complete the following procedures before removing the batteries. Turn on the camera To turn on page 43). Close the Battery/Memory Card door.

User Guide
Page 7
... correct, then press again to confirm. To change the language later, use the Camera Setup Menu (see "Using the Camera Setup Menu" on page 33). To change the date and time later, use the Camera Setup Menu (see "Using the Camera Setup Menu" on page 14. 1. Use to choose the region you want , then...
... correct, then press again to confirm. To change the language later, use the Camera Setup Menu (see "Using the Camera Setup Menu" on page 33). To change the date and time later, use the Camera Setup Menu (see "Using the Camera Setup Menu" on page 14. 1. Use to choose the region you want , then...
User Guide
Page 8
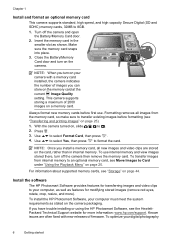
... slot as shown. If you install a memory card, all images from internal memory to your digital photography 6 Getting started This camera supports storing a maximum of 2000 images on the camera. NOTE: Once you have trouble installing or using the HP Photosmart Software, see "Storage" on page 44. Insert the memory card in internal memory. To...
... slot as shown. If you install a memory card, all images from internal memory to your digital photography 6 Getting started This camera supports storing a maximum of 2000 images on the camera. NOTE: Once you have trouble installing or using the HP Photosmart Software, see "Storage" on page 44. Insert the memory card in internal memory. To...
User Guide
Page 9
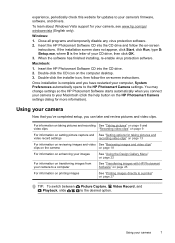
...and follow the on-screen instructions. Once installation is the letter of your computer, System Preferences automatically opens to the HP Photosmart Camera settings. Close all programs and temporarily disable any virus protection software. 2. Double-click the installer icon, then follow ...click OK. 3. Double-click the CD icon on the HP Photosmart Camera settings dialog for more information). Using your camera 7 Using your camera Now that you've completed setup, you connect your camera to your camera, see www.hp.com/go/ windowsvista (English only). Windows: 1. When ...
...and follow the on-screen instructions. Once installation is the letter of your computer, System Preferences automatically opens to the HP Photosmart Camera settings. Close all programs and temporarily disable any virus protection software. 2. Double-click the installer icon, then follow ...click OK. 3. Double-click the CD icon on the HP Photosmart Camera settings dialog for more information). Using your camera 7 Using your camera Now that you've completed setup, you connect your camera to your camera, see www.hp.com/go/ windowsvista (English only). Windows: 1. When ...

User Guide
Page 10
... in Picture Capture and you can take pictures or to to . 2. The focus brackets in the Image Display. 3. Slide to to take a picture when the camera is locked (see "Auto focus and exposure" on page 9). 4.
... in Picture Capture and you can take pictures or to to . 2. The focus brackets in the Image Display. 3. Slide to to take a picture when the camera is locked (see "Auto focus and exposure" on page 9). 4.

User Guide
Page 11
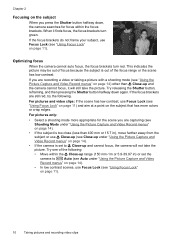
...again. When you follow the suggestions for pictures only). Instant Review After you have taken a picture or recorded a video clip, the camera displays it briefly in the Image Display turn solid green when focus is set to your image does not appear to be in proper focus...in the Image Display. 3. Auto focus and exposure When you want to . 2. Recording video clips 9 Press the Shutter button halfway down , the camera automatically measures and locks the focus (for pictures and video clips) and exposure (for focus and exposure and your computer (see "Transferring and printing images...
...again. When you follow the suggestions for pictures only). Instant Review After you have taken a picture or recorded a video clip, the camera displays it briefly in the Image Display turn solid green when focus is set to your image does not appear to be in proper focus...in the Image Display. 3. Auto focus and exposure When you want to . 2. Recording video clips 9 Press the Shutter button halfway down , the camera automatically measures and locks the focus (for pictures and video clips) and exposure (for focus and exposure and your computer (see "Transferring and printing images...
User Guide
Page 12
... Close-up under "Using the Picture Capture and Video Record menus" on page 14). • If the camera is set the camera to Close-up and cannot focus, the camera will still take the picture. This indicates the picture may be out of focus because the subject is out of... page 11). 10 Taking pictures and recording video clips Try releasing the Shutter button, reframing, and then pressing the Shutter button halfway down , the camera searches for the scene you press the Shutter button halfway down again. For pictures only: • Select a shooting mode more colors or crisp edges...
... Close-up under "Using the Picture Capture and Video Record menus" on page 14). • If the camera is set the camera to Close-up and cannot focus, the camera will still take the picture. This indicates the picture may be out of focus because the subject is out of... page 11). 10 Taking pictures and recording video clips Try releasing the Shutter button, reframing, and then pressing the Shutter button halfway down , the camera searches for the scene you press the Shutter button halfway down again. For pictures only: • Select a shooting mode more colors or crisp edges...
User Guide
Page 13
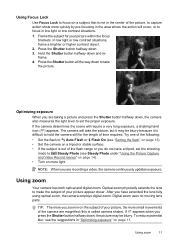
... have a tripod, set the proper exposure. Using zoom 11 Hold the Shutter button halfway down . 3. Digital zoom uses no moving lens parts. After you are recording a video, the camera continuously updates exposure. To reduce potential blur, see Steady Photo under "Using the Picture Capture and Video Record...subject of your picture within the focus brackets. Using zoom Your camera has both optical and digital zoom. TIP: The more you do not have extended the lens fully using optical zoom, the camera employs digital zoom. Press the Shutter button halfway down and re- Press the...
... have a tripod, set the proper exposure. Using zoom 11 Hold the Shutter button halfway down . 3. Digital zoom uses no moving lens parts. After you are recording a video, the camera continuously updates exposure. To reduce potential blur, see Steady Photo under "Using the Picture Capture and Video Record...subject of your picture within the focus brackets. Using zoom Your camera has both optical and digital zoom. TIP: The more you do not have extended the lens fully using optical zoom, the camera employs digital zoom. Press the Shutter button halfway down and re- Press the...

User Guide
Page 14
Press to zoom in , the scene expands to show what the camera will capture, and the MP value decreases to control zoom. When capturing images using digital zoom, make sure that the MP value on page 14. For MP values and their recommended print sizes, see Image Quality under "... print the captured image. Chapter 2 Optical zoom Optical zoom moves the lens between wide angle (1x) and telephoto (3x). If you cannot use digital zoom: 1. However, you zoom in / Panorama mode nor when recording video clips. 12 Taking pictures and recording video clips To use optical zoom ...
Press to zoom in , the scene expands to show what the camera will capture, and the MP value decreases to control zoom. When capturing images using digital zoom, make sure that the MP value on page 14. For MP values and their recommended print sizes, see Image Quality under "... print the captured image. Chapter 2 Optical zoom Optical zoom moves the lens between wide angle (1x) and telephoto (3x). If you cannot use digital zoom: 1. However, you zoom in / Panorama mode nor when recording video clips. 12 Taking pictures and recording video clips To use optical zoom ...
User Guide
Page 15
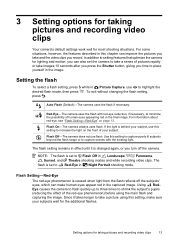
...subject's pupils (reducing the effect of human eyes appearing red in the image. NOTE: The flash is set to setting features that optimize the camera for the additional flashes. Use this chapter can improve the pictures you take and the video clips you record. If the light is changed again... "Flash Setting-Red-Eye" on the front of pictures rapidly or take a picture using the main flash and capturing the image. Flash Off-The camera does not use this setting, make human eyes appear red in this setting to capture poorly lit subjects beyond the flash range or to increase...
...subject's pupils (reducing the effect of human eyes appearing red in the image. NOTE: The flash is set to setting features that optimize the camera for the additional flashes. Use this chapter can improve the pictures you take and the video clips you record. If the light is changed again... "Flash Setting-Red-Eye" on the front of pictures rapidly or take a picture using the main flash and capturing the image. Flash Off-The camera does not use this setting, make human eyes appear red in this setting to capture poorly lit subjects beyond the flash range or to increase...

User Guide
Page 16
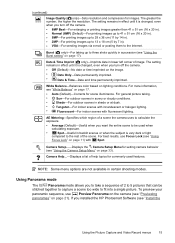
... 1 m (5.9 to 39.97 in) away. • Steady Photo-For minimizing picture blur when the subject is moving or you cannot hold the camera still long enough in moderate to stop the action. • Night Portrait-For capturing images of scenes or shooting situations. • Auto Mode (Default...Menu displays only features available for taking good shots quickly, when you do not have one image cannot capture (see "Using Panorama mode" on -camera information about an option, use menu, then press . Slide to highlight Help... This mode uses the flash and a long exposure. Use to ...
... 1 m (5.9 to 39.97 in) away. • Steady Photo-For minimizing picture blur when the subject is moving or you cannot hold the camera still long enough in moderate to stop the action. • Night Portrait-For capturing images of scenes or shooting situations. • Auto Mode (Default...Menu displays only features available for taking good shots quickly, when you do not have one image cannot capture (see "Using Panorama mode" on -camera information about an option, use menu, then press . Slide to highlight Help... This mode uses the flash and a long exposure. Use to ...
User Guide
Page 17
...is changed , even when you to the Internet. The setting remains in effect until it is changed , even when you installed the HP Photosmart Software (see "Using the Camera Setup Menu" on page 21). For more information, see "Using Focus Lock" on page 17). Using Panorama mode The / Panorama ...mode allows you turn off the camera. • Off (Default)-No date or time imprinted on the image. • Date Only-Date permanently imprinted. • Date & Time-Date and...
...is changed , even when you to the Internet. The setting remains in effect until it is changed , even when you installed the HP Photosmart Software (see "Using the Camera Setup Menu" on page 21). For more information, see "Using Focus Lock" on page 17). Using Panorama mode The / Panorama ...mode allows you turn off the camera. • Off (Default)-No date or time imprinted on the image. • Date Only-Date permanently imprinted. • Date & Time-Date and...
User Guide
Page 18
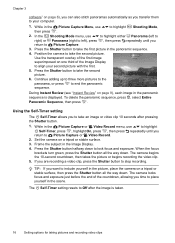
...(see "Instant Review" on a tripod or stable surface, then press the Shutter button all the way down to lock focus and exposure. The camera begins the 10-second countdown, then takes the picture or begins recording the video clip. 5. Chapter 3 software" on page 6), you can also... stitch panoramas automatically as you transfer them to your second picture with the first. 5. While in the panoramic sequence. 4. Position the camera to take the first picture in the Picture Capture Menu, use to highlight Self-Timer, press , highlight On, press , then press repeatedly ...
...(see "Instant Review" on a tripod or stable surface, then press the Shutter button all the way down to lock focus and exposure. The camera begins the 10-second countdown, then takes the picture or begins recording the video clip. 5. Chapter 3 software" on page 6), you can also... stitch panoramas automatically as you transfer them to your second picture with the first. 5. While in the panoramic sequence. 4. Position the camera to take the first picture in the Picture Capture Menu, use to highlight Self-Timer, press , highlight On, press , then press repeatedly ...
User Guide
Page 19
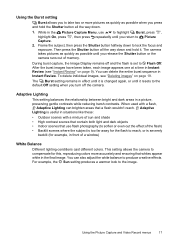
...a mixture of a window) White Balance Different lighting conditions cast different colors. This setting allows the camera to take two or more accurately and ensuring that whites appear white in the final image. Using the... image. To delete individual images, see "Instant Review" on page 19. The camera takes pictures as quickly as possible when you release the Shutter button or the camera runs out of the flash) • Backlit scenes where the subject is too ...preserving gentle contrasts while reducing harsh contrasts. During burst capture, the Image Display remains off the camera.
...a mixture of a window) White Balance Different lighting conditions cast different colors. This setting allows the camera to take two or more accurately and ensuring that whites appear white in the final image. Using the... image. To delete individual images, see "Instant Review" on page 19. The camera takes pictures as quickly as possible when you release the Shutter button or the camera runs out of the flash) • Backlit scenes where the subject is too ...preserving gentle contrasts while reducing harsh contrasts. During burst capture, the Image Display remains off the camera.
User Guide
Page 22
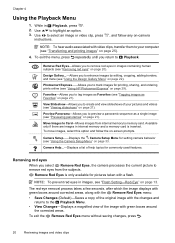
...are images in images, see "Previewing panoramas" on page 21). Camera Setup...-Displays the Camera Setup Menu for commonly used features. Use to enhance images by editing, cropping, adding borders, and more (see "Using HP Photosmart Express" on page 13. Move Images to tag images as Favorites... images" on page 21). Photosmart Express...-Allows you to the Playback Menu. • View Changes-Displays a magnified view of your computer (see "Removing red eyes" on page 21). Preview Panorama-Allows you select Remove Red Eyes, the camera processes the current picture to ...
...are images in images, see "Previewing panoramas" on page 21). Camera Setup...-Displays the Camera Setup Menu for commonly used features. Use to enhance images by editing, cropping, adding borders, and more (see "Using HP Photosmart Express" on page 13. Move Images to tag images as Favorites... images" on page 21). Photosmart Express...-Allows you to the Playback Menu. • View Changes-Displays a magnified view of your computer (see "Removing red eyes" on page 21). Preview Panorama-Allows you select Remove Red Eyes, the camera processes the current picture to ...

User Guide
Page 23
...Interval-Sets the amount of time each additional image you want to tag as a Favorite, press again. 3. NOTE: If you are using the HP Photosmart Software, images in the Favorites menu. Use to highlight Favorites, press , then press again to one of images and/or video clips on page ...repeats: Once (Default), 2x, 3x, Continuous. Previewing panoramas When an image from a panoramic sequence is displayed and you select Preview Panorama, the camera displays a stitched view of the panorama. Use to pan left and right on page 25). Tagging images as Favorites Tagging an image as a ...
...Interval-Sets the amount of time each additional image you want to tag as a Favorite, press again. 3. NOTE: If you are using the HP Photosmart Software, images in the Favorites menu. Use to highlight Favorites, press , then press again to one of images and/or video clips on page ...repeats: Once (Default), 2x, 3x, Continuous. Previewing panoramas When an image from a panoramic sequence is displayed and you select Preview Panorama, the camera displays a stitched view of the panorama. Use to pan left and right on page 25). Tagging images as Favorites Tagging an image as a ...

User Guide
Page 24
... you to add a border to an image (see "Adding borders" on page 23). Crop-Allows you need to the selected orientation (see "Cropping images" on -camera instructions. Applying artistic effects TIP: If you to crop an image to crop an image (see "Cropping images" on page 23). Apply Artistic Effects allows... colors, do so before adding a border. the original image is retained. If you to a apply color effect to an image (see "Applying artistic effects" on -camera instructions to the copy. To apply artistic effects: 1.
... you to add a border to an image (see "Adding borders" on page 23). Crop-Allows you need to the selected orientation (see "Cropping images" on -camera instructions. Applying artistic effects TIP: If you to crop an image to crop an image (see "Cropping images" on page 23). Apply Artistic Effects allows... colors, do so before adding a border. the original image is retained. If you to a apply color effect to an image (see "Applying artistic effects" on -camera instructions to the copy. To apply artistic effects: 1.


