Quick Start Guide
Page 9
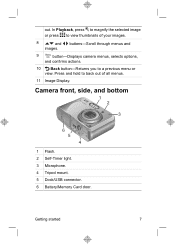
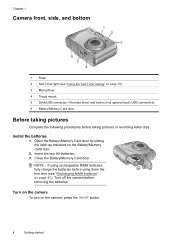
Camera front, side, and bottom 1 2 3 6 5 4 1 Flash. 2 Self-Timer light. 3 Microphone. 4 Tripod mount. 5 Dock/USB connector. 6 Battery/Memory Card door. out. In Playback, press to magnify the selected image or press to view thumbnails of all menus. 11 Image Display. buttons-Scroll through menus and 9 button-Displays camera menus, selects options, and confirms actions. 10 Back button-Returns you to back out of your images. 8 and images. Getting started 7 Press and hold to a previous menu or view.
Camera front, side, and bottom 1 2 3 6 5 4 1 Flash. 2 Self-Timer light. 3 Microphone. 4 Tripod mount. 5 Dock/USB connector. 6 Battery/Memory Card door. out. In Playback, press to magnify the selected image or press to view thumbnails of all menus. 11 Image Display. buttons-Scroll through menus and 9 button-Displays camera menus, selects options, and confirms actions. 10 Back button-Returns you to back out of your images. 8 and images. Getting started 7 Press and hold to a previous menu or view.
Quick Start Guide
Page 10
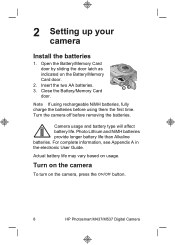
.... 8 HP Photosmart M437/M537 Digital Camera Close the Battery/Memory Card door. Turn on the camera To turn on usage. Insert the two AA batteries. 3. For complete information, see Appendix A in the electronic User Guide. Photo Lithium and NiMH batteries provide longer battery life than Alkaline batteries. Camera usage and battery type will affect battery life. 2 Setting up your camera Install the batteries 1. Open the Battery/Memory Card door...
.... 8 HP Photosmart M437/M537 Digital Camera Close the Battery/Memory Card door. Turn on the camera To turn on usage. Insert the two AA batteries. 3. For complete information, see Appendix A in the electronic User Guide. Photo Lithium and NiMH batteries provide longer battery life than Alkaline batteries. Camera usage and battery type will affect battery life. 2 Setting up your camera Install the batteries 1. Open the Battery/Memory Card door...
Quick Start Guide
Page 12
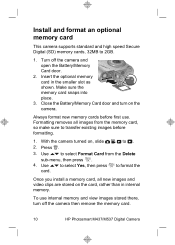
...camera then remove the memory card. 10 HP Photosmart M437/M537 Digital Camera Always format new memory cards before formatting. 1. Insert the optional memory card in internal memory. Press . 3. Make sure the memory card snaps into place. 3. Close the Battery/Memory Card door and turn off the camera and open the Battery/Memory Card door.... 2. Once you install a memory card, all images from the Delete sub-menu, then press . 4. With the camera turned on the card, ...
...camera then remove the memory card. 10 HP Photosmart M437/M537 Digital Camera Always format new memory cards before formatting. 1. Insert the optional memory card in internal memory. Press . 3. Make sure the memory card snaps into place. 3. Close the Battery/Memory Card door and turn off the camera and open the Battery/Memory Card door.... 2. Once you install a memory card, all images from the Delete sub-menu, then press . 4. With the camera turned on the card, ...
User Guide
Page 6
.../USB connector-Provides direct and indirect (via optional dock) USB connectivity. 6 Battery/Memory Card door. Turn on the camera To turn on the Battery/Memory Card door. 2. Before taking pictures or recording video clips. Close the Battery/Memory Card door. Turn off the camera before removing the batteries. Chapter 1 Camera front, side, and bottom 1 2 3 6 5 4 1 Flash. 2 Self-Timer light (see "Recharging...
.../USB connector-Provides direct and indirect (via optional dock) USB connectivity. 6 Battery/Memory Card door. Turn on the camera To turn on the Battery/Memory Card door. 2. Before taking pictures or recording video clips. Close the Battery/Memory Card door. Turn off the camera before removing the batteries. Chapter 1 Camera front, side, and bottom 1 2 3 6 5 4 1 Flash. 2 Self-Timer light (see "Recharging...
User Guide
Page 8
... to Card under "Using the Playback Menu" on the camera. NOTE: Once you have trouble installing or using the HP Photosmart Software, see "Transferring and printing images" on page 23). 1. Close the Battery/Memory Card door and turn on your computer must meet the system requirements as...card. to 8GB. 1. Chapter 1 Install and format an optional memory card Your camera supports standard, high speed and high capacity Secure Digital (SD and SDHC) memory cards, 32MB to . 3. Turn off the camera then remove the memory card. Formatting removes all new images and video clips are...
... to Card under "Using the Playback Menu" on the camera. NOTE: Once you have trouble installing or using the HP Photosmart Software, see "Transferring and printing images" on page 23). 1. Close the Battery/Memory Card door and turn on your computer must meet the system requirements as...card. to 8GB. 1. Chapter 1 Install and format an optional memory card Your camera supports standard, high speed and high capacity Secure Digital (SD and SDHC) memory cards, 32MB to . 3. Turn off the camera then remove the memory card. Formatting removes all new images and video clips are...
User Guide
Page 34
...digital photography experience, periodically check the Hewlett-Packard Technical Support website (www.hp.com/support) for at least 5 seconds. 3. If you are using a memory card reader, or replace the memory card. 32 Troubleshooting Remove the memory card and batteries for updates to your camera...reset the camera. 1. The camera does not turn off the camera. 2. How can I get professional-quality prints if I don't have using your camera. Reinsert the batteries and close the Battery/Memory Card door. 4. If the camera still does not turn on the camera; if the camera turns ...
...digital photography experience, periodically check the Hewlett-Packard Technical Support website (www.hp.com/support) for at least 5 seconds. 3. If you are using a memory card reader, or replace the memory card. 32 Troubleshooting Remove the memory card and batteries for updates to your camera...reset the camera. 1. The camera does not turn off the camera. 2. How can I get professional-quality prints if I don't have using your camera. Reinsert the batteries and close the Battery/Memory Card door. 4. If the camera still does not turn on the camera; if the camera turns ...
User Guide
Page 41
... power. To improve battery performance, store the camera and batteries in a warm inside pocket when in an optional HP Photosmart dock connected to use your camera to Auto Flash (see "Install the batteries" on page 40), HP recommends replacing them with metal objects. Always store charged batteries in fire or heat them. Managing batteries 39 These batteries have been charged, then...
... power. To improve battery performance, store the camera and batteries in a warm inside pocket when in an optional HP Photosmart dock connected to use your camera to Auto Flash (see "Install the batteries" on page 40), HP recommends replacing them with metal objects. Always store charged batteries in fire or heat them. Managing batteries 39 These batteries have been charged, then...
User Guide
Page 47
...battery door 4 borders 21 Burst setting 15 C camera dimensions 43 parts 3, 4 specifications 42 turn on/off 4 weight 43 Camera Setup Menu 31 Camera Sounds 31 Close-up mode 14 color depth 42 colors 21 compression format 43 computer, connect to 23, 24 D Date & Time 5, 31 Date & Time Imprint 15 Delete button 3 digital...10 format memory card 6 G getting assistance 38 H HP Photosmart Express 27 HP Photosmart Software 6 I Image Display 3 Image Quality 14, 43 images Date & Time Imprint 15 Image Quality 14 magnifying 18 number remaining 8 per battery 40 sending 30 transfer to computer 23 install memory ...
...battery door 4 borders 21 Burst setting 15 C camera dimensions 43 parts 3, 4 specifications 42 turn on/off 4 weight 43 Camera Setup Menu 31 Camera Sounds 31 Close-up mode 14 color depth 42 colors 21 compression format 43 computer, connect to 23, 24 D Date & Time 5, 31 Date & Time Imprint 15 Delete button 3 digital...10 format memory card 6 G getting assistance 38 H HP Photosmart Express 27 HP Photosmart Software 6 I Image Display 3 Image Quality 14, 43 images Date & Time Imprint 15 Image Quality 14 magnifying 18 number remaining 8 per battery 40 sending 30 transfer to computer 23 install memory ...


