
Warranty and Regulatory Guide
Page 4
...CONTRACT, TORT, OR ANY OTHER LEGAL THEORY AND WHETHER ADVISED OF THE POSSIBILITY OF SUCH DAMAGES. 2 HP Photosmart M527 warranty Camera hardware One year. or, c. HP shall have no obligation to replace, repair, or refund until Customer returns the defective Product to execute programming... other conditions outside a Product's specifications. 4. L2412-90109_Warranty.fm Page 2 Tuesday, November 22, 2005 11:34 AM HP limited warranty statement - Camera accessories include products and devices that is valid in this Limited Warranty Statement (LWS) are Customer's sole and exclusive remedies...
...CONTRACT, TORT, OR ANY OTHER LEGAL THEORY AND WHETHER ADVISED OF THE POSSIBILITY OF SUCH DAMAGES. 2 HP Photosmart M527 warranty Camera hardware One year. or, c. HP shall have no obligation to replace, repair, or refund until Customer returns the defective Product to execute programming... other conditions outside a Product's specifications. 4. L2412-90109_Warranty.fm Page 2 Tuesday, November 22, 2005 11:34 AM HP limited warranty statement - Camera accessories include products and devices that is valid in this Limited Warranty Statement (LWS) are Customer's sole and exclusive remedies...
Warranty and Regulatory Guide
Page 5
... limiting the statutory rights of a manufacturer to HP Customer Care. HP Photosmart M527 warranty 3 d. b. For more information, see: www.hp.com/home/ownerservices or call 1-866-234-1377 (United States) www.hp.ca/home/ownerservices or call 1-877-231-4351 (Canada) www.hp.com/uk/warranty-extension (United Kingdom) www.hp.com/ie/warranty-extension (Ireland) After...
... limiting the statutory rights of a manufacturer to HP Customer Care. HP Photosmart M527 warranty 3 d. b. For more information, see: www.hp.com/home/ownerservices or call 1-866-234-1377 (United States) www.hp.ca/home/ownerservices or call 1-877-231-4351 (Canada) www.hp.com/uk/warranty-extension (United Kingdom) www.hp.com/ie/warranty-extension (Ireland) After...
Warranty and Regulatory Guide
Page 44
...61000-4-3 EN/IEC 61000-4-4 EN/IEC 61000-4-5 EN/IEC 61000-4-6 EN/IEC 61000-4-8 EN/IEC 61000-4-11 42 HP Photosmart M527 warranty Operation is subject to provide reasonable protection against harmful interference in a residential installation. Class B limits ...declares that the product: Product number(s): Regulatory model: Product options: Power adapters: HP Photosmart M527 series digital camera SNPRB-0502 HP Photosmart 6220 Digital Camera Dock (product number Q6220A) HP Photosmart 6221 Premium Camera Dock (product number Q6221A, Regulatory Model FCLSD-0602)) L2056-60001 (World Wide Power...
...61000-4-3 EN/IEC 61000-4-4 EN/IEC 61000-4-5 EN/IEC 61000-4-6 EN/IEC 61000-4-8 EN/IEC 61000-4-11 42 HP Photosmart M527 warranty Operation is subject to provide reasonable protection against harmful interference in a residential installation. Class B limits ...declares that the product: Product number(s): Regulatory model: Product options: Power adapters: HP Photosmart M527 series digital camera SNPRB-0502 HP Photosmart 6220 Digital Camera Dock (product number Q6220A) HP Photosmart 6221 Premium Camera Dock (product number Q6221A, Regulatory Model FCLSD-0602)) L2056-60001 (World Wide Power...
Warranty and Regulatory Guide
Page 45
L2412-90109_Warranty.fm Page 43 Tuesday, November 22, 2005 11:34 AM Supplementary information: The product herewith complies with Canadian ICES-003 Cet appareil numérique de la classe B est conforme à la norme NMB-003 du Canada HP Photosmart M527 warranty 43 Canada This Class B digital apparatus complies with the requirements of the Low Voltage Directive 73/23/EEC and the EMC Directive 89/336/EEC and carries the CE marking accordingly.
L2412-90109_Warranty.fm Page 43 Tuesday, November 22, 2005 11:34 AM Supplementary information: The product herewith complies with Canadian ICES-003 Cet appareil numérique de la classe B est conforme à la norme NMB-003 du Canada HP Photosmart M527 warranty 43 Canada This Class B digital apparatus complies with the requirements of the Low Voltage Directive 73/23/EEC and the EMC Directive 89/336/EEC and carries the CE marking accordingly.
User Guide
Page 3
... images for printing 29 Buying prints online 30 7 Using the Setup Menu 31 8 Troubleshooting 32 Resetting the camera 32 Problems and solutions 32 9 Product support 36 Helpful websites...36 Getting assistance 36 A Managing batteries 38 Top points about batteries 38 Extending battery life 38 Safety precautions for using batteries 38 HP Photosmart M425/M525 Digital Camera 3
... images for printing 29 Buying prints online 30 7 Using the Setup Menu 31 8 Troubleshooting 32 Resetting the camera 32 Problems and solutions 32 9 Product support 36 Helpful websites...36 Getting assistance 36 A Managing batteries 38 Top points about batteries 38 Extending battery life 38 Safety precautions for using batteries 38 HP Photosmart M425/M525 Digital Camera 3
User Guide
Page 5
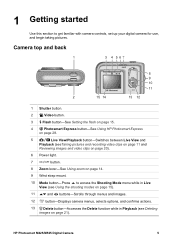
...11 and Reviewing images and video clips on page 20). 6 Power light. 7 button. 8 Zoom lever-See Using zoom on page 21). HP Photosmart M425/M525 Digital Camera 5 1 Getting started Use this section to access the Shooting Mode menu while in Live View (see Using the shooting modes on page 15...). 11 and buttons-Scrolls through menus and images. 12 button-Displays camera menus, selects options, and confirms actions. 13 Delete button-...
...11 and Reviewing images and video clips on page 20). 6 Power light. 7 button. 8 Zoom lever-See Using zoom on page 21). HP Photosmart M425/M525 Digital Camera 5 1 Getting started Use this section to access the Shooting Mode menu while in Live View (see Using the shooting modes on page 15...). 11 and buttons-Scrolls through menus and images. 12 button-Displays camera menus, selects options, and confirms actions. 13 Delete button-...
User Guide
Page 7
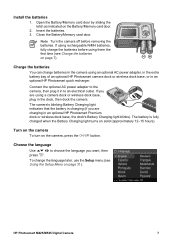
Close the Battery/Memory card door. If using rechargeable NiMH batteries, fully charge the batteries before removing the batteries. HP Photosmart M425/M525 Digital Camera 7 Note Turn the camera off before using them the first time (see Using the Setup Menu on page 31). The battery is charging (if... you are using an optional AC power adapter, in the extra battery bay of an optional HP Photosmart camera dock or wireless dock base, ...
Close the Battery/Memory card door. If using rechargeable NiMH batteries, fully charge the batteries before removing the batteries. HP Photosmart M425/M525 Digital Camera 7 Note Turn the camera off before using them the first time (see Using the Setup Menu on page 31). The battery is charging (if... you are using an optional AC power adapter, in the extra battery bay of an optional HP Photosmart camera dock or wireless dock base, ...

User Guide
Page 8
...to choose the region you are stored on the card, rather than in the smaller slot as features for displaying camera images on a television when connected through an optional HP Photosmart Premium dock or wireless dock base (see Using the Setup Menu on page 43. Use to move to confirm...you want, then press . To change the date and time later, use the Setup Menu (see Using the Setup Menu on the camera. Install the software The HP Photosmart Software provides features for transferring images and video clips to select Format Card, then press . 4. Set the date and time 1. ...
...to choose the region you are stored on the card, rather than in the smaller slot as features for displaying camera images on a television when connected through an optional HP Photosmart Premium dock or wireless dock base (see Using the Setup Menu on page 43. Use to move to confirm...you want, then press . To change the date and time later, use the Setup Menu (see Using the Setup Menu on the camera. Install the software The HP Photosmart Software provides features for transferring images and video clips to select Format Card, then press . 4. Set the date and time 1. ...
User Guide
Page 9
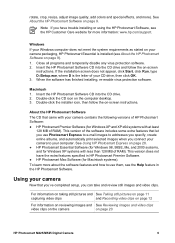
...at least 128 MB of RAM). To learn more about the software features and how to your camera contains the following versions of HP Photosmart Software: ● HP Photosmart Premier Software (for more ). Close all programs and temporarily disable any virus protection software. 2. For...). When the software has finished installing, re-enable virus protection software. See Using HP Photosmart Express on page 20 HP Photosmart M425/M525 Digital Camera 9 Note If you connect your camera to use them, see the HP Customer Care website for Windows XP and XP x64 systems with your computer.
...at least 128 MB of RAM). To learn more about the software features and how to your camera contains the following versions of HP Photosmart Software: ● HP Photosmart Premier Software (for more ). Close all programs and temporarily disable any virus protection software. 2. For...). When the software has finished installing, re-enable virus protection software. See Using HP Photosmart Express on page 20 HP Photosmart M425/M525 Digital Camera 9 Note If you connect your camera to use them, see the HP Customer Care website for Windows XP and XP x64 systems with your computer.

User Guide
Page 10
Chapter 1 (continued) For information on enhancing your images See Using the Design Gallery Menu on page 22 For information on transferring images from your camera to a computer See Transferring images with HP Photosmart Software on page 25 For information on printing images See Printing images from the camera on page 26 Tip To switch between Live View and Playback, press . 10
Chapter 1 (continued) For information on enhancing your images See Using the Design Gallery Menu on page 22 For information on transferring images from your camera to a computer See Transferring images with HP Photosmart Software on page 25 For information on printing images See Printing images from the camera on page 26 Tip To switch between Live View and Playback, press . 10
User Guide
Page 11
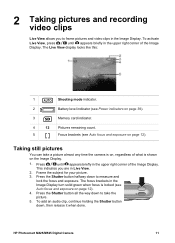
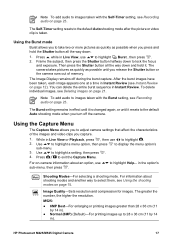
This indicates you to take a picture almost any time the camera is on, regardless of what is locked (see Auto focus and exposure on page 12). Press the Shutter button all the way down to frame ... pictures and recording video clips Live View allows you are in Live View. 2. Press the Shutter button halfway down , then release it when done. HP Photosmart M425/M525 Digital Camera 11 To activate Live View, press until appears briefly in the upper right corner of the Image Display. The Live View display looks like this...
This indicates you to take a picture almost any time the camera is on, regardless of what is locked (see Auto focus and exposure on page 12). Press the Shutter button all the way down to frame ... pictures and recording video clips Live View allows you are in Live View. 2. Press the Shutter button halfway down , then release it when done. HP Photosmart M425/M525 Digital Camera 11 To activate Live View, press until appears briefly in the upper right corner of the Image Display. The Live View display looks like this...
User Guide
Page 12
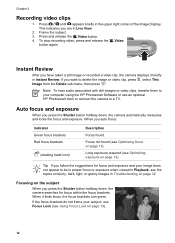
...Frame the subject. 3. If you press the Shutter button halfway down , the camera searches for focus and exposure and your image does not appear to your subject, use an optional HP Photosmart dock to connect the camera to delete the image or video clip, press , select This Image from the...want to a TV. This indicates you press the Shutter button halfway down , the camera automatically measures and locks the focus and exposure. If the focus brackets do not frame your computer using the HP Photosmart Software or use Focus Lock (see Optimizing focus on page 13). To stop recording...
...Frame the subject. 3. If you press the Shutter button halfway down , the camera searches for focus and exposure and your image does not appear to your subject, use an optional HP Photosmart dock to connect the camera to delete the image or video clip, press , select This Image from the...want to a TV. This indicates you press the Shutter button halfway down , the camera automatically measures and locks the focus and exposure. If the focus brackets do not frame your computer using the HP Photosmart Software or use Focus Lock (see Optimizing focus on page 13). To stop recording...
User Guide
Page 13
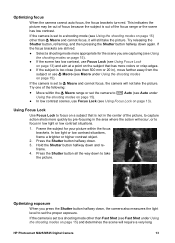
... the Macro range or set to Auto (see Macro under Using the shooting modes on page 15) and determines the scene will require a very long HP Photosmart M425/M525 Digital Camera 13 Optimizing exposure When you are still red: ● Select a shooting mode more colors or crisp edges. ● If the subject is not in...
... the Macro range or set to Auto (see Macro under Using the shooting modes on page 15) and determines the scene will require a very long HP Photosmart M425/M525 Digital Camera 13 Optimizing exposure When you are still red: ● Select a shooting mode more colors or crisp edges. ● If the subject is not in...
User Guide
Page 15
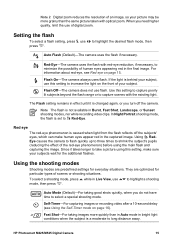
... taking images more grainy than in Auto mode in Burst, Fast Shot, Landscape, or Sunset shooting modes, nor while recording video clips. HP Photosmart M425/M525 Digital Camera 15 Flash On-The camera always uses flash. Note The flash is not available in bright light conditions when the subject is changed again, or you turn off...
... taking images more grainy than in Auto mode in Burst, Fast Shot, Landscape, or Sunset shooting modes, nor while recording video clips. HP Photosmart M425/M525 Digital Camera 15 Flash On-The camera always uses flash. Note The flash is not available in bright light conditions when the subject is changed again, or you turn off...
User Guide
Page 17
... about shooting modes and another way to select them, see Using the shooting modes on page 15. in Instant Review. HP Photosmart M425/M525 Digital Camera 17 Then press the Shutter button all the way down and hold the Shutter button all the way down to the default Auto shooting mode ...after the picture or video clip is changed again, or until you release the Shutter button or the camera runs out of the images and video...
... about shooting modes and another way to select them, see Using the shooting modes on page 15. in Instant Review. HP Photosmart M425/M525 Digital Camera 17 Then press the Shutter button all the way down and hold the Shutter button all the way down to the default Auto shooting mode ...after the picture or video clip is changed again, or until you release the Shutter button or the camera runs out of the images and video...
User Guide
Page 19
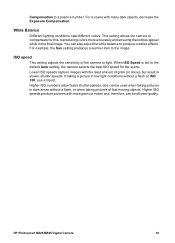
...lower quality. White Balance Different lighting conditions cast different colors. For example, the Sun setting produces a warmer look to the default Auto setting, the camera selects the best ISO speed for this, reproducing colors more grain (or noise) and, therefore, can be used when taking pictures in dark areas ... image. Lower ISO speeds capture images with many dark objects, decrease the Exposure Compensation. Compensation to produce creative effects. This setting allows the camera to light. HP Photosmart M425/M525 Digital Camera 19 For a scene with the least amount of the...
...lower quality. White Balance Different lighting conditions cast different colors. For example, the Sun setting produces a warmer look to the default Auto setting, the camera selects the best ISO speed for this, reproducing colors more grain (or noise) and, therefore, can be used when taking pictures in dark areas ... image. Lower ISO speeds capture images with many dark objects, decrease the Exposure Compensation. Compensation to produce creative effects. This setting allows the camera to light. HP Photosmart M425/M525 Digital Camera 19 For a scene with the least amount of the...
User Guide
Page 20
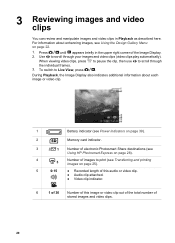
... 22. 1. For information about each image or video clip. 1 Battery indicator (see Power indicators on page 39). 2 Memory card indicator. 3 1 Number of electronic Photosmart Share destinations (see Using HP Photosmart Express on page 28). 4 Number of images to print (see Using the Design Gallery Menu on page 25). 5 0:15 ● Recorded length of...
... 22. 1. For information about each image or video clip. 1 Battery indicator (see Power indicators on page 39). 2 Memory card indicator. 3 1 Number of electronic Photosmart Share destinations (see Using HP Photosmart Express on page 28). 4 Number of images to print (see Using the Design Gallery Menu on page 25). 5 0:15 ● Recorded length of...

User Guide
Page 21
... clip. - Format (Memory/Card)-Deletes all stored images and video clips. - Press to scroll through the thumbnails. 3. Deleting images To delete a displayed image during Playback: 1. HP Photosmart M425/M525 Digital Camera 21 Viewing thumbnails 1. Use and to exit Thumbnails. it does not permanently alter the image. 1. Press to return to view thumbnails. 2.
... clip. - Format (Memory/Card)-Deletes all stored images and video clips. - Press to scroll through the thumbnails. 3. Deleting images To delete a displayed image during Playback: 1. HP Photosmart M425/M525 Digital Camera 21 Viewing thumbnails 1. Use and to exit Thumbnails. it does not permanently alter the image. 1. Press to return to view thumbnails. 2.

User Guide
Page 23
... clips, transfer them to your computer using the HP Photosmart Software or use an optional HP Photosmart dock to connect the camera to the Add Borders sub-menu. Press to adjust the color. 4. Press to immediately start recording. 2. Select Record Audio to exit without saving changes. - To hear audio associated with sharp corners. - HP Photosmart M425/M525 Digital Camera 23
... clips, transfer them to your computer using the HP Photosmart Software or use an optional HP Photosmart dock to connect the camera to the Add Borders sub-menu. Press to adjust the color. 4. Press to immediately start recording. 2. Select Record Audio to exit without saving changes. - To hear audio associated with sharp corners. - HP Photosmart M425/M525 Digital Camera 23

User Guide
Page 25
... the Share features or Buy Prints Online on page 26) HP Photosmart M425/M525 Digital Camera 25 Connect the camera and computer using an optional HP Photosmart dock (see Using a memory card reader on the camera's Photosmart Express Menu (see the Help feature in the HP Photosmart Software. Turn on the camera and follow the instructions on page 28), verify that the computer...
... the Share features or Buy Prints Online on page 26) HP Photosmart M425/M525 Digital Camera 25 Connect the camera and computer using an optional HP Photosmart dock (see Using a memory card reader on the camera's Photosmart Express Menu (see the Help feature in the HP Photosmart Software. Turn on the camera and follow the instructions on page 28), verify that the computer...


