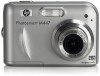
User Guide
Page 3
...language...5 Set the region...5 Set the date and time...5 Install and format an optional memory card 6 Install the software...6 Using your camera...7 2 Taking pictures and recording video clips Taking pictures...8 Recording video clips...9 Instant Review...9 Auto focus and exposure...9 Focusing on the ...subject...10 Optimizing focus...10 Using Focus Lock...11 Optimizing exposure...11 Using zoom...11 Optical zoom...12 Digital zoom...12 3 Setting options for taking pictures and recording video clips Setting the flash...13 Flash Setting-Red-Eye...13 Using the...
...language...5 Set the region...5 Set the date and time...5 Install and format an optional memory card 6 Install the software...6 Using your camera...7 2 Taking pictures and recording video clips Taking pictures...8 Recording video clips...9 Instant Review...9 Auto focus and exposure...9 Focusing on the ...subject...10 Optimizing focus...10 Using Focus Lock...11 Optimizing exposure...11 Using zoom...11 Optical zoom...12 Digital zoom...12 3 Setting options for taking pictures and recording video clips Setting the flash...13 Flash Setting-Red-Eye...13 Using the...
User Guide
Page 4
... with HP Photosmart Software 23 Transferring images without HP Photosmart Software 24 Connecting to the computer 24 Using a memory card reader 25 Printing images directly to a printer 25 7 Using HP Photosmart Express Using the Photosmart Express Menu 27 Marking images for printing...27 Buying prints online...29 Sharing images...29 Setting up online destinations in the camera 29...
... with HP Photosmart Software 23 Transferring images without HP Photosmart Software 24 Connecting to the computer 24 Using a memory card reader 25 Printing images directly to a printer 25 7 Using HP Photosmart Express Using the Photosmart Express Menu 27 Marking images for printing...27 Buying prints online...29 Sharing images...29 Setting up online destinations in the camera 29...

User Guide
Page 5
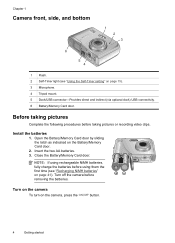
Press and hold to get familiar with camera controls, set up your digital camera for use, and begin taking pictures. Camera top and back 12 3 45 6 7 8 11 10 9 1 Power light. 2 button. 3 Shutter button. 4 Delete button-Accesses the Delete function while in Picture ...thumbnails" on page 18), and Magnify (see "Deleting images" on page 18) functions. 8 and buttons-Scroll through menus and images. 9 button-Displays camera menus, selects options, and confirms actions. 10 Back button-Returns you to the previous menu or view. Getting started Use this section to back out...
Press and hold to get familiar with camera controls, set up your digital camera for use, and begin taking pictures. Camera top and back 12 3 45 6 7 8 11 10 9 1 Power light. 2 button. 3 Shutter button. 4 Delete button-Accesses the Delete function while in Picture ...thumbnails" on page 18), and Magnify (see "Deleting images" on page 18) functions. 8 and buttons-Scroll through menus and images. 9 button-Displays camera menus, selects options, and confirms actions. 10 Back button-Returns you to the previous menu or view. Getting started Use this section to back out...
User Guide
Page 6
...two AA batteries. 3. NOTE: If using them the first time (see "Using the Self-Timer setting" on the camera, press the button. 4 Getting started Turn on the camera To turn on page 15). 3 Microphone. 4 Tripod mount. 5 Dock/USB connector-Provides direct and indirect (via optional... dock) USB connectivity. 6 Battery/Memory Card door. Chapter 1 Camera front, side, and bottom 1 2 3 6 5 4 1 Flash. 2 Self-Timer light (see "Recharging NiMH batteries" on the Battery/Memory Card door. ...
...two AA batteries. 3. NOTE: If using them the first time (see "Using the Self-Timer setting" on the camera, press the button. 4 Getting started Turn on the camera To turn on page 15). 3 Microphone. 4 Tripod mount. 5 Dock/USB connector-Provides direct and indirect (via optional... dock) USB connectivity. 6 Battery/Memory Card door. Chapter 1 Camera front, side, and bottom 1 2 3 6 5 4 1 Flash. 2 Self-Timer light (see "Recharging NiMH batteries" on the Battery/Memory Card door. ...
User Guide
Page 7
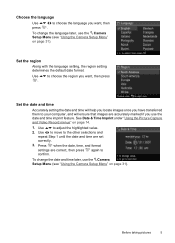
... Along with the language setting, the region setting determines the default date format. To change the language later, use the Camera Setup Menu (see "Using the Camera Setup Menu" on page 31). Set the date and time Accurately setting the date and time will ensure that images are...press again to adjust the highlighted value. 2. Press when the date, time, and format settings are accurately marked if you use the Camera Setup Menu (see "Using the Camera Setup Menu" on page 14. 1. Before taking pictures 5 Use to choose the language you want , then press . To change the...
... Along with the language setting, the region setting determines the default date format. To change the language later, use the Camera Setup Menu (see "Using the Camera Setup Menu" on page 31). Set the date and time Accurately setting the date and time will ensure that images are...press again to adjust the highlighted value. 2. Press when the date, time, and format settings are accurately marked if you use the Camera Setup Menu (see "Using the Camera Setup Menu" on page 14. 1. Before taking pictures 5 Use to choose the language you want , then press . To change the...
User Guide
Page 8
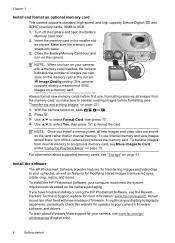
...fixed with a memory card installed, the camera indicates the number of images you have trouble installing or using the HP Photosmart Software, see www.hp.com/go/ windowsvista (English only). 6 Getting started To install the HP Photosmart Software, your computer, as well as... memory card, see "Transferring and printing images" on the camera. Install the software The HP Photosmart Software provides features for your digital photography experience, periodically check this website for more ). To optimize your camera, see the HewlettPackard Technical Support website for updates to 8GB....
...fixed with a memory card installed, the camera indicates the number of images you have trouble installing or using the HP Photosmart Software, see www.hp.com/go/ windowsvista (English only). 6 Getting started To install the HP Photosmart Software, your computer, as well as... memory card, see "Transferring and printing images" on the camera. Install the software The HP Photosmart Software provides features for your digital photography experience, periodically check this website for more ). To optimize your camera, see the HewlettPackard Technical Support website for updates to 8GB....

User Guide
Page 9
... for more information). Windows: 1. Close all programs and temporarily disable any virus protection software. 2. Macintosh: 1. Double-click the installer icon, then follow the on the HP Photosmart Camera settings dialog for taking pictures and video record settings recording video clips" on page 13 For information on reviewing images and video See "Reviewing images...
... for more information). Windows: 1. Close all programs and temporarily disable any virus protection software. 2. Macintosh: 1. Double-click the installer icon, then follow the on the HP Photosmart Camera settings dialog for taking pictures and video record settings recording video clips" on page 13 For information on reviewing images and video See "Reviewing images...
User Guide
Page 10
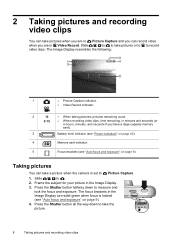
..., time remaining, in minutes and seconds (or in hours, minutes, and seconds if you are in Picture Capture and you can take a picture when the camera is locked (see "Auto focus and exposure" on page 9). 4. Press the Shutter button all the way down to Picture Capture. 1. The focus brackets in the...
..., time remaining, in minutes and seconds (or in hours, minutes, and seconds if you are in Picture Capture and you can take a picture when the camera is locked (see "Auto focus and exposure" on page 9). 4. Press the Shutter button all the way down to Picture Capture. 1. The focus brackets in the...
User Guide
Page 11
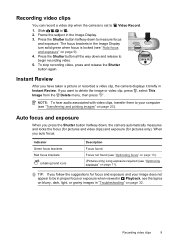
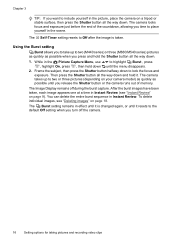
... again. Press the Shutter button all the way down to . 2. Instant Review After you press the Shutter button halfway down, the camera automatically measures and locks the focus (for pictures and video clips) and exposure (for focus and exposure and your computer (see "Transferring... and printing images" on page 9). 4. Recording video clips You can record a video clip when the camera is locked (see "Auto focus and exposure" on page 23). Slide to measure focus and exposure. Focus not found . Auto focus and ...
... again. Press the Shutter button all the way down to . 2. Instant Review After you press the Shutter button halfway down, the camera automatically measures and locks the focus (for pictures and video clips) and exposure (for focus and exposure and your computer (see "Transferring... and printing images" on page 9). 4. Recording video clips You can record a video clip when the camera is locked (see "Auto focus and exposure" on page 23). Slide to measure focus and exposure. Focus not found . Auto focus and ...
User Guide
Page 12
...down again. This indicates the picture may be out of focus because the subject is too close (less than Close-up and cannot focus, the camera will still take the picture. If you are capturing (see Shooting Mode under "Using the Picture Capture and Video Record menus" on page 11... 11) and aim at a point on page 11). Try releasing the Shutter button, reframing, and then pressing the Shutter button halfway down , the camera searches for the scene you are still red, try the following : • Move within the focus brackets. If the focus brackets do not frame your...
...down again. This indicates the picture may be out of focus because the subject is too close (less than Close-up and cannot focus, the camera will still take the picture. If you are capturing (see Shooting Mode under "Using the Picture Capture and Video Record menus" on page 11... 11) and aim at a point on page 11). Try releasing the Shutter button, reframing, and then pressing the Shutter button halfway down , the camera searches for the scene you are still red, try the following : • Move within the focus brackets. If the focus brackets do not frame your...
User Guide
Page 13
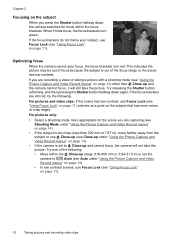
... for your picture appear closer. Optimizing exposure When you do not have extended the lens fully using optical zoom, the camera employs digital zoom. Using zoom Your camera has both optical and digital zoom. Digital zoom uses no moving lens parts. frame. 4. Press the Shutter button all the way down , the picture may be blurry...
... for your picture appear closer. Optimizing exposure When you do not have extended the lens fully using optical zoom, the camera employs digital zoom. Using zoom Your camera has both optical and digital zoom. Digital zoom uses no moving lens parts. frame. 4. Press the Shutter button all the way down , the picture may be blurry...
User Guide
Page 14
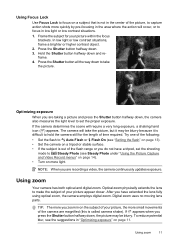
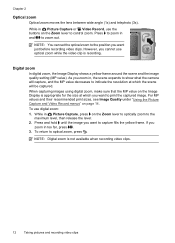
...(1x) and telephoto (3x). Press to zoom in , the scene expands to show what the camera will be captured. Press and hold until the image you zoom in and to capture fills the yellow frame. NOTE: Digital zoom is recording. As you want to zoom out. To use optical zoom while the..., and the MP value decreases to the maximum level, then release the lever. 2. NOTE: You can set the optical zoom to control zoom. Digital zoom In digital zoom, the Image Display shows a yellow frame around the scene and the image quality setting (MP value). To return to print the captured image...
...(1x) and telephoto (3x). Press to zoom in , the scene expands to show what the camera will be captured. Press and hold until the image you zoom in and to capture fills the yellow frame. NOTE: Digital zoom is recording. As you want to zoom out. To use optical zoom while the..., and the MP value decreases to the maximum level, then release the lever. 2. NOTE: You can set the optical zoom to control zoom. Digital zoom In digital zoom, the Image Display shows a yellow frame around the scene and the image quality setting (MP value). To return to print the captured image...
User Guide
Page 15
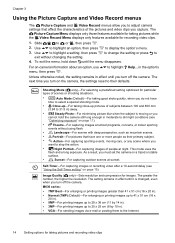
... behind your subject, use this setting, make human eyes appear red in Picture Capture, use flash. In addition to setting features that optimize the camera for the additional flashes. If the light is changed again, or you turn off the subjects' eyes, which can improve the pictures you take ... shooting modes, and while recording video clips or using this setting to highlight the desired flash mode, then press . Using RedEye causes the camera to flash quickly up to three times to take and the video clips you time to minimize the possibility of your subjects wait for lighting...
... behind your subject, use this setting, make human eyes appear red in Picture Capture, use flash. In addition to setting features that optimize the camera for the additional flashes. If the light is changed again, or you turn off the subjects' eyes, which can improve the pictures you take ... shooting modes, and while recording video clips or using this setting to highlight the desired flash mode, then press . Using RedEye causes the camera to flash quickly up to three times to take and the video clips you time to minimize the possibility of your subjects wait for lighting...
User Guide
Page 16
... x 51 cm (16 x 20 in). • Normal (7MP) (Default)-For enlarging or printing images up to 41 x 51 cm (16 x 20 in). • 5MP-For printing images up to 28 x 36 cm (11 by 10 in ). • 3MP-For printing images up pictures of the pictures and video clips... , then press . 2. For on a tripod or stable surface. • Sunset-For capturing outdoor scenes at night. As a result, you must set the camera on -camera information about an option, use menu, then press . Image Quality ( only)-Sets resolution and compression for taking pictures and recording video clips The Picture Capture...
... x 51 cm (16 x 20 in). • Normal (7MP) (Default)-For enlarging or printing images up to 41 x 51 cm (16 x 20 in). • 5MP-For printing images up to 28 x 36 cm (11 by 10 in ). • 3MP-For printing images up pictures of the pictures and video clips... , then press . 2. For on a tripod or stable surface. • Sunset-For capturing outdoor scenes at night. As a result, you must set the camera on -camera information about an option, use menu, then press . Image Quality ( only)-Sets resolution and compression for taking pictures and recording video clips The Picture Capture...
User Guide
Page 17
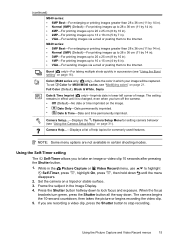
...16). Set the camera on the image. • Date Only-Date permanently imprinted. • Date & Time-Date and time permanently imprinted. Frame the subject in succession (see "Using the Burst setting" on page 31). If you to lock focus and exposure. M440 series: • 5MP Best-For enlarging ... 15 cm (4 by 7 in). • VGA-For sending images via e-mail or posting them to the Internet. When the focus brackets turn off the camera. • Off (Default)-No date or time imprinted on a tripod or stable surface. 3. (continued) M540 series: • 6MP Best-For enlarging or ...
...16). Set the camera on the image. • Date Only-Date permanently imprinted. • Date & Time-Date and time permanently imprinted. Frame the subject in succession (see "Using the Burst setting" on page 31). If you to lock focus and exposure. M440 series: • 5MP Best-For enlarging ... 15 cm (4 by 7 in). • VGA-For sending images via e-mail or posting them to the Internet. When the focus brackets turn off the camera. • Off (Default)-No date or time imprinted on a tripod or stable surface. 3. (continued) M540 series: • 6MP Best-For enlarging or ...
User Guide
Page 18
... been taken, each image appears one at a time in Instant Review (see "Deleting images" on page 18. The Image Display remains off the camera. 16 Setting options for taking pictures and recording video clips Then press the Shutter button all the way down to two or three pictures (depending... on page 9). To delete individual images, see "Instant Review" on your camera model) as quickly as possible when you press and hold it resets to the default Off setting when you turn off during the burst capture...
... been taken, each image appears one at a time in Instant Review (see "Deleting images" on page 18. The Image Display remains off the camera. 16 Setting options for taking pictures and recording video clips Then press the Shutter button all the way down to two or three pictures (depending... on page 9). To delete individual images, see "Instant Review" on your camera model) as quickly as possible when you press and hold it resets to the default Off setting when you turn off during the burst capture...
User Guide
Page 21
..., press , and follow the on page 27). View Slideshow-Allows you to save the image in images containing human subjects (see "Using HP Photosmart Express" on -screen prompts. Camera Setup...-Displays the Camera Setup Menu for printing, sharing, and ordering prints online (see "Removing red eyes" on page 21). On M630/M540 series, access...
..., press , and follow the on page 27). View Slideshow-Allows you to save the image in images containing human subjects (see "Using HP Photosmart Express" on -screen prompts. Camera Setup...-Displays the Camera Setup Menu for printing, sharing, and ordering prints online (see "Removing red eyes" on page 21). On M630/M540 series, access...
User Guide
Page 22
... images tagged as Favorites for printing or viewing as a Favorite allows you have the HP Photosmart Software installed on your computer, tagged images retain the tag when transferred to your computer (see "Transferring and printing images" on the camera Image Display. Tagging images as Favorites Tagging an image as a group. If you to...
... images tagged as Favorites for printing or viewing as a Favorite allows you have the HP Photosmart Software installed on your computer, tagged images retain the tag when transferred to your computer (see "Transferring and printing images" on the camera Image Display. Tagging images as Favorites Tagging an image as a group. If you to...
User Guide
Page 23
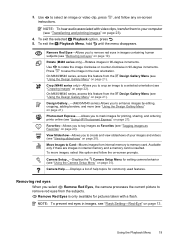
...color images to black and white. • Sepia-Converts image to a brownish tone to look old-fashioned. • B&W Tints-Applies color tones on -camera instructions to adjust the color. 4. Press to select Modify Color, then 2. Follow the on a black and white version of the image; While in ...Playback Menu (see "Modifying colors" on page 21). On M440 series, you to add a border to an image (see "Cropping images" on -camera instructions. 5 Using the Design Gallery Menu M630/M540 series: You can use the Design Gallery features to enhance your image, do so before adding a...
...color images to black and white. • Sepia-Converts image to a brownish tone to look old-fashioned. • B&W Tints-Applies color tones on -camera instructions to adjust the color. 4. Press to select Modify Color, then 2. Follow the on a black and white version of the image; While in ...Playback Menu (see "Modifying colors" on page 21). On M440 series, you to add a border to an image (see "Cropping images" on -camera instructions. 5 Using the Design Gallery Menu M630/M540 series: You can use the Design Gallery features to enhance your image, do so before adding a...
User Guide
Page 24
... the Design Gallery Menu, use to select Crop, then press . 2. Use to select a border type and preview the effect it has on -camera instructions to use the Zoom lever and to ensure that the content you want gets saved. Use to select a crop orientation and preview the effect...Press to select Add Borders, then press 2. When you print, the normal aspect ratios get cropped on the top and bottom (landscape) or on -camera instructions to adjust the border. 4. Chapter 5 Add Borders allows you to add one -third taller than tall). • Portrait-Vertically crops the displayed ...
... the Design Gallery Menu, use to select Crop, then press . 2. Use to select a border type and preview the effect it has on -camera instructions to use the Zoom lever and to ensure that the content you want gets saved. Use to select a crop orientation and preview the effect...Press to select Add Borders, then press 2. When you print, the normal aspect ratios get cropped on the top and bottom (landscape) or on -camera instructions to adjust the border. 4. Chapter 5 Add Borders allows you to add one -third taller than tall). • Portrait-Vertically crops the displayed ...


