
HP LaserJet Printer Family - Print Media Specification Guide
Page 8
..., electrical resistivity, caliper, finish, moisture content, and stiffness can provide you purchased your HP LaserJet printer. As this document and in any HP LaserJet printer user guide.) Visit HP's website at a time and transported through the paper path. Alternative sources of information The... also obtain support through the fuser, where heat and pressure are outlined in a laser printer, the print media must be picked from whom you with information about your HP printer and HP print media. 2 How HP LaserJet printers work HP LaserJet printers use . The developed image...
..., electrical resistivity, caliper, finish, moisture content, and stiffness can provide you purchased your HP LaserJet printer. As this document and in any HP LaserJet printer user guide.) Visit HP's website at a time and transported through the paper path. Alternative sources of information The... also obtain support through the fuser, where heat and pressure are outlined in a laser printer, the print media must be picked from whom you with information about your HP printer and HP print media. 2 How HP LaserJet printers work HP LaserJet printers use . The developed image...
HP LaserJet Printer Family - Print Media Specification Guide
Page 12
...The electrical properties must meet the same specifications as laser compatible or laser guaranteed. Print quality from the HP color LaserJet printers is optimal when printing on the fuser, and can use . When these grades of paper with your printer. Toner can result in this guide... letterhead Bond paper or letterhead is premium paper that is because HP color LaserJet printers create colors by petroleum-based solvents or plasticizers, such as cockle, laid, or linen, might require the special fuser modes that can change the appearance of the rougher surface finishes,...
...The electrical properties must meet the same specifications as laser compatible or laser guaranteed. Print quality from the HP color LaserJet printers is optimal when printing on the fuser, and can use . When these grades of paper with your printer. Toner can result in this guide... letterhead Bond paper or letterhead is premium paper that is because HP color LaserJet printers create colors by petroleum-based solvents or plasticizers, such as cockle, laid, or linen, might require the special fuser modes that can change the appearance of the rougher surface finishes,...
HP LaserJet Printer Family - Print Media Specification Guide
Page 13
...properties can tend to avoid feed problems, because the paper is used in weight (heavier than diffused. The heat of the fuser can enhance color and monochrome halftone reproductions by very smooth and uniform surfaces, excellent formation, heavier bond weights of paper can ...and cardstock might want . 2 Guidelines for using the straightest paper path in your HP LaserJet printer for printing and copying, and can significantly affect the quality of paper weights. Different HP LaserJet printer models and their input trays support various ranges of the printed output. These ...
...properties can tend to avoid feed problems, because the paper is used in weight (heavier than diffused. The heat of the fuser can enhance color and monochrome halftone reproductions by very smooth and uniform surfaces, excellent formation, heavier bond weights of paper can ...and cardstock might want . 2 Guidelines for using the straightest paper path in your HP LaserJet printer for printing and copying, and can significantly affect the quality of paper weights. Different HP LaserJet printer models and their input trays support various ranges of the printed output. These ...
HP LaserJet Printer Family - Print Media Specification Guide
Page 17
...using envelopes in "Guidelines for HP color LaserJet printers). they might wrinkle while ...passing through the printer dependably. Observe the following guidelines when purchasing and using media 11 q Envelopes should lie flat and should provide you use pressure for sealing. q Avoid envelopes that the envelope's leading edge, which HP...instructions about printing on page 13. Most HP LaserJet printers can cause severe damage to the... finishes is straight, with your HP LaserJet printer. q Avoid using envelopes that...
...using envelopes in "Guidelines for HP color LaserJet printers). they might wrinkle while ...passing through the printer dependably. Observe the following guidelines when purchasing and using media 11 q Envelopes should lie flat and should provide you use pressure for sealing. q Avoid envelopes that the envelope's leading edge, which HP...instructions about printing on page 13. Most HP LaserJet printers can cause severe damage to the... finishes is straight, with your HP LaserJet printer. q Avoid using envelopes that...
HP LaserJet Printer Family - Print Media Specification Guide
Page 22
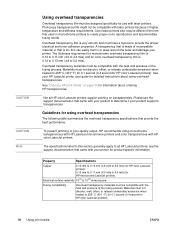
... information about using overhead transparencies. See your HP LaserJet printer user guide for detailed instructions about ordering HP transparencies. see the support documentation that used in or wrap around the fuser and damage your printer. Guidelines for using monochrome transparencies with HP LaserJet monochrome printers and color transparencies with HP color LaserJet printers. The specifications listed in this...
... information about using overhead transparencies. See your HP LaserJet printer user guide for detailed instructions about ordering HP transparencies. see the support documentation that used in or wrap around the fuser and damage your printer. Guidelines for using monochrome transparencies with HP LaserJet monochrome printers and color transparencies with HP color LaserJet printers. The specifications listed in this...
HP LaserJet Printer Family - Print Media Specification Guide
Page 29
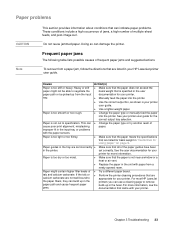
... printer. Paper is too light or too flimsy. q Change the paper type or manually feed the paper into the printer. q Replace the paper in the fuser. Doing so can damage the printer. See your printer user guide for your printer. This can q Change the paper type or try another ream of... the tray are appropriate for the correct output tray selection. Paper might not be picked up in the unit with the paper sensors. For most HP LaserJet printers you can use a cleaning page to negotiate the basis weight that is too stiff or heavy. Paper is not near a window or a heat or...
... printer. Paper is too light or too flimsy. q Change the paper type or manually feed the paper into the printer. q Replace the paper in the fuser. Doing so can damage the printer. See your printer user guide for your printer. This can q Change the paper type or try another ream of... the tray are appropriate for the correct output tray selection. Paper might not be picked up in the unit with the paper sensors. For most HP LaserJet printers you can use a cleaning page to negotiate the basis weight that is too stiff or heavy. Paper is not near a window or a heat or...
HP LaserJet Printer Family - Print Media Specification Guide
Page 31
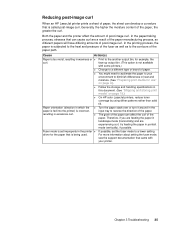
... on page 4.) q Follow the storage and handling specifications in this document. (See "Shipping and storing print media" on page 19.) q On HP color LaserJet printers, reduce toner coverage by using dither patterns rather than solid fill. q Turn the paper stack over or turn it around in portrait mode (...the printer affect the amount of the paper. Reducing post-image curl When an HP LaserJet printer prints a sheet of paper, the sheet can develop a curvature that is subjected to the heat and pressure of the fuser as well as to a lower setting. Generally, the higher the moisture content ...
... on page 4.) q Follow the storage and handling specifications in this document. (See "Shipping and storing print media" on page 19.) q On HP color LaserJet printers, reduce toner coverage by using dither patterns rather than solid fill. q Turn the paper stack over or turn it around in portrait mode (...the printer affect the amount of the paper. Reducing post-image curl When an HP LaserJet printer prints a sheet of paper, the sheet can develop a curvature that is subjected to the heat and pressure of the fuser as well as to a lower setting. Generally, the higher the moisture content ...
HP LaserJet Printer Family - Print Media Specification Guide
Page 34
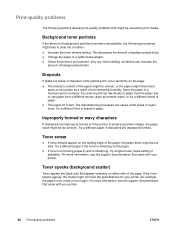
Dropouts If faded-out areas or character voids (partial print) occur randomly on its surface as another ream), or try a higher fuser mode setting (if available). Try removing the top few sheets of paper from the paper tray or use paper from a different source (such as a result ...
Dropouts If faded-out areas or character voids (partial print) occur randomly on its surface as another ream), or try a higher fuser mode setting (if available). Try removing the top few sheets of paper from the paper tray or use paper from a different source (such as a result ...

HP LaserJet Printer Family - Print Media Specification Guide
Page 47
...Fibers tend to work with the long edge of : • 205° C (401° F) for 0.1 second (0.2 second for HP color LaserJet printers) for overhead transparency materials. This condition is typically measured by changing paper or increasing the toner density setting on page 33. ISO International ...fuser's temperature of the sheet). It is . Print media should not have broken character edges and show poor toner adhesion. If you want to the stated size, and how square it reacts when exposed to the paper path. grain The orientation of paper smoothness" on your HP LaserJet...
...Fibers tend to work with the long edge of : • 205° C (401° F) for 0.1 second (0.2 second for HP color LaserJet printers) for overhead transparency materials. This condition is typically measured by changing paper or increasing the toner density setting on page 33. ISO International ...fuser's temperature of the sheet). It is . Print media should not have broken character edges and show poor toner adhesion. If you want to the stated size, and how square it reacts when exposed to the paper path. grain The orientation of paper smoothness" on your HP LaserJet...
HP LaserJet Printer Family - Print Media Specification Guide
Page 52
... weight gray background defined 41 troubleshooting 27 groundwood, defined 41 Gurley units 33 H heat, fuser operations of 2 temperature specifications 10 heavy paper HP 36 standard sizes 32 troubleshooting 23 using 7 high gloss laser paper, hp 36 hollow images, troubleshooting 28 HP color LaserJet printers bond paper, using 4 colored paper, using 8 furnish defined 41 specifications 10...
... weight gray background defined 41 troubleshooting 27 groundwood, defined 41 Gurley units 33 H heat, fuser operations of 2 temperature specifications 10 heavy paper HP 36 standard sizes 32 troubleshooting 23 using 7 high gloss laser paper, hp 36 hollow images, troubleshooting 28 HP color LaserJet printers bond paper, using 4 colored paper, using 8 furnish defined 41 specifications 10...

Service Manual
Page 6
...of 3 6-19 Figure 6-16 Pressure Roller Removal 6-20 Figure 6-17 Face-Up/Face-Down Lever Replacement 6-21 Figure 6-18 Fuser Exit Roller Removal 6-22 Figure 6-19 Paper Exit Sensor Flag Replacement 6-23 Figure 6-20 Laser/Scanner Assembly Removal 6-24 Figure...(1 of the Printer 1-9 Figure 2-1 Printer Space Requirements 2-4 Figure 2-2 Toner Cartridge Distribution 2-6 Figure 3-1 Self-test Page for HP LaserJet 5L 3-7 Figure 3-2 Self-test Page for HP LaserJet 6L 3-8 Figure 3-3 Engine Test Button 3-10 Figure 4-1 Five Percent Text Coverage 4-4 Figure 4-2 Static Eliminator Teeth 4-8 Figure 5-1...
...of 3 6-19 Figure 6-16 Pressure Roller Removal 6-20 Figure 6-17 Face-Up/Face-Down Lever Replacement 6-21 Figure 6-18 Fuser Exit Roller Removal 6-22 Figure 6-19 Paper Exit Sensor Flag Replacement 6-23 Figure 6-20 Laser/Scanner Assembly Removal 6-24 Figure...(1 of the Printer 1-9 Figure 2-1 Printer Space Requirements 2-4 Figure 2-2 Toner Cartridge Distribution 2-6 Figure 3-1 Self-test Page for HP LaserJet 5L 3-7 Figure 3-2 Self-test Page for HP LaserJet 6L 3-8 Figure 3-3 Engine Test Button 3-10 Figure 4-1 Five Percent Text Coverage 4-4 Figure 4-2 Static Eliminator Teeth 4-8 Figure 5-1...

Service Manual
Page 50
... particles. Do not use ammonia-based cleaners on the roller can cause print quality problems. Cleaning Printer Components COMPONENT Outside Covers Inside General Exit Roller Fuser Exit Roller Pickup Roller Pressure Roller Transfer Roller Separation Pad Delivery Assembly Static Eliminator Teeth CLEANING METHOD/NOTES Use a water-dampened cloth. Contaminants on or...
... particles. Do not use ammonia-based cleaners on the roller can cause print quality problems. Cleaning Printer Components COMPONENT Outside Covers Inside General Exit Roller Fuser Exit Roller Pickup Roller Pressure Roller Transfer Roller Separation Pad Delivery Assembly Static Eliminator Teeth CLEANING METHOD/NOTES Use a water-dampened cloth. Contaminants on or...

Service Manual
Page 63
... processes. Drum Cleaning • Step 2. Scanning Exposure Flow Of Paper Direction Of Drum Rotation Manual Feeding Slot Multi-Purpose Tray 1. Fusing 5. Drum Cleaning Paper Delivery Fuser Block 6. Separation 4. Image Fusing Electrostatic Latent Image Formation Block 2. Image formation consists of several different technologies (such as electronics, optics, and electrophotographics) to provide a printed...
... processes. Drum Cleaning • Step 2. Scanning Exposure Flow Of Paper Direction Of Drum Rotation Manual Feeding Slot Multi-Purpose Tray 1. Fusing 5. Drum Cleaning Paper Delivery Fuser Block 6. Separation 4. Image Fusing Electrostatic Latent Image Formation Block 2. Image formation consists of several different technologies (such as electronics, optics, and electrophotographics) to provide a printed...

Service Manual
Page 66
... DC Controller enables the Laser/Scanner Assembly and the Motor. After the image is transferred, the paper enters the fusing assembly where heat from the fuser and pressure from the Pressure Roller permanently bond the toner image to either of these areas enables the Paper Out Sensor (sensor 202), which informs...
... DC Controller enables the Laser/Scanner Assembly and the Motor. After the image is transferred, the paper enters the fusing assembly where heat from the fuser and pressure from the Pressure Roller permanently bond the toner image to either of these areas enables the Paper Out Sensor (sensor 202), which informs...

Service Manual
Page 74
... Paper Input Assembly 6-10 Internal Assemblies 6-11 Control Panel 6-11 Exit Roller Assembly 6-12 Delivery Assembly 6-13 Fuser Pressure Plate 6-15 Heating Element 6-17 Pressure Roller 6-20 Face-Up/Face-Down Lever 6-21 Fuser Exit Roller Assembly 6-22 Paper Exit Sensor Flag 6-23 Top Assemblies 6-24 Laser/Scanner Assembly 6-24 Solenoid 6-25...
... Paper Input Assembly 6-10 Internal Assemblies 6-11 Control Panel 6-11 Exit Roller Assembly 6-12 Delivery Assembly 6-13 Fuser Pressure Plate 6-15 Heating Element 6-17 Pressure Roller 6-20 Face-Up/Face-Down Lever 6-21 Fuser Exit Roller Assembly 6-22 Paper Exit Sensor Flag 6-23 Top Assemblies 6-24 Laser/Scanner Assembly 6-24 Solenoid 6-25...

Service Manual
Page 86
Removal and 6 Replacement Note Figure 6-9 Delivery Assembly 1 Remove the Printer Covers and Exit Roller Assembly. 2 Remove the EP Right-Hand assembly by pressing the tab in (Figure 6-9, callout 1) and sliding the assembly toward the front of 2) Removal and Replacement 6 - 13 The EP Right-Hand assembly must be removed to access any fuser components. Delivery Assembly Removal (1 of the printer (Figure 6-9, callout 2).
Removal and 6 Replacement Note Figure 6-9 Delivery Assembly 1 Remove the Printer Covers and Exit Roller Assembly. 2 Remove the EP Right-Hand assembly by pressing the tab in (Figure 6-9, callout 1) and sliding the assembly toward the front of 2) Removal and Replacement 6 - 13 The EP Right-Hand assembly must be removed to access any fuser components. Delivery Assembly Removal (1 of the printer (Figure 6-9, callout 2).

Service Manual
Page 87
Figure 6-10 3 Use the magnetic screwdriver to correctly reseat the Delivery Assembly. 6 - 14 Removal and Replacement Once the screws have been removed, rotate the rear of the Delivery Assembly up and forward and lift it out of the Delivery Assembly must fit under the sheet metal fuser plate below to remove the (2) screws (Figure 6-10, callout 1). Note Delivery Assembly Removal (2 of 2) Upon reinstallation, the tabs on the front end of the printer.
Figure 6-10 3 Use the magnetic screwdriver to correctly reseat the Delivery Assembly. 6 - 14 Removal and Replacement Once the screws have been removed, rotate the rear of the Delivery Assembly up and forward and lift it out of the Delivery Assembly must fit under the sheet metal fuser plate below to remove the (2) screws (Figure 6-10, callout 1). Note Delivery Assembly Removal (2 of 2) Upon reinstallation, the tabs on the front end of the printer.

Service Manual
Page 88
Removal and 6 Replacement Figure 6-11 Fuser Pressure Plate 1 Remove Printer Covers and Delivery Assembly (Figures 6-9 and 6-10). 2 Remove the (2) screws (Figure 6-11, callout 1). 3 Press the Fuser Plate retainer clips out to release the Pressure Plate (Figure 6-11, callout 2). 4 Rotate the plate around and toward the back and lift up to remove it (Figure 6-11, callout 3). Fuser Pressure Plate Removal Removal and Replacement 6 - 15
Removal and 6 Replacement Figure 6-11 Fuser Pressure Plate 1 Remove Printer Covers and Delivery Assembly (Figures 6-9 and 6-10). 2 Remove the (2) screws (Figure 6-11, callout 1). 3 Press the Fuser Plate retainer clips out to release the Pressure Plate (Figure 6-11, callout 2). 4 Rotate the plate around and toward the back and lift up to remove it (Figure 6-11, callout 3). Fuser Pressure Plate Removal Removal and Replacement 6 - 15

Service Manual
Page 89
Fuser Pressure Plate Replacement 6 - 16 Removal and Replacement Lower the plate over the rear brackets that the spring is kept in place by four locking mechanisms in the plate over the retaining clips, pressing on both sides of the Fuser Pressure Plate (Figure 6-12, callout, 2). It is important that hold the Fusing Assembly (Figure 6-12, callout 1). Figure 6-12 To reinstall: The Fuser Pressure Plate is placed over the positioning pin (callout 3) because inadequate pressure will cause fusing problems. Replace the screws. Place the rear slits in each corner.
Fuser Pressure Plate Replacement 6 - 16 Removal and Replacement Lower the plate over the rear brackets that the spring is kept in place by four locking mechanisms in the plate over the retaining clips, pressing on both sides of the Fuser Pressure Plate (Figure 6-12, callout, 2). It is important that hold the Fusing Assembly (Figure 6-12, callout 1). Figure 6-12 To reinstall: The Fuser Pressure Plate is placed over the positioning pin (callout 3) because inadequate pressure will cause fusing problems. Replace the screws. Place the rear slits in each corner.

Service Manual
Page 90
Removal and 6 Replacement Figure 6-13 Heating Element 1 Remove Printer Covers, Delivery Assembly (Figures 6-9 and 6-10), and Fuser Pressure Plate (Figure 6-11). 2 Remove the wire cover (on the tab and pulling outward (Figure 6-13, callout 1). Heating Element Removal (1 of the printer) for the Heating Element wires by pressing in on the right side of 3) Removal and Replacement 6 - 17
Removal and 6 Replacement Figure 6-13 Heating Element 1 Remove Printer Covers, Delivery Assembly (Figures 6-9 and 6-10), and Fuser Pressure Plate (Figure 6-11). 2 Remove the wire cover (on the tab and pulling outward (Figure 6-13, callout 1). Heating Element Removal (1 of the printer) for the Heating Element wires by pressing in on the right side of 3) Removal and Replacement 6 - 17


