Understanding pixel defects in TFT flat panel monitors
Page 2
...point that millions of tiny sub-pixels cover the typical flat panel screen, producing the mixture of its customers. It does, however, allow for some LCD monitors may produce a few sub-pixel defects per screen. Doing business with HP gives you understand how pixel and sub-pixel defects occur,... and what HP does about it? To help ensure that each customer receives the ...
...point that millions of tiny sub-pixels cover the typical flat panel screen, producing the mixture of its customers. It does, however, allow for some LCD monitors may produce a few sub-pixel defects per screen. Doing business with HP gives you understand how pixel and sub-pixel defects occur,... and what HP does about it? To help ensure that each customer receives the ...
Understanding pixel defects in TFT flat panel monitors
Page 3
.... The light from the rear, and so create the image. This limits the contrast, resolution, and the response time that will pass through the panel or be blocked, depending on to the next, that liquid crystals can be achieved with such a simple, passive-matrix drive system. 3 In 1963... controlling the alignment of the LC molecules electrically, causing them to effectively act as any color and any brightness, and the combination of all HP LCD monitors as well as an ordered arrangement of its "off . The intersection of rows and columns define the pixels and subpixels of the display,...
.... The light from the rear, and so create the image. This limits the contrast, resolution, and the response time that will pass through the panel or be blocked, depending on to the next, that liquid crystals can be achieved with such a simple, passive-matrix drive system. 3 In 1963... controlling the alignment of the LC molecules electrically, causing them to effectively act as any color and any brightness, and the combination of all HP LCD monitors as well as an ordered arrangement of its "off . The intersection of rows and columns define the pixels and subpixels of the display,...
Understanding pixel defects in TFT flat panel monitors
Page 4
...and response time possible with a 1920 x 1200 pixel native format requires embedding nearly seven million transistors in the LCD array. This results in a great improvement in the panel processing, and other rows and columns of the display. How pixel defects occur Damage to any other display technology... an enormously complex device. This is still 99.9999% defect free! 4 When we see that the panel is more than double the number of one percent. with LCD technology, and permits the manufacture of largesize, high-resolution displays which rival any one transistor to be placed...
...and response time possible with a 1920 x 1200 pixel native format requires embedding nearly seven million transistors in the LCD array. This results in a great improvement in the panel processing, and other rows and columns of the display. How pixel defects occur Damage to any other display technology... an enormously complex device. This is still 99.9999% defect free! 4 When we see that the panel is more than double the number of one percent. with LCD technology, and permits the manufacture of largesize, high-resolution displays which rival any one transistor to be placed...
Understanding pixel defects in TFT flat panel monitors
Page 5
...normal operating mode at competitive costs, and most importantly the goal of approximately 20 inches (51 cm). Historically, HP has maintained stringent manufacturing specifications for HP monitors manufactured before May 2009: Bright sub-pixel defects: Dark sub-pixel defects: Total sub-pixel defects: Full pixel...are also easier to spot when they appear brighter to 600 lux; HP specifications HP pixel defect specifications continue to be refined, but will always represent the best panel quality standards which HP scans for pixel defects: Viewing distance of approximately 14 inches ...
...normal operating mode at competitive costs, and most importantly the goal of approximately 20 inches (51 cm). Historically, HP has maintained stringent manufacturing specifications for HP monitors manufactured before May 2009: Bright sub-pixel defects: Dark sub-pixel defects: Total sub-pixel defects: Full pixel...are also easier to spot when they appear brighter to 600 lux; HP specifications HP pixel defect specifications continue to be refined, but will always represent the best panel quality standards which HP scans for pixel defects: Viewing distance of approximately 14 inches ...
Understanding pixel defects in TFT flat panel monitors
Page 6
This policy applies for HP monitors manufactured in flat panel monitors: Class 0 panels are ever permitted; International standards (ISO-9241) The International Standards Organization (ISO) has published its own set of specifications for measuring pixel ... of each; These identify three classes for pixel defects, contained within the above listed range of the HP monitor. in most cases, HP displays will meet the more than 5 bright ("stuck on") subpixels are permitted). Class 3 panels permit any or all of the following : 2 full bright pixels 2 full ...
This policy applies for HP monitors manufactured in flat panel monitors: Class 0 panels are ever permitted; International standards (ISO-9241) The International Standards Organization (ISO) has published its own set of specifications for measuring pixel ... of each; These identify three classes for pixel defects, contained within the above listed range of the HP monitor. in most cases, HP displays will meet the more than 5 bright ("stuck on") subpixels are permitted). Class 3 panels permit any or all of the following : 2 full bright pixels 2 full ...
HP L2045w LCD Monitor User Guide
Page 5
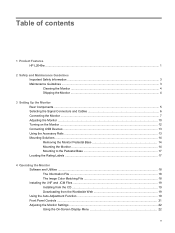
... of contents 1 Product Features HP L2045w ...1 2 Safety and Maintenance Guidelines Important Safety Information ...3 Maintenance Guidelines ...3 Cleaning the Monitor ...4 Shipping the Monitor ...4 3 Setting Up the Monitor Rear Components ...5 Selecting the Signal Connectors and Cables 6 Connecting the Monitor ...7 Adjusting the Monitor ...10 Turning on the Monitor ...12 Connecting USB Devices ...13... the CD ...19 Downloading from the Worldwide Web 19 Using the Auto-Adjustment Function 19 Front Panel Controls ...21 Adjusting the Monitor Settings ...22 Using the On-Screen Display Menu 22 v
... of contents 1 Product Features HP L2045w ...1 2 Safety and Maintenance Guidelines Important Safety Information ...3 Maintenance Guidelines ...3 Cleaning the Monitor ...4 Shipping the Monitor ...4 3 Setting Up the Monitor Rear Components ...5 Selecting the Signal Connectors and Cables 6 Connecting the Monitor ...7 Adjusting the Monitor ...10 Turning on the Monitor ...12 Connecting USB Devices ...13... the CD ...19 Downloading from the Worldwide Web 19 Using the Auto-Adjustment Function 19 Front Panel Controls ...21 Adjusting the Monitor Settings ...22 Using the On-Screen Display Menu 22 v
HP L2045w LCD Monitor User Guide
Page 9
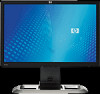
...as the optional HP Quick Release ● Removable pedestal base with VESA 40mm mounting holes for mounting an HP Thin Client with the optional HP Quick Release &#... ports ● Accessory rail on monitor to accept optional mounted devices, such as an HP speaker bar ● Rubberized cable management on monitor back and pedestal base ● Plug...includes HP Display Assistant, Pivot Pro software, monitor driver software, and product documentation ● HP LiteSaver feature to meet requirements for reduced power consumption HP L2045w 1 1 Product Features HP L2045w The flat panel monitor has...
...as the optional HP Quick Release ● Removable pedestal base with VESA 40mm mounting holes for mounting an HP Thin Client with the optional HP Quick Release &#... ports ● Accessory rail on monitor to accept optional mounted devices, such as an HP speaker bar ● Rubberized cable management on monitor back and pedestal base ● Plug...includes HP Display Assistant, Pivot Pro software, monitor driver software, and product documentation ● HP LiteSaver feature to meet requirements for reduced power consumption HP L2045w 1 1 Product Features HP L2045w The flat panel monitor has...

HP L2045w LCD Monitor User Guide
Page 15
Place the monitor in a convenient, well-ventilated location near the computer. Connecting the Monitor 7 Figure 3-3 Connecting the DVI-D Signal Cable (not included with monitor) Figure 3-4 Connecting the VGA Signal Cable Connecting the Monitor 1. The inputs can be selected through the On-Screen Display (OSD) feature by pressing the Input Select button on the front panel. The monitor will automatically determine which inputs have valid video signals.
Place the monitor in a convenient, well-ventilated location near the computer. Connecting the Monitor 7 Figure 3-3 Connecting the DVI-D Signal Cable (not included with monitor) Figure 3-4 Connecting the VGA Signal Cable Connecting the Monitor 1. The inputs can be selected through the On-Screen Display (OSD) feature by pressing the Input Select button on the front panel. The monitor will automatically determine which inputs have valid video signals.

HP L2045w LCD Monitor User Guide
Page 16
...; Plug the power cord into a grounded (earthed) electrical outlet that no one end of the USB hub cable to the USB connector on the rear panel of electric shock or damage to the upstream USB connector on a cord or cable. 2. The grounding plug is easily accessible at all times. • Disconnect... power from the equipment by unplugging the power cord from the electrical outlet, grasp the cord by the plug. 8 Chapter 3 Setting Up the Monitor Do not pull on the monitor. To reduce the risk of the computer or to a USB hub, and the other end to the equipment: • Do not disable...
...; Plug the power cord into a grounded (earthed) electrical outlet that no one end of the USB hub cable to the USB connector on the rear panel of electric shock or damage to the upstream USB connector on a cord or cable. 2. The grounding plug is easily accessible at all times. • Disconnect... power from the equipment by unplugging the power cord from the electrical outlet, grasp the cord by the plug. 8 Chapter 3 Setting Up the Monitor Do not pull on the monitor. To reduce the risk of the computer or to a USB hub, and the other end to the equipment: • Do not disable...

HP L2045w LCD Monitor User Guide
Page 18
Figure 3-9 Swiveling the Monitor 10 Chapter 3 Setting Up the Monitor Swivel the monitor to a comfortable eye level. Tilt the monitor's panel forward or backward to set it to the left or right for the best viewing angle. Adjusting the Monitor 1. Figure 3-8 Tilting the Monitor 2.
Figure 3-9 Swiveling the Monitor 10 Chapter 3 Setting Up the Monitor Swivel the monitor to a comfortable eye level. Tilt the monitor's panel forward or backward to set it to the left or right for the best viewing angle. Adjusting the Monitor 1. Figure 3-8 Tilting the Monitor 2.

HP L2045w LCD Monitor User Guide
Page 21
Connecting USB Devices The monitor provides two USB connectors on the rear panel to connect devices such as the HP speaker bar, onto the monitor. Refer to Step 2 in Connecting the Monitor on the monitor. Refer to the documentation included with the optional device for detailed mounting instructions. NOTE: You must connect the USB hub cable from...
Connecting USB Devices The monitor provides two USB connectors on the rear panel to connect devices such as the HP speaker bar, onto the monitor. Refer to Step 2 in Connecting the Monitor on the monitor. Refer to the documentation included with the optional device for detailed mounting instructions. NOTE: You must connect the USB hub cable from...

HP L2045w LCD Monitor User Guide
Page 22
... pedestal base to the mounting fixture. 1. Figure 3-14 Removing the Monitor from the Pedestal Base Mounting the Monitor An optional HP Quick Release can remove the monitor panel from getting scratched, defaced, or broken. 3. Mounting Solutions Removing the Monitor Pedestal Base You can be sure the monitor is turned off and the power and signal cables are...
... pedestal base to the mounting fixture. 1. Figure 3-14 Removing the Monitor from the Pedestal Base Mounting the Monitor An optional HP Quick Release can remove the monitor panel from getting scratched, defaced, or broken. 3. Mounting Solutions Removing the Monitor Pedestal Base You can be sure the monitor is turned off and the power and signal cables are...

HP L2045w LCD Monitor User Guide
Page 24
... is important to support the weight of the monitor display panel. For best performance, it is rated to verify that the manufacturer's mounting solution is compliant with the monitor. Figure 3-17 Mounting the Monitor Using a Third-Party Solution 16 Chapter 3 Setting Up the Monitor If mounting the monitor using another manufacturer's solution, use the power and...
... is important to support the weight of the monitor display panel. For best performance, it is rated to verify that the manufacturer's mounting solution is compliant with the monitor. Figure 3-17 Mounting the Monitor Using a Third-Party Solution 16 Chapter 3 Setting Up the Monitor If mounting the monitor using another manufacturer's solution, use the power and...

HP L2045w LCD Monitor User Guide
Page 25
... Labels Locating the Rating Labels 17 Locating the Rating Labels The rating labels on the rear panel of the monitor display head. You may need these numbers when contacting HP about the monitor model. To mount an HP thin client to verify that comes with Quick Release. Figure 3-18 Mounting a Thin Client...weight of the thin client does not affect the stability of the HP thin client to the pedestal base. It allows you to quickly and securely attach some models of the monitor. The rating labels are located on the monitor provide the spare part number, product number, and serial number. ...
... Labels Locating the Rating Labels 17 Locating the Rating Labels The rating labels on the rear panel of the monitor display head. You may need these numbers when contacting HP about the monitor model. To mount an HP thin client to verify that comes with Quick Release. Figure 3-18 Mounting a Thin Client...weight of the thin client does not affect the stability of the HP thin client to the pedestal base. It allows you to quickly and securely attach some models of the monitor. The rating labels are located on the monitor provide the spare part number, product number, and serial number. ...
HP L2045w LCD Monitor User Guide
Page 27
Insert the CD in the Windows Display control panel. Refer to the Monitor Driver Software Readme file on -screen instructions. 5. Follow the links for the VGA (analog) input by following image quality conditions: ● Fuzzy or unclear...and select the country region. 2. The CD menu is using the −/Auto button on the monitor and the auto-adjustment pattern software utility on the computer from the HP monitors support Web site: 1. Select Install Monitor Driver Software. 4. Ensure that you can correct the following the instructions. Using the Auto-Adjustment ...
Insert the CD in the Windows Display control panel. Refer to the Monitor Driver Software Readme file on -screen instructions. 5. Follow the links for the VGA (analog) input by following image quality conditions: ● Fuzzy or unclear...and select the country region. 2. The CD menu is using the −/Auto button on the monitor and the auto-adjustment pattern software utility on the computer from the HP monitors support Web site: 1. Select Install Monitor Driver Software. 4. Ensure that you can correct the following the instructions. Using the Auto-Adjustment ...

HP L2045w LCD Monitor User Guide
Page 28
Select Open Auto-Adjustment Software. The setup test pattern is displayed. 4. Allow the monitor to exit the test pattern. 20 Chapter 4 Operating the Monitor Refer to Adjusting the Monitor Settings on the monitor front panel to produce a stable, centered image. 6. Insert the CD in this chapter. ● If the result is not...displayed. 5. Press the −/Auto button on page 22 in the disc drive. Press the ESC key or any other key on the monitor front panel. ● You can also press the Menu/Select button, then select Auto-Adjustment from the OSD Main Menu. Press the −/Auto...
Select Open Auto-Adjustment Software. The setup test pattern is displayed. 4. Allow the monitor to exit the test pattern. 20 Chapter 4 Operating the Monitor Refer to Adjusting the Monitor Settings on the monitor front panel to produce a stable, centered image. 6. Insert the CD in this chapter. ● If the result is not...displayed. 5. Press the −/Auto button on page 22 in the disc drive. Press the ESC key or any other key on the monitor front panel. ● You can also press the Menu/Select button, then select Auto-Adjustment from the OSD Main Menu. Press the −/Auto...

HP L2045w LCD Monitor User Guide
Page 29
Sleep mode = Amber. Sleep Timer mode = Flashing Amber. 6 Power Turns the monitor on or off. Front Panel Controls 21 Front Panel Controls Table 4-1 Monitor Front Panel Controls Control Function 1 Menu/Select Opens, selects or exits the OSD menu. 2 − (Minus)/Auto ● Navigates backward through the OSD menu and decreases adjustment ...
Sleep mode = Amber. Sleep Timer mode = Flashing Amber. 6 Power Turns the monitor on or off. Front Panel Controls 21 Front Panel Controls Table 4-1 Monitor Front Panel Controls Control Function 1 Menu/Select Opens, selects or exits the OSD menu. 2 − (Minus)/Auto ● Navigates backward through the OSD menu and decreases adjustment ...

HP L2045w LCD Monitor User Guide
Page 30
... new adjustments will revert to the OSD Main Menu screen. To select an item from the Main Menu. buttons on the monitor's front panel. 3. OSD Menu Selections The following : 1. After changing an OSD menu item, and if the menu screen has these ...panel to scroll up, or the − (Minus)/Auto button to and highlight your viewing preferences. to return to the previous setting. 22 Chapter 4 Operating the Monitor Adjusting the Monitor Settings The monitor settings can be discarded and the settings will be adjusted from the On-Screen Display (OSD) menu or from the HP...
... new adjustments will revert to the OSD Main Menu screen. To select an item from the Main Menu. buttons on the monitor's front panel. 3. OSD Menu Selections The following : 1. After changing an OSD menu item, and if the menu screen has these ...panel to scroll up, or the − (Minus)/Auto button to and highlight your viewing preferences. to return to the previous setting. 22 Chapter 4 Operating the Monitor Adjusting the Monitor Settings The monitor settings can be discarded and the settings will be adjusted from the On-Screen Display (OSD) menu or from the HP...

HP L2045w LCD Monitor User Guide
Page 34
..., continue adjusting the values until the distortion disappears. To restore the factory settings, select Yes from a centralized console application The HP Display Assistant Utility has two modes of operation: Wizard and OSD mode. It provides: ● Accurate screen calibration through a ...obtain the best overall image quality ● Software control of steps that allows the flat panel screen to minimize video distortion or video jitter. Optimizing Digital Conversion This monitor contains advanced circuitry that will obtain the best results by using the auto-adjustment pattern ...
..., continue adjusting the values until the distortion disappears. To restore the factory settings, select Yes from a centralized console application The HP Display Assistant Utility has two modes of operation: Wizard and OSD mode. It provides: ● Accurate screen calibration through a ...obtain the best overall image quality ● Software control of steps that allows the flat panel screen to minimize video distortion or video jitter. Optimizing Digital Conversion This monitor contains advanced circuitry that will obtain the best results by using the auto-adjustment pattern ...

HP L2045w LCD Monitor User Guide
Page 35
... OSD to 1680 × 1050 - 75Hz - The OSD can be enabled or disabled by pressing and holding the Menu button on the monitor front panel to display the Advanced Menu. 2. This also extends the life of Range - Scroll down and highlight Management. 3. The...Signal Out of the backlight bulbs in Progress - Press the Menu button on the front panel for the monitor to Sleep - Identifying Monitor Conditions Special messages will appear on the monitor video input connector. Indicates the monitor is not properly connected to lock the OSD. Indicates the screen display is an energy-...
... OSD to 1680 × 1050 - 75Hz - The OSD can be enabled or disabled by pressing and holding the Menu button on the monitor front panel to display the Advanced Menu. 2. This also extends the life of Range - Scroll down and highlight Management. 3. The...Signal Out of the backlight bulbs in Progress - Press the Menu button on the front panel for the monitor to Sleep - Identifying Monitor Conditions Special messages will appear on the monitor video input connector. Indicates the monitor is not properly connected to lock the OSD. Indicates the screen display is an energy-...

