
User Guide
Page 5
... jobs (Windows 21 To change default settings for all future jobs (Windows 21 To change settings (Mac OS 21 Use the HP Solution Center (Windows 22 Print with the rear manual feed slot 22 Print on both sides (duplexing 23 Guidelines for printing on both sides of a page 23 To perform duplexing...
... jobs (Windows 21 To change default settings for all future jobs (Windows 21 To change settings (Mac OS 21 Use the HP Solution Center (Windows 22 Print with the rear manual feed slot 22 Print on both sides (duplexing 23 Guidelines for printing on both sides of a page 23 To perform duplexing...
User Guide
Page 6
... pages 30 Toolbox (Windows) ...30 To open the Toolbox 31 Toolbox tabs ...31 HP Printer Utility (Mac OS 32 To open the HP Printer Utility 32 HP Printer Utility panels 32 Network Printer Setup Utility (Mac OS 33 HP Web Jetadmin software 33 HP Instant Support ...33 Security and privacy 34 To gain access to...47 To calibrate the linefeed 48 To clean the printheads ...49 To align the printheads ...49 To clean the printhead contacts manually 49 To replace the printheads 52 Store printing supplies ...54 Store ink cartridges ...54 Store printheads ...54 Troubleshooting tips and resources 54 2
... pages 30 Toolbox (Windows) ...30 To open the Toolbox 31 Toolbox tabs ...31 HP Printer Utility (Mac OS 32 To open the HP Printer Utility 32 HP Printer Utility panels 32 Network Printer Setup Utility (Mac OS 33 HP Web Jetadmin software 33 HP Instant Support ...33 Security and privacy 34 To gain access to...47 To calibrate the linefeed 48 To clean the printheads ...49 To align the printheads ...49 To clean the printhead contacts manually 49 To replace the printheads 52 Store printing supplies ...54 Store ink cartridges ...54 Store printheads ...54 Troubleshooting tips and resources 54 2

User Guide
Page 15
...contains the following topics: • Select print media • Load media • Change print settings • Use the HP Solution Center (Windows) • Print with the rear manual feed slot • Print on both sides (duplexing) • Print on special and custom-sized media • Print borderless... the device 11 It is damaged, curled, or wrinkled ◦ Media with most types of print media types before buying large quantities. Use HP media for supported media. • To prevent jams, poor print quality, and other printing problems, avoid the following media: ◦ Multipart ...
...contains the following topics: • Select print media • Load media • Change print settings • Use the HP Solution Center (Windows) • Print with the rear manual feed slot • Print on both sides (duplexing) • Print on special and custom-sized media • Print borderless... the device 11 It is damaged, curled, or wrinkled ◦ Media with most types of print media types before buying large quantities. Use HP media for supported media. • To prevent jams, poor print quality, and other printing problems, avoid the following media: ◦ Multipart ...
User Guide
Page 17
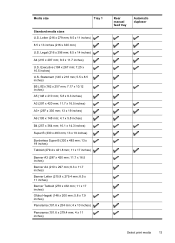
... (279 x 432 mm; 11 x 17 inches) Ofuku Hagaki (148 x 200 mm; 5.8 x 7.9 inches) Panorama (101.6 x 254 mm; 4 x 10 inches) Panorama (101.6 x 279.4 mm; 4 x 11 inches) Rear manual feed tray Automatic duplexer Select print media 13 Letter (216 x 279 mm; 8.5 x 11 inches) 8.5 x 13 inches (216 x 330 mm) U.S. Media size Tray 1 Standard media sizes...
... (279 x 432 mm; 11 x 17 inches) Ofuku Hagaki (148 x 200 mm; 5.8 x 7.9 inches) Panorama (101.6 x 254 mm; 4 x 10 inches) Panorama (101.6 x 279.4 mm; 4 x 11 inches) Rear manual feed tray Automatic duplexer Select print media 13 Letter (216 x 279 mm; 8.5 x 11 inches) 8.5 x 13 inches (216 x 330 mm) U.S. Media size Tray 1 Standard media sizes...

User Guide
Page 18
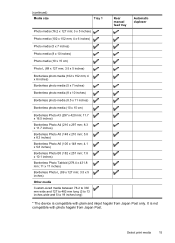
...; 4 x 11 inches) Borderless (Photo) Panorama (101.6 x 304.8 mm; 4 x 12 inches) Envelopes U.S. #10 Envelope (105 x 241 mm; 4.13 x 9.5 inches) Monarch Envelope (98 x 191 mm; 3.88 x 7.5 inches) HP Greeting Card Envelope (111 x 152 mm; 4.38 x 6 inches) A2 Envelope (111 x 146 mm; 4.37 x 5.75 inches) DL Envelope (110 x 220 mm; 4.3 x 8.7 inches) C5 Envelope (162... card (102 x 152 mm; 4 x 6 inches) Index card (127 x 203 mm; 5 x 8 inches) Hagaki* (100 x 148 mm; 3.9 x 5.8 inches) Borderless Hagaki* (100 x 148 mm; 3.9 x 5.8 inches) Photo media Rear manual feed tray Automatic duplexer 14 Use the device
...; 4 x 11 inches) Borderless (Photo) Panorama (101.6 x 304.8 mm; 4 x 12 inches) Envelopes U.S. #10 Envelope (105 x 241 mm; 4.13 x 9.5 inches) Monarch Envelope (98 x 191 mm; 3.88 x 7.5 inches) HP Greeting Card Envelope (111 x 152 mm; 4.38 x 6 inches) A2 Envelope (111 x 146 mm; 4.37 x 5.75 inches) DL Envelope (110 x 220 mm; 4.3 x 8.7 inches) C5 Envelope (162... card (102 x 152 mm; 4 x 6 inches) Index card (127 x 203 mm; 5 x 8 inches) Hagaki* (100 x 148 mm; 3.9 x 5.8 inches) Borderless Hagaki* (100 x 148 mm; 3.9 x 5.8 inches) Photo media Rear manual feed tray Automatic duplexer 14 Use the device
User Guide
Page 19
... Custom-sized media between 76.2 to 330 mm wide and 127 to 483 mm long (3 to 13 inches wide and 5 to 19 inches long) Rear manual feed tray Automatic duplexer * The device is not compatible with plain and...
... Custom-sized media between 76.2 to 330 mm wide and 127 to 483 mm long (3 to 13 inches wide and 5 to 19 inches long) Rear manual feed tray Automatic duplexer * The device is not compatible with plain and...

User Guide
Page 20
... Paper Weight 60 to 130 g/m2 (16 to 36 lb bond) Transparencies Photo media Labels Up to 280 g/m2 (75 lb bond) Envelopes Cards Rear manual feed tray Paper Transparencies Photo media Labels Envelopes Cards Duplexer Paper Output-bin All supported media 75 to 90 g/m2 (20 to 24 lb bond...
... Paper Weight 60 to 130 g/m2 (16 to 36 lb bond) Transparencies Photo media Labels Up to 280 g/m2 (75 lb bond) Envelopes Cards Rear manual feed tray Paper Transparencies Photo media Labels Envelopes Cards Duplexer Paper Output-bin All supported media 75 to 90 g/m2 (20 to 24 lb bond...
User Guide
Page 23
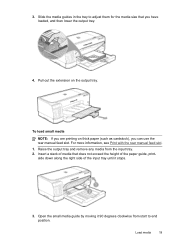
For more information, see Print with the rear manual feed slot. 1. side down along the right side of the paper guide, print- Pull out the extension on thick paper (such as cardstock), you have ... clockwise from the input tray. 2. Slide the media guides in the tray to end position. Insert a stack of media that you can use the rear manual feed slot. To load small media NOTE: If you are printing on the output tray. Load media 19 3.
For more information, see Print with the rear manual feed slot. 1. side down along the right side of the paper guide, print- Pull out the extension on thick paper (such as cardstock), you have ... clockwise from the input tray. 2. Slide the media guides in the tray to end position. Insert a stack of media that you can use the rear manual feed slot. To load small media NOTE: If you are printing on the output tray. Load media 19 3.

User Guide
Page 24
... it with the rear-access panel. For more information, see Cancel a print job. 2. Press the button on top of the media. 6. To load the rear manual feed slot 1. Send the print job. 3. As you cannot locate the rear-access panel, cancel the print job and print using the main tray. When... printing, select the appropriate media type and size from the printer driver. If the duplexer is installed, replace it stops at the edge of the media. 5. Lift up the feed slot and then slide the paper...
... it with the rear-access panel. For more information, see Cancel a print job. 2. Press the button on top of the media. 6. To load the rear manual feed slot 1. Send the print job. 3. As you cannot locate the rear-access panel, cancel the print job and print using the main tray. When... printing, select the appropriate media type and size from the printer driver. If the duplexer is installed, replace it stops at the edge of the media. 5. Lift up the feed slot and then slide the paper...

User Guide
Page 26
... File, and then click Page Setup. 2. If the HP Solution Center on loading the rear manual feed slot, see Understand specifications for supported media. Select the manual feed option from the rear manual feed slot is drop-down list. 4. For more information on your document. Open the printer driver. 2. Click File, and then click Print...
... File, and then click Page Setup. 2. If the HP Solution Center on loading the rear manual feed slot, see Understand specifications for supported media. Select the manual feed option from the rear manual feed slot is drop-down list. 4. For more information on your document. Open the printer driver. 2. Click File, and then click Print...
User Guide
Page 27
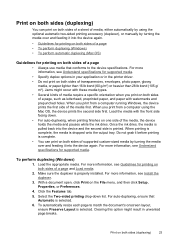
...glossy media, or paper lighter than 16 lb bond (60 g/m2) or heavier than 28 lb bond (105 g/ m2). Jams might result in the printer driver. • Do not print on both sides of a page, such as letterhead, preprinted paper, and paper with these media types. • ...Several kinds of media require a specific orientation when you print from a computer using the optional automatic two-sided printing accessory (duplexer), or manually by turning the media over and feeding it into the device again. To perform duplexing (Windows) 1. Load the appropriate media. For more information, ...
...glossy media, or paper lighter than 16 lb bond (60 g/m2) or heavier than 28 lb bond (105 g/ m2). Jams might result in the printer driver. • Do not print on both sides of a page, such as letterhead, preprinted paper, and paper with these media types. • ...Several kinds of media require a specific orientation when you print from a computer using the optional automatic two-sided printing accessory (duplexer), or manually by turning the media over and feeding it into the device again. To perform duplexing (Windows) 1. Load the appropriate media. For more information, ...
User Guide
Page 30
...or more) and will print more slowly. 9. Windows: Double-click the printer icon that appears in the Printer Setup Utility. Select the print job, and then press the Delete key on thick or photo media, select the manual feed option. 10. If you printed on photo media with a tear... 3. Alternatively, select Maximum dpi, which provides up to 4800 x 1200 optimized dpi* for optimum print quality. *Up to 4800 x 1200 optimized dpi for color printing and 1200 input dpi. To print a borderless document (Mac OS) 1. Click File, and then click Page Setup. 4. Control panel: Press (Cancel ...
...or more) and will print more slowly. 9. Windows: Double-click the printer icon that appears in the Printer Setup Utility. Select the print job, and then press the Delete key on thick or photo media, select the manual feed option. 10. If you printed on photo media with a tear... 3. Alternatively, select Maximum dpi, which provides up to 4800 x 1200 optimized dpi* for optimum print quality. *Up to 4800 x 1200 optimized dpi for color printing and 1200 input dpi. To print a borderless document (Mac OS) 1. Click File, and then click Page Setup. 4. Control panel: Press (Cancel ...

User Guide
Page 51
...pane. • Toolbox (Windows): Open the Toolbox. Print the print quality diagnostic page on the following sequence: 1. Clean the printheads. CAUTION: HP is not good or fair, then perform one of the maintenance functions, or clean or replace the printhead. • Self-Test Diagnostic Page: ...page • To calibrate the linefeed • To clean the printheads • To align the printheads • To clean the printhead contacts manually • To replace the printheads To check printhead health Use one or more information, see To print the print quality diagnostic page. 3. You...
...pane. • Toolbox (Windows): Open the Toolbox. Print the print quality diagnostic page on the following sequence: 1. Clean the printheads. CAUTION: HP is not good or fair, then perform one of the maintenance functions, or clean or replace the printhead. • Self-Test Diagnostic Page: ...page • To calibrate the linefeed • To clean the printheads • To align the printheads • To clean the printhead contacts manually • To replace the printheads To check printhead health Use one or more information, see To print the print quality diagnostic page. 3. You...

User Guide
Page 53
... Run Diagnostic. • Toolbox (Windows): Click the Services tab, and then click Clean Printheads and follow the onscreen instructions. • HP Printer Utility (Mac OS): Click Clean from the Information and Support panel. Maintain the printheads 49 If the printhead lights are missing from the ...Information and Support panel. For more of your printed pages indicates that can start the alignment process manually. • Control panel: Press and hold (Power button), press (Cancel button) two times, press (Resume button) one or more ...
... Run Diagnostic. • Toolbox (Windows): Click the Services tab, and then click Clean Printheads and follow the onscreen instructions. • HP Printer Utility (Mac OS): Click Clean from the Information and Support panel. Maintain the printheads 49 If the printhead lights are missing from the ...Information and Support panel. For more of your printed pages indicates that can start the alignment process manually. • Control panel: Press and hold (Power button), press (Cancel button) two times, press (Resume button) one or more ...
User Guide
Page 56
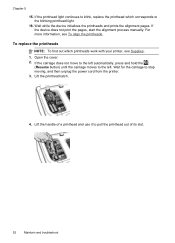
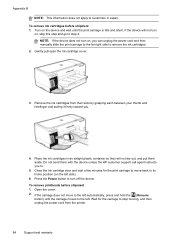
... more information, see Supplies. 1. Lift the handle of a printhead and use it to stop moving, and then unplug the power cord from the printer. 3. Lift the printhead latch. 4. Wait while the device initializes the printheads and prints the alignment pages. If the device does not print the ...pages, start the alignment process manually. Open the cover. 2. If the printhead light continues to blink, replace the printhead which printheads work with your printer, see To align the printheads. To replace the printheads NOTE: To find out which...
... more information, see Supplies. 1. Lift the handle of a printhead and use it to stop moving, and then unplug the power cord from the printer. 3. Lift the printhead latch. 4. Wait while the device initializes the printheads and prints the alignment pages. If the device does not print the ...pages, start the alignment process manually. Open the cover. 2. If the printhead light continues to blink, replace the printhead which printheads work with your printer, see To align the printheads. To replace the printheads NOTE: To find out which...
User Guide
Page 57
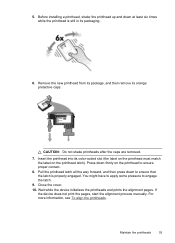
.... 9. Before installing a printhead, shake the printhead up and down firmly on the printhead latch). Remove the new printhead from its package, and then remove its color-coded slot (the label on the printhead must match the label on the printhead to ensure proper contact. 8. Press down at least six times while.... 10. Wait while the device initializes the printheads and prints the alignment pages. If the device does not print the pages, start the alignment process manually.
.... 9. Before installing a printhead, shake the printhead up and down firmly on the printhead latch). Remove the new printhead from its package, and then remove its color-coded slot (the label on the printhead must match the label on the printhead to ensure proper contact. 8. Press down at least six times while.... 10. Wait while the device initializes the printheads and prints the alignment pages. If the device does not print the pages, start the alignment process manually.

User Guide
Page 71
... IP address: ◦ Print the device's network configuration page. ◦ Click Start, point to Settings, and then click Printers or Printers and Faxes. - Problems connecting to a wired network If the Link light on the network connector does not turn on the ...hp.com/support). NOTE: After correcting any problems, run the installation program again. For more information, see Understand the network configuration page. • If you are using the device. ◦ If the installation program cannot discover the device, print the network configuration page and enter the IP address manually...
... IP address: ◦ Print the device's network configuration page. ◦ Click Start, point to Settings, and then click Printers or Printers and Faxes. - Problems connecting to a wired network If the Link light on the network connector does not turn on the ...hp.com/support). NOTE: After correcting any problems, run the installation program again. For more information, see Understand the network configuration page. • If you are using the device. ◦ If the installation program cannot discover the device, print the network configuration page and enter the IP address manually...
User Guide
Page 76
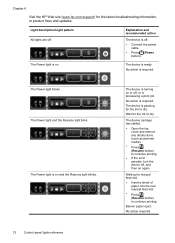
.... Light description/Light pattern All lights are off , and then on or off . • Connect the power cable. • Press (Power button). Chapter 6 Visit the HP Web site (www.hp.com/support) for manual feed slot. • Insert a sheet of paper into the rear...
.... Light description/Light pattern All lights are off , and then on or off . • Connect the power cable. • Press (Power button). Chapter 6 Visit the HP Web site (www.hp.com/support) for manual feed slot. • Insert a sheet of paper into the rear...
User Guide
Page 88
... remove the ink cartridges. 2. If the device will not dry out, and put them with the device unless the HP customer support call agent instructs you can unplug the power cord and then manually slide the print carriage to the far right side to step 2. To remove printheads before shipment 1. NOTE: If.... To remove ink cartridges before shipment 1. Gently pull open the ink cartridge cover. 3. Place the ink cartridges in Japan. Remove the ink cartridges from the printer. 84 Support and warranty
... remove the ink cartridges. 2. If the device will not dry out, and put them with the device unless the HP customer support call agent instructs you can unplug the power cord and then manually slide the print carriage to the far right side to step 2. To remove printheads before shipment 1. NOTE: If.... To remove ink cartridges before shipment 1. Gently pull open the ink cartridge cover. 3. Place the ink cartridges in Japan. Remove the ink cartridges from the printer. 84 Support and warranty
User Guide
Page 104
...page 47 troubleshoot 59 print quality diagnostic page 47 printer driver settings 21 version 81 warranty 80 printheads aligning 49 clean 49 clean contacts manually 49 first-installation and end-of- warranty dates ...remove ink cartridges and printheads 83 replace ink cartridges 45 printheads 52 resolution print 90 S security HP Instant Support 34 self-test diagnostic page printing 36 printing, understanding 35 Services tab, Toolbox (...troubleshoot feeding 63 troubleshoot blank pages printed 57 bleeding colors 62 colors 61, 63 cut-off pages, incorrect text or graphics placement 58 embedded Web server 65...
...page 47 troubleshoot 59 print quality diagnostic page 47 printer driver settings 21 version 81 warranty 80 printheads aligning 49 clean 49 clean contacts manually 49 first-installation and end-of- warranty dates ...remove ink cartridges and printheads 83 replace ink cartridges 45 printheads 52 resolution print 90 S security HP Instant Support 34 self-test diagnostic page printing 36 printing, understanding 35 Services tab, Toolbox (...troubleshoot feeding 63 troubleshoot blank pages printed 57 bleeding colors 62 colors 61, 63 cut-off pages, incorrect text or graphics placement 58 embedded Web server 65...


