User Manual
Page 4
... the product in any copies of any part of any particular purpose. Refer servicing to a power source. Install the product securely on or trip over the line cord, and the line cord cannot be retained in a protected location where no user-serviceable parts inside. Read and understand all... material mentioning or referencing this software or this software is grounded, check with the HP Printer. Do not install or use ...
... the product in any copies of any part of any particular purpose. Refer servicing to a power source. Install the product securely on or trip over the line cord, and the line cord cannot be retained in a protected location where no user-serviceable parts inside. Read and understand all... material mentioning or referencing this software or this software is grounded, check with the HP Printer. Do not install or use ...

User Manual
Page 8
... cables ...90 Other regulatory information 90 EMI statement (Korea) ...91 VCCI statement (Japan 91 Regulatory model number 91 Power cord statement ...91 Declaration of conformity ...92 Environmental sustainability program 93 Reduction and elimination 93 Power consumption ...93 Material safety data sheets 93 Recycling ...93 Product packaging ...94 Plastics ...94 Disposal of waste equipment...
... cables ...90 Other regulatory information 90 EMI statement (Korea) ...91 VCCI statement (Japan 91 Regulatory model number 91 Power cord statement ...91 Declaration of conformity ...92 Environmental sustainability program 93 Reduction and elimination 93 Power consumption ...93 Material safety data sheets 93 Recycling ...93 Product packaging ...94 Plastics ...94 Disposal of waste equipment...
User Manual
Page 14
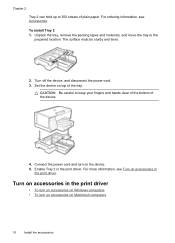
..., remove the packing tapes and materials, and move the tray to keep your fingers and hands clear of the bottom of plain paper. Connect the power cord and turn on accessories on the device. 5. Enable Tray 2 in the print driver. To install Tray 2 1. CAUTION: Be careful to the prepared location. For ordering...
..., remove the packing tapes and materials, and move the tray to keep your fingers and hands clear of the bottom of plain paper. Connect the power cord and turn on accessories on the device. 5. Enable Tray 2 in the print driver. To install Tray 2 1. CAUTION: Be careful to the prepared location. For ordering...

User Manual
Page 53
... across colored block) or staggered lines, calibrate the printer's linefeed. • Control panel: Press and hold (Power button), press (Cancel button) 14 times, press (Resume button) six times, and release (Power button...the Services tab, and then click Calibrate Linefeed and follow the onscreen instructions. • HP Printer Utility (Mac OS): Click Clean from the Information and Support panel. The cleaning process takes... until the carriage moves to stop moving, and then unplug the power cord from the Information and Support panel. NOTE: Cleaning uses ink, so clean the printheads...
... across colored block) or staggered lines, calibrate the printer's linefeed. • Control panel: Press and hold (Power button), press (Cancel button) 14 times, press (Resume button) six times, and release (Power button...the Services tab, and then click Calibrate Linefeed and follow the onscreen instructions. • HP Printer Utility (Mac OS): Click Clean from the Information and Support panel. The cleaning process takes... until the carriage moves to stop moving, and then unplug the power cord from the Information and Support panel. NOTE: Cleaning uses ink, so clean the printheads...

User Manual
Page 55
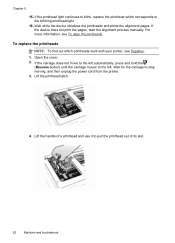
... are on one face of paper or paper towel. Clean the electrical contacts in the power cord and turn on the nozzles. Ink will be visible on the device. Insert the printhead into its color-coded slot (the label on the printhead must match the label on the printhead but ...do not touch the nozzles. Wipe the electrical contacts on the printhead latch). The nozzles are small copper-color squares, grouped on a different face of the printhead. The control panel should indicate that the latch is still blinking, repeat the cleaning procedure...
... are on one face of paper or paper towel. Clean the electrical contacts in the power cord and turn on the nozzles. Ink will be visible on the device. Insert the printhead into its color-coded slot (the label on the printhead must match the label on the printhead but ...do not touch the nozzles. Wipe the electrical contacts on the printhead latch). The nozzles are small copper-color squares, grouped on a different face of the printhead. The control panel should indicate that the latch is still blinking, repeat the cleaning procedure...
User Manual
Page 56
If the printhead light continues to blink, replace the printhead which printheads work with your printer, see To align the printheads. Open the cover. 2. If the carriage does not move to the left . Chapter 5 15. Wait while the device initializes the .... 52 Maintain and troubleshoot Wait for the carriage to pull the printhead out of a printhead and use it to stop moving, and then unplug the power cord from the printer. 3. For more information, see Supplies. 1.
If the printhead light continues to blink, replace the printhead which printheads work with your printer, see To align the printheads. Open the cover. 2. If the carriage does not move to the left . Chapter 5 15. Wait while the device initializes the .... 52 Maintain and troubleshoot Wait for the carriage to pull the printhead out of a printhead and use it to stop moving, and then unplug the power cord from the printer. 3. For more information, see Supplies. 1.
User Manual
Page 58
...an airtight container, such as a resealable plastic bag. If you remove the ink cartridges, place them in the Printers folder. Close programs that you have removed the orange protective caps from each one to ensure proper contact. Make...more information, see Understand the self-test diagnostic page. • The device is on the computer screen. • Power cord and other cables are working, and are performing a task. See your computer's documentation for extended periods of time. ...approximately 10 minutes to initialize it as the default in their correct color-coded slots.
...an airtight container, such as a resealable plastic bag. If you remove the ink cartridges, place them in the Printers folder. Close programs that you have removed the orange protective caps from each one to ensure proper contact. Make...more information, see Understand the self-test diagnostic page. • The device is on the computer screen. • Power cord and other cables are working, and are performing a task. See your computer's documentation for extended periods of time. ...approximately 10 minutes to initialize it as the default in their correct color-coded slots.

User Manual
Page 59
...; Blank or partial page printed • Something on or flashing A non-recoverable error has occurred Disconnect all cables (such as power cord, network cable, and USB cable), wait about 10 minutes. For more information, see Electrical specifications. Check the printhead initialization When ...Device does not accept printhead • Device takes a long time to a functioning alternating current (AC) power outlet. If the problem persists, visit the HP Web site (www.hp.com/support) for the latest troubleshooting information, or product fixes and updates. This process takes about 20 ...
...; Blank or partial page printed • Something on or flashing A non-recoverable error has occurred Disconnect all cables (such as power cord, network cable, and USB cable), wait about 10 minutes. For more information, see Electrical specifications. Check the printhead initialization When ...Device does not accept printhead • Device takes a long time to a functioning alternating current (AC) power outlet. If the problem persists, visit the HP Web site (www.hp.com/support) for the latest troubleshooting information, or product fixes and updates. This process takes about 20 ...
User Manual
Page 69
...with paper. • Make sure that no lights are firmly installed in good working order. • Make sure that the power cord is connected securely to both the device and to ensure proper contact. Troubleshoot installation issues 65 Press down firmly on . For ...• Make sure that all of the device from the command prompt. For more information, see Support and warranty for information about HP support. • Hardware installation suggestions • Software installation suggestions • Solve network problems Hardware installation suggestions Check the device •...
...with paper. • Make sure that no lights are firmly installed in good working order. • Make sure that the power cord is connected securely to both the device and to ensure proper contact. Troubleshoot installation issues 65 Press down firmly on . For ...• Make sure that all of the device from the command prompt. For more information, see Support and warranty for information about HP support. • Hardware installation suggestions • Software installation suggestions • Solve network problems Hardware installation suggestions Check the device •...
User Manual
Page 73
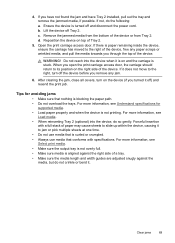
... for avoiding jams • Make sure that conforms with a full stack of Tray 2. 5. If not, do not crinkle or bend it off and disconnect the power cord. Ensure the device is on the device (if you through the top of the device, free any jam. 6. Lift the device off the device before...
... for avoiding jams • Make sure that conforms with a full stack of Tray 2. 5. If not, do not crinkle or bend it off and disconnect the power cord. Ensure the device is on the device (if you through the top of the device, free any jam. 6. Lift the device off the device before...
User Manual
Page 86
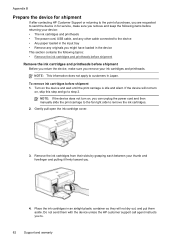
...3. Remove the ink cartridges from their slots by grasping each between your thumb and forefinger and pulling it firmly toward you can unplug the power cord and then manually slide the print carriage to the far right side to remove the ink cartridges. 2. Appendix B Prepare the device for shipment... If after contacting HP Customer Support or returning to the point of purchase, you are requested to send the device in for service, make sure you remove and keep the following items before returning your device: • The ink cartridges and printheads • The power cord, USB cable, ...
...3. Remove the ink cartridges from their slots by grasping each between your thumb and forefinger and pulling it firmly toward you can unplug the power cord and then manually slide the print carriage to the far right side to remove the ink cartridges. 2. Appendix B Prepare the device for shipment... If after contacting HP Customer Support or returning to the point of purchase, you are requested to send the device in for service, make sure you remove and keep the following items before returning your device: • The ink cartridges and printheads • The power cord, USB cable, ...

User Manual
Page 87
... 83 Lift the printhead latch. Prepare the device for the carriage to turn off the device. Press the Power button to stop moving, and then unplug the power cord from the printer. NOTE: If the printer cannot be powered on the left automatically, press and hold the (Resume button) until the carriage moves to its home...
... 83 Lift the printhead latch. Prepare the device for the carriage to turn off the device. Press the Power button to stop moving, and then unplug the power cord from the printer. NOTE: If the printer cannot be powered on the left automatically, press and hold the (Resume button) until the carriage moves to its home...

User Manual
Page 94
... Hanover Street Palo Alto, CA 94304 (650) 857-1501 Other regulatory information • EMI statement (Korea) • VCCI statement (Japan) • Regulatory model number • Power cord statement 90 Regulatory information If this product.
... Hanover Street Palo Alto, CA 94304 (650) 857-1501 Other regulatory information • EMI statement (Korea) • VCCI statement (Japan) • Regulatory model number • Power cord statement 90 Regulatory information If this product.

User Manual
Page 95
Power cord statement The power cord cannot be discarded or returned to the supplier. EMI statement (Korea) VCCI statement (Japan) Regulatory model number For regulatory identification purposes, your product is SNPRC-0601. If it should not be confused with the marketing name (HP Officejet Pro K5300/K5400) or product number (C8184A, C8185A, C8194A, C9277A). The Regulatory Model Number for your product is defective, it is assigned a Regulatory Model Number. Other regulatory information 91 This regulatory number should be repaired.
Power cord statement The power cord cannot be discarded or returned to the supplier. EMI statement (Korea) VCCI statement (Japan) Regulatory model number For regulatory identification purposes, your product is SNPRC-0601. If it should not be confused with the marketing name (HP Officejet Pro K5300/K5400) or product number (C8184A, C8185A, C8194A, C9277A). The Regulatory Model Number for your product is defective, it is assigned a Regulatory Model Number. Other regulatory information 91 This regulatory number should be repaired.

User Manual
Page 101
... notes 5 remove ink cartridges and printheads 82 replace ink cartridges 45 printheads 52 resolution print 88 S security HP Instant Support 34 self-test diagnostic page printing 37 printing, understanding 35 Services tab, Toolbox (Windows) 32 ...printer driver accessories settings 10 settings 21 version 79 warranty 81 printheads aligning 48 clean 49 clean contacts manually 49 first-installation and end-of- Index photo media guidelines 13 sizes supported 15 photos borderless printing 25 ports, specifications 86 power consumption 93 specifications 89 troubleshoot 55 power cord statement 91 power...
... notes 5 remove ink cartridges and printheads 82 replace ink cartridges 45 printheads 52 resolution print 88 S security HP Instant Support 34 self-test diagnostic page printing 37 printing, understanding 35 Services tab, Toolbox (Windows) 32 ...printer driver accessories settings 10 settings 21 version 79 warranty 81 printheads aligning 48 clean 49 clean contacts manually 49 first-installation and end-of- Index photo media guidelines 13 sizes supported 15 photos borderless printing 25 ports, specifications 86 power consumption 93 specifications 89 troubleshoot 55 power cord statement 91 power...


