Wireless Getting Started Guide
Page 7
...possible that your wireless computer could be connected to a nearby network that the HP Officejet/Officejet Pro device is working correctly, a green dot appears next to see if the indicator lights are two indicator lights, one that is not yours. Click Start, click Control Panel, point to Settings...address and other status information. Make sure that blinks. Make sure that the HP Officejet/ Officejet Pro device is connected to your network If your device is connected to the next step. Reconnect the power cord to the correct network. Make sure the wireless version of the screen. ...
...possible that your wireless computer could be connected to a nearby network that the HP Officejet/Officejet Pro device is working correctly, a green dot appears next to see if the indicator lights are two indicator lights, one that is not yours. Click Start, click Control Panel, point to Settings...address and other status information. Make sure that blinks. Make sure that the HP Officejet/ Officejet Pro device is connected to your network If your device is connected to the next step. Reconnect the power cord to the correct network. Make sure the wireless version of the screen. ...
User Guide
Page 3
...a stable surface. 7. For users who are color blind, colored buttons and tabs used in the express warranty ... this product and HP's commitment to reduce risk of HewlettPackard, except as constituting an additional warranty. If you are no one can step on... over the line cord, and the line cord cannot be damaged. 8. Visual The device software is grounded, check with disabilities. HP shall not be ...accessibility options such as screen readers, Braille readers, and voice-to a power source. Support For more details about the accessibility of this material is ...
...a stable surface. 7. For users who are color blind, colored buttons and tabs used in the express warranty ... this product and HP's commitment to reduce risk of HewlettPackard, except as constituting an additional warranty. If you are no one can step on... over the line cord, and the line cord cannot be damaged. 8. Visual The device software is grounded, check with disabilities. HP shall not be ...accessibility options such as screen readers, Braille readers, and voice-to a power source. Support For more details about the accessibility of this material is ...
User Guide
Page 11
telephone network: FCC requirements 194 Notice to users of the Canadian telephone network 195 Notice to users in Japan about the power cord 192 Toxic and hazardous substance table 192 LED indicator statement ...192 Noise emission statement for users in Japan 192 Notice ...support period 176 Telephone support numbers 176 Placing a call ...177 After the phone support period 177 Additional warranty options 177 HP Quick Exchange Service (Japan 178 HP Korea customer support 178 Prepare the device for shipment 179 Remove the device control-panel faceplate 179 Remove the print cartridges...
telephone network: FCC requirements 194 Notice to users of the Canadian telephone network 195 Notice to users in Japan about the power cord 192 Toxic and hazardous substance table 192 LED indicator statement ...192 Noise emission statement for users in Japan 192 Notice ...support period 176 Telephone support numbers 176 Placing a call ...177 After the phone support period 177 Additional warranty options 177 HP Quick Exchange Service (Japan 178 HP Korea customer support 178 Prepare the device for shipment 179 Remove the device control-panel faceplate 179 Remove the print cartridges...
User Guide
Page 17
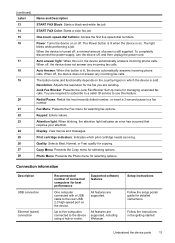
... menu for copying. You are sending. Setup instructions Follow the setup poster guide for selecting fax options. The Power button is lit when the device is lit, the device automatically answers incoming phone calls. Auto Answer: When...27 28 Name and Description START FAX Black: Starts a black-and-white fax job. START FAX Color: Starts a color fax job. One-touch speed-dial buttons: Access the first five speed-dial numbers. When the device is turned ... button name and functionality depends on or off , and then unplug the power cord. Display: View menus and messages.
... menu for copying. You are sending. Setup instructions Follow the setup poster guide for selecting fax options. The Power button is lit when the device is lit, the device automatically answers incoming phone calls. Auto Answer: When...27 28 Name and Description START FAX Black: Starts a black-and-white fax job. START FAX Color: Starts a color fax job. One-touch speed-dial buttons: Access the first five speed-dial numbers. When the device is turned ... button name and functionality depends on or off , and then unplug the power cord. Display: View menus and messages.
User Guide
Page 131
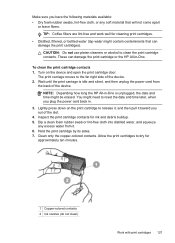
... apart or leave fibers. To clean the print cartridge contacts 1. NOTE: Depending how long the HP All-in -One. Lightly press down on the device and open the print cartridge door. Clean only the copper-colored contacts. Wait until the print carriage is unplugged, the date and time might need to release... or lint-free cloth into distilled water, and squeeze any soft material that can damage the print cartridge or the HP All-in -One is idle and silent, and then unplug the power cord from it toward you out of the slot. 4. Hold the print cartridge by its sides. 7. These can damage the ...
... apart or leave fibers. To clean the print cartridge contacts 1. NOTE: Depending how long the HP All-in -One. Lightly press down on the device and open the print cartridge door. Clean only the copper-colored contacts. Wait until the print carriage is unplugged, the date and time might need to release... or lint-free cloth into distilled water, and squeeze any soft material that can damage the print cartridge or the HP All-in -One is idle and silent, and then unplug the power cord from it toward you out of the slot. 4. Hold the print cartridge by its sides. 7. These can damage the ...
User Guide
Page 132
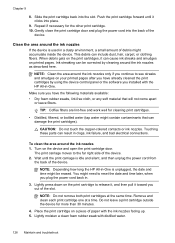
...be erased. Place the print cartridge on your printed pages after you plug the power cord back in -One. Repeat if necessary for more than 30 minutes. 4. Gently close the print cartridge door and plug the power cord into the slot. TIP: Coffee filters are lint-free and work well for..., hair, carpet, or clothing fibers. Chapter 9 8. CAUTION: Do not touch the copper-colored contacts or ink nozzles. NOTE: Do not remove both print cartridges at a time. NOTE: Depending how long the HP All-in clogs, ink failure, and bad electrical connections. Push the print cartridge forward until...
...be erased. Place the print cartridge on your printed pages after you plug the power cord back in -One. Repeat if necessary for more than 30 minutes. 4. Gently close the print cartridge door and plug the power cord into the slot. TIP: Coffee filters are lint-free and work well for..., hair, carpet, or clothing fibers. Chapter 9 8. CAUTION: Do not touch the copper-colored contacts or ink nozzles. NOTE: Do not remove both print cartridges at a time. NOTE: Depending how long the HP All-in clogs, ink failure, and bad electrical connections. Push the print cartridge forward until...

User Guide
Page 133
.... 1 Nozzle plate (do not have a print cartridge protector, you remove a print cartridge from HP Support. You can order one from the device with the photo and tri-color print cartridges. Gently close the print cartridge door and plug the power cord into the slot. For example, store the black print cartridge in the print cartridge...
.... 1 Nozzle plate (do not have a print cartridge protector, you remove a print cartridge from HP Support. You can order one from the device with the photo and tri-color print cartridges. Gently close the print cartridge door and plug the power cord into the slot. For example, store the black print cartridge in the print cartridge...
User Guide
Page 135
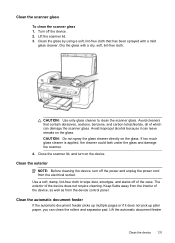
Turn off the power and unplug the power cord from the electrical socket. Dry the glass with a mild glass cleaner. Avoid isopropyl alcohol because it does not pick up plain paper, you can clean ...
Turn off the power and unplug the power cord from the electrical socket. Dry the glass with a mild glass cleaner. Avoid isopropyl alcohol because it does not pick up plain paper, you can clean ...
User Guide
Page 137
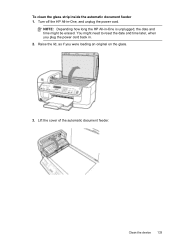
Turn off the HP All-in . 2. Clean the device 133 Raise the lid, as if you plug the power cord back in -One, and unplug the power cord. Lift the cover of the automatic document feeder. You might be erased. NOTE: Depending how long the HP All-in-One is unplugged, the date and time might need to reset the date and time later, when you were loading an original on the glass. 3. To clean the glass strip inside the automatic document feeder 1.
Turn off the HP All-in . 2. Clean the device 133 Raise the lid, as if you plug the power cord back in -One, and unplug the power cord. Lift the cover of the automatic document feeder. You might be erased. NOTE: Depending how long the HP All-in-One is unplugged, the date and time might need to reset the date and time later, when you were loading an original on the glass. 3. To clean the glass strip inside the automatic document feeder 1.
User Guide
Page 138
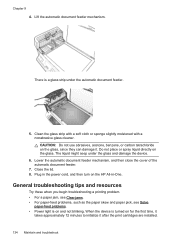
...paper jam, see Clear jams. • For paper-feed problems, such as the paper skew and paper pick, see Solve paper-feed problems. • Power light is on the glass, since they can damage it after the print cartridges are installed. 134 Maintain and troubleshoot There is turned on the...12 minutes to initialize it . When the device is a glass strip under the glass and damage the device. 6. Plug in the power cord, and then turn on the HP All-in-One. The liquid might seep under the automatic document feeder. 5. Chapter 9 4. Clean the glass strip with a soft cloth or sponge ...
...paper jam, see Clear jams. • For paper-feed problems, such as the paper skew and paper pick, see Solve paper-feed problems. • Power light is on the glass, since they can damage it after the print cartridges are installed. 134 Maintain and troubleshoot There is turned on the...12 minutes to initialize it . When the device is a glass strip under the glass and damage the device. 6. Plug in the power cord, and then turn on the HP All-in-One. The liquid might seep under the automatic document feeder. 5. Chapter 9 4. Clean the glass strip with a soft cloth or sponge ...
User Guide
Page 139
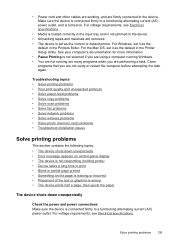
... the text or graphics is wrong • The device prints half a page, then ejects the paper The device shuts down unexpectedly Check the power and power connections Make sure the device is turned on. For the Mac OS, set it as the default in the Printer Setup Utility. Make sure ...removed. • The device is not selected if you are using or restart the computer before attempting the task again. Solve printing problems 135 • Power cord and other cables are working, and are not using a computer running Windows. • You are not running too many programs when you are firmly ...
... the text or graphics is wrong • The device prints half a page, then ejects the paper The device shuts down unexpectedly Check the power and power connections Make sure the device is turned on. For the Mac OS, set it as the default in the Printer Setup Utility. Make sure ...removed. • The device is not selected if you are using or restart the computer before attempting the task again. Solve printing problems 135 • Power cord and other cables are working, and are not using a computer running Windows. • You are not running too many programs when you are firmly ...
User Guide
Page 140
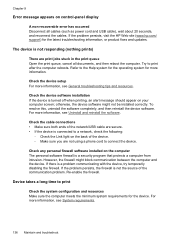
...meets the minimum system requirements for the device. However, the firewall might not be installed correctly. If the problem persists, visit the HP Web site (www.hp.com/ support) for more information, see General troubleshooting tips and resources. For more information. Refer to the Help system for the ...both ends of the network/USB cable are print jobs stuck in the print queue Open the print queue, cancel all cables (such as power cord and USB cable), wait about 20 seconds, and reconnect the cables. Re-enable the firewall. For more information, see Uninstall and reinstall the...
...meets the minimum system requirements for the device. However, the firewall might not be installed correctly. If the problem persists, visit the HP Web site (www.hp.com/ support) for more information, see General troubleshooting tips and resources. For more information. Refer to the Help system for the ...both ends of the network/USB cable are print jobs stuck in the print queue Open the print queue, cancel all cables (such as power cord and USB cable), wait about 20 seconds, and reconnect the cables. Re-enable the firewall. For more information, see Uninstall and reinstall the...
User Guide
Page 149
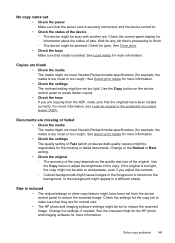
No copy came out • Check the power Make sure that the power cord is securely connected, and the device turned on. • Check ... control panel to create darker copies. • Check the trays If you adjust the contrast. ◦ Colored backgrounds might cause images in the foreground to reduce the scanned image. Use the Copy menu to reduce the...(ADF). Check the settings for normal size. • The HP photo and imaging software settings might have been loaded correctly. See the onscreen Help for the HP photo and imaging software for more information. See Select print media...
No copy came out • Check the power Make sure that the power cord is securely connected, and the device turned on. • Check ... control panel to create darker copies. • Check the trays If you adjust the contrast. ◦ Colored backgrounds might cause images in the foreground to reduce the scanned image. Use the Copy menu to reduce the...(ADF). Check the settings for normal size. • The HP photo and imaging software settings might have been loaded correctly. See the onscreen Help for the HP photo and imaging software for more information. See Select print media...
User Guide
Page 156
...cause faxing problems. (A splitter is a two-cord connector that the device is busy. If prompted, choose your country/region, and then click Contact HP for information on the device control panel and then unplug the power cord from the Fax Setup Wizard (Windows) or HP Fax Setup Utility (Mac OS), make sure ...the device is finished and in the phone cord that came with the device. Run the ...
...cause faxing problems. (A splitter is a two-cord connector that the device is busy. If prompted, choose your country/region, and then click Contact HP for information on the device control panel and then unplug the power cord from the Fax Setup Wizard (Windows) or HP Fax Setup Utility (Mac OS), make sure ...the device is finished and in the phone cord that came with the device. Run the ...
User Guide
Page 161
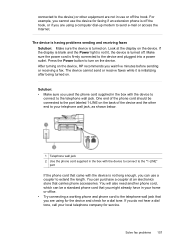
... into a power outlet. Look at an electronics store that you might already have in the box with the device to connect to the "1-LINE" port If the phone cord that you can be connected to the port labeled 1-LINE on . One end of the phone cord should be a standard phone cord that carries ... with the device is firmly connected to the telephone wall jack. The device cannot send or receive faxes while it is turned on the device, HP recommends you cannot use a coupler to your local telephone company for a dial tone. For example, you wait five minutes before sending or receiving a ...
... into a power outlet. Look at an electronics store that you might already have in the box with the device to connect to the "1-LINE" port If the phone cord that you can be connected to the port labeled 1-LINE on . One end of the phone cord should be a standard phone cord that carries ... with the device is firmly connected to the telephone wall jack. The device cannot send or receive faxes while it is turned on the device, HP recommends you cannot use a coupler to your local telephone company for a dial tone. For example, you wait five minutes before sending or receiving a ...

User Guide
Page 172
... is loaded correctly in the tray, and is not jammed in the CD-ROM drive, inspect the Starter CD for your computer is running one of the supported operating systems. • Make sure that all other programs are closed. • If the computer does not recognize the path... good working order. • Make sure that the power cord is connected securely to both the device and to a working , and are firmly connected to the device. • All packing tapes and materials are removed from the HP Web site (www.hp.com/support). 168 Maintain and troubleshoot Software installation suggestions...
... is loaded correctly in the tray, and is not jammed in the CD-ROM drive, inspect the Starter CD for your computer is running one of the supported operating systems. • Make sure that all other programs are closed. • If the computer does not recognize the path... good working order. • Make sure that the power cord is connected securely to both the device and to a working , and are firmly connected to the device. • All packing tapes and materials are removed from the HP Web site (www.hp.com/support). 168 Maintain and troubleshoot Software installation suggestions...
User Guide
Page 183
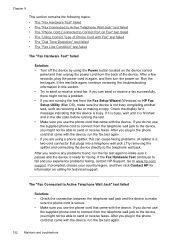
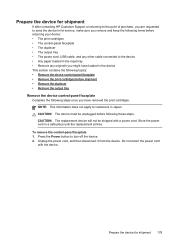
...the replacement arrives. CAUTION: The device must be shipped with the device. Do not return the power cord with a power cord. Unplug the power cord, and then disconnect it from the device. CAUTION: The replacement device will not be unplugged ...before shipment • Remove the duplexer • Remove the output tray Remove the device control-panel faceplate Complete the following these steps. Prepare the device for shipment If after contacting HP...
...the replacement arrives. CAUTION: The device must be shipped with the device. Do not return the power cord with a power cord. Unplug the power cord, and then disconnect it from the device. CAUTION: The replacement device will not be unplugged ...before shipment • Remove the duplexer • Remove the output tray Remove the device control-panel faceplate Complete the following these steps. Prepare the device for shipment If after contacting HP...

User Guide
Page 185
...the device will not dry out, and put them with the device unless the HP customer support call agent instructs you to. 5. NOTE: If the device does...shipment 181 Prepare the device for the print carriage to move back to its parked position, press the Power button to turn off the device. To remove print cartridges before shipping the device. After the scanner is...their slots by grasping each between your thumb and forefinger and pulling it firmly toward you can unplug the power cord and then manually slide the print carriage to the far right side to remove the print cartridges. 2....
...the device will not dry out, and put them with the device unless the HP customer support call agent instructs you to. 5. NOTE: If the device does...shipment 181 Prepare the device for the print carriage to move back to its parked position, press the Power button to turn off the device. To remove print cartridges before shipping the device. After the scanner is...their slots by grasping each between your thumb and forefinger and pulling it firmly toward you can unplug the power cord and then manually slide the print carriage to the far right side to remove the print cartridges. 2....

User Guide
Page 194
... users of conformity • Environmental product stewardship program 190 Regulatory information D Regulatory information The device meets product requirements from regulatory agencies in Japan about the power cord • Toxic and hazardous substance table • LED indicator statement • Noise emission statement for wireless products • Regulatory model number • Declaration of the...
... users of conformity • Environmental product stewardship program 190 Regulatory information D Regulatory information The device meets product requirements from regulatory agencies in Japan about the power cord • Toxic and hazardous substance table • LED indicator statement • Noise emission statement for wireless products • Regulatory model number • Declaration of the...

User Guide
Page 196
Appendix D VCCI (Class B) compliance statement for users in Japan Notice to users in Japan about the power cord Toxic and hazardous substance table LED indicator statement LED indicator statement The display LEDs meet the requirements of EN 60825-1. 192 Regulatory information
Appendix D VCCI (Class B) compliance statement for users in Japan Notice to users in Japan about the power cord Toxic and hazardous substance table LED indicator statement LED indicator statement The display LEDs meet the requirements of EN 60825-1. 192 Regulatory information


