
User Manual
Page 1
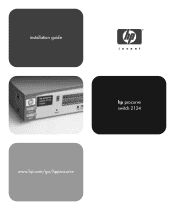
installation guide hp procurve switch 2124 www.hp.com/go/hpprocurve
installation guide hp procurve switch 2124 www.hp.com/go/hpprocurve

User Manual
Page 3
HP Procurve Switch 2124 Installation Guide
HP Procurve Switch 2124 Installation Guide
User Manual
Page 4
... change without prior permission is protected by Hewlett-Packard. Publication Number J4868-90001 June 2001 Applicable Products HP Procurve Switch 2124 (HP J4868A) Disclaimer The information contained in this product, please read the "Installation Precautions" in chapter 2, "Installing the Switch 2124", and the safety statements in connection with the product. Hewlett-Packard Company 8000 Foothills Boulevard, m/s 5552...
... change without prior permission is protected by Hewlett-Packard. Publication Number J4868-90001 June 2001 Applicable Products HP Procurve Switch 2124 (HP J4868A) Disclaimer The information contained in this product, please read the "Installation Precautions" in chapter 2, "Installing the Switch 2124", and the safety statements in connection with the product. Hewlett-Packard Company 8000 Foothills Boulevard, m/s 5552...

User Manual
Page 5
... Switch 2-8 5. Contents 1 Introducing the HP Procurve Switch 2124 Front of the Switch 1-2 Network Ports 1-2 Reset Button 1-2 LEDs 1-3 LED Mode Select Button and Indicator LEDs 1-4 Back of the Switch 1-5 Power Connector 1-5 Features 1-6 Switch Operation Overview 1-6 Address Table Operation 1-6 2 Installing the Switch 2124 Included Parts 2-1 Installation Procedures 2-2 Summary 2-2 Installation Precautions 2-3 1. Connect the Network Cables 2-13 Example Network Topologies 2-14 As a Desktop Switch...
... Switch 2-8 5. Contents 1 Introducing the HP Procurve Switch 2124 Front of the Switch 1-2 Network Ports 1-2 Reset Button 1-2 LEDs 1-3 LED Mode Select Button and Indicator LEDs 1-4 Back of the Switch 1-5 Power Connector 1-5 Features 1-6 Switch Operation Overview 1-6 Address Table Operation 1-6 2 Installing the Switch 2124 Included Parts 2-1 Installation Procedures 2-2 Summary 2-2 Installation Precautions 2-3 1. Connect the Network Cables 2-13 Example Network Topologies 2-14 As a Desktop Switch...

User Manual
Page 7
... networking. This chapter describes your HP Switch 2124 including: I Switch operation overview 1-1 You can also connect this switch to hubs, other switches, or routers as part of the switch I Features I Front and back of your network infrastructure. This switch is a multiport switch that offers low latency for installing an HP 100-FX SC Transceiver (HP J4853A). HP Procurve Switch 2124 (HP J4868A) Throughout this manual, this...
... networking. This chapter describes your HP Switch 2124 including: I Switch operation overview 1-1 You can also connect this switch to hubs, other switches, or routers as part of the switch I Features I Front and back of your network infrastructure. This switch is a multiport switch that offers low latency for installing an HP 100-FX SC Transceiver (HP J4853A). HP Procurve Switch 2124 (HP J4868A) Throughout this manual, this...
User Manual
Page 8
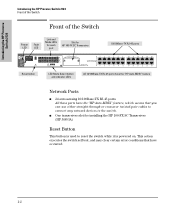
... any network devices to reset the switch while it is powered on. I 24 auto-sensing 10/100Base-TX RJ-45 ports All these ports have occurred. 1-2 Introducing the HP Procurve Switch 2124 Introducing the HP Procurve Switch 2124 Front of the Switch Front of the Switch Link and Mode LEDs Slot for... Power Fault for each HP 100-FX SC Transceiver LED LED port 10/100Base-TX RJ-45 ports...
... any network devices to reset the switch while it is powered on. I 24 auto-sensing 10/100Base-TX RJ-45 ports All these ports have occurred. 1-2 Introducing the HP Procurve Switch 2124 Introducing the HP Procurve Switch 2124 Front of the Switch Front of the Switch Link and Mode LEDs Slot for... Power Fault for each HP 100-FX SC Transceiver LED LED port 10/100Base-TX RJ-45 ports...
User Manual
Page 9
... active network cable is connected to the port • the port is an on the next page for more information. Introducing the HP Procurve Switch 2124 Introducing the HP Procurve Switch 2124 Front of switch self test. An unsupported transceiver has been installed in the transceiver slot. See "LED Mode Select Button and Indicator LEDs" on /off...
... active network cable is connected to the port • the port is an on the next page for more information. Introducing the HP Procurve Switch 2124 Introducing the HP Procurve Switch 2124 Front of switch self test. An unsupported transceiver has been installed in the transceiver slot. See "LED Mode Select Button and Indicator LEDs" on /off...
User Manual
Page 10
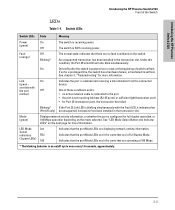
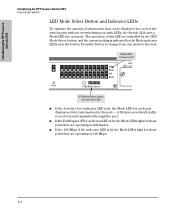
... is indicated by the LED Mode Select button, and the current setting is received and transmitted through the port. Introducing the HP Procurve Switch 2124 Introducing the HP Procurve Switch 2124 Front of the Switch LED Mode Select Button and Indicator LEDs To optimize the amount of information that can be displayed for each port. Mode LEDs... and indicator LEDs I If the Full Duplex (FDx) indicator LED is lit, the Mode LED for each port displays activity information for each of the switch ports without overwhelming you with LEDs, the Switch 2124 uses a Mode LED for the port -
... is indicated by the LED Mode Select button, and the current setting is received and transmitted through the port. Introducing the HP Procurve Switch 2124 Introducing the HP Procurve Switch 2124 Front of the Switch LED Mode Select Button and Indicator LEDs To optimize the amount of information that can be displayed for each port. Mode LEDs... and indicator LEDs I If the Full Duplex (FDx) indicator LED is lit, the Mode LED for each port displays activity information for each of the switch ports without overwhelming you with LEDs, the Switch 2124 uses a Mode LED for the port -
User Manual
Page 11
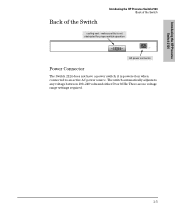
cooling vent - it is not obstructed for proper switch operation AC power connector Power Connector The Switch 2124 does not have a power switch; Introducing the HP Procurve Switch 2124 Introducing the HP Procurve Switch 2124 Back of the Switch Back of the Switch . make sure this is powered on when connected to any voltage between 100--240 volts and either 50 or 60 Hz. The switch automatically adjusts to an active AC power source. There are no voltage range settings required. 1-5
cooling vent - it is not obstructed for proper switch operation AC power connector Power Connector The Switch 2124 does not have a power switch; Introducing the HP Procurve Switch 2124 Introducing the HP Procurve Switch 2124 Back of the Switch Back of the Switch . make sure this is powered on when connected to any voltage between 100--240 volts and either 50 or 60 Hz. The switch automatically adjusts to an active AC power source. There are no voltage range settings required. 1-5
User Manual
Page 12
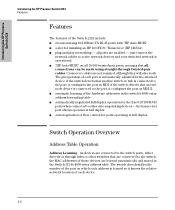
Introducing the HP Procurve Switch 2124 Introducing the HP Procurve Switch 2124 Features Features The features of the Switch 2124 include: I 24 auto-sensing 10/100Base-TX RJ-45 ports with "HP Auto-MDIX" I a slot for ports operating at full duplex. The switch also identifies the number of the port on ...active network devices and your switched network is learned so it configures the port as MDI; all connections can be made using straight-through hubs or other auto-negotiating devices - The pin operation of the hardware addresses in the Switch 2124's 4000-entry address table....
Introducing the HP Procurve Switch 2124 Introducing the HP Procurve Switch 2124 Features Features The features of the Switch 2124 include: I 24 auto-sensing 10/100Base-TX RJ-45 ports with "HP Auto-MDIX" I a slot for ports operating at full duplex. The switch also identifies the number of the port on ...active network devices and your switched network is learned so it configures the port as MDI; all connections can be made using straight-through hubs or other auto-negotiating devices - The pin operation of the hardware addresses in the Switch 2124's 4000-entry address table....
User Manual
Page 13
... new port location of that address are moved in the address table. I forward - When devices are forwarded or filtered out appropriately. Introducing the HP Procurve Switch 2124 Introducing the HP Procurve Switch 2124 Switch Operation Overview Forwarding, Filtering, Flooding. Based on a port, the destination address will not yet be in a packet received on the port location of...
... new port location of that address are moved in the address table. I forward - When devices are forwarded or filtered out appropriately. Introducing the HP Procurve Switch 2124 Introducing the HP Procurve Switch 2124 Switch Operation Overview Forwarding, Filtering, Flooding. Based on a port, the destination address will not yet be in a packet received on the port location of...
User Manual
Page 15
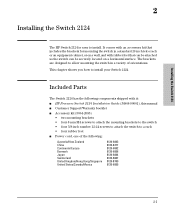
...6807 8120-8709 8120-6805 2-1 Included Parts The Switch 2124 has the following components shipped with rubber feet that can be attached so the switch can be securely located on a wall, and with it: I HP Procurve Switch 2124 Installation Guide (J4868-90001), this manual I Customer... number 12-24 screws to attach the switch to allow mounting the switch in a standard 19-inch telco rack or an equipment cabinet, or on a horizontal surface. Installing the Switch 2124 2 Installing the Switch 2124 The HP Switch 2124 is easy to install your Switch 2124. The brackets are designed to a rack...
...6807 8120-8709 8120-6805 2-1 Included Parts The Switch 2124 has the following components shipped with rubber feet that can be attached so the switch can be securely located on a wall, and with it: I HP Procurve Switch 2124 Installation Guide (J4868-90001), this manual I Customer... number 12-24 screws to attach the switch to allow mounting the switch in a standard 19-inch telco rack or an equipment cabinet, or on a horizontal surface. Installing the Switch 2124 2 Installing the Switch 2124 The HP Switch 2124 is easy to install your Switch 2124. The brackets are designed to a rack...
User Manual
Page 16
... where you will be up and running. The Switch 2124 can be easier to the nearby AC power source. 6. Connect power to the switch ports. Connect the network devices. Please see page 2-3 for installing an HP 100-FX SC Transceiver (HP J4853A). Depending on a horizontal surface. 5. Once the switch is properly prepared including having a good location...
... where you will be up and running. The Switch 2124 can be easier to the nearby AC power source. 6. Connect power to the switch ports. Connect the network devices. Please see page 2-3 for installing an HP 100-FX SC Transceiver (HP J4853A). Depending on a horizontal surface. 5. Once the switch is properly prepared including having a good location...
User Manual
Page 17
... as possible, with the heaviest device at the bottom and progressively lighter devices installed above. The mark is your HP Switch 2124. To determine the possibility of overloading the supply circuits, add together the ampere ratings of the safety agency that... the power cord can be adequately secured to ensure proper switch cooling. 2-3 Installing the Switch 2124 Warning Cautions Installing the Switch 2124 Installation Procedures Installation Precautions: Follow these precautions when installing your assurance that defines the regulations for...
... as possible, with the heaviest device at the bottom and progressively lighter devices installed above. The mark is your HP Switch 2124. To determine the possibility of overloading the supply circuits, add together the ampere ratings of the safety agency that... the power cord can be adequately secured to ensure proper switch cooling. 2-3 Installing the Switch 2124 Warning Cautions Installing the Switch 2124 Installation Procedures Installation Precautions: Follow these precautions when installing your assurance that defines the regulations for...
User Manual
Page 18
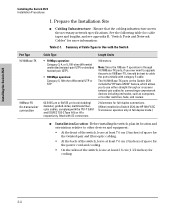
...Location - Ensure that the cabling infrastructure meets the necessary network specifications. Length Limits 100 meters. The 10/100-Base-TX ports on the Switch 2124 include the"HP Auto-MDIX" feature, which allows you ever want to upgrade the ports to 100Base-TX, it would be best to Use with the... Switch Port Type 10/100Base-TX 100Base-FX for full-duplex connections. (When installed in a Switch 2124, the HP 100-FX SC Transceiver operates only in full-duplex mode.) I Cabling Infrastructure - Note: Since the...
...Location - Ensure that the cabling infrastructure meets the necessary network specifications. Length Limits 100 meters. The 10/100-Base-TX ports on the Switch 2124 include the"HP Auto-MDIX" feature, which allows you ever want to upgrade the ports to 100Base-TX, it would be best to Use with the... Switch Port Type 10/100Base-TX 100Base-FX for full-duplex connections. (When installed in a Switch 2124, the HP 100-FX SC Transceiver operates only in full-duplex mode.) I Cabling Infrastructure - Note: Since the...

User Manual
Page 19
... Model: Install only the HP J4853A 100-FX SC Transceiver into the transceiver slot as shown in the illustration below, or by following the instructions in the slot, make sure that comes with the transceiver. Unplug the AC power from the switch. 2. Installing the Switch 2124 Tr a n s c e i v e r Notes Installing the Switch 2124 Installation Procedures 2. Retain the...
... Model: Install only the HP J4853A 100-FX SC Transceiver into the transceiver slot as shown in the illustration below, or by following the instructions in the slot, make sure that comes with the transceiver. Unplug the AC power from the switch. 2. Installing the Switch 2124 Tr a n s c e i v e r Notes Installing the Switch 2124 Installation Procedures 2. Retain the...

User Manual
Page 20
...location, you should be located near the switch installation. The LED behavior is connected to the switch and to a power source. If your switch requires a different power cord than the one supplied with the switch to the power connector on when the...Check the LEDs on the switch. The switch automatically adjusts to the power connector The Switch 2124 does not have optionally installed a transceiver, but before mounting the switch in its self test. 1. Installing the Switch 2124 Installing the Switch 2124 Installation Procedures 3. Verify the Switch Operates Correctly After you have...
...location, you should be located near the switch installation. The LED behavior is connected to the switch and to a power source. If your switch requires a different power cord than the one supplied with the switch to the power connector on when the...Check the LEDs on the switch. The switch automatically adjusts to the power connector The Switch 2124 does not have optionally installed a transceiver, but before mounting the switch in its self test. 1. Installing the Switch 2124 Installing the Switch 2124 Installation Procedures 3. Verify the Switch Operates Correctly After you have...

User Manual
Page 21
...: During the self test: • All the switch and port LEDs are connected to active network devices, the Link LEDs stay on and the Mode LEDs behave according to complete. Installing the Switch 2124 Installing the Switch 2124 Installation Procedures switch port LEDs Power and Fault LEDs When the switch is powered on, it starts blinking, the...
...: During the self test: • All the switch and port LEDs are connected to active network devices, the Link LEDs stay on and the Mode LEDs behave according to complete. Installing the Switch 2124 Installing the Switch 2124 Installation Procedures switch port LEDs Power and Fault LEDs When the switch is powered on, it starts blinking, the...

User Manual
Page 22
... and partially install the two bottom screws, as a server cabinet. Installing the Switch 2124 Installation Procedures 4. Warning For safe operation, please read the Installation Precautions on the next page. The Switch 2124 can be mounted in these ways: I in a stable location. Then proceed... to mount the switch in a rack or cabinet I on a horizontal surface I on a wall Rack or Cabinet Mounting The Switch 2124 is designed to the switch with the switch. Installing the Switch 2124 8 mm M4 screws 2-8 Equipment Cabinet Note If you are ...
... and partially install the two bottom screws, as a server cabinet. Installing the Switch 2124 Installation Procedures 4. Warning For safe operation, please read the Installation Precautions on the next page. The Switch 2124 can be mounted in these ways: I in a stable location. Then proceed... to mount the switch in a rack or cabinet I on a horizontal surface I on a wall Rack or Cabinet Mounting The Switch 2124 is designed to the switch with the switch. Installing the Switch 2124 8 mm M4 screws 2-8 Equipment Cabinet Note If you are ...

User Manual
Page 23
...at the same level in each rack/cabinet upright as shown in the illustration below describe a convenient method of mounting the switch in a rack by placing it on both sides of a close (0.5-inch) pair on two screws that you first install in the ... top hole of a pair of the bracket slide onto the screws, then tighten these screws. Installing the Switch 2124 Note Installing the Switch 2124 Installation Procedures Steps 2, 3, and 4 below . You may, instead, just hold the switch with attached brackets up with mounting brackets onto the partially installed screw 2-9 Place the...
...at the same level in each rack/cabinet upright as shown in the illustration below describe a convenient method of mounting the switch in a rack by placing it on both sides of a close (0.5-inch) pair on two screws that you first install in the ... top hole of a pair of the bracket slide onto the screws, then tighten these screws. Installing the Switch 2124 Note Installing the Switch 2124 Installation Procedures Steps 2, 3, and 4 below . You may, instead, just hold the switch with attached brackets up with mounting brackets onto the partially installed screw 2-9 Place the...


