
User Manual
Page 1
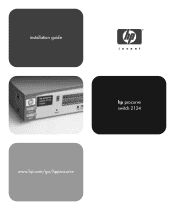
installation guide hp procurve switch 2124 www.hp.com/go/hpprocurve
installation guide hp procurve switch 2124 www.hp.com/go/hpprocurve

User Manual
Page 3
HP Procurve Switch 2124 Installation Guide
HP Procurve Switch 2124 Installation Guide
User Manual
Page 4
...the copyright laws. Safety Before installing and operating this product, please read the "Installation Precautions" in chapter 2, "Installing the Switch 2124", and the safety statements in connection with the product. © Copyright 2001 Hewlett-Packard Company All Rights Reserved. Reproduction... of this document is not furnished by copyright. Publication Number J4868-90001 June 2001 Applicable Products HP Procurve Switch 2124 (HP J4868A) Disclaimer The information contained in this material. Hewlett-Packard Company 8000 Foothills Boulevard, m/s 5552 Roseville, California 95747...
...the copyright laws. Safety Before installing and operating this product, please read the "Installation Precautions" in chapter 2, "Installing the Switch 2124", and the safety statements in connection with the product. © Copyright 2001 Hewlett-Packard Company All Rights Reserved. Reproduction... of this document is not furnished by copyright. Publication Number J4868-90001 June 2001 Applicable Products HP Procurve Switch 2124 (HP J4868A) Disclaimer The information contained in this material. Hewlett-Packard Company 8000 Foothills Boulevard, m/s 5552 Roseville, California 95747...

User Manual
Page 5
... 2-12 6. Install An Optional Transceiver 2-5 3. Prepare the Installation Site 2-4 2. Contents 1 Introducing the HP Procurve Switch 2124 Front of the Switch 1-2 Network Ports 1-2 Reset Button 1-2 LEDs 1-3 LED Mode Select Button and Indicator LEDs 1-4 Back of the Switch 1-5 Power Connector 1-5 Features 1-6 Switch Operation Overview 1-6 Address Table Operation 1-6 2 Installing the Switch 2124 Included Parts 2-1 Installation Procedures 2-2 Summary 2-2 Installation Precautions 2-3 1.
... 2-12 6. Install An Optional Transceiver 2-5 3. Prepare the Installation Site 2-4 2. Contents 1 Introducing the HP Procurve Switch 2124 Front of the Switch 1-2 Network Ports 1-2 Reset Button 1-2 LEDs 1-3 LED Mode Select Button and Indicator LEDs 1-4 Back of the Switch 1-5 Power Connector 1-5 Features 1-6 Switch Operation Overview 1-6 Address Table Operation 1-6 2 Installing the Switch 2124 Included Parts 2-1 Installation Procedures 2-2 Summary 2-2 Installation Precautions 2-3 1.

User Manual
Page 6
... Troubleshooting Tips 3-1 Diagnosing with the LEDs 3-3 Hardware Diagnostic Tests 3-5 Testing the Switch by Resetting It 3-5 Testing Twisted-Pair Cabling 3-5 Testing End-to-End Network Communications 3-6 HP Customer Support Services 3-6 A Specifications Physical A-1 Electrical A-1 Environmental A-1 Acoustic A-1 Connectors A-2 Safety A-2 B Switch Ports and Network Cables Switch Ports B-1 Cables B-2 Twisted-Pair Cable/Connector Pin-Outs B-2 Straight-Through Twisted-Pair...
... Troubleshooting Tips 3-1 Diagnosing with the LEDs 3-3 Hardware Diagnostic Tests 3-5 Testing the Switch by Resetting It 3-5 Testing Twisted-Pair Cabling 3-5 Testing End-to-End Network Communications 3-6 HP Customer Support Services 3-6 A Specifications Physical A-1 Electrical A-1 Environmental A-1 Acoustic A-1 Connectors A-2 Safety A-2 B Switch Ports and Network Cables Switch Ports B-1 Cables B-2 Twisted-Pair Cable/Connector Pin-Outs B-2 Straight-Through Twisted-Pair...

User Manual
Page 7
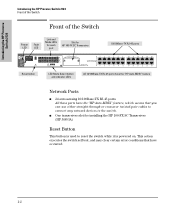
.... You can directly connect end node devices such as part of your HP Switch 2124 including: I Front and back of the switch I Features I Switch operation overview 1-1 HP Procurve Switch 2124 (HP J4868A) Throughout this manual, this switch, providing dedicated bandwidth to build high-performance switched workgroup networks. The Switch 2124 has 24 auto-sensing 10/100Base-TX RJ-45 ports, and...
.... You can directly connect end node devices such as part of your HP Switch 2124 including: I Front and back of the switch I Features I Switch operation overview 1-1 HP Procurve Switch 2124 (HP J4868A) Throughout this manual, this switch, providing dedicated bandwidth to build high-performance switched workgroup networks. The Switch 2124 has 24 auto-sensing 10/100Base-TX RJ-45 ports, and...
User Manual
Page 8
...LEDs All 10/100Base-TX RJ-45 ports have the "HP Auto-MDIX" feature Network Ports I One transceiver slot for installing the HP 100-FX SC Transceiver (HP J4853A) Reset Button This button is powered on. This action executes the switch self test, and may clear certain error conditions that have... the "HP Auto-MDIX" feature, which means that you can use either...
...LEDs All 10/100Base-TX RJ-45 ports have the "HP Auto-MDIX" feature Network Ports I One transceiver slot for installing the HP 100-FX SC Transceiver (HP J4853A) Reset Button This button is powered on. This action executes the switch self test, and may clear certain error conditions that have... the "HP Auto-MDIX" feature, which means that you can use either...
User Manual
Page 9
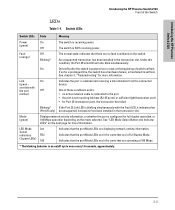
... on or reset, at 100 Mbps. * The blinking behavior is NOT receiving power. Fault (orange) Off Blinking* The normal state; Introducing the HP Procurve Switch 2124 Introducing the HP Procurve Switch 2124 Front of these conditions exists: • no active network cable is connected to the port • the port is not receiving link...
... on or reset, at 100 Mbps. * The blinking behavior is NOT receiving power. Fault (orange) Off Blinking* The normal state; Introducing the HP Procurve Switch 2124 Introducing the HP Procurve Switch 2124 Front of these conditions exists: • no active network cable is connected to the port • the port is not receiving link...
User Manual
Page 10
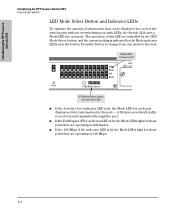
... (Act) indicator LED is lit, the Mode LEDs light for those ports that are operating in full duplex. Introducing the HP Procurve Switch 2124 Introducing the HP Procurve Switch 2124 Front of the Switch LED Mode Select Button and Indicator LEDs To optimize the amount of information that can be displayed for each port. Press... and indicator LEDs I If the 100 Mbps (100) indicator LED is lit, the Mode LED for each port displays activity information for each of the switch ports without overwhelming you with LEDs, the Switch 2124 uses a Mode LED for the port -
... (Act) indicator LED is lit, the Mode LEDs light for those ports that are operating in full duplex. Introducing the HP Procurve Switch 2124 Introducing the HP Procurve Switch 2124 Front of the Switch LED Mode Select Button and Indicator LEDs To optimize the amount of information that can be displayed for each port. Press... and indicator LEDs I If the 100 Mbps (100) indicator LED is lit, the Mode LED for each port displays activity information for each of the switch ports without overwhelming you with LEDs, the Switch 2124 uses a Mode LED for the port -
User Manual
Page 11
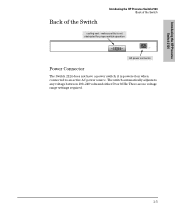
make sure this is powered on when connected to any voltage between 100--240 volts and either 50 or 60 Hz. The switch automatically adjusts to an active AC power source. There are no voltage range settings required. 1-5 it is not obstructed for proper switch operation AC power connector Power Connector The Switch 2124 does not have a power switch; cooling vent - Introducing the HP Procurve Switch 2124 Introducing the HP Procurve Switch 2124 Back of the Switch Back of the Switch .
make sure this is powered on when connected to any voltage between 100--240 volts and either 50 or 60 Hz. The switch automatically adjusts to an active AC power source. There are no voltage range settings required. 1-5 it is not obstructed for proper switch operation AC power connector Power Connector The Switch 2124 does not have a power switch; cooling vent - Introducing the HP Procurve Switch 2124 Introducing the HP Procurve Switch 2124 Back of the Switch Back of the Switch .
User Manual
Page 12
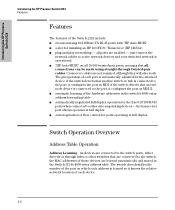
all ports are not required, although they will also work. just connect the network cables to active network devices and your switched network is operational I "HP Auto-MDIX" on which each device. 1-6 Cross-over cables are enabled - The pin operation of each port is ...the port as MDI-X. the transceiver port always operates at full duplex Switch Operation Overview Address Table Operation Address Learning. Introducing the HP Procurve Switch 2124 Introducing the HP Procurve Switch 2124 Features Features The features of the Switch 2124 include: I 24 auto-sensing 10/100Base-TX RJ-45 ports...
all ports are not required, although they will also work. just connect the network cables to active network devices and your switched network is operational I "HP Auto-MDIX" on which each device. 1-6 Cross-over cables are enabled - The pin operation of each port is ...the port as MDI-X. the transceiver port always operates at full duplex Switch Operation Overview Address Table Operation Address Learning. Introducing the HP Procurve Switch 2124 Introducing the HP Procurve Switch 2124 Features Features The features of the Switch 2124 include: I 24 auto-sensing 10/100Base-TX RJ-45 ports...
User Manual
Page 13
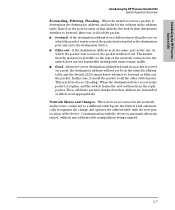
... maintained, without any address table manipulation being required. 1-7 Introducing the HP Procurve Switch 2124 Introducing the HP Procurve Switch 2124 Switch Operation Overview Forwarding, Filtering, Flooding. When the switch receives a packet, it replies, and the switch learns the new address from the reply packet. I forward - if...the device is referred to forward or filter out the packet. The switch thereby isolates local traffic so the rest of the network connected to a different switch port, the Switch 2124 automatically recognizes the change and updates the address table with the...
... maintained, without any address table manipulation being required. 1-7 Introducing the HP Procurve Switch 2124 Introducing the HP Procurve Switch 2124 Switch Operation Overview Forwarding, Filtering, Flooding. When the switch receives a packet, it replies, and the switch learns the new address from the reply packet. I forward - if...the device is referred to forward or filter out the packet. The switch thereby isolates local traffic so the rest of the network connected to a different switch port, the Switch 2124 automatically recognizes the change and updates the address table with the...
User Manual
Page 15
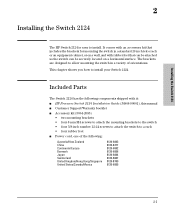
...-6806 8120-6804 8120-6807 8120-8709 8120-6805 2-1 The brackets are designed to allow mounting the switch in a standard 19-inch telco rack or an equipment cabinet, or on a wall, and with it: I HP Procurve Switch 2124 Installation Guide (J4868-90001), this manual I Customer Support/Warranty booklet I Accessory kit (5064-2085) •...
...-6806 8120-6804 8120-6807 8120-8709 8120-6805 2-1 The brackets are designed to allow mounting the switch in a standard 19-inch telco rack or an equipment cabinet, or on a wall, and with it: I HP Procurve Switch 2124 Installation Guide (J4868-90001), this manual I Customer Support/Warranty booklet I Accessory kit (5064-2085) •...
User Manual
Page 16
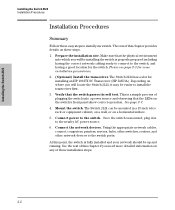
.... 5. This is properly prepared including having a good location for installing an HP 100-FX SC Transceiver (HP J4853A). Once the switch is mounted, plug it may be installing the switch is a simple process of plugging the switch into which you will locate the Switch 2124, it in a 19-inch telco rack or equipment cabinet, on a wall...
.... 5. This is properly prepared including having a good location for installing an HP 100-FX SC Transceiver (HP J4853A). Once the switch is mounted, plug it may be installing the switch is a simple process of plugging the switch into which you will locate the Switch 2124, it in a 19-inch telco rack or equipment cabinet, on a wall...
User Manual
Page 17
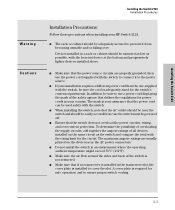
...your installation requires a different power cord than the one supplied with the switch to connect it from becoming unstable and/or falling over -current protection. I If your HP Switch 2124. I Do not install the switch in case the switch must be sure the cord is installed to cover the slot. I ...Make sure the air flow around the sides and back of all devices installed on the devices near the switch and should be used safely...
...your installation requires a different power cord than the one supplied with the switch to connect it from becoming unstable and/or falling over -current protection. I If your HP Switch 2124. I Do not install the switch in case the switch must be sure the cord is installed to cover the slot. I ...Make sure the air flow around the sides and back of all devices installed on the devices near the switch and should be used safely...
User Manual
Page 18
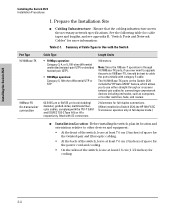
...cooling. • On the sides of Cable Types to cable the ports initially with the Switch Port Type 10/100Base-TX 100Base-FX for full-duplex connections. (When installed in a Switch 2124, the HP 100-FX SC Transceiver operates only in full-duplex mode.) I Cabling Infrastructure - Summary ...of the switch, leave at least 3.8 cm (1 1/2 inches) for more information: Table 2-1. The 10/100-Base-TX ports on the Switch 2124 include the"HP Auto-MDIX" feature, which allows you ever want to upgrade the ports to...
...cooling. • On the sides of Cable Types to cable the ports initially with the Switch Port Type 10/100Base-TX 100Base-FX for full-duplex connections. (When installed in a Switch 2124, the HP 100-FX SC Transceiver operates only in full-duplex mode.) I Cabling Infrastructure - Summary ...of the switch, leave at least 3.8 cm (1 1/2 inches) for more information: Table 2-1. The 10/100-Base-TX ports on the Switch 2124 include the"HP Auto-MDIX" feature, which allows you ever want to upgrade the ports to...

User Manual
Page 19
...3. I If you screw in the retaining screws to reboot the switch and initialize the transceiver. I Install only the HP J4853A 100-FX SC Transceiver into the transceiver slot. 2-5 Supported Transceiver Model: Install only the HP J4853A 100-FX SC Transceiver into the transceiver slot in the slot... removed with the face of the switch. 4. Unplug the AC power from the switch. 2. Press in the manual that you do not overtighten them. 5. I Make sure the transceiver is not supported. Install An Optional Transceiver Install an optional HP 100-FX SC Transceiver into the ...
...3. I If you screw in the retaining screws to reboot the switch and initialize the transceiver. I Install only the HP J4853A 100-FX SC Transceiver into the transceiver slot. 2-5 Supported Transceiver Model: Install only the HP J4853A 100-FX SC Transceiver into the transceiver slot in the slot... removed with the face of the switch. 4. Unplug the AC power from the switch. 2. Press in the manual that you do not overtighten them. 5. I Make sure the transceiver is not supported. Install An Optional Transceiver Install an optional HP 100-FX SC Transceiver into the ...

User Manual
Page 20
... source and verifying that it passes its network location, you should be located near the switch installation. There are no voltage range settings required. Verify the Switch Operates Correctly After you have a power switch. For safety, the power outlet should first check that it is powered on page 2-3.... 2. It is working properly by plugging it into a nearby properly grounded electrical outlet. The switch automatically adjusts to a power source. The LED behavior is connected to the switch and to any voltage between 100-240 volts and either 50 or 60 Hz. Check the LEDs...
... source and verifying that it passes its network location, you should be located near the switch installation. There are no voltage range settings required. Verify the Switch Operates Correctly After you have a power switch. For safety, the power outlet should first check that it is powered on page 2-3.... 2. It is working properly by plugging it into a nearby properly grounded electrical outlet. The switch automatically adjusts to a power source. The LED behavior is connected to the switch and to any voltage between 100-240 volts and either 50 or 60 Hz. Check the LEDs...

User Manual
Page 21
...LED display is different than 10 seconds or it performs its diagnostic self test. LED Behavior: During the self test: • All the switch and port LEDs are on , it starts blinking, the self test has not completed correctly. Refer to complete. Installing the... Switch 2124 Installing the Switch 2124 Installation Procedures switch port LEDs Power and Fault LEDs When the switch is powered on . When the self test completes successfully: • The large Power LED remains on. ...
...LED display is different than 10 seconds or it performs its diagnostic self test. LED Behavior: During the self test: • All the switch and port LEDs are on , it starts blinking, the self test has not completed correctly. Refer to complete. Installing the... Switch 2124 Installing the Switch 2124 Installation Procedures switch port LEDs Power and Fault LEDs When the switch is powered on . When the self test completes successfully: • The large Power LED remains on. ...

User Manual
Page 22
... are ready to be mounted in any EIA-standard 19-inch telco rack or in place of the 12-24 screws that are installing the switch in an equipment cabinet, use the clips and screws that came with the included 8-mm M4 screws. Plan which four holes you are supplied with... the switch. Installing the Switch 2124 Installation Procedures 4. The Switch 2124 can be using in the cabinet and install all four clips and partially install the two bottom screws, as a server cabinet...
... are ready to be mounted in any EIA-standard 19-inch telco rack or in place of the 12-24 screws that are installing the switch in an equipment cabinet, use the clips and screws that came with the included 8-mm M4 screws. Plan which four holes you are supplied with... the switch. Installing the Switch 2124 Installation Procedures 4. The Switch 2124 can be using in the cabinet and install all four clips and partially install the two bottom screws, as a server cabinet...


