HP DesignJet 5000 Series Printer - Setup Poster
Page 1
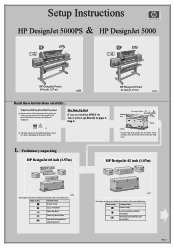
... Assembly Assorted consumables and documents Page 1 Mark on the printer model. When this is necessary this symbol is cut. 1. st570 n The time required to lift them. What You Will Need For This Procedure: n Because some of the components of box Printer body Legs Assembly Take-... of the printer are bulky, you may fall as soon as the strap is displayed: The Take-Up Reel If you are installing ONLY the Take-Up Reel, go directly to the table below. Setup Instructions HP DesignJet 5000PS & HP DesignJet 5000 HP DesignJet Printer 60 inch (1.57 m) st501 HP DesignJet Printer 42 inch...
... Assembly Assorted consumables and documents Page 1 Mark on the printer model. When this is necessary this symbol is cut. 1. st570 n The time required to lift them. What You Will Need For This Procedure: n Because some of the components of box Printer body Legs Assembly Take-... of the printer are bulky, you may fall as soon as the strap is displayed: The Take-Up Reel If you are installing ONLY the Take-Up Reel, go directly to the table below. Setup Instructions HP DesignJet 5000PS & HP DesignJet 5000 HP DesignJet Printer 60 inch (1.57 m) st501 HP DesignJet Printer 42 inch...

HP DesignJet 5000 Series Printer - Setup Poster
Page 2
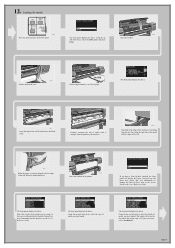
... from this material yet. st512 Install eight screws into the Cross Brace. Installing the legs onto the printer Printer Handles st502 Find the handles on the rear of the Cross Brace. Page 2 st515 Secure the feet to the outside of the printer as shown above. Orientate the ...3. Check that there is clear of obstructions. DO NOT REMOVE this point which is ANTI-SLIP material around the wheels of the printer. There must have come loose during assembly. st516 Important: Some screws may have the polystyrene inside to support the weight of the feet. st509 Remove the...
... from this material yet. st512 Install eight screws into the Cross Brace. Installing the legs onto the printer Printer Handles st502 Find the handles on the rear of the Cross Brace. Page 2 st515 Secure the feet to the outside of the printer as shown above. Orientate the ...3. Check that there is clear of obstructions. DO NOT REMOVE this point which is ANTI-SLIP material around the wheels of the printer. There must have come loose during assembly. st516 Important: Some screws may have the polystyrene inside to support the weight of the feet. st509 Remove the...

HP DesignJet 5000 Series Printer - Setup Poster
Page 3
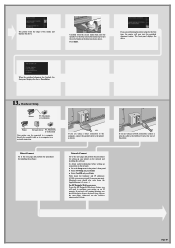
... do not touch the floor. Side view Adjust the stabilizer feet so that the wheels do not need to lift the printer. More unpacking st521 Remove the media rolls and spindles from the wheels. Install the pins into the upright position. 4. st529 Open the window and remove the Carriage Packing Material. 5. st528 Remove the protective covering from the printer. st530 Loosen the four...
... do not touch the floor. Side view Adjust the stabilizer feet so that the wheels do not need to lift the printer. More unpacking st521 Remove the media rolls and spindles from the wheels. Install the pins into the upright position. 4. st529 Open the window and remove the Carriage Packing Material. 5. st528 Remove the protective covering from the printer. st530 Loosen the four...

HP DesignJet 5000 Series Printer - Setup Poster
Page 4
...use with the clamp screw on the right-hand assembly by pushing firmly on to the leg. st532 Install the left -hand assembly down so that it rests securely on to the legs. st535 Release the clamp on to the media guides as shown above. st546 Install the Take-Up Reel spindle into the printer by removing... to secure the clamp in place and connect the sensor cable as shown above . st539 Install the front of the sensor assembly onto the front of the plastic core supplied, adaptors are available with a screw. Note: These are for use a 3 inch (76mm) cardboard core instead...
...use with the clamp screw on the right-hand assembly by pushing firmly on to the leg. st532 Install the left -hand assembly down so that it rests securely on to the legs. st535 Release the clamp on to the media guides as shown above. st546 Install the Take-Up Reel spindle into the printer by removing... to secure the clamp in place and connect the sensor cable as shown above . st539 Install the front of the sensor assembly onto the front of the plastic core supplied, adaptors are available with a screw. Note: These are for use a 3 inch (76mm) cardboard core instead...

HP DesignJet 5000 Series Printer - Setup Poster
Page 5
... 1cm dot st580 Remove the bin 'film' from its design. st548 Slide deflector supports sideways until the T-piece on to the creases. Turn on the take -up reel by turning the switch to the end, so that the creases are in the bin holders. Page 5 Install Deflectors (HP DesignJet 60 inch/1.52 m only) Important note for owners of the...
... 1cm dot st580 Remove the bin 'film' from its design. st548 Slide deflector supports sideways until the T-piece on to the creases. Turn on the take -up reel by turning the switch to the end, so that the creases are in the bin holders. Page 5 Install Deflectors (HP DesignJet 60 inch/1.52 m only) Important note for owners of the...

HP DesignJet 5000 Series Printer - Setup Poster
Page 6
...correctly positioned on position. Page 6 st557 Select the language you want for the front panel using the up and down keys. st588 Install the left hand adapter to the film and sides as shown above . Front Panel Label and Power On Cutouts st556 Attach the Front Panel Overlay to the adaptors ... the rear as shown above. Press Enter. st590 Raise the bin until the large pins align with the letter 'L'. st587 Install the right adapter to the on the Front Panel locating tabs. The right hand adapter is marked with their slots. st586a Remove the red orientation dot. st585...
...correctly positioned on position. Page 6 st557 Select the language you want for the front panel using the up and down keys. st588 Install the left hand adapter to the film and sides as shown above . Front Panel Label and Power On Cutouts st556 Attach the Front Panel Overlay to the adaptors ... the rear as shown above. Press Enter. st590 Raise the bin until the large pins align with the letter 'L'. st587 Install the right adapter to the on the Front Panel locating tabs. The right hand adapter is marked with their slots. st586a Remove the red orientation dot. st585...

HP DesignJet 5000 Series Printer - Setup Poster
Page 7
Ink System Startup INK STARTUP Printer startup. Colored label st054 at the top of the Carriage Assembly. The front panel displays the above message. Carriage Assembly st056a Open the window and locate the printhead carriage. This will display the above . st093 To remove the setup printhead, lift up the cover. Installing the Printhead and Printhead Cleaner st062 Remove the blue protective cap and the clear protective tape from the Carriage Assembly. st095...
Ink System Startup INK STARTUP Printer startup. Colored label st054 at the top of the Carriage Assembly. The front panel displays the above message. Carriage Assembly st056a Open the window and locate the printhead carriage. This will display the above . st093 To remove the setup printhead, lift up the cover. Installing the Printhead and Printhead Cleaner st062 Remove the blue protective cap and the clear protective tape from the Carriage Assembly. st095...

HP DesignJet 5000 Series Printer - Setup Poster
Page 8
... to the spindle. st050 Open the printer's right door below the front panel. Close the cover on the left -hand end of the paper is successful, the front panel will go. INK STARTUP Checking printhead CLEANERS The front panel displays the above . The blue media guide must be on the carriage and shut the window. Installing a roll B A st002 Remove the blue colored stop onto the spindle and push...
... to the spindle. st050 Open the printer's right door below the front panel. Close the cover on the left -hand end of the paper is successful, the front panel will go. INK STARTUP Checking printhead CLEANERS The front panel displays the above . The blue media guide must be on the carriage and shut the window. Installing a roll B A st002 Remove the blue colored stop onto the spindle and push...
HP DesignJet 5000 Series Printer - Setup Poster
Page 9
The front panel displays the above . Open the window. st039a Lower the window of paper. The front panel displays the above . Page 9 For information on this case it emerges from the printer as shown above . In this function, see the User's Reference Guide. Using the up and down keys, select the type of media you have loaded. st012 Continue inserting the roll of media until it will display the...
The front panel displays the above . Open the window. st039a Lower the window of paper. The front panel displays the above . Page 9 For information on this case it emerges from the printer as shown above . In this function, see the User's Reference Guide. Using the up and down keys, select the type of media you have loaded. st012 Continue inserting the roll of media until it will display the...
HP DesignJet 5000 Series Printer - Setup Poster
Page 10
... for setting up your printer on an IP network. If you are using a direct connection to the computer, connect the parallel cable to turn the roll of media in the printer's front panel. Press Enter. 13. Otherwise see the next page). Network Connect Go to continue When the printhead alignment has finished, the front panel displays the above . For HP DesignJet WebAccess users: To use the HP DesignJet Printers Software Setup CD (see the JetDirect Administrator's Guide. Page 10 Press ENTER...
... for setting up your printer on an IP network. If you are using a direct connection to the computer, connect the parallel cable to turn the roll of media in the printer's front panel. Press Enter. 13. Otherwise see the next page). Network Connect Go to continue When the printhead alignment has finished, the front panel displays the above . For HP DesignJet WebAccess users: To use the HP DesignJet Printers Software Setup CD (see the JetDirect Administrator's Guide. Page 10 Press ENTER...
HP DesignJet 5000 Series Printer - Setup Poster
Page 12
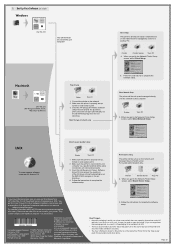
... the software setup. When you can also get to print. 2. When you get to the Network Printer Setup screen, select Direct Network Setup. Make sure the printer is properly set up , turned on the network and is a registered trademark Copyright Hewlett-Packard Hewlett-Packard Company in its root directory). 4. Set Up Your Software (all models) Windows Software setup For Windows users hp designjet printers Use this CD (HP DesignJet 5000 Series Macintosh Software) Network Setup Printer Your PC 1. Insert the HP DesignJet Printers Software Setup CD...
... the software setup. When you can also get to print. 2. When you get to the Network Printer Setup screen, select Direct Network Setup. Make sure the printer is properly set up , turned on the network and is a registered trademark Copyright Hewlett-Packard Hewlett-Packard Company in its root directory). 4. Set Up Your Software (all models) Windows Software setup For Windows users hp designjet printers Use this CD (HP DesignJet 5000 Series Macintosh Software) Network Setup Printer Your PC 1. Insert the HP DesignJet Printers Software Setup CD...


