
CA493-00130 Rev
Page 1
... describes how to service the charge roller unit. Scope Document number Revision number Date Security level HP Indigo 10000 Digital Press, HP Indigo 15K Digital Press, HP Indigo 15K HD Digital Press, HP Indigo 12000 Digital Press, HP Indigo 12000 HD Digital Press, HP Indigo 20000 Digital Press, HP Indigo 25K Digital Press, HP Indigo 30000 Digital Press, HP Indigo 35K Digital Press. Check Knowledge Zone on PrintOS for the most recent version of release. CAUTION: The procedures...
... describes how to service the charge roller unit. Scope Document number Revision number Date Security level HP Indigo 10000 Digital Press, HP Indigo 15K Digital Press, HP Indigo 15K HD Digital Press, HP Indigo 12000 Digital Press, HP Indigo 12000 HD Digital Press, HP Indigo 20000 Digital Press, HP Indigo 25K Digital Press, HP Indigo 30000 Digital Press, HP Indigo 35K Digital Press. Check Knowledge Zone on PrintOS for the most recent version of release. CAUTION: The procedures...

CA493-00130 Rev
Page 4
... the PIP. Unit location and function The charge roller (CR) electrically charges the surface of operation. It is made from conductive rubber. This roller is pressed against the surface of the PIP by the charge roller. 2 Chapter 2 Theory of operation The roller is located above the PIP drum. It is driven...
... the PIP. Unit location and function The charge roller (CR) electrically charges the surface of operation. It is made from conductive rubber. This roller is pressed against the surface of the PIP by the charge roller. 2 Chapter 2 Theory of operation The roller is located above the PIP drum. It is driven...
CA493-00130 Rev
Page 6
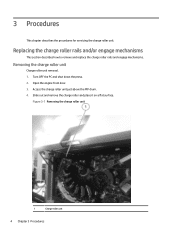
Open the engine front door. 3. Turn OFF the PC and shut down the press. 2. Replacing the charge roller rails and/or engage mechanisms This section describes how to remove and replace the charge roller rails and engage mechanisms. Removing ...
Open the engine front door. 3. Turn OFF the PC and shut down the press. 2. Replacing the charge roller rails and/or engage mechanisms This section describes how to remove and replace the charge roller rails and engage mechanisms. Removing ...

CA493-00130 Rev
Page 8
... Insert the 4 original M6 Allen screws into the rear engage mechanism. Carefully place the front engage mechanism onto the 2 placement pins on the front press wall. Install the rear engage mechanism as follows: a. Remove the rear engage mechanism. Remove these screws and the engage mechanism. 5. NOTE: To ...Open the engine rear door, locate the charge roller rear engage mechanism and remove the 2 M4 Allen screws that secure the rails to the press chassis by 4 M6 Allen screws. Remove the front engage mechanism. To access these screws, raise the engage mechanism. Insert the 4 original ...
... Insert the 4 original M6 Allen screws into the rear engage mechanism. Carefully place the front engage mechanism onto the 2 placement pins on the front press wall. Install the rear engage mechanism as follows: a. Remove the rear engage mechanism. Remove these screws and the engage mechanism. 5. NOTE: To ...Open the engine rear door, locate the charge roller rear engage mechanism and remove the 2 M4 Allen screws that secure the rails to the press chassis by 4 M6 Allen screws. Remove the front engage mechanism. To access these screws, raise the engage mechanism. Insert the 4 original ...

CA493-00130 Rev
Page 9
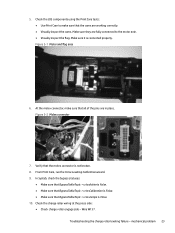
... charge roller unit all the way in its slot until it reaches the rear engage mechanism. Repeat steps a-d for the front rail. 4. At the press front, reinsert (slide on the front engage mechanism. Replacing the carbon brushes 7 In the rear side of charge roller, insert the rear rail in ... from the charge roller assembly. c. Tighten the guide pin. b. Carefully place the rear engage mechanism onto the 2 placement pins on the rear press wall. From the front side of charge roller, another person should connect the rear rail to the rear engage mechanism. 5. Do not tighten this...
... charge roller unit all the way in its slot until it reaches the rear engage mechanism. Repeat steps a-d for the front rail. 4. At the press front, reinsert (slide on the front engage mechanism. Replacing the carbon brushes 7 In the rear side of charge roller, insert the rear rail in ... from the charge roller assembly. c. Tighten the guide pin. b. Carefully place the rear engage mechanism onto the 2 placement pins on the rear press wall. From the front side of charge roller, another person should connect the rear rail to the rear engage mechanism. 5. Do not tighten this...

CA493-00130 Rev
Page 11
6. Install the carbon brush cap. 8. Repeat the above procedure for the second carbon brush. 9. Unscrew the carbon brush caps. Insert the new carbon brush into position. Figure 3-9 Removing the carbon brush caps Replacing the carbon brush housing 9 Reinstall the rubber charge roller from the press. 2. Replacing the carbon brush housing Do the following: 1. Remove the charge roller assembly from the charge roller assembly. 10. Figure 3-8 Carbon brush 7. Reinstall the charge roller assembly to the press. Remove the rubber charge roller from the charge roller assembly. 3.
6. Install the carbon brush cap. 8. Repeat the above procedure for the second carbon brush. 9. Unscrew the carbon brush caps. Insert the new carbon brush into position. Figure 3-9 Removing the carbon brush caps Replacing the carbon brush housing 9 Reinstall the rubber charge roller from the press. 2. Replacing the carbon brush housing Do the following: 1. Remove the charge roller assembly from the charge roller assembly. 10. Figure 3-8 Carbon brush 7. Reinstall the charge roller assembly to the press. Remove the rubber charge roller from the charge roller assembly. 3.

CA493-00130 Rev
Page 14
... contains two JOS motors. Return the end cap cover. 14. Reinstall the charge roller assembly to both motors. 1. Remove the rubber charge roller from the press. 2. Install the carbon brushes. 15. Remove the charge roller assembly from the charge roller assembly. 12 Chapter 3 Procedures Figure 3-16 Pushing on carbon brush housing...
... contains two JOS motors. Return the end cap cover. 14. Reinstall the charge roller assembly to both motors. 1. Remove the rubber charge roller from the press. 2. Install the carbon brushes. 15. Remove the charge roller assembly from the charge roller assembly. 12 Chapter 3 Procedures Figure 3-16 Pushing on carbon brush housing...

CA493-00130 Rev
Page 17
Figure 3-22 Inserting new motor into position using the four Allen screws. 11. Connect the motor connector. 9. Reinstall the charge roller assembly to the press. Reinstall the back panel. 10. Reinstall the rubber charge roller from the charge roller assembly. 12. Fasten the motor into position 8. Replacing the Jump-Over-Seam (JOS) motor 15 7. Insert the new motor into position.
Figure 3-22 Inserting new motor into position using the four Allen screws. 11. Connect the motor connector. 9. Reinstall the charge roller assembly to the press. Reinstall the back panel. 10. Reinstall the rubber charge roller from the charge roller assembly. 12. Fasten the motor into position 8. Replacing the Jump-Over-Seam (JOS) motor 15 7. Insert the new motor into position.

CA493-00130 Rev
Page 21
... imaging oil from the PIP trailing edge, and transfers it to record the correct press angle of the print. - The charge roller Voltage Calibration is performed automatically together with the press on the balancing roller reduces its electrical efficiency, and causes the charge roller to... prevent damaging the roller. ● The Seam Calibration wizard is performed automatically at the leading edge of the seam. ● Incorrect press angle values may cause: - The charge roller picks up "). Figure 4-1 The charge roller seam area 1 Balancing roller 2 Charge roller 3 PIP...
... imaging oil from the PIP trailing edge, and transfers it to record the correct press angle of the print. - The charge roller Voltage Calibration is performed automatically together with the press on the balancing roller reduces its electrical efficiency, and causes the charge roller to... prevent damaging the roller. ● The Seam Calibration wizard is performed automatically at the leading edge of the seam. ● Incorrect press angle values may cause: - The charge roller picks up "). Figure 4-1 The charge roller seam area 1 Balancing roller 2 Charge roller 3 PIP...
CA493-00130 Rev
Page 25
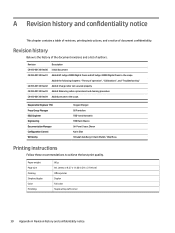
... Care tests: ● Use Print Care to the motor axle. ● Visually inspect the flag. Figure 5-2 Molex connector 7. Check the charge roller wiring at the press side: ● Check charge roller engage side - From Print Care, run the Force Leveling Calibration wizard. 9. Wire W137. Troubleshooting the charge roller leveling failure - 5. In...
... Care tests: ● Use Print Care to the motor axle. ● Visually inspect the flag. Figure 5-2 Molex connector 7. Check the charge roller wiring at the press side: ● Check charge roller engage side - From Print Care, run the Force Leveling Calibration wizard. 9. Wire W137. Troubleshooting the charge roller leveling failure - 5. In...

CA493-00130 Rev
Page 28
... the engine Figure 5-3 Charge roller rear guide rail screws Securing the charge roller This is a possible solution for the charge roller securing issue. Change the press status to accommodate the grounding cables. Charge roller not secured properly The charge roller rear guide rails may not be secured correctly. Due to a mistake...
... the engine Figure 5-3 Charge roller rear guide rail screws Securing the charge roller This is a possible solution for the charge roller securing issue. Change the press status to accommodate the grounding cables. Charge roller not secured properly The charge roller rear guide rails may not be secured correctly. Due to a mistake...

CA493-00130 Rev
Page 29
... engine front door. 5. Apply Omnifit 50 or Loctite 222. Open the engine rear door. 3. Turn off the press. 3. 2. Check if the grounding cables are , go to the rear rail screws. Turn off the press software. 2. Remove one rail screw. Remove the other rail screw. Figure 5-4 Incorrect Figure 5-5 Correct Solving the ... 50 or Loctite 222. Solving the issue 27 Reinstall the screw onto the rail. If they are connected to Solving the issue on the press. Remove the charge roller from the engine. 6. If not, the issue does not exist on page 27. Reinstall the screw onto the rail...
... engine front door. 5. Apply Omnifit 50 or Loctite 222. Open the engine rear door. 3. Turn off the press. 3. 2. Check if the grounding cables are , go to the rear rail screws. Turn off the press software. 2. Remove one rail screw. Remove the other rail screw. Figure 5-4 Incorrect Figure 5-5 Correct Solving the ... 50 or Loctite 222. Solving the issue 27 Reinstall the screw onto the rail. If they are connected to Solving the issue on the press. Remove the charge roller from the engine. 6. If not, the issue does not exist on page 27. Reinstall the screw onto the rail...

CA493-00130 Rev
Page 30
Install the three grounding cables in the engine. 9. Turn on the press software. 28 Chapter 5 Troubleshooting Undo the lockout/tagout procedure. 11. Figure 5-7 Grounding cables 8. Turn on the press. 12. Reinstall the charge roller in place. Close the engine front door. 10. Figure 5-6 Rail screws 7.
Install the three grounding cables in the engine. 9. Turn on the press software. 28 Chapter 5 Troubleshooting Undo the lockout/tagout procedure. 11. Figure 5-7 Grounding cables 8. Turn on the press. 12. Reinstall the charge roller in place. Close the engine front door. 10. Figure 5-6 Rail screws 7.
CA493-00130 Rev
Page 32
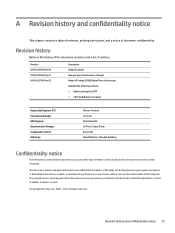
...00130 Rev00 CA493-00130 Rev01 CA493-00130 Rev02 CA493-00130 Rev03 CA493-00130 Rev04 Description Initial document Added HP Indigo 20000 Digital Press and HP Indigo 30000 Digital Press to achieve the best print quality. A Revision history and confidentiality notice This chapter contains a table of... Duplex Full color Staple at top-left corner 30 Appendix A Revision history and confidentiality notice Responsible Engineer (TS) Press Group Manager R&D Engineer Engineering Documentation Manager Configuration Control Written by Yevgeni Shpigel Gil Pantofaro TBD Yonni Hartstein TBD Haim ...
...00130 Rev00 CA493-00130 Rev01 CA493-00130 Rev02 CA493-00130 Rev03 CA493-00130 Rev04 Description Initial document Added HP Indigo 20000 Digital Press and HP Indigo 30000 Digital Press to achieve the best print quality. A Revision history and confidentiality notice This chapter contains a table of... Duplex Full color Staple at top-left corner 30 Appendix A Revision history and confidentiality notice Responsible Engineer (TS) Press Group Manager R&D Engineer Engineering Documentation Manager Configuration Control Written by Yevgeni Shpigel Gil Pantofaro TBD Yonni Hartstein TBD Haim ...

Performing the Customer Acceptance Test Procedure CATP -- CA493-02780 Rev 02
Page 1
i HP Indigo 20000 Digital Press, HP Indigo 25K Digital Press, HP Indigo 50000 Digital Press CA493-02780 02 25 January 2023 HP Confidential The information contained in this document is accurate at the date of this document. The procedures contained in this document can be performed only by HP-certified CEs or explicitly authorized operators. Check CE Suitcase for the most recent version...
i HP Indigo 20000 Digital Press, HP Indigo 25K Digital Press, HP Indigo 50000 Digital Press CA493-02780 02 25 January 2023 HP Confidential The information contained in this document is accurate at the date of this document. The procedures contained in this document can be performed only by HP-certified CEs or explicitly authorized operators. Check CE Suitcase for the most recent version...

Performing the Customer Acceptance Test Procedure CATP -- CA493-02780 Rev 02
Page 3
...repair routine) ● Periodic maintenance (per normal CE maintenance routine) The job contains elements that allow the verification of a wide range of press parameters. Performing the Customer Acceptance Test Procedure (CATP) 1 Figure 1-1 CATP job You can download the file from CE Suitcase. The file ... CATP Job 1120 X 746 mm V - 4.0 The job enables you to test and verify the performance of the press after any of the following situations: ● Press installation (after the installation is explained below. 1 Performing the Customer Acceptance Test Procedure (CATP) The details of Performing ...
...repair routine) ● Periodic maintenance (per normal CE maintenance routine) The job contains elements that allow the verification of a wide range of press parameters. Performing the Customer Acceptance Test Procedure (CATP) 1 Figure 1-1 CATP job You can download the file from CE Suitcase. The file ... CATP Job 1120 X 746 mm V - 4.0 The job enables you to test and verify the performance of the press after any of the following situations: ● Press installation (after the installation is explained below. 1 Performing the Customer Acceptance Test Procedure (CATP) The details of Performing ...

Performing the Customer Acceptance Test Procedure CATP -- CA493-02780 Rev 02
Page 4
...V - 4.0. 3. Verify that the print shows full cover of CATP Job 1120 X 746 mm V - 4.0 2. Print 30 copies of the image. 5. with the press. 2. Open the Job Properties screen. Set it to T mode. ● 1220mm CA042-28760 ruler scaled to 0.1 or 0.2 mm accuracy ● x25 magnification, magnifying...for CATP specifications. 1. Check the following equipment is available: ● It is recommended to measure the optical density and gray scales with the press. Run Color Calibration wizard on a single page.) ● White spots of 20 images. Print a run of size less than 5,000 ...
...V - 4.0. 3. Verify that the print shows full cover of CATP Job 1120 X 746 mm V - 4.0 2. Print 30 copies of the image. 5. with the press. 2. Open the Job Properties screen. Set it to T mode. ● 1220mm CA042-28760 ruler scaled to 0.1 or 0.2 mm accuracy ● x25 magnification, magnifying...for CATP specifications. 1. Check the following equipment is available: ● It is recommended to measure the optical density and gray scales with the press. Run Color Calibration wizard on a single page.) ● White spots of 20 images. Print a run of size less than 5,000 ...

Performing the Customer Acceptance Test Procedure CATP -- CA493-02780 Rev 02
Page 13
Point the barcode reader at each barcode sign and press the barcode trigger. 4. Printing test If the CATP job passes the test, print 500 images. Table 1-17 Gray 20 Composite Item Description L Verify color uniformity ... the print run, verify the following: Pass/Fail/ Waiver Printing test 11 Table 1-16 Barcodes Item Description Q Pass/Fail/ Waiver Create a new WordPad document on press PC desktop 1. Verify that the barcode reader is plugged into the USB port. 3. From the desktop of the...
Point the barcode reader at each barcode sign and press the barcode trigger. 4. Printing test If the CATP job passes the test, print 500 images. Table 1-17 Gray 20 Composite Item Description L Verify color uniformity ... the print run, verify the following: Pass/Fail/ Waiver Printing test 11 Table 1-16 Barcodes Item Description Q Pass/Fail/ Waiver Create a new WordPad document on press PC desktop 1. Verify that the barcode reader is plugged into the USB port. 3. From the desktop of the...

Performing the Customer Acceptance Test Procedure CATP -- CA493-02780 Rev 02
Page 14
Printing a customer job after the CATP Do the following after the CATP. 1. Ask for leaks. 1. Check the entire fluid system for the customer's approval. 12 Chapter 1 Performing the Customer Acceptance Test Procedure (CATP) Print a customer job on an HP Indigo-approved substrate. 2. Print quality should be consistent. 2. No more than ONE press-stopping malfunction per 1,000 impressions. 3.
Printing a customer job after the CATP Do the following after the CATP. 1. Ask for leaks. 1. Check the entire fluid system for the customer's approval. 12 Chapter 1 Performing the Customer Acceptance Test Procedure (CATP) Print a customer job on an HP Indigo-approved substrate. 2. Print quality should be consistent. 2. No more than ONE press-stopping malfunction per 1,000 impressions. 3.
Performing the Customer Acceptance Test Procedure CATP -- CA493-02780 Rev 02
Page 15
... distributed in any form or medium, or disclosed to the scope. The copyright notice, which appears in part. © Copyright HP Indigo Ltd., 2020 - 2023. Revision history and confidentiality notice 13 All rights reserved. Nothing herein may be deemed to constitute publication or... document contains valuable trade secrets and confidential information of HP Indigo Ltd. Revision CA493-02780 Rev 00 CA493-02780 Rev 01 CA493-02780 Rev 02 Description Initial document New job, plus miscellaneous changes Added HP Indigo 50000 Digital Press to any manner, without prior written authorization of...
... distributed in any form or medium, or disclosed to the scope. The copyright notice, which appears in part. © Copyright HP Indigo Ltd., 2020 - 2023. Revision history and confidentiality notice 13 All rights reserved. Nothing herein may be deemed to constitute publication or... document contains valuable trade secrets and confidential information of HP Indigo Ltd. Revision CA493-02780 Rev 00 CA493-02780 Rev 01 CA493-02780 Rev 02 Description Initial document New job, plus miscellaneous changes Added HP Indigo 50000 Digital Press to any manner, without prior written authorization of...


