
CA493-00130 Rev
Page 1
... Roller Service This document describes how to service the charge roller unit. CAUTION: The procedures contained in this document is accurate at the date of this document can be performed only by HP-Certified CEs or explicitly authorized operators. i Scope Document number Revision number Date Security level HP Indigo 10000 Digital Press, HP Indigo 15K Digital Press, HP Indigo 15K HD Digital Press, HP Indigo 12000 Digital Press, HP Indigo 12000 HD Digital Press, HP Indigo 20000...
... Roller Service This document describes how to service the charge roller unit. CAUTION: The procedures contained in this document is accurate at the date of this document can be performed only by HP-Certified CEs or explicitly authorized operators. i Scope Document number Revision number Date Security level HP Indigo 10000 Digital Press, HP Indigo 15K Digital Press, HP Indigo 15K HD Digital Press, HP Indigo 12000 Digital Press, HP Indigo 12000 HD Digital Press, HP Indigo 20000...

CA493-00130 Rev
Page 2
... ...1 Prerequisites ...1 2 Theory of operation ...2 Unit location and function ...2 Unit components ...2 Unit operation...3 3 Procedures ...4 Replacing the charge roller rails and/or engage mechanisms 4 Replacing the carbon brushes...7 Replacing the carbon brush housing...9 Replacing the Jump-Over-Seam (JOS) motor ...12 4 Calibrations ...19 5 Troubleshooting...20 Troubleshooting in Print Care...20 Troubleshooting table ...21 Troubleshooting the charge roller leveling failure - mechanical problem 22 Charge roller not secured properly...26 Maintenance routines ...29 Appendix A Revision...
... ...1 Prerequisites ...1 2 Theory of operation ...2 Unit location and function ...2 Unit components ...2 Unit operation...3 3 Procedures ...4 Replacing the charge roller rails and/or engage mechanisms 4 Replacing the carbon brushes...7 Replacing the carbon brush housing...9 Replacing the Jump-Over-Seam (JOS) motor ...12 4 Calibrations ...19 5 Troubleshooting...20 Troubleshooting in Print Care...20 Troubleshooting table ...21 Troubleshooting the charge roller leveling failure - mechanical problem 22 Charge roller not secured properly...26 Maintenance routines ...29 Appendix A Revision...

CA493-00130 Rev
Page 5
... on the PIP drum, and rotates by friction. There is disengaged, the charge roller and the balancing roller do not touch each other. ● Balancing roller - Charges the balancing roller. Unit operation 3 Figure 2-2 Charge roller 1 Balancing roller 2 Charge roller The charge roller is a metal core covered with molded polyurethane. The charge roller is removable and serviceable. The CE needs to identify the charge roller and the balancing...
... on the PIP drum, and rotates by friction. There is disengaged, the charge roller and the balancing roller do not touch each other. ● Balancing roller - Charges the balancing roller. Unit operation 3 Figure 2-2 Charge roller 1 Balancing roller 2 Charge roller The charge roller is a metal core covered with molded polyurethane. The charge roller is removable and serviceable. The CE needs to identify the charge roller and the balancing...

CA493-00130 Rev
Page 8
...Open the engine rear door, locate the charge roller rear engage mechanism and remove the 2 M4 Allen screws that secure the rails to the press chassis by 4 M6 Allen screws. The front engage mechanism is also connected to the press chassis by 4 M6 Allen screws. Install... rails. 4. The rear engage mechanism is connected to the rear engage mechanism. Remove the front engage mechanism. NOTE: To access the holes for this procedure. 1. To access these screws and the engage mechanism. 5. Remove these screws, raise the engage mechanism. Remove the rear engage mechanism.
...Open the engine rear door, locate the charge roller rear engage mechanism and remove the 2 M4 Allen screws that secure the rails to the press chassis by 4 M6 Allen screws. The front engage mechanism is also connected to the press chassis by 4 M6 Allen screws. Install... rails. 4. The rear engage mechanism is connected to the rear engage mechanism. Remove the front engage mechanism. NOTE: To access the holes for this procedure. 1. To access these screws and the engage mechanism. 5. Remove these screws, raise the engage mechanism. Remove the rear engage mechanism.

CA493-00130 Rev
Page 9
...Remove the charge roller assembly from the charge roller assembly. Tighten the 4 M6 Allen screws. 3. From the front side of charge roller, another person should connect the rear rail to the rear engage mechanism. 5. Tighten the 2 M4 Allen screws that connect the 2 rails to the rear engage mechanism using the original M4 Allen screw. Install... the rear side of charge roller, insert the rear rail in . 6. Tighten the guide pin. e. Close the engine front door. Replacing the carbon brushes Do the following: 1. Remove the rubber charge roller from the press. 2. Replacing the carbon ...
...Remove the charge roller assembly from the charge roller assembly. Tighten the 4 M6 Allen screws. 3. From the front side of charge roller, another person should connect the rear rail to the rear engage mechanism. 5. Tighten the 2 M4 Allen screws that connect the 2 rails to the rear engage mechanism using the original M4 Allen screw. Install... the rear side of charge roller, insert the rear rail in . 6. Tighten the guide pin. e. Close the engine front door. Replacing the carbon brushes Do the following: 1. Remove the rubber charge roller from the press. 2. Replacing the carbon ...
CA493-00130 Rev
Page 23
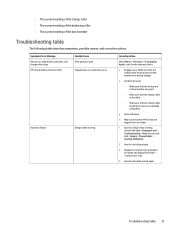
.... Troubleshooting table 21 Symptom / Error Message Oil pick-up, edge bands, dark dots, and charge roller rings PIP charge below minimum limit Possible Cause Print quality issues Engage issue or conduction issue Auto Bias failure Charge roller leveling Corrective Action Select Menu > Print Care > Print Quality Assist. Bypass the charge roller activation. The current reading of the balancing roller - Make sure that the charge roller housing touches the location...
.... Troubleshooting table 21 Symptom / Error Message Oil pick-up, edge bands, dark dots, and charge roller rings PIP charge below minimum limit Possible Cause Print quality issues Engage issue or conduction issue Auto Bias failure Charge roller leveling Corrective Action Select Menu > Print Care > Print Quality Assist. Bypass the charge roller activation. The current reading of the balancing roller - Make sure that the charge roller housing touches the location...

CA493-00130 Rev
Page 24
... software issue To check the charge roller leveling status, ● select Print Care > Diagnostics and Troubleshooting > Diagnostics > Element Activation (the first tab) > PIP Area. Clean the balancing roller with distilled water and a lint-free wipe. 4. mechanical problem on page 22. Clean the JOS cam inner surface with a lintfree wipe. Make sure there is no residues. (You do not need to Disable. However, if you do not need to manually...
... software issue To check the charge roller leveling status, ● select Print Care > Diagnostics and Troubleshooting > Diagnostics > Element Activation (the first tab) > PIP Area. Clean the balancing roller with distilled water and a lint-free wipe. 4. mechanical problem on page 22. Clean the JOS cam inner surface with a lintfree wipe. Make sure there is no residues. (You do not need to Disable. However, if you do not need to manually...
CA493-00130 Rev
Page 25
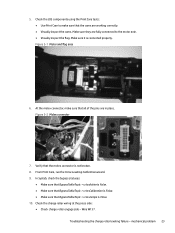
... False. 10. From Print Care, run the Force Leveling Calibration wizard. 9. 5. In Systab, check the bypass statuses: ● Make sure that BypassTableTopic > crJosActive is False. ● Make sure that BypassTableTopic > crJosCalibration is False. ● Make sure that the molex connector is connected properly. Make sure it is not broken. 8. Check the JOS components using the Print Care tests: ● Use Print Care to the motor...
... False. 10. From Print Care, run the Force Leveling Calibration wizard. 9. 5. In Systab, check the bypass statuses: ● Make sure that BypassTableTopic > crJosActive is False. ● Make sure that BypassTableTopic > crJosCalibration is False. ● Make sure that the molex connector is connected properly. Make sure it is not broken. 8. Check the JOS components using the Print Care tests: ● Use Print Care to the motor...
CA493-00130 Rev
Page 27
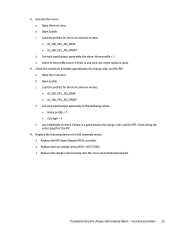
... = 3 e. W137 CRE). ● Replace the charge roller housing. 12. Activate the motor: a. b. Load the profiles for the front and rear motors: ● IO_SDV_PSS_JOS_REAR ● IO_SDV_PSS_JOS_FRONT d. mechanical problem 25 Open the front door. Open Systab. Open the front door. Troubleshooting the charge roller leveling failure - b. c. e. Check the maximum available gap between the charge roller and the PIP. Set each input/output separately the value: Home...
... = 3 e. W137 CRE). ● Replace the charge roller housing. 12. Activate the motor: a. b. Load the profiles for the front and rear motors: ● IO_SDV_PSS_JOS_REAR ● IO_SDV_PSS_JOS_FRONT d. mechanical problem 25 Open the front door. Open Systab. Open the front door. Troubleshooting the charge roller leveling failure - b. c. e. Check the maximum available gap between the charge roller and the PIP. Set each input/output separately the value: Home...
CA493-00130 Rev
Page 32
... Engineering Documentation Manager Configuration Control Written by Yevgeni Shpigel Gil Pantofaro TBD Yonni Hartstein TBD Haim Niazov Uri Porat / Isaac Diwan Karin Eilat Yehudah Goldberg / Chaim Mateh / Chip Moss Printing instructions Follow these recommendations to the scope. Paper weight Page size Printing Simplex/duplex Color Finishing 80 g A4, Letter, or 8.27 x 11.00 in (21 x 27.94 cm) Office printer Duplex Full color Staple...
... Engineering Documentation Manager Configuration Control Written by Yevgeni Shpigel Gil Pantofaro TBD Yonni Hartstein TBD Haim Niazov Uri Porat / Isaac Diwan Karin Eilat Yehudah Goldberg / Chaim Mateh / Chip Moss Printing instructions Follow these recommendations to the scope. Paper weight Page size Printing Simplex/duplex Color Finishing 80 g A4, Letter, or 8.27 x 11.00 in (21 x 27.94 cm) Office printer Duplex Full color Staple...
Performing the Customer Acceptance Test Procedure CATP -- CA493-02780 Rev 02
Page 1
... CEs or explicitly authorized operators. HP Indigo 20000 Digital Press, HP Indigo 25K Digital Press, HP Indigo 50000 Digital Press CA493-02780 02 25 January 2023 HP Confidential The information contained in this document. Performing the Customer Acceptance Test Procedure (CATP) Document details Purpose Scope Document number Revision number Date Security level To describe how to perform the Customer Acceptance Test Procedure (CATP). Check CE Suitcase for the...
... CEs or explicitly authorized operators. HP Indigo 20000 Digital Press, HP Indigo 25K Digital Press, HP Indigo 50000 Digital Press CA493-02780 02 25 January 2023 HP Confidential The information contained in this document. Performing the Customer Acceptance Test Procedure (CATP) Document details Purpose Scope Document number Revision number Date Security level To describe how to perform the Customer Acceptance Test Procedure (CATP). Check CE Suitcase for the...

Performing the Customer Acceptance Test Procedure CATP -- CA493-02780 Rev 02
Page 3
... of Performing the Customer Acceptance Test Procedure (CATP) is a tool to be used by CEs and as part of press parameters. The file name is CATP Job 1120 X 746 mm V - 4.0 The job enables you to test and verify the performance of the press after any of the following situations: ● Press installation (after the installation is complete, after the Completion...
... of Performing the Customer Acceptance Test Procedure (CATP) is a tool to be used by CEs and as part of press parameters. The file name is CATP Job 1120 X 746 mm V - 4.0 The job enables you to test and verify the performance of the press after any of the following situations: ● Press installation (after the installation is complete, after the Completion...

Performing the Customer Acceptance Test Procedure CATP -- CA493-02780 Rev 02
Page 4
... X-Rite eXact 2 Portable Spectrophotometer device. Print 30 copies of the image. 5. Otherwise, replace the PIP and/or blanket. 2. Run Color Calibration wizard on a single page.) ● White spots of 20 images. Load the Condat 90 substrate that the following : 2 Chapter 1 Performing the Customer Acceptance Test Procedure (CATP) Load the CATP Job 1120 X 746 mm V - 4.0. 3. Set it to T mode. ● 1220mm CA042-28760 ruler...
... X-Rite eXact 2 Portable Spectrophotometer device. Print 30 copies of the image. 5. Otherwise, replace the PIP and/or blanket. 2. Run Color Calibration wizard on a single page.) ● White spots of 20 images. Load the Condat 90 substrate that the following : 2 Chapter 1 Performing the Customer Acceptance Test Procedure (CATP) Load the CATP Job 1120 X 746 mm V - 4.0. 3. Set it to T mode. ● 1220mm CA042-28760 ruler...

Performing the Customer Acceptance Test Procedure CATP -- CA493-02780 Rev 02
Page 12
Verify an image transfer of at the correct solid level. 10 Chapter 1 Performing the Customer Acceptance Test Procedure (CATP) Make sure there is no overdraft, smearing, hollows, cracks, or broken edges in the letters. Make sure that all negative letters are clear without fog, smearing, overdraft, ink contamination, and printed at least 90%. Make sure that squares are visible, clearly distinguished, and...
Verify an image transfer of at the correct solid level. 10 Chapter 1 Performing the Customer Acceptance Test Procedure (CATP) Make sure there is no overdraft, smearing, hollows, cracks, or broken edges in the letters. Make sure that all negative letters are clear without fog, smearing, overdraft, ink contamination, and printed at least 90%. Make sure that squares are visible, clearly distinguished, and...
Performing the Customer Acceptance Test Procedure CATP -- CA493-02780 Rev 02
Page 15
... at the date of authors. Check CE Suitcase for the most recent version of this document is the history of the document revisions and a list of release. All rights reserved. Revision CA493-02780 Rev 00 CA493-02780 Rev 01 CA493-02780 Rev 02 Description Initial document New job, plus miscellaneous changes Added HP Indigo 50000 Digital Press to any third...
... at the date of authors. Check CE Suitcase for the most recent version of this document is the history of the document revisions and a list of release. All rights reserved. Revision CA493-02780 Rev 00 CA493-02780 Rev 01 CA493-02780 Rev 02 Description Initial document New job, plus miscellaneous changes Added HP Indigo 50000 Digital Press to any third...
Dripping Troubleshooting
Page 1
iii Check CE Suitcase for the most recent version of this document is accurate at the date of release. Dripping Troubleshooting Document details Purpose Scope Document number Revision number Date Security level To describe how to troubleshoot dripping issues HP Indigo 20000 Digital Press CA493-02130 Rev00 6 September 2023 HP Confidential The information contained in this document.
iii Check CE Suitcase for the most recent version of this document is accurate at the date of release. Dripping Troubleshooting Document details Purpose Scope Document number Revision number Date Security level To describe how to troubleshoot dripping issues HP Indigo 20000 Digital Press CA493-02130 Rev00 6 September 2023 HP Confidential The information contained in this document.

Dripping Troubleshooting
Page 3
... and replace the cleaning station sponge rollers if necessary. 5. Inspect the wiper for cleaning the station. 1. Check cleaning station cleanliness and clean the unit if needed. 4. Procedures 1 Check PIP underlayer condition: a. usually around the center. Make sure it's properly installed in its place. 3. Check cleaning station engage system. 6. Verify all press doors and covers are closed and sealed properly during print. 2. Chiller temperature set point is within specifications...
... and replace the cleaning station sponge rollers if necessary. 5. Inspect the wiper for cleaning the station. 1. Check cleaning station cleanliness and clean the unit if needed. 4. Procedures 1 Check PIP underlayer condition: a. usually around the center. Make sure it's properly installed in its place. 3. Check cleaning station engage system. 6. Verify all press doors and covers are closed and sealed properly during print. 2. Chiller temperature set point is within specifications...

Dripping Troubleshooting
Page 4
... 10000 value and choose set . Blower should start work . c. e. Open SYSTAB IO and search for mechanical damage on the underlayer surface. Click "Reset" to turn off the blower, and change the Override Type to the blower and it's not working replace it with a new one. Blower should start work . If not check that the cables are connected and there is power to the blower, if...
... 10000 value and choose set . Blower should start work . c. e. Open SYSTAB IO and search for mechanical damage on the underlayer surface. Click "Reset" to turn off the blower, and change the Override Type to the blower and it's not working replace it with a new one. Blower should start work . If not check that the cables are connected and there is power to the blower, if...

Dripping Troubleshooting
Page 5
... it's not working replace it with a new one. d. Figure 1-2 ITM Suction system 2. Open SYSTAB IO and search for : IO_EH_AIR_SUCTION_INVERTOR_OP. c. Blower should start work. External Heating 3 b. If not, check that the cables are connected and there is power to the blower, if there is power to Hard Override. Operate the External Heating suction (see pic below): a. Change the Override type to No Override. Operate the External...
... it's not working replace it with a new one. d. Figure 1-2 ITM Suction system 2. Open SYSTAB IO and search for : IO_EH_AIR_SUCTION_INVERTOR_OP. c. Blower should start work. External Heating 3 b. If not, check that the cables are connected and there is power to the blower, if there is power to Hard Override. Operate the External Heating suction (see pic below): a. Change the Override type to No Override. Operate the External...

Dripping Troubleshooting
Page 6
... a new one . Blower should start work . Enter 10000 value and choose set . Blower should start work . BIDs 1. d. Enter 10000 value and choose set . a. Change the Override type to the blower and it's not working replace it with a new one . b. If not, check that the cables are connected and there is power to No Override. Inspect the BID hoses routing, make sure there is power to Hard Override...
... a new one . Blower should start work . Enter 10000 value and choose set . Blower should start work . BIDs 1. d. Enter 10000 value and choose set . a. Change the Override type to the blower and it's not working replace it with a new one . b. If not, check that the cables are connected and there is power to No Override. Inspect the BID hoses routing, make sure there is power to Hard Override...


