Upgrading and Servicing Guide
Page 17
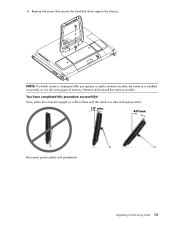
6 Replace the screw that secures the hard disk drive cage to the chassis. Upgrading and Servicing Guide 13 Now, place the computer upright on a flat surface with the stand in a safe and open position. 10° min. 40°max Reconnect power cables and peripherals. NOTE: If a blank screen is displayed after you replace or add a memory module, the memory is installed incorrectly, or it is the wrong type of memory. You have completed this procedure successfully! Remove and reinstall the memory module.
6 Replace the screw that secures the hard disk drive cage to the chassis. Upgrading and Servicing Guide 13 Now, place the computer upright on a flat surface with the stand in a safe and open position. 10° min. 40°max Reconnect power cables and peripherals. NOTE: If a blank screen is displayed after you replace or add a memory module, the memory is installed incorrectly, or it is the wrong type of memory. You have completed this procedure successfully! Remove and reinstall the memory module.

Warranty and Support Guide
Page 13
...need. Disk Drive DVD DVD CD No CD or DVD drive Disc Type DVD-R, DVD+R DVD+R Dual-Layer CD-R Number of Required Blank Discs 1-3 discs 1-2 discs 7-16 discs Contact HP Support The process takes some of recovery discs for example, Recovery 1, Recovery 2). 4 Store the Recovery discs in a safe place. NOTE...You may be rejected. The next time you create can quit the process at the next screen that the information written on the disc is correct. To purchase recovery discs, go to http://www.hp.com/support and visit the Software & Driver downloads page for this section to perform a system...
...need. Disk Drive DVD DVD CD No CD or DVD drive Disc Type DVD-R, DVD+R DVD+R Dual-Layer CD-R Number of Required Blank Discs 1-3 discs 1-2 discs 7-16 discs Contact HP Support The process takes some of recovery discs for example, Recovery 1, Recovery 2). 4 Store the Recovery discs in a safe place. NOTE...You may be rejected. The next time you create can quit the process at the next screen that the information written on the disc is correct. To purchase recovery discs, go to http://www.hp.com/support and visit the Software & Driver downloads page for this section to perform a system...

Upgrade and Service Guide
Page 18
Now, place the computer upright on a flat surface with the stand in a safe and open position. 10° min. 40°max Reconnect power cables and peripherals. 14 Upgrading and Servicing Guide 6 Replace the screw that secures the hard disk drive cage to the chassis. You have completed this procedure successfully! Remove and reinstall the memory module. NOTE: If a blank screen is displayed after you replace or add a memory module, the memory is installed incorrectly, or it is the wrong type of memory.
Now, place the computer upright on a flat surface with the stand in a safe and open position. 10° min. 40°max Reconnect power cables and peripherals. 14 Upgrading and Servicing Guide 6 Replace the screw that secures the hard disk drive cage to the chassis. You have completed this procedure successfully! Remove and reinstall the memory module. NOTE: If a blank screen is displayed after you replace or add a memory module, the memory is installed incorrectly, or it is the wrong type of memory.


