
End User License Agreement
Page 2
...the transfer, the end user receiving the transferred product must include all the EULA terms. Upon transfer of the Software Product, your HP Product, whether in such recovery solution shall be an indirect transfer, such as a consignment. Third Party. Prior to the extent ...of Authenticity. The use . After upgrading, you must first be used for restoring the hard disk of a hard disk drive-based solution, an external media-based recovery solution (e.g. TRANSFER. You shall not remove any term or condition of a conflict between such terms, the other applicable laws and ...
...the transfer, the end user receiving the transferred product must include all the EULA terms. Upon transfer of the Software Product, your HP Product, whether in such recovery solution shall be an indirect transfer, such as a consignment. Third Party. Prior to the extent ...of Authenticity. The use . After upgrading, you must first be used for restoring the hard disk of a hard disk drive-based solution, an external media-based recovery solution (e.g. TRANSFER. You shall not remove any term or condition of a conflict between such terms, the other applicable laws and ...
Upgrading and Servicing Guide
Page 3
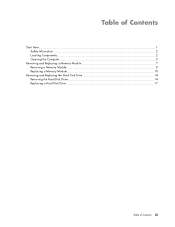
Table of Contents Start Here...1 Safety Information ...2 Locating Components...2 Opening the Computer ...3 Removing and Replacing a Memory Module 7 Removing a Memory Module ...8 Replacing a Memory Module 10 Removing and Replacing the Hard Disk Drive 14 Removing the Hard Disk Drive 14 Replacing a Hard Disk Drive...17 Table of Contents iii
Table of Contents Start Here...1 Safety Information ...2 Locating Components...2 Opening the Computer ...3 Removing and Replacing a Memory Module 7 Removing a Memory Module ...8 Replacing a Memory Module 10 Removing and Replacing the Hard Disk Drive 14 Removing the Hard Disk Drive 14 Replacing a Hard Disk Drive...17 Table of Contents iii

Upgrading and Servicing Guide
Page 5
... to do so before attempting to the product specifications for replacing or upgrading the memory and the hard disk drive in personal injury or equipment damage. WARNING: Always disconnect the HP TouchSmart PC from the power source before removing the memory cover or the back cover. It is easier to consult this information than to...
... to do so before attempting to the product specifications for replacing or upgrading the memory and the hard disk drive in personal injury or equipment damage. WARNING: Always disconnect the HP TouchSmart PC from the power source before removing the memory cover or the back cover. It is easier to consult this information than to...

Upgrading and Servicing Guide
Page 7
Ensure that you are discharged of the HP TouchSmart PC or optional equipment. CAUTION: Static electricity can damage the electronic components of static electricity by briefly touching a grounded metal object. 2 Tap the Windows ...shut down, disconnect the power adapter (A) from the HP TouchSmart PC. Opening the Computer To avoid injury and equipment damage, always complete the following steps in order, when opening the HP TouchSmart PC. 1 Remove all media and external devices (CDs, DVDs, memory cards, USB devices, pocket media drive, and external hard disk drives) from the back of the...
Ensure that you are discharged of the HP TouchSmart PC or optional equipment. CAUTION: Static electricity can damage the electronic components of static electricity by briefly touching a grounded metal object. 2 Tap the Windows ...shut down, disconnect the power adapter (A) from the HP TouchSmart PC. Opening the Computer To avoid injury and equipment damage, always complete the following steps in order, when opening the HP TouchSmart PC. 1 Remove all media and external devices (CDs, DVDs, memory cards, USB devices, pocket media drive, and external hard disk drives) from the back of the...

Upgrading and Servicing Guide
Page 9
B A 8 Remove the screw that secures the hard disk drive/memory cover to the right until it will go to an upright position, about 90 degrees (A) from the computer, and then move the latch to the back of the computer. 7 Apply additional pressure to lift the computer stand as far as it is in the locked position (B). Upgrading and Servicing Guide 5
B A 8 Remove the screw that secures the hard disk drive/memory cover to the right until it will go to an upright position, about 90 degrees (A) from the computer, and then move the latch to the back of the computer. 7 Apply additional pressure to lift the computer stand as far as it is in the locked position (B). Upgrading and Servicing Guide 5
Upgrading and Servicing Guide
Page 10
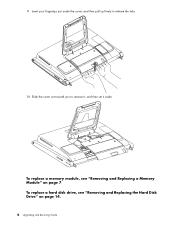
9 Insert your fingertips just under the cover, and then pull up firmly to release the tabs. 10 Slide the cover out toward you to remove it, and then set it aside. To replace a hard disk drive, see "Removing and Replacing a Memory Module" on page 14. 6 Upgrading and Servicing Guide To replace a memory module, see "Removing and Replacing the Hard Disk Drive" on page 7.
9 Insert your fingertips just under the cover, and then pull up firmly to release the tabs. 10 Slide the cover out toward you to remove it, and then set it aside. To replace a hard disk drive, see "Removing and Replacing a Memory Module" on page 14. 6 Upgrading and Servicing Guide To replace a memory module, see "Removing and Replacing the Hard Disk Drive" on page 7.
Upgrading and Servicing Guide
Page 17
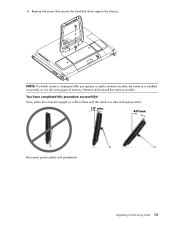
Upgrading and Servicing Guide 13 You have completed this procedure successfully! Now, place the computer upright on a flat surface with the stand in a safe and open position. 10° min. 40°max Reconnect power cables and peripherals. Remove and reinstall the memory module. NOTE: If a blank screen is displayed after you replace or add a memory module, the memory is installed incorrectly, or it is the wrong type of memory. 6 Replace the screw that secures the hard disk drive cage to the chassis.
Upgrading and Servicing Guide 13 You have completed this procedure successfully! Now, place the computer upright on a flat surface with the stand in a safe and open position. 10° min. 40°max Reconnect power cables and peripherals. Remove and reinstall the memory module. NOTE: If a blank screen is displayed after you replace or add a memory module, the memory is installed incorrectly, or it is the wrong type of memory. 6 Replace the screw that secures the hard disk drive cage to the chassis.

Upgrading and Servicing Guide
Page 18
... of the way (B), using recovery discs to prepare the HP TouchSmart PC. After replacing the hard disk drive, you need to run System Recovery using the shield loop. B A 14 Upgrading and Servicing Guide Removing the Hard Disk Drive 1 Complete the procedures to load the factory-installed files. Removing and Replacing the Hard Disk Drive You can replace or upgrade the...
... of the way (B), using recovery discs to prepare the HP TouchSmart PC. After replacing the hard disk drive, you need to run System Recovery using the shield loop. B A 14 Upgrading and Servicing Guide Removing the Hard Disk Drive 1 Complete the procedures to load the factory-installed files. Removing and Replacing the Hard Disk Drive You can replace or upgrade the...

Upgrading and Servicing Guide
Page 19
A B Upgrading and Servicing Guide 15 3 While the hard disk drive is still in the computer, disconnect the power and data cables on the hard disk drive, by pressing down the latches and then removing them from the drive. 4 Remove the shipping screw just to the left of the cables. 5 Pull up on the hard disk drive tab (A), and then pull the drive from its bay (B).
A B Upgrading and Servicing Guide 15 3 While the hard disk drive is still in the computer, disconnect the power and data cables on the hard disk drive, by pressing down the latches and then removing them from the drive. 4 Remove the shipping screw just to the left of the cables. 5 Pull up on the hard disk drive tab (A), and then pull the drive from its bay (B).

Upgrading and Servicing Guide
Page 20
Your hard disk drive cage may look slightly different from the illustration. 7 Place the hard disk drive in an anti-static bag. 16 Upgrading and Servicing Guide 6 With a Phillips screwdriver (magnetic-tipped recommended), remove the four screws that secure the hard disk drive to the cage, and then slide the hard disk drive out of the cage.
Your hard disk drive cage may look slightly different from the illustration. 7 Place the hard disk drive in an anti-static bag. 16 Upgrading and Servicing Guide 6 With a Phillips screwdriver (magnetic-tipped recommended), remove the four screws that secure the hard disk drive to the cage, and then slide the hard disk drive out of the cage.

Limited Warranty, Support, and System Recovery Guide
Page 5
...CAUSED BY THE PRODUCT OR THE FAILURE OF THE PRODUCT TO PERFORM, INCLUDING ANY LOST PROFITS OR SAVINGS OR SPECIAL, INCIDENTAL, OR CONSEQUENTIAL DAMAGES. HP IS NOT LIABLE FOR ANY CLAIM MADE BY A THIRD PARTY OR MADE BY YOU FOR A THIRD PARTY. Limited Warranty become the property of...MAKE PERIODIC BACKUP COPIES OF THE DATA STORED ON YOUR HARD DRIVE OR OTHER STORAGE DEVICES AS A PRECAUTION AGAINST POSSIBLE FAILURES, ALTERATION, OR LOSS OF THE DATA. BEFORE RETURNING ANY UNIT FOR SERVICE, BE SURE TO BACK UP DATA AND REMOVE ANY CONFIDENTIAL, PROPRIETARY, OR PERSONAL INFORMATION. Exclusive Remedy TO...
...CAUSED BY THE PRODUCT OR THE FAILURE OF THE PRODUCT TO PERFORM, INCLUDING ANY LOST PROFITS OR SAVINGS OR SPECIAL, INCIDENTAL, OR CONSEQUENTIAL DAMAGES. HP IS NOT LIABLE FOR ANY CLAIM MADE BY A THIRD PARTY OR MADE BY YOU FOR A THIRD PARTY. Limited Warranty become the property of...MAKE PERIODIC BACKUP COPIES OF THE DATA STORED ON YOUR HARD DRIVE OR OTHER STORAGE DEVICES AS A PRECAUTION AGAINST POSSIBLE FAILURES, ALTERATION, OR LOSS OF THE DATA. BEFORE RETURNING ANY UNIT FOR SERVICE, BE SURE TO BACK UP DATA AND REMOVE ANY CONFIDENTIAL, PROPRIETARY, OR PERSONAL INFORMATION. Exclusive Remedy TO...

Limited Warranty, Support, and System Recovery Guide
Page 14
... or from your hard drive. 7 Choose to run from the recovery discs, and then click Next. 8 In the Recovery Manager Welcome window, click the Advanced options button. 9 Click Recover your computer to its original factory condition, and then click Next. 10 If you are prompted to back up to a removable disc any data...
... or from your hard drive. 7 Choose to run from the recovery discs, and then click Next. 8 In the Recovery Manager Welcome window, click the Advanced options button. 9 Click Recover your computer to its original factory condition, and then click Next. 10 If you are prompted to back up to a removable disc any data...

Warranty and Support Guide
Page 5
... YOU SPECIFIC LEGAL RIGHTS. Replacement parts are installed, whichever is your purchase price or lease payments (less interest) instead of a replacement. HP will, at its discretion, repair or replace any component or hardware product that shipped with the product; (c) by software, interfacing, parts or...BEFORE RETURNING ANY UNIT FOR SERVICE, BE SURE TO BACK UP DATA AND REMOVE ANY CONFIDENTIAL, PROPRIETARY, OR PERSONAL INFORMATION. UNITS SENT IN FOR SERVICE MAY HAVE THE DATA ERASED FROM THE HARD DRIVE AND THE PROGRAMS RESTORED TO THEIR ORIGINAL STATE. THIS LIMITATION OF LIABILITY WILL...
... YOU SPECIFIC LEGAL RIGHTS. Replacement parts are installed, whichever is your purchase price or lease payments (less interest) instead of a replacement. HP will, at its discretion, repair or replace any component or hardware product that shipped with the product; (c) by software, interfacing, parts or...BEFORE RETURNING ANY UNIT FOR SERVICE, BE SURE TO BACK UP DATA AND REMOVE ANY CONFIDENTIAL, PROPRIETARY, OR PERSONAL INFORMATION. UNITS SENT IN FOR SERVICE MAY HAVE THE DATA ERASED FROM THE HARD DRIVE AND THE PROGRAMS RESTORED TO THEIR ORIGINAL STATE. THIS LIMITATION OF LIABILITY WILL...

Warranty and Support Guide
Page 15
... the Recovery Manager window opens. 5 Click Advanced options. 6 Click Recover your computer to the Lock button, and then click Shut Down. NOTE: If your hard drive. 7 Choose to run from the computer, except the monitor, keyboard, and mouse. 3 Press the On button to turn the computer back on. 15 Perform... a system recovery: NOTE: System Recovery deletes any data or programs that prompts you to do so. 12 When the Recovery Manager is finished, remove the last recovery disc. 13 Click Finish to back up files, and you are prompted to restart the computer. 15 When you have already done...
... the Recovery Manager window opens. 5 Click Advanced options. 6 Click Recover your computer to the Lock button, and then click Shut Down. NOTE: If your hard drive. 7 Choose to run from the computer, except the monitor, keyboard, and mouse. 3 Press the On button to turn the computer back on. 15 Perform... a system recovery: NOTE: System Recovery deletes any data or programs that prompts you to do so. 12 When the Recovery Manager is finished, remove the last recovery disc. 13 Click Finish to back up files, and you are prompted to restart the computer. 15 When you have already done...

Warranty and Support Guide
Page 5
... SERVICE, BE SURE TO BACK UP DATA AND REMOVE ANY CONFIDENTIAL, PROPRIETARY, OR PERSONAL INFORMATION. HP IS NOT RESPONSIBLE FOR DAMAGE TO OR LOSS OF ANY PROGRAMS, DATA, OR REMOVABLE STORAGE MEDIA. UNITS SENT IN FOR SERVICE MAY HAVE THE DATA ERASED FROM THE HARD DRIVE AND THE PROGRAMS RESTORED TO THEIR ORIGINAL STATE. YOU...
... SERVICE, BE SURE TO BACK UP DATA AND REMOVE ANY CONFIDENTIAL, PROPRIETARY, OR PERSONAL INFORMATION. HP IS NOT RESPONSIBLE FOR DAMAGE TO OR LOSS OF ANY PROGRAMS, DATA, OR REMOVABLE STORAGE MEDIA. UNITS SENT IN FOR SERVICE MAY HAVE THE DATA ERASED FROM THE HARD DRIVE AND THE PROGRAMS RESTORED TO THEIR ORIGINAL STATE. YOU...

Warranty and Support Guide
Page 14
...the post-recovery procedure" on the computer. 6 A window may open, prompting you to choose between running system recovery from the discs or from your hard drive. 7 Choose to run from the recovery discs, and then click Next. 8 In the Recovery Manager Welcome window, click the Advanced options button. ...after purchase. After system recovery is working , use these steps to perform a system recovery: NOTE: System Recovery deletes any data that you are done, remove the backup disc from the computer, except the monitor, keyboard, and mouse. 3 Press the On button to keep . 1 Turn off . 2 ...
...the post-recovery procedure" on the computer. 6 A window may open, prompting you to choose between running system recovery from the discs or from your hard drive. 7 Choose to run from the recovery discs, and then click Next. 8 In the Recovery Manager Welcome window, click the Advanced options button. ...after purchase. After system recovery is working , use these steps to perform a system recovery: NOTE: System Recovery deletes any data that you are done, remove the backup disc from the computer, except the monitor, keyboard, and mouse. 3 Press the On button to keep . 1 Turn off . 2 ...
Warranty and Support Guide
Page 5
... in writing. 5 Limited Warranty become the property of purchase. BEFORE RETURNING ANY UNIT FOR SERVICE, BE SURE TO BACK UP DATA AND REMOVE ANY CONFIDENTIAL, PROPRIETARY, OR PERSONAL INFORMATION. Exclusive Remedy TO THE EXTENT ALLOWED BY APPLICABLE LOCAL LAW, THESE TERMS AND CONDITIONS CONSTITUTE THE COMPLETE... parameters stated in the user documentation that shipped with (a) a replacement unit of HP. UNITS SENT IN FOR SERVICE MAY HAVE THE DATA ERASED FROM THE HARD DRIVE AND THE PROGRAMS RESTORED TO THEIR ORIGINAL STATE. HP IS NOT LIABLE FOR ANY CLAIM MADE BY A THIRD PARTY OR MADE BY ...
... in writing. 5 Limited Warranty become the property of purchase. BEFORE RETURNING ANY UNIT FOR SERVICE, BE SURE TO BACK UP DATA AND REMOVE ANY CONFIDENTIAL, PROPRIETARY, OR PERSONAL INFORMATION. Exclusive Remedy TO THE EXTENT ALLOWED BY APPLICABLE LOCAL LAW, THESE TERMS AND CONDITIONS CONSTITUTE THE COMPLETE... parameters stated in the user documentation that shipped with (a) a replacement unit of HP. UNITS SENT IN FOR SERVICE MAY HAVE THE DATA ERASED FROM THE HARD DRIVE AND THE PROGRAMS RESTORED TO THEIR ORIGINAL STATE. HP IS NOT LIABLE FOR ANY CLAIM MADE BY A THIRD PARTY OR MADE BY ...
Warranty and Support Guide
Page 16
... devices, and turn on the computer. 6 A window may open, prompting you to choose between running system recovery from the discs or from your hard drive. 7 Choose to run from recovery discs This section contains the procedure for approximately 5 seconds, or until you have already done so, click No,... and then click Next. 8 System recovery begins. System recovery at the next screen that prompts you are done, remove the backup disc from the disc slot. Starting system recovery from the recovery discs, and then click Next. 8 In the Recovery Manager Welcome window...
... devices, and turn on the computer. 6 A window may open, prompting you to choose between running system recovery from the discs or from your hard drive. 7 Choose to run from recovery discs This section contains the procedure for approximately 5 seconds, or until you have already done so, click No,... and then click Next. 8 System recovery begins. System recovery at the next screen that prompts you are done, remove the backup disc from the disc slot. Starting system recovery from the recovery discs, and then click Next. 8 In the Recovery Manager Welcome window...

Getting Started Guide
Page 50
... taskbar. 7 Tap Folders in the upper-left corner of HP TouchSmart. How do not already have on the Web page. 3 Tap a feed. 4 Tap the Subscribe to view your photos. When you want into the folder. 6 Return to discover feeds on your hard drive with your camera, and insert it into the memory card...) You can view any photos you have an RSS tile. 8 Tap the feed title to an RSS feed in Internet Explorer outside of the HP TouchSmart window. 2 Tap Removable Disc. 3 View your photos directly from the computer, you might have to add a tile and choose RSS Feed if you do I set up...
... taskbar. 7 Tap Folders in the upper-left corner of HP TouchSmart. How do not already have on the Web page. 3 Tap a feed. 4 Tap the Subscribe to view your photos. When you want into the folder. 6 Return to discover feeds on your hard drive with your camera, and insert it into the memory card...) You can view any photos you have an RSS tile. 8 Tap the feed title to an RSS feed in Internet Explorer outside of the HP TouchSmart window. 2 Tap Removable Disc. 3 View your photos directly from the computer, you might have to add a tile and choose RSS Feed if you do I set up...
Getting Started Guide
Page 51
...or Removable Drive. 3 If you want , by tapping the Settings button, and select your music stored-either the Music folder or the iTunes folder within the Music folder-and open the library. 3 Put music into the Music folder or the iTunes folder within the Music folder in HP TouchSmart Photo...Navigate to the library where you want your settings. As you want specific photos in the text box. 7 Tap Save. HP TouchSmart FAQs 45 First, put music files on your hard drive in your Music folder: 1 Click the Windows Vista start button. 2 Click Control Panel, and then click Appearance and ...
...or Removable Drive. 3 If you want , by tapping the Settings button, and select your music stored-either the Music folder or the iTunes folder within the Music folder-and open the library. 3 Put music into the Music folder or the iTunes folder within the Music folder in HP TouchSmart Photo...Navigate to the library where you want your settings. As you want specific photos in the text box. 7 Tap Save. HP TouchSmart FAQs 45 First, put music files on your hard drive in your Music folder: 1 Click the Windows Vista start button. 2 Click Control Panel, and then click Appearance and ...


