HP TouchSmart Desktop PCs - Troubleshooting and Maintenance Guide
Page 13
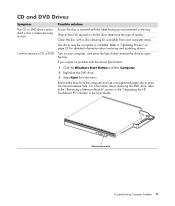
... drivers. I cannot remove a CD or DVD. Turn on page 22 for detailed information about removing the DVD drive, refer to the "Removing a Memory Module" section in the "Upgrading the HP TouchSmart PC" chapter in the tray. Refer to "Updating Drivers" on your computer, and press the Eject button nearest the drive to press the...
... drivers. I cannot remove a CD or DVD. Turn on page 22 for detailed information about removing the DVD drive, refer to the "Removing a Memory Module" section in the "Upgrading the HP TouchSmart PC" chapter in the tray. Refer to "Updating Drivers" on your computer, and press the Eject button nearest the drive to press the...
HP TouchSmart Desktop PCs - User Guide
Page 4
...written notes and drawings 43 Upgrading the HP TouchSmart PC 45 Safety Information ...45 Opening and Closing the HP TouchSmart PC 45 Preparing the HP TouchSmart PC 45 Before opening the HP TouchSmart PC 46 After closing the HP TouchSmart PC 46 Removing the rear... cover ...47 Replacing the rear cover ...48 Removing the vertical cover ...48 Replacing the vertical cover ...49 Adding Memory...49 Removing a memory module...49 Installing a memory...
...written notes and drawings 43 Upgrading the HP TouchSmart PC 45 Safety Information ...45 Opening and Closing the HP TouchSmart PC 45 Preparing the HP TouchSmart PC 45 Before opening the HP TouchSmart PC 46 After closing the HP TouchSmart PC 46 Removing the rear... cover ...47 Replacing the rear cover ...48 Removing the vertical cover ...48 Replacing the vertical cover ...49 Adding Memory...49 Removing a memory module...49 Installing a memory...
HP TouchSmart Desktop PCs - User Guide
Page 51
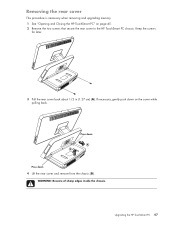
WARNING: Beware of sharp edges inside the chassis. Removing the rear cover This procedure is necessary when removing and upgrading memory. 1 See "Opening and Closing the HP TouchSmart PC" on the cover while pulling back. 4 Lift the rear cover and remove from the chassis (B). Upgrading the HP TouchSmart PC 47 If necessary, gently push down on page 45. 2 Remove the two screws that secure the rear cover to the HP TouchSmart PC chassis. Keep the screws for later. + - 3 Pull the rear cover back about 1/2 in (1.27 cm) (A).
WARNING: Beware of sharp edges inside the chassis. Removing the rear cover This procedure is necessary when removing and upgrading memory. 1 See "Opening and Closing the HP TouchSmart PC" on the cover while pulling back. 4 Lift the rear cover and remove from the chassis (B). Upgrading the HP TouchSmart PC 47 If necessary, gently push down on page 45. 2 Remove the two screws that secure the rear cover to the HP TouchSmart PC chassis. Keep the screws for later. + - 3 Pull the rear cover back about 1/2 in (1.27 cm) (A).
HP TouchSmart Desktop PCs - User Guide
Page 53
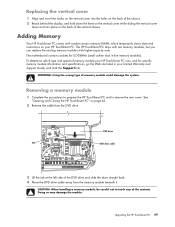
... Doing so may damage the module. Upgrading the HP TouchSmart PC 49 Removing a memory module 1 Complete the procedures to prepare the HP TouchSmart PC and to touch any of memory module could damage the system. See "Opening and Closing the HP TouchSmart PC" on the back of the vertical...determine which temporarily stores data and instructions on your HP TouchSmart PC. The HP TouchSmart PC ships with two memory modules, but you can replace the existing memory modules with random access memory (RAM), which type and speed of memory module your Limited Warranty and Support Guide, and ...
... Doing so may damage the module. Upgrading the HP TouchSmart PC 49 Removing a memory module 1 Complete the procedures to prepare the HP TouchSmart PC and to touch any of memory module could damage the system. See "Opening and Closing the HP TouchSmart PC" on the back of the vertical...determine which temporarily stores data and instructions on your HP TouchSmart PC. The HP TouchSmart PC ships with two memory modules, but you can replace the existing memory modules with random access memory (RAM), which type and speed of memory module your Limited Warranty and Support Guide, and ...
HP TouchSmart Desktop PCs - User Guide
Page 54
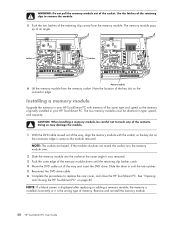
... retaining clips away from the memory socket. Installing a memory module Upgrade the memory in your HP TouchSmart PC. NOTE: The sockets are keyed. If the module slot does not match the socket, turn the memory module over. 2 Slide the memory module into the socket at an angle. Remove and reinstall the memory module. 50 HP TouchSmart PC User Guide WARNING: Do...
... retaining clips away from the memory socket. Installing a memory module Upgrade the memory in your HP TouchSmart PC. NOTE: The sockets are keyed. If the module slot does not match the socket, turn the memory module over. 2 Slide the memory module into the socket at an angle. Remove and reinstall the memory module. 50 HP TouchSmart PC User Guide WARNING: Do...
HP TouchSmart Desktop PCs - User Guide
Page 60
... GS-66 using GS-61 memory, upgrade UG- 49 microphone using UG- 24 microphone array UG- 1 mouse autoscroll GS-28 cursor speed GS-29 panning GS-28 replace batteries UG- 11 setting up UG- 8 storing UG- 1 switching button functions GS-29 using UG- 11 56 HP TouchSmart PC User Guide Music GS-...making a movie GS-147 previewing a movie GS-148 rotating images clockwise GS-145 selecting style GS-145 setting the duration of video GS-146 upgrading GS-151 using the magicMoments feature GS-144 N network wireless UG- 2 Norton Internet Security configuring GS-44 registering GS-44 note deleting notes in...
... GS-66 using GS-61 memory, upgrade UG- 49 microphone using UG- 24 microphone array UG- 1 mouse autoscroll GS-28 cursor speed GS-29 panning GS-28 replace batteries UG- 11 setting up UG- 8 storing UG- 1 switching button functions GS-29 using UG- 11 56 HP TouchSmart PC User Guide Music GS-...making a movie GS-147 previewing a movie GS-148 rotating images clockwise GS-145 selecting style GS-145 setting the duration of video GS-146 upgrading GS-151 using the magicMoments feature GS-144 N network wireless UG- 2 Norton Internet Security configuring GS-44 registering GS-44 note deleting notes in...


