HP w19 LCD Monitor User's Guide
Page 10
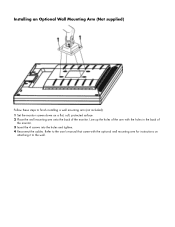
Installing an Optional Wall Mounting Arm (Not supplied) Follow these steps to finish installing a wall mounting arm (not included): 1 Set the monitor screen down on attaching it to the user's manual that came with the holes in the back of the monitor. Refer to the wall. Line up the holes of the arm with the optional wall mounting arm for instructions on a flat, soft, protected surface. 2 Place the wall mounting arm onto the back of the monitor. 3 Insert the 4 screws into the holes and tighten. 4 Reconnect the cables.
Installing an Optional Wall Mounting Arm (Not supplied) Follow these steps to finish installing a wall mounting arm (not included): 1 Set the monitor screen down on attaching it to the user's manual that came with the holes in the back of the monitor. Refer to the wall. Line up the holes of the arm with the optional wall mounting arm for instructions on a flat, soft, protected surface. 2 Place the wall mounting arm onto the back of the monitor. 3 Insert the 4 screws into the holes and tighten. 4 Reconnect the cables.


