HP w19 LCD Monitor User's Guide
Page 1
... not furnished by HP. registered trademarks of HP. HP w19 LCD Monitor User's Guide • Preface • Safety and Maintenance Guidelines • Setup • Using the Monitor • Drivers and Auto-Adjustment • Technical Support FAQ • Specifications • LCD Monitor Quality and Pixel Policy • Agency Regulatory Notices The only warranties for HP products and services are set forth in this document may be photocopied, reproduced, or translated to change without the...
... not furnished by HP. registered trademarks of HP. HP w19 LCD Monitor User's Guide • Preface • Safety and Maintenance Guidelines • Setup • Using the Monitor • Drivers and Auto-Adjustment • Technical Support FAQ • Specifications • LCD Monitor Quality and Pixel Policy • Agency Regulatory Notices The only warranties for HP products and services are set forth in this document may be photocopied, reproduced, or translated to change without the...
HP w19 LCD Monitor User's Guide
Page 2
... that helps you make better use of data and tells you how to avoid the problem. The sections are used as follows: • Safety and Maintenance Guidelines • Setup • Using the Monitor • Drivers and Auto-Adjustment • Technical Support FAQ • Specifications • LCD Monitor Quality and Pixel Policy • Agency Regulatory Notices Notational Conventions The following subsections describe notational conventions used in this guide, blocks...
... that helps you make better use of data and tells you how to avoid the problem. The sections are used as follows: • Safety and Maintenance Guidelines • Setup • Using the Monitor • Drivers and Auto-Adjustment • Technical Support FAQ • Specifications • LCD Monitor Quality and Pixel Policy • Agency Regulatory Notices Notational Conventions The following subsections describe notational conventions used in this guide, blocks...
HP w19 LCD Monitor User's Guide
Page 3
... cause damage. • Use only a power source and connection compatible with this monitor, as having this monitor. WARNING: To reduce the risk of the cord. The grounding plug is designed for use with surge protection or uninterruptible power supply (UPS). Use a power strip whose manufacturer offers a damage replacement policy so you can easily reach. Back to Contents Page Safety and Maintenance Guidelines: HP w19 LCD Monitor Important Safety Information...
... cause damage. • Use only a power source and connection compatible with this monitor, as having this monitor. WARNING: To reduce the risk of the cord. The grounding plug is designed for use with surge protection or uninterruptible power supply (UPS). Use a power strip whose manufacturer offers a damage replacement policy so you can easily reach. Back to Contents Page Safety and Maintenance Guidelines: HP w19 LCD Monitor Important Safety Information...
HP w19 LCD Monitor User's Guide
Page 4
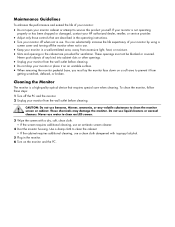
... not open your monitor or place it from excessive light, heat, or moisture. • Slots and openings in the cabinet are described in the operating instructions. • Turn your monitor off the monitor when not in use. • Keep your HP authorized dealer, reseller, or service provider. • Adjust only those controls that requires special care when cleaning. If your monitor from the wall outlet before cleaning. These openings...
... not open your monitor or place it from excessive light, heat, or moisture. • Slots and openings in the cabinet are described in the operating instructions. • Turn your monitor off the monitor when not in use. • Keep your HP authorized dealer, reseller, or service provider. • Adjust only those controls that requires special care when cleaning. If your monitor from the wall outlet before cleaning. These openings...
HP w19 LCD Monitor User's Guide
Page 5
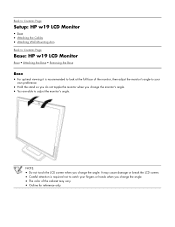
.... • Hold the stand so you do not topple the monitor when you change the angle. It may vary. • Outline for reference only. Back to Contents Page Setup: HP w19 LCD Monitor • Base • Attaching the Cables • Attaching Wall Mounting Arm Back to Contents Page Base: HP w19 LCD Monitor Base • Attaching the Base • Removing the Base Base • For optimal viewing it is required not to adjust the monitor's angle.
.... • Hold the stand so you do not topple the monitor when you change the angle. It may vary. • Outline for reference only. Back to Contents Page Setup: HP w19 LCD Monitor • Base • Attaching the Cables • Attaching Wall Mounting Arm Back to Contents Page Base: HP w19 LCD Monitor Base • Attaching the Base • Removing the Base Base • For optimal viewing it is required not to adjust the monitor's angle.
HP w19 LCD Monitor User's Guide
Page 6
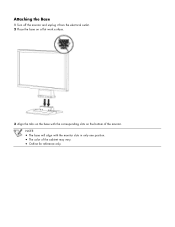
NOTE: • The base will align with the corresponding slots on the bottom of the cabinet may vary. • Outline for reference only. Attaching the Base 1 Turn off the monitor and unplug it from the electrical outlet. 2 Place the base on a flat work surface. 3 Align the tabs on the base with the monitor slots in only one position. • The color of the monitor.
NOTE: • The base will align with the corresponding slots on the bottom of the cabinet may vary. • Outline for reference only. Attaching the Base 1 Turn off the monitor and unplug it from the electrical outlet. 2 Place the base on a flat work surface. 3 Align the tabs on the base with the monitor slots in only one position. • The color of the monitor.

HP w19 LCD Monitor User's Guide
Page 8
... monitor and connect the other end to the computer's DVI port. 5 Turn on the back of the monitor. 2 Connect one end of the 15-pin D-Sub (VGA) cable to the back of the monitor and connect the other end of your monitor displays an image, installation is complete. If your monitor into the power adapter. 4 (Optional - Requires a video card with DVI port) - If it does not display an image, see Technical Support FAQ and Using the Monitor...
... monitor and connect the other end to the computer's DVI port. 5 Turn on the back of the monitor. 2 Connect one end of the 15-pin D-Sub (VGA) cable to the back of the monitor and connect the other end of your monitor displays an image, installation is complete. If your monitor into the power adapter. 4 (Optional - Requires a video card with DVI port) - If it does not display an image, see Technical Support FAQ and Using the Monitor...
HP w19 LCD Monitor User's Guide
Page 9
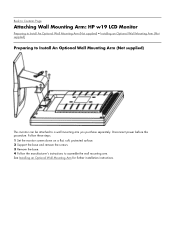
... Wall Mounting Arm for further installation instructions. Disconnect power before this procedure. Back to Contents Page Attaching Wall Mounting Arm: HP w19 LCD Monitor Preparing to Install An Optional Wall Mounting Arm (Not supplied) • Installing an Optional Wall Mounting Arm (Not supplied) Preparing to Install An Optional Wall Mounting Arm (Not supplied) This monitor can be attached to assemble the wall mounting arm. Follow these steps: 1 Set the monitor screen down on a flat, soft, protected surface. 2 Support the base and remove the screws. 3 Remove the base...
... Wall Mounting Arm for further installation instructions. Disconnect power before this procedure. Back to Contents Page Attaching Wall Mounting Arm: HP w19 LCD Monitor Preparing to Install An Optional Wall Mounting Arm (Not supplied) • Installing an Optional Wall Mounting Arm (Not supplied) Preparing to Install An Optional Wall Mounting Arm (Not supplied) This monitor can be attached to assemble the wall mounting arm. Follow these steps: 1 Set the monitor screen down on a flat, soft, protected surface. 2 Support the base and remove the screws. 3 Remove the base...
HP w19 LCD Monitor User's Guide
Page 10
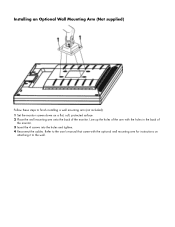
Refer to the user's manual that came with the holes in the back of the monitor. Installing an Optional Wall Mounting Arm (Not supplied) Follow these steps to the wall. Line up the holes of the arm with the optional wall mounting arm for instructions on attaching it to finish installing a wall mounting arm (not included): 1 Set the monitor screen down on a flat, soft, protected surface. 2 Place the wall mounting arm onto the back of the monitor. 3 Insert the 4 screws into the holes and tighten. 4 Reconnect the cables.
Refer to the user's manual that came with the holes in the back of the monitor. Installing an Optional Wall Mounting Arm (Not supplied) Follow these steps to the wall. Line up the holes of the arm with the optional wall mounting arm for instructions on attaching it to finish installing a wall mounting arm (not included): 1 Set the monitor screen down on a flat, soft, protected surface. 2 Place the wall mounting arm onto the back of the monitor. 3 Insert the 4 screws into the holes and tighten. 4 Reconnect the cables.
HP w19 LCD Monitor User's Guide
Page 11
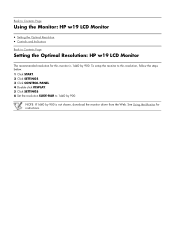
To setup the monitor to this monitor is not shown, download the monitor driver from the Web. See Using the Monitor for this resolution, follow the steps below. 1 Click START. 2 Click SETTINGS. 3 Click CONTROL PANEL. 4 Double click DISPLAY. 5 Click SETTINGS. 6 Set the resolution SLIDE-BAR to Contents Page Setting the Optimal Resolution: HP w19 LCD Monitor The recommended resolution for instructions. NOTE: If 1440 by 900. Back to Contents Page Using the Monitor: HP w19 LCD Monitor • Setting the Optimal Resolution • Controls and Indicators Back...
To setup the monitor to this monitor is not shown, download the monitor driver from the Web. See Using the Monitor for this resolution, follow the steps below. 1 Click START. 2 Click SETTINGS. 3 Click CONTROL PANEL. 4 Double click DISPLAY. 5 Click SETTINGS. 6 Set the resolution SLIDE-BAR to Contents Page Setting the Optimal Resolution: HP w19 LCD Monitor The recommended resolution for instructions. NOTE: If 1440 by 900. Back to Contents Page Using the Monitor: HP w19 LCD Monitor • Setting the Optimal Resolution • Controls and Indicators Back...
HP w19 LCD Monitor User's Guide
Page 12
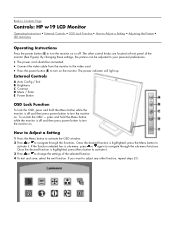
...; The power cord should be connected. • Connect the video cable from the monitor to the video card. • Press the power button (E) to turn the monitor on or off. The other function, repeat steps 2-3. The power indicator will light up. Back to Contents Page Controls: HP w19 LCD Monitor Operating Instructions • External Controls • OSD Lock Function • How to Adjust a Setting • Adjusting the Picture • LED Indicators Operating Instructions Press the power button (E) to turn on the monitor. Once the...
...; The power cord should be connected. • Connect the video cable from the monitor to the video card. • Press the power button (E) to turn the monitor on or off. The other function, repeat steps 2-3. The power indicator will light up. Back to Contents Page Controls: HP w19 LCD Monitor Operating Instructions • External Controls • OSD Lock Function • How to Adjust a Setting • Adjusting the Picture • LED Indicators Operating Instructions Press the power button (E) to turn on the monitor. Once the...
HP w19 LCD Monitor User's Guide
Page 13
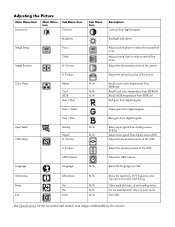
... from digital-register Green gain from digital-register Brightness Backlight adjustment Image Setup Image Position Focus Clock H. User / Blue Blue gain from digital source (DVI) Adjust the horizontal position of the picture Color Temp. Position N/A N/A Select input signal from analog source (D-Sub) Select input signal from digital-register Input Select OSD Setup Analog Digital H. Position Adjust picture phase to reduce horizontal-line noise Adjust picture clock to main menu Exit OSD See Specifications for the horizontal and vertical scan ranges addressable by this monitor...
... from digital-register Green gain from digital-register Brightness Backlight adjustment Image Setup Image Position Focus Clock H. User / Blue Blue gain from digital source (DVI) Adjust the horizontal position of the picture Color Temp. Position N/A N/A Select input signal from analog source (D-Sub) Select input signal from digital-register Input Select OSD Setup Analog Digital H. Position Adjust picture phase to reduce horizontal-line noise Adjust picture clock to main menu Exit OSD See Specifications for the horizontal and vertical scan ranges addressable by this monitor...
HP w19 LCD Monitor User's Guide
Page 14
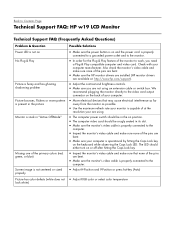
... using the instructions in the download pages. LED Color Green Red Back to Contents Page Installing Drivers and Using the Auto-Adjustment Feature: HP w19 LCD Monitor Downloading from the World Wide Web To download the latest version of INF and ICM files from the HP Support Web site: 1 Refer to: http://www.hp.com/support 2 Select your country/region. 3 Select Download Drivers and Software. 4 Enter the model number for your monitor is using the Auto button on the monitor. LED Indicators Status Full Power Mode...
... using the instructions in the download pages. LED Color Green Red Back to Contents Page Installing Drivers and Using the Auto-Adjustment Feature: HP w19 LCD Monitor Downloading from the World Wide Web To download the latest version of INF and ICM files from the HP Support Web site: 1 Refer to: http://www.hp.com/support 2 Select your country/region. 3 Select Download Drivers and Software. 4 Enter the model number for your monitor is using the Auto button on the monitor. LED Indicators Status Full Power Mode...
HP w19 LCD Monitor User's Guide
Page 15
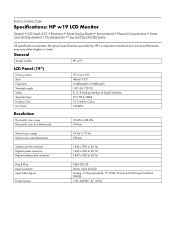
... not using an extension cable or switch box. Check with your computer manufacturer. The LED should be snugly seated in "Active Off-Mode" Missing one of the primary colors (red, green, or blue) Screen image is not centered or sized properly Picture has color defects (white does not look white) Possible Solutions • Make sure the power button is on and the power cord is properly connected to a grounded power outlet and to the monitor...
... not using an extension cable or switch box. Check with your computer manufacturer. The LED should be snugly seated in "Active Off-Mode" Missing one of the primary colors (red, green, or blue) Screen image is not centered or sized properly Picture has color defects (white does not look white) Possible Solutions • Make sure the power button is on and the power cord is properly connected to a grounded power outlet and to the monitor...
HP w19 LCD Monitor User's Guide
Page 16
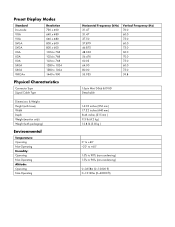
... Clock TFT Color LCD 48cm(19.0") 0.285mm(H) x 0.285mm(V) 150° (H) 130°(V) R, G, B Analog lnterface & Digital Interface H/V TTL & TMDS 16.2 million Colors 135MHz Resolution Horizontal scan range Horizontal scan size (Maximum) 30 kHz to 83 kHz 410mm Vertical scan range Vertical scan size (Maximum) 55 Hz to Contents Page Specifications: HP w19 LCD Monitor General • LCD Panel (19") • Resolution • Preset Display Modes • Environmental • Physical Characteristics • Power Cord Set Requirements • Pin Assignments • Plug...
... Clock TFT Color LCD 48cm(19.0") 0.285mm(H) x 0.285mm(V) 150° (H) 130°(V) R, G, B Analog lnterface & Digital Interface H/V TTL & TMDS 16.2 million Colors 135MHz Resolution Horizontal scan range Horizontal scan size (Maximum) 30 kHz to 83 kHz 410mm Vertical scan range Vertical scan size (Maximum) 55 Hz to Contents Page Specifications: HP w19 LCD Monitor General • LCD Panel (19") • Resolution • Preset Display Modes • Environmental • Physical Characteristics • Power Cord Set Requirements • Pin Assignments • Plug...
HP w19 LCD Monitor User's Guide
Page 17
Preset Display Modes Standard Dos-mode VGA VGA SVGA SVGA XGA XGA XGA SXGA SXGA WXGA+ Resolution 720 x 400 640 x 480 640 x 480 800 x 600 800 x 600 1024 x 768 1024 x 768 1024 x 768 1280 x 1024 1280 x 1024 1440 x 900 Physical Characteristics Connector Type Signal Cable Type Dimensions & Weight: Height (with base) Width Depth Weight (monitor only)...Horizontal Frequency (kHz) 31.47 31.47 37.50 37.879 46.875 48.363 56.476 60.02 64.00 80.00 55.935 Vertical Frequency (Hz) 70.0 60.0 75.0 60.0 75.0 60.0 70.0 75.0 60.0 75.0 59.8 15-pin Mini D-Sub & DVI-D Detachable 14.02 inches (356 mm ) 17.32 inches...
Preset Display Modes Standard Dos-mode VGA VGA SVGA SVGA XGA XGA XGA SXGA SXGA WXGA+ Resolution 720 x 400 640 x 480 640 x 480 800 x 600 800 x 600 1024 x 768 1024 x 768 1024 x 768 1280 x 1024 1280 x 1024 1440 x 900 Physical Characteristics Connector Type Signal Cable Type Dimensions & Weight: Height (with base) Width Depth Weight (monitor only)...Horizontal Frequency (kHz) 31.47 31.47 37.50 37.879 46.875 48.363 56.476 60.02 64.00 80.00 55.935 Vertical Frequency (Hz) 70.0 60.0 75.0 60.0 75.0 60.0 70.0 75.0 60.0 75.0 59.8 15-pin Mini D-Sub & DVI-D Detachable 14.02 inches (356 mm ) 17.32 inches...
HP w19 LCD Monitor User's Guide
Page 18
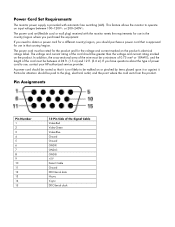
... power cord must be walked on input voltages between 4.94 ft. (1.5 m) and 12 ft. (3.6 m). If you have questions about the type of the cord should be a minimum of 0.75 mm² or 18AWG, and the length of the Signal Cable Video-Red Video-Green Video-Blue Ground Ground GND-R GND-G GND-B +5V Detect Cable Ground DDC-Serial data H-sync V-sync DDC-Serial clock This feature allows the monitor...
... power cord must be walked on input voltages between 4.94 ft. (1.5 m) and 12 ft. (3.6 m). If you have questions about the type of the cord should be a minimum of 0.75 mm² or 18AWG, and the length of the Signal Cable Video-Red Video-Green Video-Blue Ground Ground GND-R GND-G GND-B +5V Detect Cable Ground DDC-Serial data H-sync V-sync DDC-Serial clock This feature allows the monitor...
HP w19 LCD Monitor User's Guide
Page 19
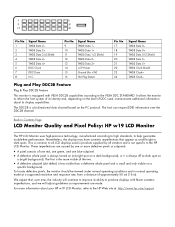
... about your HP w19 LCD Monitor, refer to produce displays with VESA DDC2B capabilities according to help guarantee trouble-free performance. These imperfections are made. For more information about its identity and, depending on the level of the two. • A defective subpixel (dot defect) is less visible than a defective whole pixel and is a bi-directional data channel based on a specific background. TMDS...
... about your HP w19 LCD Monitor, refer to produce displays with VESA DDC2B capabilities according to help guarantee trouble-free performance. These imperfections are made. For more information about its identity and, depending on the level of the two. • A defective subpixel (dot defect) is less visible than a defective whole pixel and is a bi-directional data channel based on a specific background. TMDS...
HP w19 LCD Monitor User's Guide
Page 20
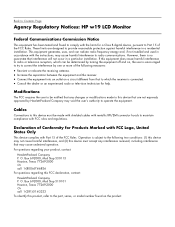
... shielded cables with metallic RFI/EMI connector hoods to maintain compliance with the instructions, may cause undesired operation. Cables Connections to this device must be notified that any interference received, including interference that to which can radiate radio frequency energy and, if not installed and used in a particular installation. For questions regarding this product, refer to the part, series, or model number found...
... shielded cables with metallic RFI/EMI connector hoods to maintain compliance with the instructions, may cause undesired operation. Cables Connections to this device must be notified that any interference received, including interference that to which can radiate radio frequency energy and, if not installed and used in a particular installation. For questions regarding this product, refer to the part, series, or model number found...
HP w19 LCD Monitor User's Guide
Page 22
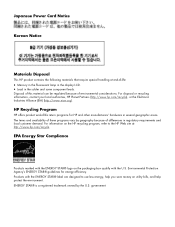
... the display LCD. • Lead in several geographic areas. Japanese Power Cord Notice Korean Notice Materials Disposal This HP product contains the following materials that require special handling at : http://www.hp.com.../recycle EPA Energy Star Compliance Products marked with the ENERGY STAR® logo on utility bills, and help protect the environment. For information on the HP recycling program, refer to use less energy, help you save...
... the display LCD. • Lead in several geographic areas. Japanese Power Cord Notice Korean Notice Materials Disposal This HP product contains the following materials that require special handling at : http://www.hp.com.../recycle EPA Energy Star Compliance Products marked with the ENERGY STAR® logo on utility bills, and help protect the environment. For information on the HP recycling program, refer to use less energy, help you save...


