
HP HDX 18 Entertainment PC - Maintenance and Service Guide
Page 18
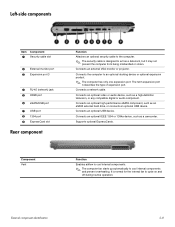
... cable slot 2 External monitor port 3 Expansion port 3 4 RJ-45 (network) jack 5 HDMI port 6 eSATA/USB port 7 USB port 8 1394 port 9 ExpressCard slot Rear component Function Attaches an optional security cable to the computer. ✎ The security cable is normal for the internal fan to cycle on and off during routine operation. Connects the computer to cool internal components and prevent overheating. Connects a network cable. Component Vent Function Enables airflow to cool internal components. ✎ The computer fan starts up automatically to an optional docking device...
... cable slot 2 External monitor port 3 Expansion port 3 4 RJ-45 (network) jack 5 HDMI port 6 eSATA/USB port 7 USB port 8 1394 port 9 ExpressCard slot Rear component Function Attaches an optional security cable to the computer. ✎ The security cable is normal for the internal fan to cycle on and off during routine operation. Connects the computer to cool internal components and prevent overheating. Connects a network cable. Component Vent Function Enables airflow to cool internal components. ✎ The computer fan starts up automatically to an optional docking device...
HP HDX 18 Entertainment PC - Maintenance and Service Guide
Page 39
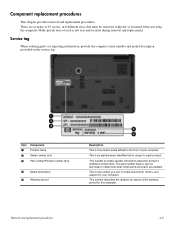
... is the product name affixed to each screw size and location during removal and replacement. Service tag When ordering parts or requesting information, provide the computer serial number and model description provided on the service tag. The part number helps a service technician to locate documents, drivers, and support for this computer. Item Component 1 Product name 2 Serial number (s/n) 3 Part number/Product number (p/n) 4 Model description 5 Warranty period Description This is unique to the front...
... is the product name affixed to each screw size and location during removal and replacement. Service tag When ordering parts or requesting information, provide the computer serial number and model description provided on the service tag. The part number helps a service technician to locate documents, drivers, and support for this computer. Item Component 1 Product name 2 Serial number (s/n) 3 Part number/Product number (p/n) 4 Model description 5 Warranty period Description This is unique to the front...

HP HDX 18 Entertainment PC - Maintenance and Service Guide
Page 48
..., 1-DIMM) Spare part number 510402-001 510401-001 510400-001 506591-001 497693-001 497692-001 Before removing the memory module, follow these steps: 1. Removal and replacement procedures 4-15 Disconnect all external devices connected to release the memory module. (The edge of the memory module slot to the computer. 3. Spread the retaining tabs 1 on , and then shut it down the computer. Remove the hard drive cover (see "Battery" on page...
..., 1-DIMM) Spare part number 510402-001 510401-001 510400-001 506591-001 497693-001 497692-001 Before removing the memory module, follow these steps: 1. Removal and replacement procedures 4-15 Disconnect all external devices connected to release the memory module. (The edge of the memory module slot to the computer. 3. Spread the retaining tabs 1 on , and then shut it down the computer. Remove the hard drive cover (see "Battery" on page...
HP HDX 18 Entertainment PC - Maintenance and Service Guide
Page 92
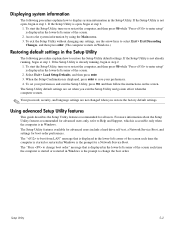
... enter. 3. To set when you restore the factory default settings. The Setup Utility features available for advanced users include a hard drive self-test, a Network Service Boot, and settings for all users. The " to boot from LAN" message that is displayed in the lower-left corner of the screen each time the computer is started or restarted in Windows is the prompt for advanced users only, refer to display system information in the Setup Utility. Setup Utility 5-2 If the Setup Utility...
... enter. 3. To set when you restore the factory default settings. The Setup Utility features available for advanced users include a hard drive self-test, a Network Service Boot, and settings for all users. The " to boot from LAN" message that is displayed in the lower-left corner of the screen each time the computer is started or restarted in Windows is the prompt for advanced users only, refer to display system information in the Setup Utility. Setup Utility 5-2 If the Setup Utility...

HP HDX 18 Entertainment PC - Maintenance and Service Guide
Page 134
... jack connector pinout 9-2 location 2-7 B backup and recovery 8-1 base enclosure, spare part number 3-4, 3-13 bass scroll zone 2-3 battery removal 4-8 spare part numbers 3-6, 3-13, 4-8 battery bay 2-9 battery light 2-5 battery release latch 2-9 Bluetooth module removal 4-23 spare part number 3-3, 3-12, 4-23 Bluetooth module cable removal 4-28 spare part number 3-3, 3-12, 4-28 Blu-ray ROM DVD±RW SuperMulti DL Drive precautions 4-2 removal 4-9 spare part numbers 3-6, 3-14, 4-9 specifications 6-5 Index boot options 5-4 boot order 5-4 bottom components 2-9 button components 2-2 button sound...
... jack connector pinout 9-2 location 2-7 B backup and recovery 8-1 base enclosure, spare part number 3-4, 3-13 bass scroll zone 2-3 battery removal 4-8 spare part numbers 3-6, 3-13, 4-8 battery bay 2-9 battery light 2-5 battery release latch 2-9 Bluetooth module removal 4-23 spare part number 3-3, 3-12, 4-23 Bluetooth module cable removal 4-28 spare part number 3-3, 3-12, 4-28 Blu-ray ROM DVD±RW SuperMulti DL Drive precautions 4-2 removal 4-9 spare part numbers 3-6, 3-14, 4-9 specifications 6-5 Index boot options 5-4 boot order 5-4 bottom components 2-9 button components 2-2 button sound...

HP HDX 18 Entertainment PC - Maintenance and Service Guide
Page 136
... 2-7 network 2-8 RJ-45 2-8 TV antenna/cable 2-7 K key components 2-4 keyboard product description 1-4 removal 4-24 spare part numbers 3-3, 3-12, 3-13, 3-14, 4-24 keyboard cover removal 4-20 spare part number 3-3, 3-13, 4-20 keys esc 2-4 fn 2-4 function 2-4 integrated numeric keypad 2-4 Windows applications 2-4 Windows logo 2-4 L language support 5-4 LED board cable, removal 4-29 left-side components 2-8 light components 2-5 lights battery 2-5 caps lock 2-5 Digital Media Slot 2-7 drive 2-5 num lock 2-5 optical drive 2-7 power 2-5 TouchPad 2-6 treble/bass down 2-5 treble/bass up 2-5 volume down...
... 2-7 network 2-8 RJ-45 2-8 TV antenna/cable 2-7 K key components 2-4 keyboard product description 1-4 removal 4-24 spare part numbers 3-3, 3-12, 3-13, 3-14, 4-24 keyboard cover removal 4-20 spare part number 3-3, 3-13, 4-20 keys esc 2-4 fn 2-4 function 2-4 integrated numeric keypad 2-4 Windows applications 2-4 Windows logo 2-4 L language support 5-4 LED board cable, removal 4-29 left-side components 2-8 light components 2-5 lights battery 2-5 caps lock 2-5 Digital Media Slot 2-7 drive 2-5 num lock 2-5 optical drive 2-7 power 2-5 TouchPad 2-6 treble/bass down 2-5 treble/bass up 2-5 volume down...

HP HDX 18 Entertainment PC - Maintenance and Service Guide
Page 137
...1-4 power-on password 5-3 previous/rewind button 2-2 processor product description 1-1 removal 4-56 spare part numbers 3-4, 3-13, 3-14, 4-56 product description audio 1-3 chipset 1-1 display panel 1-1 docking 1-4 Ethernet 1-3 external media card 1-3 graphics 1-1 hard drive 1-2 keyboard 1-4 memory 1-1 microphone 1-2 modem 1-3 operating system 1-4 optical drive 1-2 pointing device 1-4 ports 1-4 power requirements 1-4 processor 1-1 security 1-4 serviceability 1-4 TV tuner 1-3 webcam 1-3 wireless 1-3 product name 1-1, 3-1, 4-6 R rear components 2-8 recovery discs, creating 8-1 recycling battery 11...
...1-4 power-on password 5-3 previous/rewind button 2-2 processor product description 1-1 removal 4-56 spare part numbers 3-4, 3-13, 3-14, 4-56 product description audio 1-3 chipset 1-1 display panel 1-1 docking 1-4 Ethernet 1-3 external media card 1-3 graphics 1-1 hard drive 1-2 keyboard 1-4 memory 1-1 microphone 1-2 modem 1-3 operating system 1-4 optical drive 1-2 pointing device 1-4 ports 1-4 power requirements 1-4 processor 1-1 security 1-4 serviceability 1-4 TV tuner 1-3 webcam 1-3 wireless 1-3 product name 1-1, 3-1, 4-6 R rear components 2-8 recovery discs, creating 8-1 recycling battery 11...
Wireless (Select Models Only) - Windows Vista
Page 24
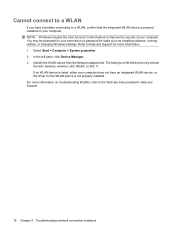
... WLAN device is properly installed on troubleshooting WLANs, refer to the Web site links provided in Help and Support. 18 Chapter 5 Troubleshooting wireless connection problems Refer to improve the security of your computer: NOTE: Windows includes the User Account Control feature to Help and Support for tasks such as installing software, running utilities, or changing Windows settings. The listing for a WLAN device may be prompted for your permission or password for...
... WLAN device is properly installed on troubleshooting WLANs, refer to the Web site links provided in Help and Support. 18 Chapter 5 Troubleshooting wireless connection problems Refer to improve the security of your computer: NOTE: Windows includes the User Account Control feature to Help and Support for tasks such as installing software, running utilities, or changing Windows settings. The listing for a WLAN device may be prompted for your permission or password for...
Security - Windows Vista
Page 8
... models include a separate numeric keypad, which functions exactly like the keyboard number keys. ● A password must be entered at a Setup Utility prompt. A password set . For additional information about Windows passwords, such as they are set, changed, or deleted, it in a file on the computer. ● Do not use the same password for a Setup Utility feature and for a Windows security feature. Passwords can be set and entered with the same keys. CAUTION: To prevent being locked...
... models include a separate numeric keypad, which functions exactly like the keyboard number keys. ● A password must be entered at a Setup Utility prompt. A password set . For additional information about Windows passwords, such as they are set, changed, or deleted, it in a file on the computer. ● Do not use the same password for a Setup Utility feature and for a Windows security feature. Passwords can be set and entered with the same keys. CAUTION: To prevent being locked...
Software Updates - Windows Vista
Page 7
... or password for a system BIOS update by identifying the BIOS version currently installed on the system ROM. If your computer model, product category, and series or family. NOTE: Windows® includes the User Account Control feature to improve the security of this guide: 1. Prepare for tasks such as installing applications, running utilities, or changing Windows settings. NOTE: The computer system BIOS is connected to Windows Help for data transfer among hardware devices...
... or password for a system BIOS update by identifying the BIOS version currently installed on the system ROM. If your computer model, product category, and series or family. NOTE: Windows® includes the User Account Control feature to improve the security of this guide: 1. Prepare for tasks such as installing applications, running utilities, or changing Windows settings. NOTE: The computer system BIOS is connected to Windows Help for data transfer among hardware devices...

Drives - Windows Vista
Page 18
... hard drive so that you can safely delete to free up disk space and help the computer to improve the security of fragmented files, Disk Defragmenter may set it works without supervision. You may want to set Disk Defragmenter to complete. Using Disk Cleanup Disk Cleanup searches the hard drive for tasks such as installing software, running utilities, or changing Windows settings. Select Start > All Programs > Accessories > System Tools > Disk Defragmenter. 2. After you use...
... hard drive so that you can safely delete to free up disk space and help the computer to improve the security of fragmented files, Disk Defragmenter may set it works without supervision. You may want to set Disk Defragmenter to complete. Using Disk Cleanup Disk Cleanup searches the hard drive for tasks such as installing software, running utilities, or changing Windows settings. Select Start > All Programs > Accessories > System Tools > Disk Defragmenter. 2. After you use...

Drives - Windows Vista
Page 27
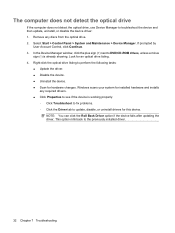
... detect the optical drive, use Device Manager to DVD/CD-ROM drives, unless a minus sign (-) is working properly: ◦ Click Troubleshoot to fix problems. ◦ Click the Driver tab to update, disable, or uninstall drivers for an optical drive listing. 4. If prompted by User Account Control, click Continue. 3. NOTE: You can click the Roll Back Driver option if the device fails after updating the driver. Windows scans your system for installed hardware and installs any discs from the optical...
... detect the optical drive, use Device Manager to DVD/CD-ROM drives, unless a minus sign (-) is working properly: ◦ Click Troubleshoot to fix problems. ◦ Click the Driver tab to update, disable, or uninstall drivers for an optical drive listing. 4. If prompted by User Account Control, click Continue. 3. NOTE: You can click the Roll Back Driver option if the device fails after updating the driver. Windows scans your system for installed hardware and installs any discs from the optical...
Drives - Windows Vista
Page 32
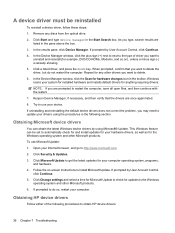
... Change settings and select a time for Microsoft Update to check for your computer operating system, programs, and hardware. 4. Obtaining HP device drivers Follow either of driver you are prompted to install Microsoft Update. Click Start and type device manager in the pane above the box. 3. In the Device Manager window, click the plus sign (+) next to next to the type of the following section. Click a listed driver, and press the delete key...
... Change settings and select a time for Microsoft Update to check for your computer operating system, programs, and hardware. 4. Obtaining HP device drivers Follow either of driver you are prompted to install Microsoft Update. Click Start and type device manager in the pane above the box. 3. In the Device Manager window, click the plus sign (+) next to next to the type of the following section. Click a listed driver, and press the delete key...
Drives - Windows Vista
Page 34
...hard drive; optical drive DVD burning 12, 27 changing region setting 9 copying 11 playing 7 removing 13 DVD drive 3 DVD region settings 9 H hard disk drive HP ProtectSmart Hard Drive Protection 15 installing 19 removing 18 replacing 18 hard drive HP ProtectSmart Hard Drive Protection 15 installing 19 removing 18 replacing 18 HP ProtectSmart Hard Drive Protection 15 L light, drive 16 M maintenance Disk Cleanup 14 Disk Defragmenter 14 O optical disc removing 13 optical drive 3 R region codes, DVD 9 S software Disk Cleanup 14 Disk Defragmenter 14 T troubleshooting burning discs 27 device driver...
...hard drive; optical drive DVD burning 12, 27 changing region setting 9 copying 11 playing 7 removing 13 DVD drive 3 DVD region settings 9 H hard disk drive HP ProtectSmart Hard Drive Protection 15 installing 19 removing 18 replacing 18 hard drive HP ProtectSmart Hard Drive Protection 15 installing 19 removing 18 replacing 18 HP ProtectSmart Hard Drive Protection 15 L light, drive 16 M maintenance Disk Cleanup 14 Disk Defragmenter 14 O optical disc removing 13 optical drive 3 R region codes, DVD 9 S software Disk Cleanup 14 Disk Defragmenter 14 T troubleshooting burning discs 27 device driver...

Multimedia - Windows Vista
Page 20
... other supported external display. Connect one HDMI device connected to an optional video or audio device, such as a high-definition television, or any other end of the HDMI cable to the device manufacturer's instructions. 3. Configuring the audio using HDMI For best results, connect an audio or video device, such as your computer, and then configure the default audio playback device according to the HDMI port on the computer keyboard. 16 Chapter 4 Video Determining the type of graphics card is installed on your media program. Connecting an HDMI device...
... other supported external display. Connect one HDMI device connected to an optional video or audio device, such as a high-definition television, or any other end of the HDMI cable to the device manufacturer's instructions. 3. Configuring the audio using HDMI For best results, connect an audio or video device, such as your computer, and then configure the default audio playback device according to the HDMI port on the computer keyboard. 16 Chapter 4 Video Determining the type of graphics card is installed on your media program. Connecting an HDMI device...
Multimedia - Windows Vista
Page 36
... drive listing. 4. This option rolls back to troubleshoot the device and then update, uninstall, or disable the device driver: 1. In the Device Manager window, click the plus sign (+) next to DVD/CD-ROM drives, unless a minus sign (-) is working properly: ◦ Click Troubleshoot to fix problems. ◦ Click the Driver tab to see if the device is already showing. Select Start > Control Panel > System and Maintenance > Device Manager. Remove any required drivers. ● Click Properties to update, disable, or uninstall drivers for hardware changes...
... drive listing. 4. This option rolls back to troubleshoot the device and then update, uninstall, or disable the device driver: 1. In the Device Manager window, click the plus sign (+) next to DVD/CD-ROM drives, unless a minus sign (-) is working properly: ◦ Click Troubleshoot to fix problems. ◦ Click the Driver tab to see if the device is already showing. Select Start > Control Panel > System and Maintenance > Device Manager. Remove any required drivers. ● Click Properties to update, disable, or uninstall drivers for hardware changes...
Multimedia - Windows Vista
Page 40
... for example, DVD/CD-ROMs, Modems, and so on -screen instructions to use Microsoft Update: 1. Try to install Microsoft Update. If uninstalling and reinstalling the default device drivers does not correct the problem, you want to do not restart the computer. If prompted to uninstall and reinstall (for any discs from the optical drive. 2. In the Device Manager window, click the Scan for updates to the Windows operating system and...
... for example, DVD/CD-ROMs, Modems, and so on -screen instructions to use Microsoft Update: 1. Try to install Microsoft Update. If uninstalling and reinstalling the default device drivers does not correct the problem, you want to do not restart the computer. If prompted to uninstall and reinstall (for any discs from the optical drive. 2. In the Device Manager window, click the Scan for updates to the Windows operating system and...

Multimedia - Windows Vista
Page 42
...burning 26 changing region setting 24 playing 22 removing 27 DVD drive 21 DVD region settings 24 E earbuds 3 external audio devices, connecting 12 external monitor port 15 H HDMI configuring 16 connecting 16 HDMI port 16 headphone (audio-out) jacks 3 headphones 3 high-definition devices, connecting 16 I internal digital dual array microphones, identifying 2 issues, resolving 31 J jacks audio-in (microphone) 3 audio-out (headphone) 3 TV antenna/cable 2 M media activity buttons 7 media activity hotkeys 8 media button 4 MediaSmart starting 4, 9 using 9 MediaSmart software 9 microphones, internal...
...burning 26 changing region setting 24 playing 22 removing 27 DVD drive 21 DVD region settings 24 E earbuds 3 external audio devices, connecting 12 external monitor port 15 H HDMI configuring 16 connecting 16 HDMI port 16 headphone (audio-out) jacks 3 headphones 3 high-definition devices, connecting 16 I internal digital dual array microphones, identifying 2 issues, resolving 31 J jacks audio-in (microphone) 3 audio-out (headphone) 3 TV antenna/cable 2 M media activity buttons 7 media activity hotkeys 8 media button 4 MediaSmart starting 4, 9 using 9 MediaSmart software 9 microphones, internal...

Power Management - Windows Vista
Page 5
..., the power lights blink and the screen clears. Using power-saving states 1 When Sleep is in the Sleep state for an extended period or if the battery reaches a critical battery level while in Windows® Control Panel. Power settings and timeouts can exit Sleep in Hibernation. Your work is in the Sleep state or in any of networking connection or perform any computer functions while the computer is saved to a disc or an external media card.
..., the power lights blink and the screen clears. Using power-saving states 1 When Sleep is in the Sleep state for an extended period or if the battery reaches a critical battery level while in Windows® Control Panel. Power settings and timeouts can exit Sleep in Hibernation. Your work is in the Sleep state or in any of networking connection or perform any computer functions while the computer is saved to a disc or an external media card.

Power Management - Windows Vista
Page 25
Click Start, and then click the arrow next to use the preceding shutdown procedures, try the following emergency procedures in the sequence provided: ● Press ctrl+alt+delete, and then click the Power button. ● Press and hold the power button for an ...Sleep state or in Hibernation, you are connecting an external hardware device that does not connect to a USB port ● When the computer will be unused and disconnected from external power for at least 5 seconds. ● Disconnect the computer from external power and remove the battery. 21 Save your work and close all open...
Click Start, and then click the arrow next to use the preceding shutdown procedures, try the following emergency procedures in the sequence provided: ● Press ctrl+alt+delete, and then click the Power button. ● Press and hold the power button for an ...Sleep state or in Hibernation, you are connecting an external hardware device that does not connect to a USB port ● When the computer will be unused and disconnected from external power for at least 5 seconds. ● Disconnect the computer from external power and remove the battery. 21 Save your work and close all open...


