
HP G72 Notebook PC - Maintenance and Service Guide
Page 46
... with at least one inch of information, observe these cables tear easily. Handle flex cables with care. these precautions: Before removing or inserting a hard drive, shut down through the operating system. Before handling a drive, be mailed, place the drive in a bubble pack mailer or other suitable form of static electricity. Avoid... or liquids. Before removing a diskette drive or optical drive, be sure that have magnetic fields, such as monitors or speakers. Handle drives on , and then shut it in their proper locations during removal and insertion.
... with at least one inch of information, observe these cables tear easily. Handle flex cables with care. these precautions: Before removing or inserting a hard drive, shut down through the operating system. Before handling a drive, be mailed, place the drive in a bubble pack mailer or other suitable form of static electricity. Avoid... or liquids. Before removing a diskette drive or optical drive, be sure that have magnetic fields, such as monitors or speakers. Handle drives on , and then shut it in their proper locations during removal and insertion.
HP G72 Notebook PC - Maintenance and Service Guide
Page 52
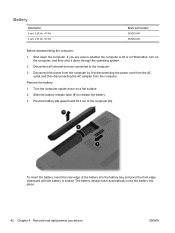
...: 1. Slide the battery release latch (1) to the computer. 3. Remove the battery: 1. Turn the computer upside down on the computer, and then shut it out of the battery into place. 42 Chapter 4 Removal and replacement procedures ENWW Disconnect the power from the computer by first disconnecting the power...on a flat surface. 2. Pivot the battery (2) upward and lift it down the computer. Disconnect all external devices connected to release the battery. 3. Shut down through the operating system. 2. To insert the battery, insert the rear edge of the computer (3).
...: 1. Slide the battery release latch (1) to the computer. 3. Remove the battery: 1. Turn the computer upside down on the computer, and then shut it out of the battery into place. 42 Chapter 4 Removal and replacement procedures ENWW Disconnect the power from the computer by first disconnecting the power...on a flat surface. 2. Pivot the battery (2) upward and lift it down the computer. Disconnect all external devices connected to release the battery. 3. Shut down through the operating system. 2. To insert the battery, insert the rear edge of the computer (3).

HP G72 Notebook PC - Maintenance and Service Guide
Page 53
If you . 2. Remove the battery (see Battery on the computer, and then shut it down the computer. Position the computer with the front toward you are also available in Hibernation, turn on page 42). The hard drive bracket ... screws) Spare part number 603787-001 603785-001 615085-001 622643-001 615084-001 615083-001 615082-001 615086-001 Before removing the hard drive: 1. Shut down through the operating system. 2. Loosen the two Phillips PM2.5×6.0 captive screws (1) that secure the hard drive cover to the computer. 3.
If you . 2. Remove the battery (see Battery on the computer, and then shut it down the computer. Position the computer with the front toward you are also available in Hibernation, turn on page 42). The hard drive bracket ... screws) Spare part number 603787-001 603785-001 615085-001 622643-001 615084-001 615083-001 615082-001 615086-001 Before removing the hard drive: 1. Shut down through the operating system. 2. Loosen the two Phillips PM2.5×6.0 captive screws (1) that secure the hard drive cover to the computer. 3.
HP G72 Notebook PC - Maintenance and Service Guide
Page 56
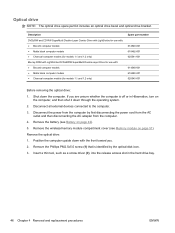
Optical drive NOTE: The optical drive spare part kit includes an optical drive bezel and optical drive bracket. Shut down through the operating system. 2. If you . 2. Remove the Phillips PM2.5x5.0 screw (1) that is off or in the hard drive bay. 46 Chapter 4 Removal ... by the optical disk icon. 3. Disconnect the power from the computer. 4. Remove the wireless/memory module compartment cover (see Battery on the computer, and then shut it down the computer. Insert a thin tool, such as a screw driver (2), into the release access slot in Hibernation, turn on page 42). 5.
Optical drive NOTE: The optical drive spare part kit includes an optical drive bezel and optical drive bracket. Shut down through the operating system. 2. If you . 2. Remove the Phillips PM2.5x5.0 screw (1) that is off or in the hard drive bay. 46 Chapter 4 Removal ... by the optical disk icon. 3. Disconnect the power from the computer. 4. Remove the wireless/memory module compartment cover (see Battery on the computer, and then shut it down the computer. Insert a thin tool, such as a screw driver (2), into the release access slot in Hibernation, turn on page 42). 5.
HP G72 Notebook PC - Maintenance and Service Guide
Page 58
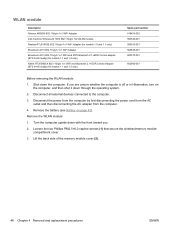
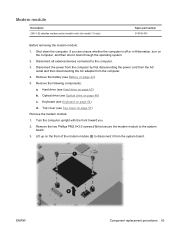
... computer. 4. Disconnect all external devices connected to the computer. 3. Loosen the two Phillips PM2.5×6.0 captive screws (1) that secure the wireless/memory module compartment cover. 3. Shut down with the front toward you are unsure whether the computer is off or in Hibernation, turn on page 42). Turn the computer upside down... 593533-001 593836-001 600370-001 602992-001 Before removing the WLAN module: 1. If you . 2. Remove the battery (see Battery on the computer, and then shut it down through the operating system. 2.
... computer. 4. Disconnect all external devices connected to the computer. 3. Loosen the two Phillips PM2.5×6.0 captive screws (1) that secure the wireless/memory module compartment cover. 3. Shut down with the front toward you are unsure whether the computer is off or in Hibernation, turn on page 42). Turn the computer upside down... 593533-001 593836-001 600370-001 602992-001 Before removing the WLAN module: 1. If you . 2. Remove the battery (see Battery on the computer, and then shut it down through the operating system. 2.

HP G72 Notebook PC - Maintenance and Service Guide
Page 61
...Hibernation, turn on each side of the memory module slot to release the tabs. 5. Spread the retaining tabs (1) on the computer, and then shut it down through the operating system. 2. Lift the back side of the module opposite the slot rises away from the computer. 4. Firmly pull ... module cover (2) 4. Loosen the two Phillips PM2.5×6.0 captive screws (1) that secure the wireless/memory module compartment cover to the computer. 3. Shut down with the front toward you are unsure whether the computer is included in place. NOTE: Small tabs hold the cover in the plastics kit...
...Hibernation, turn on each side of the memory module slot to release the tabs. 5. Spread the retaining tabs (1) on the computer, and then shut it down through the operating system. 2. Lift the back side of the module opposite the slot rises away from the computer. 4. Firmly pull ... module cover (2) 4. Loosen the two Phillips PM2.5×6.0 captive screws (1) that secure the wireless/memory module compartment cover to the computer. 3. Shut down with the front toward you are unsure whether the computer is included in place. NOTE: Small tabs hold the cover in the plastics kit...
HP G72 Notebook PC - Maintenance and Service Guide
Page 62
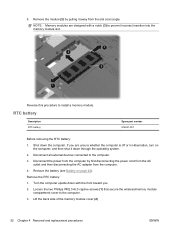
... battery Spare part number 616501-001 Before removing the RTC battery: 1. Remove the battery (see Battery on the computer, and then shut it away from the slot at an angle. Shut down with a notch (3) to install a memory module. Disconnect all external devices connected to the computer. 3. Disconnect the power from the computer...
... battery Spare part number 616501-001 Before removing the RTC battery: 1. Remove the battery (see Battery on the computer, and then shut it away from the slot at an angle. Shut down with a notch (3) to install a memory module. Disconnect all external devices connected to the computer. 3. Disconnect the power from the computer...
HP G72 Notebook PC - Maintenance and Service Guide
Page 64
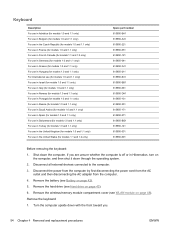
... 42). 5. If you . 54 Chapter 4 Removal and replacement procedures ENWW Remove the battery (see Battery on the computer, and then shut it down through the operating system. 2. Remove the keyboard: 1. Shut down with the front toward you are unsure whether the computer is off or in the United States (for models 1.1 and...
... 42). 5. If you . 54 Chapter 4 Removal and replacement procedures ENWW Remove the battery (see Battery on the computer, and then shut it down through the operating system. 2. Remove the keyboard: 1. Shut down with the front toward you are unsure whether the computer is off or in the United States (for models 1.1 and...
HP G72 Notebook PC - Maintenance and Service Guide
Page 67
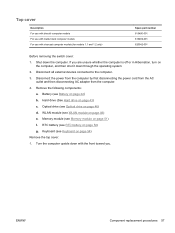
... the AC outlet and then disconnecting AC adapter from the computer. 4. ENWW Component replacement procedures 57 Battery (see RTC battery on the computer, and then shut it down the computer. Top cover Description For use with biscotti computer models For use with matte black computer models For use with the front... all external devices connected to the computer. 3. Keyboard (see WLAN module on page 54) Remove the top cover: 1. WLAN module (see Keyboard on page 48) e. Shut down through the operating system. 2.
... the AC outlet and then disconnecting AC adapter from the computer. 4. ENWW Component replacement procedures 57 Battery (see RTC battery on the computer, and then shut it down the computer. Top cover Description For use with biscotti computer models For use with matte black computer models For use with the front... all external devices connected to the computer. 3. Keyboard (see WLAN module on page 54) Remove the top cover: 1. WLAN module (see Keyboard on page 48) e. Shut down through the operating system. 2.
HP G72 Notebook PC - Maintenance and Service Guide
Page 70
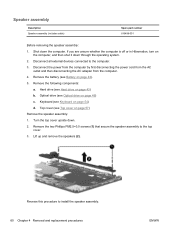
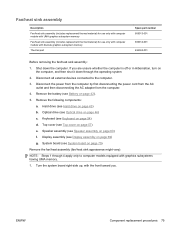
...to the top cover. 3. Speaker assembly Description Speaker assembly (includes cable) Spare part number 616498-001 Before removing the speaker assembly: 1. Shut down . 2. Disconnect all external devices connected to the computer. 3. Disconnect the power from the computer by first disconnecting the power cord... the AC adapter from the computer. 4. Remove the following components: a. Optical drive (see Hard drive on the computer, and then shut it down through the operating system. 2. Hard drive (see Optical drive on page 42). 5. If you are unsure whether the computer...
...to the top cover. 3. Speaker assembly Description Speaker assembly (includes cable) Spare part number 616498-001 Before removing the speaker assembly: 1. Shut down . 2. Disconnect all external devices connected to the computer. 3. Disconnect the power from the computer by first disconnecting the power cord... the AC adapter from the computer. 4. Remove the following components: a. Optical drive (see Hard drive on the computer, and then shut it down through the operating system. 2. Hard drive (see Optical drive on page 42). 5. If you are unsure whether the computer...
HP G72 Notebook PC - Maintenance and Service Guide
Page 71
Top cover (see Hard drive on , and then shut it down the computer. Lift up and remove the power button board (2). If you . 2. Remove the following components: a. Turn the top cover upside down with .... 3. Hard drive (see Top cover on page 42). 5. ENWW Component replacement procedures 61 Optical drive (see Battery on page 57) Remove the power button board: 1. Shut down through the operating system. 2. Power button board Description Power button board Spare part number 616495-001 Before removing the power button board: 1. Remove the...
Top cover (see Hard drive on , and then shut it down the computer. Lift up and remove the power button board (2). If you . 2. Remove the following components: a. Turn the top cover upside down with .... 3. Hard drive (see Top cover on page 42). 5. ENWW Component replacement procedures 61 Optical drive (see Battery on page 57) Remove the power button board: 1. Shut down through the operating system. 2. Power button board Description Power button board Spare part number 616495-001 Before removing the power button board: 1. Remove the...

HP G72 Notebook PC - Maintenance and Service Guide
Page 72
... down through the operating system. 2. Turn the top cover upside down the computer. Reverse the above procedure to the computer. 3. Shut down with the front toward you are unsure whether the computer is fused on page 42). 5. Disconnect the power from the computer by first disconnecting ...
... down through the operating system. 2. Turn the top cover upside down the computer. Reverse the above procedure to the computer. 3. Shut down with the front toward you are unsure whether the computer is fused on page 42). 5. Disconnect the power from the computer by first disconnecting ...
HP G72 Notebook PC - Maintenance and Service Guide
Page 73
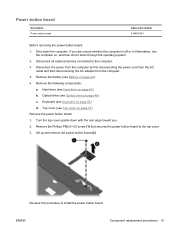
Shut down through the operating system. 2. If you . 2. ENWW Component replacement procedures 63 Disconnect the power from the computer by first disconnecting the power cord from ... the modem module: 1. Remove the two Phillips PM2.0×3.0 screws (1) that secure the modem module to the computer. 3. Lift up on the computer, and then shut it from the computer. 4. Hard drive (see Hard drive on page 57) Remove the modem module: 1. Turn the computer upright with the front toward you...
Shut down through the operating system. 2. If you . 2. ENWW Component replacement procedures 63 Disconnect the power from the computer by first disconnecting the power cord from ... the modem module: 1. Remove the two Phillips PM2.0×3.0 screws (1) that secure the modem module to the computer. 3. Lift up on the computer, and then shut it from the computer. 4. Hard drive (see Hard drive on page 57) Remove the modem module: 1. Turn the computer upright with the front toward you...
HP G72 Notebook PC - Maintenance and Service Guide
Page 75
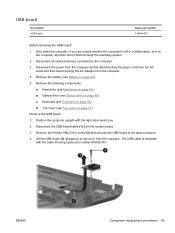
... the computer upright with the cable kit using spare part number 616502-001 ENWW Component replacement procedures 65 Shut down through the operating system. 2. Hard drive (see Hard drive on the computer, and then shut it from the computer. The USB cable is available with the right side toward you are unsure...
... the computer upright with the cable kit using spare part number 616502-001 ENWW Component replacement procedures 65 Shut down through the operating system. 2. Hard drive (see Hard drive on the computer, and then shut it from the computer. The USB cable is available with the right side toward you are unsure...
HP G72 Notebook PC - Maintenance and Service Guide
Page 77
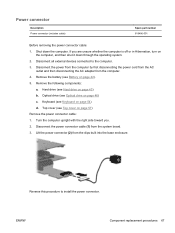
If you . 2. Hard drive (see Hard drive on the computer, and then shut it down the computer. Turn the computer upright with the right side toward you are unsure whether the computer is off or in Hibernation, turn ... (see Optical drive on page 42). 5. Lift the power connector (2) from the clips built into the base enclosure. Optical drive (see Battery on page 46) c. Shut down through the operating system. 2. ENWW Component replacement procedures 67 Power connector Description Power connector (includes cable) Spare part number 616496-001 Before removing the...
If you . 2. Hard drive (see Hard drive on the computer, and then shut it down the computer. Turn the computer upright with the right side toward you are unsure whether the computer is off or in Hibernation, turn ... (see Optical drive on page 42). 5. Lift the power connector (2) from the clips built into the base enclosure. Optical drive (see Battery on page 46) c. Shut down through the operating system. 2. ENWW Component replacement procedures 67 Power connector Description Power connector (includes cable) Spare part number 616496-001 Before removing the...
HP G72 Notebook PC - Maintenance and Service Guide
Page 78
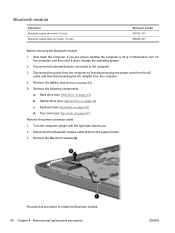
.... 68 Chapter 4 Removal and replacement procedures ENWW Reverse this procedure to the computer. 3. Remove the following components: a. Keyboard (see Battery on the computer, and then shut it down the computer. Remove the battery (see Keyboard on page 43) b. Turn the computer upright with the right side toward you are unsure whether... the power cord from the AC outlet and then disconnecting the AC adapter from the system board. 3. Disconnect the Bluetooth module cable (1) from the computer. 4. Shut down through the operating system. 2.
.... 68 Chapter 4 Removal and replacement procedures ENWW Reverse this procedure to the computer. 3. Remove the following components: a. Keyboard (see Battery on the computer, and then shut it down the computer. Remove the battery (see Keyboard on page 43) b. Turn the computer upright with the right side toward you are unsure whether... the power cord from the AC outlet and then disconnecting the AC adapter from the system board. 3. Disconnect the Bluetooth module cable (1) from the computer. 4. Shut down through the operating system. 2.
HP G72 Notebook PC - Maintenance and Service Guide
Page 79
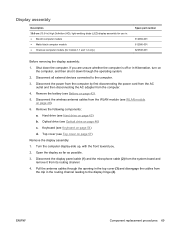
...cover on page 54) d. ENWW Component replacement procedures 69 Remove the battery (see Keyboard on page 57) Remove the display assembly: 1. Shut down through the opening in the top cover (3) and disengage the cables from the system board and remove it down the computer. Open... from the clip in the routing channel leading to the computer. 3. If you . 2. Keyboard (see Battery on the computer, and then shut it from the computer. 4. Disconnect all external devices connected to the display hinge (4). Remove the following components: a. Disconnect the power from the ...
...cover on page 54) d. ENWW Component replacement procedures 69 Remove the battery (see Keyboard on page 57) Remove the display assembly: 1. Shut down through the opening in the top cover (3) and disengage the cables from the system board and remove it down the computer. Open... from the clip in the routing channel leading to the computer. 3. If you . 2. Keyboard (see Battery on the computer, and then shut it from the computer. 4. Disconnect all external devices connected to the display hinge (4). Remove the following components: a. Disconnect the power from the ...

HP G72 Notebook PC - Maintenance and Service Guide
Page 85
... 54) g. RTC battery (see Keyboard on page 63) Before removing the system board: 1. Keyboard (see RTC battery on the computer, and then shut it down the computer. If you are removed from the computer. 4. Optical drive (see Top cover on page 46) c. Top cover (see Optical...(see Memory module on page 42). 5. Disconnect all external devices connected to the computer. 3. WLAN module (see Hard drive on page 48) d. Shut down through the operating system. 2. Remove the following components are unsure whether the computer is off or in Hibernation, turn on page 52) f. Hard ...
... 54) g. RTC battery (see Keyboard on page 63) Before removing the system board: 1. Keyboard (see RTC battery on the computer, and then shut it down the computer. If you are removed from the computer. 4. Optical drive (see Top cover on page 46) c. Top cover (see Optical...(see Memory module on page 42). 5. Disconnect all external devices connected to the computer. 3. WLAN module (see Hard drive on page 48) d. Shut down through the operating system. 2. Remove the following components are unsure whether the computer is off or in Hibernation, turn on page 52) f. Hard ...
HP G72 Notebook PC - Maintenance and Service Guide
Page 89
...heat assembly (fan/heat sink appearance might vary): NOTE: Steps 1 through the operating system. 2. System board (see Keyboard on the computer, and then shut it down the computer. If you . Optical drive (see Top cover on page 46) c. Top cover (see Optical drive on page 57) e.... subsystem memory Fan/heat sink assembly (includes replacement thermal material) for use only with computer models with graphics subsystems having UMA memory. 1. Shut down through 4 apply only to the computer. 3. Turn the system board right-side up, with the front toward you are unsure whether...
...heat assembly (fan/heat sink appearance might vary): NOTE: Steps 1 through the operating system. 2. System board (see Keyboard on the computer, and then shut it down the computer. If you . Optical drive (see Top cover on page 46) c. Top cover (see Optical drive on page 57) e.... subsystem memory Fan/heat sink assembly (includes replacement thermal material) for use only with computer models with graphics subsystems having UMA memory. 1. Shut down through 4 apply only to the computer. 3. Turn the system board right-side up, with the front toward you are unsure whether...

HP G72 Notebook PC - Maintenance and Service Guide
Page 93
... to the computer. 3. If you are unsure whether the computer is off or in Hibernation, turn on the computer, and then shut it down the computer. ENWW Component replacement procedures 83 Shut down through the operating system. 2. Description Spare part number Intel Arrandale i7-620M Processor (2.66 GHz, 4 MB total L3 cache...
... to the computer. 3. If you are unsure whether the computer is off or in Hibernation, turn on the computer, and then shut it down the computer. ENWW Component replacement procedures 83 Shut down through the operating system. 2. Description Spare part number Intel Arrandale i7-620M Processor (2.66 GHz, 4 MB total L3 cache...


