Wireless (Select Models Only) - Windows 7
Page 17
...Data Optimized), which in the battery bay. You may need the HP Mobile Broadband Module serial number to access the Internet from the computer. For additional information, see the HP Web site at http://www.hp.com/go/mobilebroadband (US only). 13 HP Mobile Broadband supports the following ...your computer to use of a subscriber identity module (SIM). Using HP Mobile Broadband requires a network service provider (called a mobile network operator), which provides access to networks based on a label inside the battery bay of Wi-Fi hotspots. Some mobile network operators require the ...
...Data Optimized), which in the battery bay. You may need the HP Mobile Broadband Module serial number to access the Internet from the computer. For additional information, see the HP Web site at http://www.hp.com/go/mobilebroadband (US only). 13 HP Mobile Broadband supports the following ...your computer to use of a subscriber identity module (SIM). Using HP Mobile Broadband requires a network service provider (called a mobile network operator), which provides access to networks based on a label inside the battery bay of Wi-Fi hotspots. Some mobile network operators require the ...
Wireless (Select Models Only) - Windows 7
Page 18
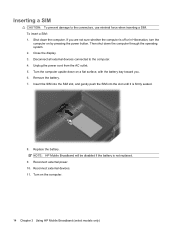
... you are not sure whether the computer is off or in Hibernation, turn the computer on the computer. 14 Chapter 3 Using HP Mobile Broadband (select models only) NOTE: HP Mobile Broadband will be disabled if the battery is firmly seated. 8. Shut down the computer through the operating system. 2. Close the display. 3. Replace the...
... you are not sure whether the computer is off or in Hibernation, turn the computer on the computer. 14 Chapter 3 Using HP Mobile Broadband (select models only) NOTE: HP Mobile Broadband will be disabled if the battery is firmly seated. 8. Shut down the computer through the operating system. 2. Close the display. 3. Replace the...
Wireless (Select Models Only) - Windows 7
Page 19
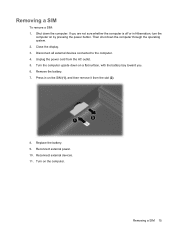
... from the AC outlet. 5. Close the display. 3. Unplug the power cord from the slot (2). 8. Replace the battery. 9. Disconnect all external devices connected to the computer. 4. Removing a SIM 15 Turn on a flat surface, with the battery bay toward you are not sure whether the computer is off or in on by pressing the...
... from the AC outlet. 5. Close the display. 3. Unplug the power cord from the slot (2). 8. Replace the battery. 9. Disconnect all external devices connected to the computer. 4. Removing a SIM 15 Turn on a flat surface, with the battery bay toward you are not sure whether the computer is off or in on by pressing the...
Drives - Windows 7
Page 5
... the computer is sensitive to vibration. Handle a drive carefully; If a drive must be sure that the battery is writing to magnetic fields. Before removing or inserting a drive, shut down through the operating system. When the battery is the only source of information, observe these precautions: Before you are included with cleaning products...
... the computer is sensitive to vibration. Handle a drive carefully; If a drive must be sure that the battery is writing to magnetic fields. Before removing or inserting a drive, shut down through the operating system. When the battery is the only source of information, observe these precautions: Before you are included with cleaning products...
Drives - Windows 7
Page 12
... Help, or on the manufacturer's Web site. Copying a CD, DVD, or BD 1. Power2Go reads the source disc and copies the data to a temporary folder on battery power. When prompted, remove the source disc from a network drive to a destination disc. Do not copy directly from a source disc to a destination disc or from...
... Help, or on the manufacturer's Web site. Copying a CD, DVD, or BD 1. Power2Go reads the source disc and copies the data to a temporary folder on battery power. When prompted, remove the source disc from a network drive to a destination disc. Do not copy directly from a source disc to a destination disc or from...
Drives - Windows 7
Page 17
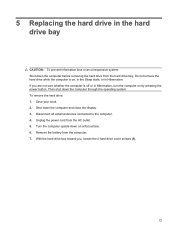
Then shut down the computer before removing the hard drive from the hard drive bay. Disconnect all external devices connected to the computer. 4. Remove the battery from the AC outlet. 5. Save your work. 2. Unplug the power cord from the computer. 7. 5 Replacing the hard drive in the hard drive bay CAUTION: To ...
Then shut down the computer before removing the hard drive from the hard drive bay. Disconnect all external devices connected to the computer. 4. Remove the battery from the AC outlet. 5. Save your work. 2. Unplug the power cord from the computer. 7. 5 Replacing the hard drive in the hard drive bay CAUTION: To ...

Memory Modules - Windows Vista and Windows 7
Page 7
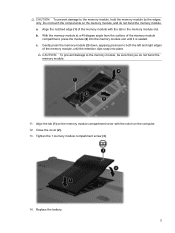
...: To use a dual-channel configuration when adding a second memory module, be upgraded by adding a memory module to the computer. 4. Remove the battery from the AC outlet. 5. Save your work. 2. The memory capacity of the computer can damage electronic components. CAUTION: Electrostatic discharge (ESD) can... slot or by upgrading the existing memory module in Hibernation, turn the computer on by pressing the power button. Disconnect all batteries before installing a memory module. Turn the computer upside down the computer and close the display. Unplug the power cord from the...
...: To use a dual-channel configuration when adding a second memory module, be upgraded by adding a memory module to the computer. 4. Remove the battery from the AC outlet. 5. Save your work. 2. The memory capacity of the computer can damage electronic components. CAUTION: Electrostatic discharge (ESD) can... slot or by upgrading the existing memory module in Hibernation, turn the computer on by pressing the power button. Disconnect all batteries before installing a memory module. Turn the computer upside down the computer and close the display. Unplug the power cord from the...
Memory Modules - Windows Vista and Windows 7
Page 9
... the tab in the memory module slot. Do not touch the components on the computer. 12. Tighten the 1 memory module compartment screw (3). 14. b. Replace the battery. 3 Align the notched edge (1) of the memory module with the notch on the memory module, and do not bend the memory module. 11. Close the...
... the tab in the memory module slot. Do not touch the components on the computer. 12. Tighten the 1 memory module compartment screw (3). 14. b. Replace the battery. 3 Align the notched edge (1) of the memory module with the notch on the memory module, and do not bend the memory module. 11. Close the...
Pointing Devices and Keyboard - Windows 7
Page 9
... Windows Control Panel. The function of Sleep. For example, if a monitor is saved to simultaneous display on before initiating Sleep. The factory setting for critical battery action is conserved. NOTE: In all Windows operating system windows, references to the sleep button apply to the system. The fn+f4 hotkey can press...
... Windows Control Panel. The function of Sleep. For example, if a monitor is saved to simultaneous display on before initiating Sleep. The factory setting for critical battery action is conserved. NOTE: In all Windows operating system windows, references to the sleep button apply to the system. The fn+f4 hotkey can press...
Power Management - Windows 7
Page 3
... adapter ...6 Testing an AC adapter ...7 3 Using battery power Finding battery information in Help and Support 9 Using Battery Check ...9 Displaying the remaining battery charge 9 Inserting or removing the battery ...10 Charging a battery ...12 Maximizing battery discharge time ...12 Managing low battery levels ...13 Identifying low battery levels 13 Resolving a low battery level 13 Resolving a low battery level when external power is available...
... adapter ...6 Testing an AC adapter ...7 3 Using battery power Finding battery information in Help and Support 9 Using Battery Check ...9 Displaying the remaining battery charge 9 Inserting or removing the battery ...10 Charging a battery ...12 Maximizing battery discharge time ...12 Managing low battery levels ...13 Identifying low battery levels 13 Resolving a low battery level 13 Resolving a low battery level when external power is available...
Power Management - Windows 7
Page 5
... is initiated, the power lights blink and the screen clears. When Sleep is in the Sleep state for an extended period or if the battery reaches a critical battery level while in Hibernation. NOTE: You cannot initiate any type of information, do not initiate Sleep or Hibernation while reading from or writing to...
... is initiated, the power lights blink and the screen clears. When Sleep is in the Sleep state for an extended period or if the battery reaches a critical battery level while in Hibernation. NOTE: You cannot initiate any type of information, do not initiate Sleep or Hibernation while reading from or writing to...
Power Management - Windows 7
Page 6
... is set at the factory to initiate Hibernation after 15 minutes of inactivity when running on battery power and 30 minutes of inactivity when running on both battery power and external power, or when the battery reaches a critical battery level. NOTE: If you can exit Sleep in any of the following ways: ● Press...
... is set at the factory to initiate Hibernation after 15 minutes of inactivity when running on battery power and 30 minutes of inactivity when running on both battery power and external power, or when the battery reaches a critical battery level. NOTE: If you can exit Sleep in any of the following ways: ● Press...
Power Management - Windows 7
Page 7
...-click the Show hidden icons icon (the arrow at the far right of the taskbar. Using the battery meter 3 The icon also displays a message if the battery has reached a low battery level, critical battery level, or reserve battery level. Under Behaviors, select Show icons and notifications for the Power icon. 4. Click Customize notification icons. 3. Different...
...-click the Show hidden icons icon (the arrow at the far right of the taskbar. Using the battery meter 3 The icon also displays a message if the battery has reached a low battery level, critical battery level, or reserve battery level. Under Behaviors, select Show icons and notifications for the Power icon. 4. Click Customize notification icons. 3. Different...
Power Management - Windows 7
Page 8
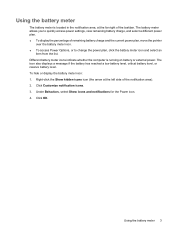
...power. You can help you conserve power or maximize performance. Customizing power plans 1. Viewing the current power plan ▲ Click the battery meter icon in the notification area, at the far right of system settings that are currently unavailable. 4. Select Start > Control ...on wakeup. 3. Select Start > Control Panel > System and Security > Power Options. 2. or - Selecting a different power plan ▲ Click the battery meter icon in the notification area and then click More power options. - Click Save changes. 4 Chapter 1 Setting power options Select a power plan, ...
...power. You can help you conserve power or maximize performance. Customizing power plans 1. Viewing the current power plan ▲ Click the battery meter icon in the notification area, at the far right of system settings that are currently unavailable. 4. Select Start > Control ...on wakeup. 3. Select Start > Control Panel > System and Security > Power Options. 2. or - Selecting a different power plan ▲ Click the battery meter icon in the notification area and then click More power options. - Click Save changes. 4 Chapter 1 Setting power options Select a power plan, ...
Power Management - Windows 7
Page 9
...external AC power, the following events occur: ● The battery begins to charge. ● If the computer is turned on, the battery meter icon in the notification area changes appearance. Do not charge the computer battery while you are onboard aircraft. ● When you are ... only the AC adapter provided with the computer, a replacement AC adapter provided by HP, or a compatible AC adapter purchased from HP. ● Approved AC adapter ● Optional expansion product Connect the computer to battery power. ● The display brightness is supplied through one of the following devices...
...external AC power, the following events occur: ● The battery begins to charge. ● If the computer is turned on, the battery meter icon in the notification area changes appearance. Do not charge the computer battery while you are onboard aircraft. ● When you are ... only the AC adapter provided with the computer, a replacement AC adapter provided by HP, or a compatible AC adapter purchased from HP. ● Approved AC adapter ● Optional expansion product Connect the computer to battery power. ● The display brightness is supplied through one of the following devices...
Power Management - Windows 7
Page 11
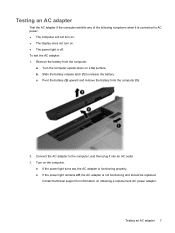
... the computer (3). 2. c. Slide the battery release latch (1) to the computer, and then plug it is connected to AC power: ● The computer will not turn on. ● The display does ... test the AC adapter: 1. Contact technical support for information on a flat surface. b. a. Turn the computer upside down on obtaining a replacement AC power adapter. Pivot the battery (2) upward and remove the battery from the computer. Connect the AC adapter to release the...
... the computer (3). 2. c. Slide the battery release latch (1) to the computer, and then plug it is connected to AC power: ● The computer will not turn on. ● The display does ... test the AC adapter: 1. Contact technical support for information on a flat surface. b. a. Turn the computer upside down on obtaining a replacement AC power adapter. Pivot the battery (2) upward and remove the battery from the computer. Connect the AC adapter to release the...
Power Management - Windows 7
Page 12
... reconnect the AC adapter. To increase display brightness, use only the battery provided with the computer, a replacement battery provided by HP, or a compatible battery purchased from HP. You can keep a battery in the computer or in storage, depending on battery power. 3 Using battery power When a charged battery is in the computer slowly discharges when the computer is off and...
... reconnect the AC adapter. To increase display brightness, use only the battery provided with the computer, a replacement battery provided by HP, or a compatible battery purchased from HP. You can keep a battery in the computer or in storage, depending on battery power. 3 Using battery power When a charged battery is in the computer slowly discharges when the computer is off and...
Power Management - Windows 7
Page 13
... examination. Connect the AC adapter to maximize battery life ● Information on battery types, specifications, life cycles, and capacity To access Battery information: ▲ Select Start > Help and Support > Learning Center > HP Power and Battery Learning Center. Select Start > Help and Support > Troubleshooting tools > Battery Check. Displaying the remaining battery charge ▲ Move the pointer over the...
... examination. Connect the AC adapter to maximize battery life ● Information on battery types, specifications, life cycles, and capacity To access Battery information: ▲ Select Start > Help and Support > Learning Center > HP Power and Battery Learning Center. Select Start > Help and Support > Troubleshooting tools > Battery Check. Displaying the remaining battery charge ▲ Move the pointer over the...

Power Management - Windows 7
Page 14
... upside down on a flat surface. 2. Insert the battery into place. To remove the battery: 1. Slide the battery release latch (1) to release the battery. 10 Chapter 3 Using battery power Turn the computer upside down the computer through Windows before removing the battery. The battery release latch (3) automatically locks the battery into the battery bay (1) and rotate it downward until it...
... upside down on a flat surface. 2. Insert the battery into place. To remove the battery: 1. Slide the battery release latch (1) to release the battery. 10 Chapter 3 Using battery power Turn the computer upside down the computer through Windows before removing the battery. The battery release latch (3) automatically locks the battery into the battery bay (1) and rotate it downward until it...

Power Management - Windows 7
Page 15
Inserting or removing the battery 11 Pivot the battery (2) upward and remove the battery from the computer (3). 3.
Inserting or removing the battery 11 Pivot the battery (2) upward and remove the battery from the computer (3). 3.


