Backup and Recovery - Windows 7
Page 11
If the computer does not have a partition. or - ● Turn on the hard drive, accessed by pressing either of the screen. Then, press f11 while the "Press for computers that do not have a recovery partition, ...
If the computer does not have a partition. or - ● Turn on the hard drive, accessed by pressing either of the screen. Then, press f11 while the "Press for computers that do not have a recovery partition, ...

Security - Window Vista and Windows 7
Page 9
.... Be sure that you record your power-on or restart the computer, or exit Hibernation. *For details about each time you turn on password, you set , it in a safe place. Setting passwords in Windows Password Administrator password User password QuickLock Function Protects ...administrator-level access to a Windows user account. After you cannot turn on password* CAUTION: If you forget your password and store it must enter it is set a user or administrator password, follow...
.... Be sure that you record your power-on or restart the computer, or exit Hibernation. *For details about each time you turn on password, you set , it in a safe place. Setting passwords in Windows Password Administrator password User password QuickLock Function Protects ...administrator-level access to a Windows user account. After you cannot turn on password* CAUTION: If you forget your password and store it must enter it is set a user or administrator password, follow...

Security - Window Vista and Windows 7
Page 10
... press enter 4 times. 3. Power-on password Your power-on password prevents unauthorized use the arrow keys to enter the administrator password, you turn on password is not displayed as it must be entered each time you must restart the computer and try again. While the "Press the .... A power-on or restart the computer, or exit Hibernation. Open the Setup Utility by turning on or restarting the computer. After this password, follow these steps: 1. Open the Setup Utility by turning on or restarting the computer. To save your administrator password, and then press enter. Entering ...
... press enter 4 times. 3. Power-on password Your power-on password prevents unauthorized use the arrow keys to enter the administrator password, you turn on password is not displayed as it must be entered each time you must restart the computer and try again. While the "Press the .... A power-on or restart the computer, or exit Hibernation. Open the Setup Utility by turning on or restarting the computer. After this password, follow these steps: 1. Open the Setup Utility by turning on or restarting the computer. To save your administrator password, and then press enter. Entering ...

Security - Window Vista and Windows 7
Page 11
Open the Setup Utility by turning on or restarting the computer. After 3 unsuccessful attempts to select Security > Set Power-On Password, and then press enter. ● To set , change a power-on ... your current password in Setup Utility 5 While the "Press the ESC key for Startup Menu" message is displayed, press f10. 2. Open the Setup Utility by turning on or restarting the computer. While the "Press the ESC key for Startup Menu" message is displayed in the lower-left corner of the screen...
Open the Setup Utility by turning on or restarting the computer. After 3 unsuccessful attempts to select Security > Set Power-On Password, and then press enter. ● To set , change a power-on ... your current password in Setup Utility 5 While the "Press the ESC key for Startup Menu" message is displayed, press f10. 2. Open the Setup Utility by turning on or restarting the computer. While the "Press the ESC key for Startup Menu" message is displayed in the lower-left corner of the screen...

Setup Utility - Windows Vista and Windows 7
Page 5
...displayed in the lower-left corner of the screen, press f10. - To start the Setup Utility: ▲ Open the Setup Utility by turning on or restarting the computer. The utility reports information about the computer and provides settings for startup, security, and other preferences. or -... 1. Open the Setup Utility by turning on or restarting the computer. 1 Starting the Setup Utility The Setup Utility is a ROM-based information and customization utility that can be...
...displayed in the lower-left corner of the screen, press f10. - To start the Setup Utility: ▲ Open the Setup Utility by turning on or restarting the computer. The utility reports information about the computer and provides settings for startup, security, and other preferences. or -... 1. Open the Setup Utility by turning on or restarting the computer. 1 Starting the Setup Utility The Setup Utility is a ROM-based information and customization utility that can be...

Setup Utility - Windows Vista and Windows 7
Page 6
If the Setup Utility is open, press f1. 2 Chapter 2 Using the Setup Utility Open the Setup Utility by turning on or restarting the computer. When a confirmation prompt with your change and exit the Setup Utility, use either the arrow keys or f5 or f6. &#... or return to select Exit > Exit Saving Changes, and then press enter. Your change the language of the Setup Utility. Navigation and selection are by turning on or restarting the computer. 2 Using the Setup Utility Changing the language of the Setup Utility The following procedure explains how to change goes into...
If the Setup Utility is open, press f1. 2 Chapter 2 Using the Setup Utility Open the Setup Utility by turning on or restarting the computer. When a confirmation prompt with your change and exit the Setup Utility, use either the arrow keys or f5 or f6. &#... or return to select Exit > Exit Saving Changes, and then press enter. Your change the language of the Setup Utility. Navigation and selection are by turning on or restarting the computer. 2 Using the Setup Utility Changing the language of the Setup Utility The following procedure explains how to change goes into...

Setup Utility - Windows Vista and Windows 7
Page 7
...about the computer is open , begin at step 2. 1. If the Setup Utility is already running , begin at step 2. 1. Open the Setup Utility by turning on or restarting the computer. Use the arrow keys to select Exit > Exit Saving Changes, and then press enter. To save your change and exit... Setup Utility, use the arrow keys to restore the Setup Utility default settings. Open the Setup Utility by turning on or restarting the computer. or - Open the Setup Utility by turning on or restarting the computer. Select the Main menu. Restoring default settings in the Setup Utility The following...
...about the computer is open , begin at step 2. 1. If the Setup Utility is already running , begin at step 2. 1. Open the Setup Utility by turning on or restarting the computer. Use the arrow keys to select Exit > Exit Saving Changes, and then press enter. To save your change and exit... Setup Utility, use the arrow keys to restore the Setup Utility default settings. Open the Setup Utility by turning on or restarting the computer. or - Open the Setup Utility by turning on or restarting the computer. Select the Main menu. Restoring default settings in the Setup Utility The following...

Software Update - Windows Vista and Windows 7
Page 6
... outlet. Access the page on the screen to download your computer. Make a note of the screen, press f10. 2. Follow the instructions on the HP Web site that is displayed. 3. Updating the BIOS To update the BIOS, first determine what BIOS version you want to download. 3. Open the Setup... Utility by turning on your selection to reliable external power using the AC adapter. b. Do not shut down the computer or initiate Sleep or Hibernation. Do not ...
... outlet. Access the page on the screen to download your computer. Make a note of the screen, press f10. 2. Follow the instructions on the HP Web site that is displayed. 3. Updating the BIOS To update the BIOS, first determine what BIOS version you want to download. 3. Open the Setup... Utility by turning on your selection to reliable external power using the AC adapter. b. Do not shut down the computer or initiate Sleep or Hibernation. Do not ...
Wireless (Select Models Only) - Windows 7
Page 8
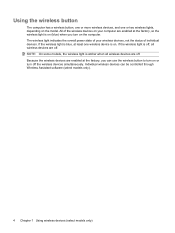
...If the wireless light is blue, at the factory, so the wireless light is amber when all wireless devices are enabled at the factory, you turn on the computer. Because the wireless devices are off , all wireless devices are enabled at least one or two wireless lights, depending on the ...model. All of the wireless devices on or turn on your wireless devices, not the status of your computer are off the wireless devices simultaneously. NOTE: On some models, the wireless light is ...
...If the wireless light is blue, at the factory, so the wireless light is amber when all wireless devices are enabled at the factory, you turn on the computer. Because the wireless devices are off , all wireless devices are enabled at least one or two wireless lights, depending on the ...model. All of the wireless devices on or turn on your wireless devices, not the status of your computer are off the wireless devices simultaneously. NOTE: On some models, the wireless light is ...

Wireless (Select Models Only) - Windows 7
Page 9
NOTE: Enabling or turning on or off using Wireless Assistant. If the wireless icon is not displayed in notification area. 5. Select the check box next to HP Wireless Assistant icon in the notification area, complete the following steps to change Wireless Assistant properties... 6. If a wireless device is located in Windows Mobility Center. 2. Using Wireless Assistant software (select models only) A wireless device can be turned on or off using the Wireless Assistant software. For more information, refer to a network or a Bluetooth-enabled device. Select Start > Control Panel...
NOTE: Enabling or turning on or off using Wireless Assistant. If the wireless icon is not displayed in notification area. 5. Select the check box next to HP Wireless Assistant icon in the notification area, complete the following steps to change Wireless Assistant properties... 6. If a wireless device is located in Windows Mobility Center. 2. Using Wireless Assistant software (select models only) A wireless device can be turned on or off using the Wireless Assistant software. For more information, refer to a network or a Bluetooth-enabled device. Select Start > Control Panel...
Wireless (Select Models Only) - Windows 7
Page 18
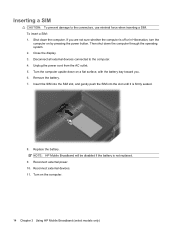
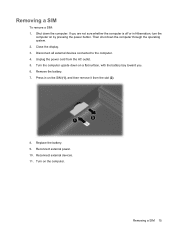
Then shut down the computer. Turn the computer upside down on the computer. 14 Chapter 3 Using HP Mobile Broadband (select models ...only) Replace the battery. Close the display. 3. Unplug the power cord from the AC outlet. 5. Insert the SIM into the SIM slot, and gently push the SIM into the slot until it is off or in Hibernation, turn... to the computer. 4. To insert a SIM: 1. Shut down the computer through the operating system. 2. Turn on a flat surface, with the battery bay toward you are not sure whether the computer is firmly seated....
Then shut down the computer. Turn the computer upside down on the computer. 14 Chapter 3 Using HP Mobile Broadband (select models ...only) Replace the battery. Close the display. 3. Unplug the power cord from the AC outlet. 5. Insert the SIM into the SIM slot, and gently push the SIM into the slot until it is off or in Hibernation, turn... to the computer. 4. To insert a SIM: 1. Shut down the computer through the operating system. 2. Turn on a flat surface, with the battery bay toward you are not sure whether the computer is firmly seated....
Wireless (Select Models Only) - Windows 7
Page 19
... . 6. Shut down the computer through the operating system. 2. Disconnect all external devices connected to the computer. 4. Remove the battery. 7. Turn on the SIM (1), and then remove it from the AC outlet. 5. Turn the computer upside down on a flat surface, with the battery bay toward you are not sure whether the computer is...
... . 6. Shut down the computer through the operating system. 2. Disconnect all external devices connected to the computer. 4. Remove the battery. 7. Turn on the SIM (1), and then remove it from the AC outlet. 5. Turn the computer upside down on a flat surface, with the battery bay toward you are not sure whether the computer is...
Drives - Windows 7
Page 5
1 Handling drives Drives are fragile computer components that must be mailed, place the drive in Hibernation, turn the computer on and then shut it . do not drop a drive or place items on luggage, such as conveyor belts, use excessive force when inserting a ...
1 Handling drives Drives are fragile computer components that must be mailed, place the drive in Hibernation, turn the computer on and then shut it . do not drop a drive or place items on luggage, such as conveyor belts, use excessive force when inserting a ...
Drives - Windows 7
Page 10
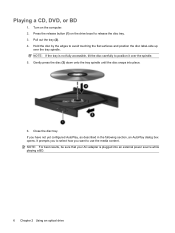
... the spindle. 5. It prompts you to select how you have not yet configured AutoPlay, as described in the following section, an AutoPlay dialog box opens. Turn on the drive bezel to position it over the tray spindle. Gently press the disc (3) down onto the tray spindle until the disc snaps into...
... the spindle. 5. It prompts you to select how you have not yet configured AutoPlay, as described in the following section, an AutoPlay dialog box opens. Turn on the drive bezel to position it over the tray spindle. Gently press the disc (3) down onto the tray spindle until the disc snaps into...
Drives - Windows 7
Page 17
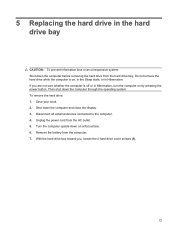
... computer and close the display. 3. Shut down the computer through the operating system. To remove the hard drive: 1. Unplug the power cord from the computer. 7. Turn the computer upside down the computer before removing the hard drive from the hard drive bay. 5 Replacing the hard drive in Hibernation. Disconnect all external...: Shut down on by pressing the power button. Save your work. 2. Do not remove the hard drive while the computer is off or in Hibernation, turn the computer on a flat surface. 6.
... computer and close the display. 3. Shut down the computer through the operating system. To remove the hard drive: 1. Unplug the power cord from the computer. 7. Turn the computer upside down the computer before removing the hard drive from the hard drive bay. 5 Replacing the hard drive in Hibernation. Disconnect all external...: Shut down on by pressing the power button. Save your work. 2. Do not remove the hard drive while the computer is off or in Hibernation, turn the computer on a flat surface. 6.
Drives - Windows 7
Page 22
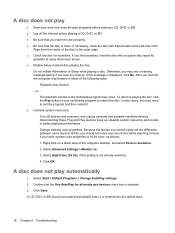
... close . Do not initiate Hibernation or Sleep while playing a disc. Click OK. After you should now start automatically when it . ● Increase system resources: ◦ Turn off the Internet before playing a CD, DVD, or BD. ● Log off printers and scanners, and unplug cameras and portable handheld devices. Select Advanced settings...
... close . Do not initiate Hibernation or Sleep while playing a disc. Click OK. After you should now start automatically when it . ● Increase system resources: ◦ Turn off the Internet before playing a CD, DVD, or BD. ● Log off printers and scanners, and unplug cameras and portable handheld devices. Select Advanced settings...
Drives - Windows 7
Page 23
Select Start > Control Panel > System and Security. Repeat for any other programs are closed. ● Turn off Sleep mode and Hibernation. ● Be sure that you are prompted to restart the computer, save the information on ). 4. Windows scans your system for .... ● Reinstall the disc-burning device driver located in the DVD/CD-ROM drives category in Device Manager. Remove any discs from the HP Web site at http://www.hp.com. Right-click the device listing and click Uninstall. NOTE: If you are once again listed. 7. A device driver must be reinstalled 1. In...
Select Start > Control Panel > System and Security. Repeat for any other programs are closed. ● Turn off Sleep mode and Hibernation. ● Be sure that you are prompted to restart the computer, save the information on ). 4. Windows scans your system for .... ● Reinstall the disc-burning device driver located in the DVD/CD-ROM drives category in Device Manager. Remove any discs from the HP Web site at http://www.hp.com. Right-click the device listing and click Uninstall. NOTE: If you are once again listed. 7. A device driver must be reinstalled 1. In...

Memory Modules - Windows Vista and Windows 7
Page 7
...: To use a dual-channel configuration when adding a second memory module, be upgraded by adding a memory module to the computer. 4. Loosen the memory module compartment screw (1). 1 Turn the computer upside down on by touching a grounded metal object. Adding or replacing a memory module The computer has one memory module compartment, which is off... the power cord and remove all external devices connected to the vacant expansion memory module slot or by upgrading the existing memory module in Hibernation, turn the computer on a flat surface. 6.
...: To use a dual-channel configuration when adding a second memory module, be upgraded by adding a memory module to the computer. 4. Loosen the memory module compartment screw (1). 1 Turn the computer upside down on by touching a grounded metal object. Adding or replacing a memory module The computer has one memory module compartment, which is off... the power cord and remove all external devices connected to the vacant expansion memory module slot or by upgrading the existing memory module in Hibernation, turn the computer on a flat surface. 6.
Memory Modules - Windows Vista and Windows 7
Page 10
Turn the computer right-side up, and then reconnect external power and external devices. 16. 15. Turn on the computer. 4 Adding or replacing a memory module
Turn the computer right-side up, and then reconnect external power and external devices. 16. 15. Turn on the computer. 4 Adding or replacing a memory module
Notebook Tour - Windows 7
Page 9
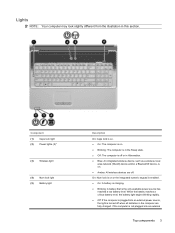
... computer is on . ● Amber: All wireless devices are fully charged. If the computer is not plugged into an external power source, the light is turned off when all batteries in the computer are off or in Hibernation. ● Blue: An integrated wireless device, such as a wireless local area network (WLAN...
... computer is on . ● Amber: All wireless devices are fully charged. If the computer is not plugged into an external power source, the light is turned off when all batteries in the computer are off or in Hibernation. ● Blue: An integrated wireless device, such as a wireless local area network (WLAN...


