

Compaq Presario CQ62 Notebook PC and HP G62 Notebook PC - Maintenance and Service Guide
Page 7
...major components 3-2 Display assembly components 3-9 Plastics Kit 3-11 Mass storage devices 3-12 Miscellaneous parts 3-13 Sequential part number listing 3-14 4 Removal and replacement procedures Preliminary replacement requirements 4-1 Tools required 4-1 Service considerations 4-1 Grounding guidelines 4-2 Component replacement procedures 4-5 Service tag 4-5 Computer feet 4-6 Battery 4-7 Hard drive 4-8 Memory module 4-10 Wireless module 4-12 Optical drive 4-14 Keyboard 4-17 Top cover 4-20 Power button board 4-23 Touchpad button board 4-24 Maintenance and Service Guide iv
...major components 3-2 Display assembly components 3-9 Plastics Kit 3-11 Mass storage devices 3-12 Miscellaneous parts 3-13 Sequential part number listing 3-14 4 Removal and replacement procedures Preliminary replacement requirements 4-1 Tools required 4-1 Service considerations 4-1 Grounding guidelines 4-2 Component replacement procedures 4-5 Service tag 4-5 Computer feet 4-6 Battery 4-7 Hard drive 4-8 Memory module 4-10 Wireless module 4-12 Optical drive 4-14 Keyboard 4-17 Top cover 4-20 Power button board 4-23 Touchpad button board 4-24 Maintenance and Service Guide iv
Compaq Presario CQ62 Notebook PC and HP G62 Notebook PC - Maintenance and Service Guide
Page 13
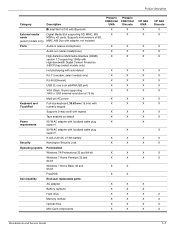
...numeric keypad Supports 2-way scroll with legend X X Taps enabled as default X X Power 65-W AC adapter with localized cable plug X requirements support 90-W AC adapter with localized cable plug X support 6-cell, 2.20 Ah, 47 Wh battery X X Security Kensington Security Lock X X Operating system Preinstalled: Windows 7® Professional 32 and 64-bit X X Windows 7 Home Premium 32 and 64-bit X X Windows 7 Home Basic 32 and 64-bit X X FreeDOS X X Serviceability End-user replaceable parts: AC adapter X X Battery (system) X X Hard drive X X Memory module...
...numeric keypad Supports 2-way scroll with legend X X Taps enabled as default X X Power 65-W AC adapter with localized cable plug X requirements support 90-W AC adapter with localized cable plug X support 6-cell, 2.20 Ah, 47 Wh battery X X Security Kensington Security Lock X X Operating system Preinstalled: Windows 7® Professional 32 and 64-bit X X Windows 7 Home Premium 32 and 64-bit X X Windows 7 Home Basic 32 and 64-bit X X FreeDOS X X Serviceability End-user replaceable parts: AC adapter X X Battery (system) X X Hard drive X X Memory module...
Compaq Presario CQ62 Notebook PC and HP G62 Notebook PC - Maintenance and Service Guide
Page 15
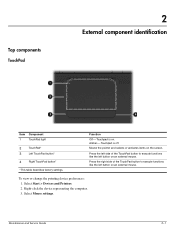
... the TouchPad button to execute functions like the left button on an external mouse. Press the left side of the TouchPad button to execute functions like the left button on an external mouse. Right-click the device representing the computer. 3. Select Start > Devices and Printers. 2. Amber-Touchpad is on the screen. Top components TouchPad 2 External component identification Item Component 1 TouchPad light 2 TouchPad* 3 Left TouchPad button* 4 Right TouchPad button* *This table describes factory settings. Maintenance and Service Guide 2-1 Function Off...
... the TouchPad button to execute functions like the left button on an external mouse. Press the left side of the TouchPad button to execute functions like the left button on an external mouse. Right-click the device representing the computer. 3. Select Start > Devices and Printers. 2. Amber-Touchpad is on the screen. Top components TouchPad 2 External component identification Item Component 1 TouchPad light 2 TouchPad* 3 Left TouchPad button* 4 Right TouchPad button* *This table describes factory settings. Maintenance and Service Guide 2-1 Function Off...
Compaq Presario CQ62 Notebook PC and HP G62 Notebook PC - Maintenance and Service Guide
Page 19
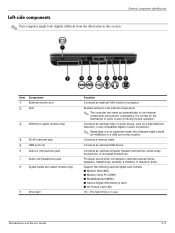
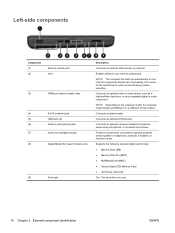
... 1 External monitor port 2 Vent 3 HDMI port (select models only) 4 RJ-45 (network) jack 5 USB ports (2) 6 Audio-in this location. Connects a network cable. Connects an optional USB device. Produces sound when connected to cycle on your computer model, the computer might look slightly different from the illustration in (microphone) jack 7 Audio-out (headphone) jack 8 Digital media slot (select models only) 9 Drive light Function Connects an external VGA monitor or projector. Maintenance and Service Guide 2-5 Connects an optional video or audio device, such...
... 1 External monitor port 2 Vent 3 HDMI port (select models only) 4 RJ-45 (network) jack 5 USB ports (2) 6 Audio-in this location. Connects a network cable. Connects an optional USB device. Produces sound when connected to cycle on your computer model, the computer might look slightly different from the illustration in (microphone) jack 7 Audio-out (headphone) jack 8 Digital media slot (select models only) 9 Drive light Function Connects an external VGA monitor or projector. Maintenance and Service Guide 2-5 Connects an optional video or audio device, such...

Compaq Presario CQ62 Notebook PC and HP G62 Notebook PC - Maintenance and Service Guide
Page 20
... drive light 2 USB port 3 RJ-11 (modem) jack (select models only) 4 AC adapter light 5 Power connector 6 Security cable slot Function Flashing-The optical drive is designed to act as a deterrent, but it might look slightly different from being accessed. Flashing white-The computer is charged. Connects an AC adapter Attaches an optional security cable to external power. Off-The computer is connected to the computer. ✎ The security cable is being mishandled or stolen. 2-6 Maintenance and Service Guide Connects...
... drive light 2 USB port 3 RJ-11 (modem) jack (select models only) 4 AC adapter light 5 Power connector 6 Security cable slot Function Flashing-The optical drive is designed to act as a deterrent, but it might look slightly different from being accessed. Flashing white-The computer is charged. Connects an AC adapter Attaches an optional security cable to external power. Off-The computer is connected to the computer. ✎ The security cable is being mishandled or stolen. 2-6 Maintenance and Service Guide Connects...

Compaq Presario CQ62 Notebook PC and HP G62 Notebook PC - Maintenance and Service Guide
Page 61
... operating system. 2. Remove the battery ( see "Battery" on page 4-12). 8. Remove the wireless module (see "Hard drive" on page 4-14). Keyboard Removal and replacement procedures Description For use in Adriatics For use in Belgium For use in Brazil (for model 1.1 only) For use in Canada For use in the Czech Republic For use in France For use in Germany For use in Greece For use in Hungary For International use For use in Israel For use...
... operating system. 2. Remove the battery ( see "Battery" on page 4-12). 8. Remove the wireless module (see "Hard drive" on page 4-14). Keyboard Removal and replacement procedures Description For use in Adriatics For use in Belgium For use in Brazil (for model 1.1 only) For use in Canada For use in the Czech Republic For use in France For use in Germany For use in Greece For use in Hungary For International use For use in Israel For use...
Compaq Presario CQ62 Notebook PC and HP G62 Notebook PC - Maintenance and Service Guide
Page 74
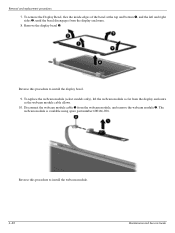
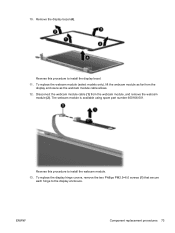
Remove the display bezel 3. Disconnect the webcam module cable 1 from the display enclosure as the webcam module cable allows. 10. Reverse this procedure to install the webcam module. 4-30 Maintenance and Service Guide Reverse this procedure to install the display bezel. 9. The webcam module is available using spare part number 600166-001. To replace the webcam module (select models only), lift the webcam module as far from the webcam module, and remove the webcam module 2. To remove the Display Bezel, flex the inside edges of the...
Remove the display bezel 3. Disconnect the webcam module cable 1 from the display enclosure as the webcam module cable allows. 10. Reverse this procedure to install the webcam module. 4-30 Maintenance and Service Guide Reverse this procedure to install the display bezel. 9. The webcam module is available using spare part number 600166-001. To replace the webcam module (select models only), lift the webcam module as far from the webcam module, and remove the webcam module 2. To remove the Display Bezel, flex the inside edges of the...
Compaq Presario CQ62 Notebook PC and HP G62 Notebook PC - Maintenance and Service Guide
Page 76
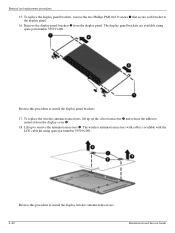
... 3. The display panel brackets are available using spare part number 595196-001. To replace the wireless antenna transceivers, lift up to install the display wireless antenna transceivers. 4-32 Maintenance and Service Guide The wireless antenna transceivers with cable is available with the LCD cable kit using spare part number 595195-001. Removal and replacement procedures 15. Remove the display panel brackets 2 from the display cover 2. 18. Reverse this procedure to the display panel. 16. To replace the display panel brackets, remove the two...
... 3. The display panel brackets are available using spare part number 595196-001. To replace the wireless antenna transceivers, lift up to install the display wireless antenna transceivers. 4-32 Maintenance and Service Guide The wireless antenna transceivers with cable is available with the LCD cable kit using spare part number 595195-001. Removal and replacement procedures 15. Remove the display panel brackets 2 from the display cover 2. 18. Reverse this procedure to the display panel. 16. To replace the display panel brackets, remove the two...
Compaq Presario CQ62 Notebook PC and HP G62 Notebook PC - Maintenance and Service Guide
Page 77
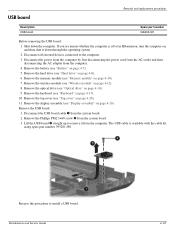
...the cable kit using spare part number 595201-001 Reverse this procedure to install a USB board. Disconnect all external devices connected to remove it down the computer. Remove the hard drive (see "Display assembly" on page 4-7). 5. Remove the display assembly (see "Hard drive" on , and then shut it from the system board. 3. Remove the battery (see "Wireless module" on page 4-17). 10. USB board Removal and replacement procedures Description USB board Spare part number 595205-001 Before removing the USB board: 1. Remove the wireless module (see "Battery" on...
...the cable kit using spare part number 595201-001 Reverse this procedure to install a USB board. Disconnect all external devices connected to remove it down the computer. Remove the hard drive (see "Display assembly" on page 4-7). 5. Remove the display assembly (see "Hard drive" on , and then shut it from the system board. 3. Remove the battery (see "Wireless module" on page 4-17). 10. USB board Removal and replacement procedures Description USB board Spare part number 595205-001 Before removing the USB board: 1. Remove the wireless module (see "Battery" on...

Compaq Presario CQ62 Notebook PC and HP G62 Notebook PC - Maintenance and Service Guide
Page 100
...CD-ROM. ■ Floppy boot-Enable/disable boot from diskette. ■ Internal Network Adapter boot-Enable/disable boot from Internal Network Adapter. ■ Boot Order-Set the boot order for: USB Floppy Internal CD/DVD ROM Drive Processor C6 sleep state (select models only) USB CD/DVD ROM drive Hard drive USB Diskette on Key USB Hard drive Network adapter Diagnostics menu Select Hard Disk Self Test Secondary Hard Disk Self Test (select models only) Memory Test To do this Change Setup Utility language. Enable/disable the capacitive button tapping sound. When enabled, saves power when...
...CD-ROM. ■ Floppy boot-Enable/disable boot from diskette. ■ Internal Network Adapter boot-Enable/disable boot from Internal Network Adapter. ■ Boot Order-Set the boot order for: USB Floppy Internal CD/DVD ROM Drive Processor C6 sleep state (select models only) USB CD/DVD ROM drive Hard drive USB Diskette on Key USB Hard drive Network adapter Diagnostics menu Select Hard Disk Self Test Secondary Hard Disk Self Test (select models only) Memory Test To do this Change Setup Utility language. Enable/disable the capacitive button tapping sound. When enabled, saves power when...

Compaq Presario CQ62 Notebook PC and HP G62 Notebook PC - Maintenance and Service Guide
Page 131
... audio 1-2 cable lock 1-3 chipset 1-1 Ethernet 1-2 external media cards 1-3 graphics 1-1 hard drives 1-2 keyboard 1-3 memory module 1-1 microphone 1-2 modem module 1-2 operating system 1-3 optical drives 1-2 panel 1-1 ports 1-3 power requirements 1-3 product name 1-1 serviceability 1-3 TouchPad 2-1 video 2-5 webcam 1-2 wireless module 1-2 product name 1-1 R recovery methods f11 recovery 8-4 recovery discs 8-4 Recovery Manager 8-4 Maintenance and Service Guide Index recovery partition 8-4 removal/replacement preliminaries 4-1 procedures 4-5 restore points 8-3 restoring factory settings...
... audio 1-2 cable lock 1-3 chipset 1-1 Ethernet 1-2 external media cards 1-3 graphics 1-1 hard drives 1-2 keyboard 1-3 memory module 1-1 microphone 1-2 modem module 1-2 operating system 1-3 optical drives 1-2 panel 1-1 ports 1-3 power requirements 1-3 product name 1-1 serviceability 1-3 TouchPad 2-1 video 2-5 webcam 1-2 wireless module 1-2 product name 1-1 R recovery methods f11 recovery 8-4 recovery discs 8-4 Recovery Manager 8-4 Maintenance and Service Guide Index recovery partition 8-4 removal/replacement preliminaries 4-1 procedures 4-5 restore points 8-3 restoring factory settings...
Service Guide
Page 24
... (1) (2) External monitor port Vent (3) HDMI port (select models only) (4) RJ-45 (network) jack (5) USB ports (2) (6) Audio-in use. 14 Chapter 2 External component identification ENWW Connects an optional video or audio device, such as a high-definition television, or any compatible digital or audio component. Supports the following optional digital card formats: ● Memory Stick (MS) ● Memory Stick Pro (MSP) ● MultiMediaCard (MMC) ● Secure Digital (SD) Memory Card ● xD-Picture Card (XD) On-The hard drive is normal for the internal fan...
... (1) (2) External monitor port Vent (3) HDMI port (select models only) (4) RJ-45 (network) jack (5) USB ports (2) (6) Audio-in use. 14 Chapter 2 External component identification ENWW Connects an optional video or audio device, such as a high-definition television, or any compatible digital or audio component. Supports the following optional digital card formats: ● Memory Stick (MS) ● Memory Stick Pro (MSP) ● MultiMediaCard (MMC) ● Secure Digital (SD) Memory Card ● xD-Picture Card (XD) On-The hard drive is normal for the internal fan...
Service Guide
Page 83
... this procedure to install the display bezel. 11. To replace the display hinge covers, remove the two Phillips PM2.5×6.0 screws (1) that secure each hinge to install the webcam module. 13. The webcam module is available using spare part number 600166-001. Disconnect the webcam module cable (1) from the display enclosure as far from the webcam module, and remove the webcam module (2). To replace the webcam module (select models only), lift the webcam module as the webcam module cable allows. 12. Reverse...
... this procedure to install the display bezel. 11. To replace the display hinge covers, remove the two Phillips PM2.5×6.0 screws (1) that secure each hinge to install the webcam module. 13. The webcam module is available using spare part number 600166-001. Disconnect the webcam module cable (1) from the display enclosure as far from the webcam module, and remove the webcam module (2). To replace the webcam module (select models only), lift the webcam module as the webcam module cable allows. 12. Reverse...

Service Guide
Page 103
... internal network adapter. ● Boot Order―Set the boot order for the f1, f2, f9, f10, f11, and f12 functions of Setup Utility. System Configuration menu Select Language Support Button Sound (select models only) Virtualization Technology (select models only) Processor C6 State (select models only) LAN Power Saving (select models only) Card Reader/1394 Power Saving (select models only) Fan Always On Action Keys Mode Boot Options To do this Run a comprehensive self-test on the hard drive. Enable/disable LAN Power Saving. Enable/disable the processor C6 sleep...
... internal network adapter. ● Boot Order―Set the boot order for the f1, f2, f9, f10, f11, and f12 functions of Setup Utility. System Configuration menu Select Language Support Button Sound (select models only) Virtualization Technology (select models only) Processor C6 State (select models only) LAN Power Saving (select models only) Card Reader/1394 Power Saving (select models only) Fan Always On Action Keys Mode Boot Options To do this Run a comprehensive self-test on the hard drive. Enable/disable LAN Power Saving. Enable/disable the processor C6 sleep...

Service Guide
Page 104
... keys to navigate and make selections. NOTE: Pointing devices are not supported in this guide might not be supported by USB can be used even when the operating system is not working or will not load. Before the operating system opens and when the F10=ROM Based Setup message displays in the lower-left corner of the screen. Use the keyboard to select File > Ignore Changes And Exit. To start...
... keys to navigate and make selections. NOTE: Pointing devices are not supported in this guide might not be supported by USB can be used even when the operating system is not working or will not load. Before the operating system opens and when the F10=ROM Based Setup message displays in the lower-left corner of the screen. Use the keyboard to select File > Ignore Changes And Exit. To start...
Service Guide
Page 108
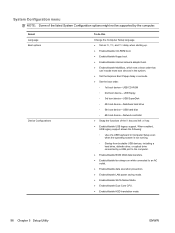
... boot device-USB SuperDisk ◦ 4th boot device-Notebook hard drive ◦ 5th boot device-USB hard disk ◦ 6th boot device-Network controller ● Swap the functions of the fn key and left ctrl key. ● Enable/disable USB legacy support. Select Language Boot options Device Configurations To do this Change the Computer Setup language. ● Set an f9, f10, and f12 delay when starting up. ● Enable/disable CD-ROM boot. ● Enable/disable floppy boot. ● Enable/disable internal network adapter boot. ● Enable/disable MultiBoot, which sets a boot order that...
... boot device-USB SuperDisk ◦ 4th boot device-Notebook hard drive ◦ 5th boot device-USB hard disk ◦ 6th boot device-Network controller ● Swap the functions of the fn key and left ctrl key. ● Enable/disable USB legacy support. Select Language Boot options Device Configurations To do this Change the Computer Setup language. ● Set an f9, f10, and f12 delay when starting up. ● Enable/disable CD-ROM boot. ● Enable/disable floppy boot. ● Enable/disable internal network adapter boot. ● Enable/disable MultiBoot, which sets a boot order that...
Service Guide
Page 116
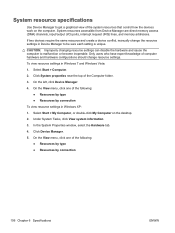
... and create a device conflict, manually change resource settings. System resources accessible from Device Manager are direct memory access (DMA) channels, input/output (I/O) ports, interrupt request (IRQ) lines, and memory addresses. Click System properties near the top of computer hardware and hardware configurations should change the resource settings in Device Manager to malfunction or become inoperable. System resource specifications Use Device Manager to get a graphical view of the system resources that control how the devices work on...
... and create a device conflict, manually change resource settings. System resources accessible from Device Manager are direct memory access (DMA) channels, input/output (I/O) ports, interrupt request (IRQ) lines, and memory addresses. Click System properties near the top of computer hardware and hardware configurations should change the resource settings in Device Manager to malfunction or become inoperable. System resource specifications Use Device Manager to get a graphical view of the system resources that control how the devices work on...
Service Guide
Page 141
...-ray Disc ROM LightScribe with SuperMulti DVD±R/RW DoubleLayer spare part number 30, 50 Blu-ray ROM with LightScribe DVD ±R/RW SuperMulti DL Drive specifications 105 boot options 93, 98 boot order 93, 98 button sound 93 buttons power 10 TouchPad right/left 8 C cables, service considerations 40 camera module removal 73 spare part number 73 camera, product description 3 caps lock light, identifying 9 Card Reader Power Saving 93 changing the language of Setup Utility 89 chipset, product description 2 compartments memory module 15 components additional hardware 17...
...-ray Disc ROM LightScribe with SuperMulti DVD±R/RW DoubleLayer spare part number 30, 50 Blu-ray ROM with LightScribe DVD ±R/RW SuperMulti DL Drive specifications 105 boot options 93, 98 boot order 93, 98 button sound 93 buttons power 10 TouchPad right/left 8 C cables, service considerations 40 camera module removal 73 spare part number 73 camera, product description 3 caps lock light, identifying 9 Card Reader Power Saving 93 changing the language of Setup Utility 89 chipset, product description 2 compartments memory module 15 components additional hardware 17...
Service Guide
Page 142
... (network 14 K keyboard product description 5 removal 57 spare part numbers 21, 57 keys Calculator 11 esc 11 fn 11 function 11 Media application 11 Print 11 Send e-mail 11 Web browser 11 Windows applications 11 Windows logo 11 L LAN Power Saving 93 language support 93 latch, battery release 15 legacy support, USB 94, 98 light power 9 lights caps lock 9 Digital Media Slot 14 webcam 12 wireless 9 M Main menu 92 mass storage devices, spare part numbers 30 memory module product description 2 removal...
... (network 14 K keyboard product description 5 removal 57 spare part numbers 21, 57 keys Calculator 11 esc 11 fn 11 function 11 Media application 11 Print 11 Send e-mail 11 Web browser 11 Windows applications 11 Windows logo 11 L LAN Power Saving 93 language support 93 latch, battery release 15 legacy support, USB 94, 98 light power 9 lights caps lock 9 Digital Media Slot 14 webcam 12 wireless 9 M Main menu 92 mass storage devices, spare part numbers 30 memory module product description 2 removal...
Service Guide
Page 143
...product description audio 3 camera 3 chipset 2 display panel 2 Ethernet 3 external media cards 4 graphics 2 hard drives 3 keyboard 5 memory module 2 microphone 3 modem module 3 operating system 5 optical drives 3 pointing devices 5 ports 4 power requirements 5 processors 1 product name 1 security 5 serviceability 5 wireless 4 product name 1 R recovering a program or driver 107 recovering from the dedicated recovery partition 112 recovering from the recovery discs 112 recovery discs 107, 108 Recovery Manager 107, 111 recovery partition 107 recovery, system 111 removal/replacement preliminaries...
...product description audio 3 camera 3 chipset 2 display panel 2 Ethernet 3 external media cards 4 graphics 2 hard drives 3 keyboard 5 memory module 2 microphone 3 modem module 3 operating system 5 optical drives 3 pointing devices 5 ports 4 power requirements 5 processors 1 product name 1 security 5 serviceability 5 wireless 4 product name 1 R recovering a program or driver 107 recovering from the dedicated recovery partition 112 recovering from the recovery discs 112 recovery discs 107, 108 Recovery Manager 107, 111 recovery partition 107 recovery, system 111 removal/replacement preliminaries...


