Multimedia - Windows Vista
Page 25
..., and then reenable the firewall. A higher contrast setting intensifies the image; A lower gamma setting makes grays look black, and makes dark colors even darker. ● Backlight Comp-Compensates in cases where a subject with a large amount of edges in the final image. A higher saturation setting creates a bolder image; a lower saturation setting creates...
..., and then reenable the firewall. A higher contrast setting intensifies the image; A lower gamma setting makes grays look black, and makes dark colors even darker. ● Backlight Comp-Compensates in cases where a subject with a large amount of edges in the final image. A higher saturation setting creates a bolder image; a lower saturation setting creates...

Service Guide
Page 31
Item Description (6) WXGA BrightView display panel (include display panel and backlight cables) For use only with 16-inch display For use only with 15.6-inch display Display panel cable kit with webcam cable (not illustrated) (7) Wireless... (shown attached to transceivers) (8) Microphone and caps lock cable (includes receiver and cable) (9) Display enclosure (includes logo) For use only with HP G60 computer models For use only with silver HP G60 computer models For use only with Presario CQ60 computer models Display Rubber Kit (not illustrated, includes display bezel rubber screw covers) Display...
Item Description (6) WXGA BrightView display panel (include display panel and backlight cables) For use only with 16-inch display For use only with 15.6-inch display Display panel cable kit with webcam cable (not illustrated) (7) Wireless... (shown attached to transceivers) (8) Microphone and caps lock cable (includes receiver and cable) (9) Display enclosure (includes logo) For use only with HP G60 computer models For use only with silver HP G60 computer models For use only with Presario CQ60 computer models Display Rubber Kit (not illustrated, includes display bezel rubber screw covers) Display...

Service Guide
Page 93
... and exclusions apply. 16 and 15.6-inch WXGA display specifications Dimensions Height Width Diagonal Number of colors Contrast ratio Brightness Pixel resolution Pitch Format Configuration Backlight Character display Total power consumption Viewing angle Hard drive specifications Metric U.S. 25.2 cm 37.8 cm 35.1 cm Up to 16.8 million 200:1 180 nits typical...
... and exclusions apply. 16 and 15.6-inch WXGA display specifications Dimensions Height Width Diagonal Number of colors Contrast ratio Brightness Pixel resolution Pitch Format Configuration Backlight Character display Total power consumption Viewing angle Hard drive specifications Metric U.S. 25.2 cm 37.8 cm 35.1 cm Up to 16.8 million 200:1 180 nits typical...
Service Guide
Page 128
...; CAUTION: The procedures in this chapter can vary from one computer model to another. Exercise caution when removing and handling the backlight to avoid damaging this component and causing exposure to display components. The display assembly must be regulated because of the battery in ...the display assembly that might require special handling at http://www.eiae.org. This HP product contains mercury in the backlight in general household waste. This section provides disassembly instructions for recycling purposes are general disassembly instructions.
...; CAUTION: The procedures in this chapter can vary from one computer model to another. Exercise caution when removing and handling the backlight to avoid damaging this component and causing exposure to display components. The display assembly must be regulated because of the battery in ...the display assembly that might require special handling at http://www.eiae.org. This HP product contains mercury in the backlight in general household waste. This section provides disassembly instructions for recycling purposes are general disassembly instructions.

Service Guide
Page 131
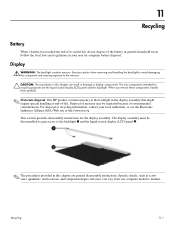
Recycling 11-4 Lift the top edge of the display panel to the display panel. 12. Use a sharp-edged tool to cut the tape 1 that secure the backlight cover to the display panel frame. 10. Remove the backlight cover. 14. Remove the display panel frame 2 from the clip 2 in the display panel. 9. Remove the screws 1 that secures the sides of the backlight cover 2 and swing it outward. 13. Turn the display panel right-side up. 15. Remove the backlight cables 1 from the display panel. 11.
Recycling 11-4 Lift the top edge of the display panel to the display panel. 12. Use a sharp-edged tool to cut the tape 1 that secure the backlight cover to the display panel frame. 10. Remove the backlight cover. 14. Remove the display panel frame 2 from the clip 2 in the display panel. 9. Remove the screws 1 that secures the sides of the backlight cover 2 and swing it outward. 13. Turn the display panel right-side up. 15. Remove the backlight cables 1 from the display panel. 11.

Service Guide
Page 132
Remove the backlight frame from the backlight frame. Remove the backlight from the display panel. Å WARNING: The backlight contains mercury. Exercise caution when removing and handling the backlight to avoid damaging this component and causing exposure to the mercury. 18. 16. Recycling 11-5 Turn the display panel upside down. 17.
Remove the backlight frame from the backlight frame. Remove the backlight from the display panel. Å WARNING: The backlight contains mercury. Exercise caution when removing and handling the backlight to avoid damaging this component and causing exposure to the mercury. 18. 16. Recycling 11-5 Turn the display panel upside down. 17.

Service Guide
Page 133
Release the LCD panel 3 from the LCD panel. 20. Recycling 11-6 Disconnect the display cable 1 from the display rear panel. 22. Recycle the LCD panel and backlight. 19. Release the tape 4 that secure the LCD panel to the display rear panel. 23. Remove the screws 2 that secures the LCD panel to the display rear panel. 21. Remove the LCD panel. 24.
Release the LCD panel 3 from the LCD panel. 20. Recycling 11-6 Disconnect the display cable 1 from the display rear panel. 22. Recycle the LCD panel and backlight. 19. Release the tape 4 that secure the LCD panel to the display rear panel. 23. Remove the screws 2 that secures the LCD panel to the display rear panel. 21. Remove the LCD panel. 24.


