
Setup Utility - Windows Vista and Windows 7
Page 10
...boot from Internal Network Adapter. ● Boot Order―Set the boot order for: ◦ USB Floppy ◦ Internal CD/DVD ROM drive ◦ USB CD/DVD ROM drive ◦ Hard drive ◦ USB Diskette on Key ◦ USB Hard drive ◦ Network adapter Diagnostics menu Select Hard Disk Self Test Secondary Hard Disk Self Test (select models only) Memory Test To do this Change the Setup Utility language. Enable/disable the processor Virtualization Technology. Run a diagnostic test on the system memory. 6 Chapter 3 Setup Utility menus Enable/disable the capacitive button tapping sound...
...boot from Internal Network Adapter. ● Boot Order―Set the boot order for: ◦ USB Floppy ◦ Internal CD/DVD ROM drive ◦ USB CD/DVD ROM drive ◦ Hard drive ◦ USB Diskette on Key ◦ USB Hard drive ◦ Network adapter Diagnostics menu Select Hard Disk Self Test Secondary Hard Disk Self Test (select models only) Memory Test To do this Change the Setup Utility language. Enable/disable the processor Virtualization Technology. Run a diagnostic test on the system memory. 6 Chapter 3 Setup Utility menus Enable/disable the capacitive button tapping sound...
Software Update, Backup and Recovery - Windows Vista
Page 5
... the hardware devices, and provides for a system BIOS update by identifying the BIOS version currently installed on the HP Web site. NOTE: Windows® includes the User Account Control feature to a network, consult the network administrator before installing any software updates, especially system BIOS updates. You may be prompted for your computer model, product category, and series or family. Refer to Windows Help for tasks such as installing applications, running utilities, or changing Windows settings.
... the hardware devices, and provides for a system BIOS update by identifying the BIOS version currently installed on the HP Web site. NOTE: Windows® includes the User Account Control feature to a network, consult the network administrator before installing any software updates, especially system BIOS updates. You may be prompted for your computer model, product category, and series or family. Refer to Windows Help for tasks such as installing applications, running utilities, or changing Windows settings.

Software Update, Backup and Recovery - Windows Vista
Page 6
... page on the screen to download your selection to the hard drive. 2 Updating software If the Setup Utility does not open with the system information displayed, use the arrow keys to select Exit > Exit Discarding Changes, and then press enter. Downloading a BIOS update CAUTION: To prevent damage to your computer: Select Start > Help and Support, and then click the link for software, driver, and BIOS updates. 2. Follow the instructions on the HP Web site that...
... page on the screen to download your selection to the hard drive. 2 Updating software If the Setup Utility does not open with the system information displayed, use the arrow keys to select Exit > Exit Discarding Changes, and then press enter. Downloading a BIOS update CAUTION: To prevent damage to your computer: Select Start > Help and Support, and then click the link for software, driver, and BIOS updates. 2. Follow the instructions on the HP Web site that...

Software Update, Backup and Recovery - Windows Vista
Page 8
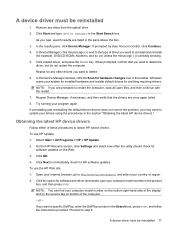
... the option for software and driver downloads, type your computer model number in the Search box, press enter, and follow these steps: To use the HP Web site: 1. Proceed to download the driver and install it later. When the list of the device. 4 Updating software NOTE: In some locations you want a specific SoftPaq, enter the SoftPaq number in the Search box, and then press enter. - After the file is displayed, click an updated driver to install...
... the option for software and driver downloads, type your computer model number in the Search box, press enter, and follow these steps: To use the HP Web site: 1. Proceed to download the driver and install it later. When the list of the device. 4 Updating software NOTE: In some locations you want a specific SoftPaq, enter the SoftPaq number in the Search box, and then press enter. - After the file is displayed, click an updated driver to install...
Wireless (Select Models Only) - Windows Vista
Page 24
... driver for a WLAN device may be prompted for your permission or password for more information on your computer: NOTE: Windows includes the User Account Control feature to improve the security of your computer does not have a problem connecting to a WLAN, confirm that the integrated WLAN device is not properly installed. Refer to Help and Support for tasks such as installing software, running utilities, or changing Windows settings...
... driver for a WLAN device may be prompted for your permission or password for more information on your computer: NOTE: Windows includes the User Account Control feature to improve the security of your computer does not have a problem connecting to a WLAN, confirm that the integrated WLAN device is not properly installed. Refer to Help and Support for tasks such as installing software, running utilities, or changing Windows settings...
Drives - Windows Vista
Page 13
... run Disk Cleanup: 1. Select Start > All Programs > Accessories > System Tools > Disk Cleanup. 2. Disk Defragmenter consolidates the fragmented files and folders on the size of your hard drive and the number of your permission or password for your computer. To run Disk Defragmenter: 1. You may be prompted for tasks such as installing software, running utilities, or changing Windows settings. Disk Defragmenter is easy to Help and Support for...
... run Disk Cleanup: 1. Select Start > All Programs > Accessories > System Tools > Disk Cleanup. 2. Disk Defragmenter consolidates the fragmented files and folders on the size of your hard drive and the number of your permission or password for your computer. To run Disk Defragmenter: 1. You may be prompted for tasks such as installing software, running utilities, or changing Windows settings. Disk Defragmenter is easy to Help and Support for...
Drives - Windows Vista
Page 21
... computer. Windows scans your computer model number on the bottom right-hand side of the display and on the service tag on bottom of these procedures to the type of driver you want a specific SoftPaq, enter the SoftPaq number in the Start Search box. Click Next to step 6. To use HP Update: 1. NOTE: You can find your system for installed hardware and installs default drivers for example, DVD/CD-ROMs, Modems...
... computer. Windows scans your computer model number on the bottom right-hand side of the display and on the service tag on bottom of these procedures to the type of driver you want a specific SoftPaq, enter the SoftPaq number in the Start Search box. Click Next to step 6. To use HP Update: 1. NOTE: You can find your system for installed hardware and installs default drivers for example, DVD/CD-ROMs, Modems...
Drives - Windows Vista
Page 22
... updated driver without downloading the file. - If prompted by User Account Control, click Continue. 5. If prompted to your computer. 18 Chapter 5 Troubleshooting Follow the on your computer after the installation is set to automatically check for updates to open a window containing additional information. 6. Click Change settings and select a time for Microsoft Update to check for and install Microsoft device drivers when new devices are connected to do so, restart your hard drive...
... updated driver without downloading the file. - If prompted by User Account Control, click Continue. 5. If prompted to your computer. 18 Chapter 5 Troubleshooting Follow the on your computer after the installation is set to automatically check for updates to open a window containing additional information. 6. Click Change settings and select a time for Microsoft Update to check for and install Microsoft device drivers when new devices are connected to do so, restart your hard drive...
Drives - Windows Vista
Page 23
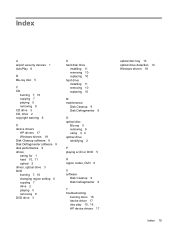
... 6 D device drivers HP drivers 17 Windows drivers 18 Disk Cleanup software 9 Disk Defragmenter software 9 disk performance 9 drives caring for 1 hard 10, 11 optical 2 drives, optical drive 3 DVD burning 7, 16 changing region setting 6 copying 7 drive 2 playing 5 removing 8 DVD drive 3 H hard disk drive installing 11 removing 10 replacing 10 hard drive installing 11 removing 10 replacing 10 M maintenance Disk Cleanup 9 Disk Defragmenter 9 O optical disc Blu-ray 5 removing 8 using 3, 4 optical drive identifying 2 P playing a CD or DVD 5 R region codes, DVD 6 S software Disk Cleanup 9 Disk...
... 6 D device drivers HP drivers 17 Windows drivers 18 Disk Cleanup software 9 Disk Defragmenter software 9 disk performance 9 drives caring for 1 hard 10, 11 optical 2 drives, optical drive 3 DVD burning 7, 16 changing region setting 6 copying 7 drive 2 playing 5 removing 8 DVD drive 3 H hard disk drive installing 11 removing 10 replacing 10 hard drive installing 11 removing 10 replacing 10 M maintenance Disk Cleanup 9 Disk Defragmenter 9 O optical disc Blu-ray 5 removing 8 using 3, 4 optical drive identifying 2 P playing a CD or DVD 5 R region codes, DVD 6 S software Disk Cleanup 9 Disk...
Notebook Tour - Windows Vista
Page 14
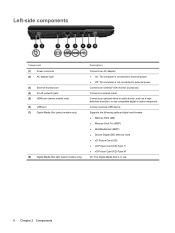
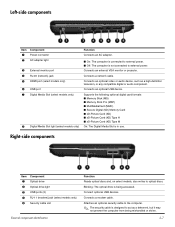
...Memory Card ● xD-Picture Card (XD) ● xD-Picture Card (XD) Type H ● xD-Picture Card (XD) Type M On: The Digital Media Slot is not connected to external power. ● Off: The computer is in use. 8 Chapter 2 Components Connect optional USB device. Connects a network cable. Connects an optional video or audio device, such as a highdefinition television, or any compatible digital or audio component. Connects an external VGA monitor or projector. Left-side components Component (1) Power connector (2) AC adapter light (3) External monitor port (4) RJ-45 (network) jack...
...Memory Card ● xD-Picture Card (XD) ● xD-Picture Card (XD) Type H ● xD-Picture Card (XD) Type M On: The Digital Media Slot is not connected to external power. ● Off: The computer is in use. 8 Chapter 2 Components Connect optional USB device. Connects a network cable. Connects an optional video or audio device, such as a highdefinition television, or any compatible digital or audio component. Connects an external VGA monitor or projector. Left-side components Component (1) Power connector (2) AC adapter light (3) External monitor port (4) RJ-45 (network) jack...
Multimedia - Windows Vista
Page 13
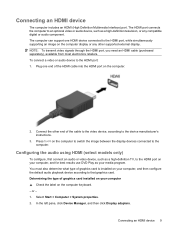
... supported external display. Configuring the audio using HDMI (select models only) To configure, first connect an audio or video device, such as a high-definition TV, to an optional video or audio device, such as your computer, and then configure the default audio playback device according to that graphics card. The HDMI port connects the computer to the HDMI port on the computer to switch the image between the display devices connected to the HDMI port: 1. NOTE: To transmit video signals through the HDMI port, you need an HDMI cable...
... supported external display. Configuring the audio using HDMI (select models only) To configure, first connect an audio or video device, such as a high-definition TV, to an optional video or audio device, such as your computer, and then configure the default audio playback device according to that graphics card. The HDMI port connects the computer to the HDMI port on the computer to switch the image between the display devices connected to the HDMI port: 1. NOTE: To transmit video signals through the HDMI port, you need an HDMI cable...
Multimedia - Windows Vista
Page 30
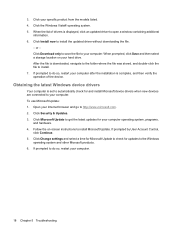
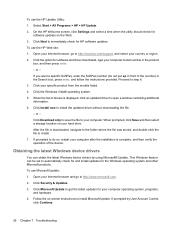
... latest Windows device drivers by User Account Control, click Continue. 26 Chapter 7 Troubleshooting Click Microsoft Update to get the latest updates for software updates on -screen instructions to your computer model number in the Search box, press enter, and follow the instructions provided. Select Start > All Programs > HP > HP Update. 2. On the HP Welcome screen, click Settings and select a time when the utility should check for your specific product from the models listed. 4. Proceed to install the updated driver without downloading...
... latest Windows device drivers by User Account Control, click Continue. 26 Chapter 7 Troubleshooting Click Microsoft Update to get the latest updates for software updates on -screen instructions to your computer model number in the Search box, press enter, and follow the instructions provided. Select Start > All Programs > HP > HP Update. 2. On the HP Welcome screen, click Settings and select a time when the utility should check for your specific product from the models listed. 4. Proceed to install the updated driver without downloading...
Power Management - Windows Vista
Page 5
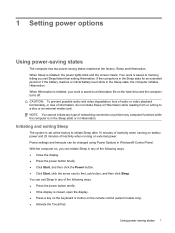
... the display is closed, open the display. ● Press a key on the keyboard or button on the hard drive and the computer turns off. Your work is set at the factory: Sleep and Hibernation. If the computer is initiated, the power lights blink and the screen clears. 1 Setting power options Using power-saving states The computer has two power-saving states enabled at the factory to initiate Sleep after 10 minutes of inactivity when running on battery power and...
... the display is closed, open the display. ● Press a key on the keyboard or button on the hard drive and the computer turns off. Your work is set at the factory: Sleep and Hibernation. If the computer is initiated, the power lights blink and the screen clears. 1 Setting power options Using power-saving states The computer has two power-saving states enabled at the factory to initiate Sleep after 10 minutes of inactivity when running on battery power and...

Power Management - Windows Vista
Page 20
... computer into external power and maintain external power until the battery is fully charged and the battery light has turned off . 2. Select Start > Control Panel > System and Maintenance > Power Options. 2. Under the current power plan, click Change plan settings. 3. Click Restore default settings for this plan, and then follow the on the computer turns off. Step 4: Fully recharge the battery To recharge the battery: 1. When the battery is off . Step 5: Reenable Hibernation and Sleep CAUTION: Failure...
... computer into external power and maintain external power until the battery is fully charged and the battery light has turned off . 2. Select Start > Control Panel > System and Maintenance > Power Options. 2. Under the current power plan, click Change plan settings. 3. Click Restore default settings for this plan, and then follow the on the computer turns off. Step 4: Fully recharge the battery To recharge the battery: 1. When the battery is off . Step 5: Reenable Hibernation and Sleep CAUTION: Failure...

Power Management - Windows Vista
Page 24
... the Power button. ● Press the power button and hold for an extended period To shut down the computer: NOTE: If the computer is in the Sleep state or in Hibernation, you must first exit Sleep or Hibernation before shutdown is unresponsive and you are connecting an external hardware device that does not connect to the Lock button. 3. Save your work and close all open...
... the Power button. ● Press the power button and hold for an extended period To shut down the computer: NOTE: If the computer is in the Sleep state or in Hibernation, you must first exit Sleep or Hibernation before shutdown is unresponsive and you are connecting an external hardware device that does not connect to the Lock button. 3. Save your work and close all open...
Service Guide
Page 4
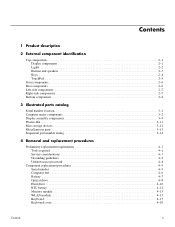
... parts catalog Serial number location 3-1 Computer major components 3-2 Display assembly components 3-9 Plastics Kit 3-11 Mass storage devices 3-12 Miscellaneous parts 3-13 Sequential part number listing 3-14 4 Removal and replacement procedures Preliminary replacement requirements 4-1 Tools required 4-1 Service considerations 4-1 Grounding guidelines 4-2 Unknown user password 4-4 Component replacement procedures 4-5 Serial number 4-5 Computer feet 4-6 Battery 4-7 Optical drive 4-8 Hard drive 4-10 RTC battery 4-12 Memory module 4-13 WLAN module 4-15 Keyboard 4-17 Keyboard...
... parts catalog Serial number location 3-1 Computer major components 3-2 Display assembly components 3-9 Plastics Kit 3-11 Mass storage devices 3-12 Miscellaneous parts 3-13 Sequential part number listing 3-14 4 Removal and replacement procedures Preliminary replacement requirements 4-1 Tools required 4-1 Service considerations 4-1 Grounding guidelines 4-2 Unknown user password 4-4 Component replacement procedures 4-5 Serial number 4-5 Computer feet 4-6 Battery 4-7 Optical drive 4-8 Hard drive 4-10 RTC battery 4-12 Memory module 4-13 WLAN module 4-15 Keyboard 4-17 Keyboard...
Service Guide
Page 20
...Item Component 1 Power connector 2 AC adapter light 3 External monitor port 4 RJ-45 (network) jack 5 HDMI port (select models only) 6 USB port 7 Digital Media Slot (select models only) 8 Digital Media Slot light (select models only) Function Connects an AC adapter. ■ On: The computer is connected to external power. ■ Off: The computer is in use. Connects an optional video or audio device, such as a deterrent, but it may not prevent the computer from being accessed. Connects an optional USB device. Connects a modem cable. Connects a network cable. Blinking: The optical...
...Item Component 1 Power connector 2 AC adapter light 3 External monitor port 4 RJ-45 (network) jack 5 HDMI port (select models only) 6 USB port 7 Digital Media Slot (select models only) 8 Digital Media Slot light (select models only) Function Connects an AC adapter. ■ On: The computer is connected to external power. ■ Off: The computer is in use. Connects an optional video or audio device, such as a deterrent, but it may not prevent the computer from being accessed. Connects an optional USB device. Connects a modem cable. Connects a network cable. Blinking: The optical...
Service Guide
Page 22
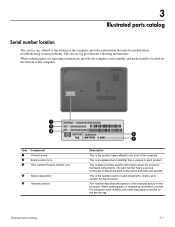
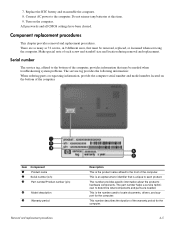
... and parts are needed when troubleshooting system problems. The service tag provides the following information: When ordering parts or requesting information, provide the computer serial number and model number located on the service tag. Illustrated parts catalog 3-1 This number provides specific information about the product's hardware components. This number describes the duration of the computer. This is an alphanumeric identifier that may be needed . Item 1 2 3 Component Product name Serial number (s/n) Part number/Product number (p/n) 4 Model...
... and parts are needed when troubleshooting system problems. The service tag provides the following information: When ordering parts or requesting information, provide the computer serial number and model number located on the service tag. Illustrated parts catalog 3-1 This number provides specific information about the product's hardware components. This number describes the duration of the computer. This is an alphanumeric identifier that may be needed . Item 1 2 3 Component Product name Serial number (s/n) Part number/Product number (p/n) 4 Model...
Service Guide
Page 46
... information that must be needed . This number provides specific information about the product's hardware components. This is the product name affixed to locate documents, drivers, and support for the computer. 4-5 Turn on the bottom of the computer. There are needed when troubleshooting system problems. The service tag provides the following information: When ordering parts or requesting information, provide the computer serial number and model number located on the computer...
... information that must be needed . This number provides specific information about the product's hardware components. This is the product name affixed to locate documents, drivers, and support for the computer. 4-5 Turn on the bottom of the computer. There are needed when troubleshooting system problems. The service tag provides the following information: When ordering parts or requesting information, provide the computer serial number and model number located on the computer...
Service Guide
Page 134
... 2-8 BIOS administrator password 5-3 Bluetooth module removal 4-35 spare part number 4-35 Bluetooth module cable 3-17 removal 4-35 spare part number 3-6, 3-17 Blu-ray disc specifications 6-4 Blu-ray ROM DVD±RW SuperMulti DL Drive product description 1-4 removal 4-9 spare part number 4-8 specifications 6-4 boot options 5-4 boot order 5-4 bottom components 2-8 Index Index built-in device Bluetooth device radio 2-8 modem 1-4 wireless button 2-3 WLAN device radio 2-8 buttons power 2-3 wireless 2-3 C cables, service consideration 4-1 caps lock light 2-2 chipset, product description 1-2 CMOS...
... 2-8 BIOS administrator password 5-3 Bluetooth module removal 4-35 spare part number 4-35 Bluetooth module cable 3-17 removal 4-35 spare part number 3-6, 3-17 Blu-ray disc specifications 6-4 Blu-ray ROM DVD±RW SuperMulti DL Drive product description 1-4 removal 4-9 spare part number 4-8 specifications 6-4 boot options 5-4 boot order 5-4 bottom components 2-8 Index Index built-in device Bluetooth device radio 2-8 modem 1-4 wireless button 2-3 WLAN device radio 2-8 buttons power 2-3 wireless 2-3 C cables, service consideration 4-1 caps lock light 2-2 chipset, product description 1-2 CMOS...


