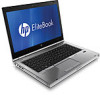
Installing SATA Drivers on HP EliteBook Notebook PCs
Page 14
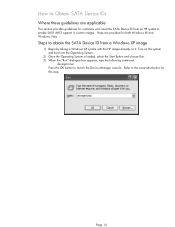
Refer to obtain the SATA Device ID from an HP system to launch the Device Manager console. Steps to the screenshot below for this step. Turn on it. Steps are applicable This section provides guidelines for customers who need the SATA Device ID from a Windows XP image 1) Begin by taking... a Windows XP system with the HP image already on the system and boot into the Operating...
Refer to obtain the SATA Device ID from an HP system to launch the Device Manager console. Steps to the screenshot below for this step. Turn on it. Steps are applicable This section provides guidelines for customers who need the SATA Device ID from a Windows XP image 1) Begin by taking... a Windows XP system with the HP image already on the system and boot into the Operating...
Installing SATA Drivers on HP EliteBook Notebook PCs
Page 17
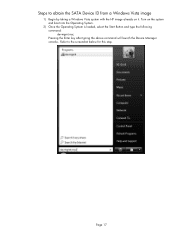
Steps to the screenshot below for this step. Refer to obtain the SATA Device ID from a Windows Vista image 1) Begin by taking a Windows Vista system with the HP image already on the system and boot into the Operating System. 2) Once the Operating System is loaded, select the Start Button and type the following command: devmgmt.msc Pressing the Enter key after typing the above command will launch the Device Manager console. Page 17 Turn on it.
Steps to the screenshot below for this step. Refer to obtain the SATA Device ID from a Windows Vista image 1) Begin by taking a Windows Vista system with the HP image already on the system and boot into the Operating System. 2) Once the Operating System is loaded, select the Start Button and type the following command: devmgmt.msc Pressing the Enter key after typing the above command will launch the Device Manager console. Page 17 Turn on it.
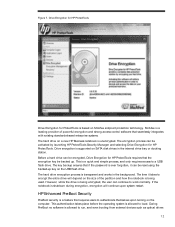
HP ProtectTools Security Software 2010
Page 12
...before the operating system is allowed to encrypt the entire drive will continue upon turning on a new HP Business notebook is being encrypted, the user can be activated by launching HP ProtectTools Security Manager and selecting Drive Encryption for ProtectTools is a quick and simple...even booting from external devices such as optical drives 12 Drive Encryption for HP ProtectTools Drive Encryption for HP ProtectTools. Before a hard drive can continue to authenticate themselves upon system restart. HP Enhanced Pre-Boot Security Pre-Boot security is ever forgotten, it takes to...
...before the operating system is allowed to encrypt the entire drive will continue upon turning on a new HP Business notebook is being encrypted, the user can be activated by launching HP ProtectTools Security Manager and selecting Drive Encryption for ProtectTools is a quick and simple...even booting from external devices such as optical drives 12 Drive Encryption for HP ProtectTools Drive Encryption for HP ProtectTools. Before a hard drive can continue to authenticate themselves upon system restart. HP Enhanced Pre-Boot Security Pre-Boot security is ever forgotten, it takes to...
RAID - Windows 7
Page 16
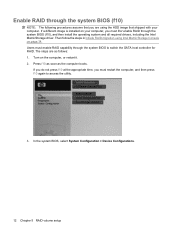
... RAID through the system BIOS (f10) NOTE: The following procedures assume that you must enable RAID capability through the system BIOS to access the utility. 3. Turn on page 14. The steps are using Intel Matrix Storage Console on the computer, or restart it. 2. Enable RAID through the system BIOS (f10), and...
... RAID through the system BIOS (f10) NOTE: The following procedures assume that you must enable RAID capability through the system BIOS to access the utility. 3. Turn on page 14. The steps are using Intel Matrix Storage Console on the computer, or restart it. 2. Enable RAID through the system BIOS (f10), and...

RAID - Windows 7
Page 17
... migration procedure. Select File > Save Changes and Exit. NOTE: The HDD image supplied with your operating system. Only turn the computer power off after exiting the f10 Setup screen. 6. CAUTION: Do NOT turn the computer off while the ROM is saving the f10 Computer Setup changes as the Complementary Metal Oxide Semiconductor...
... migration procedure. Select File > Save Changes and Exit. NOTE: The HDD image supplied with your operating system. Only turn the computer power off after exiting the f10 Setup screen. 6. CAUTION: Do NOT turn the computer off while the ROM is saving the f10 Computer Setup changes as the Complementary Metal Oxide Semiconductor...
Service Guide
Page 18
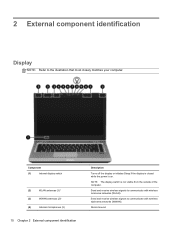
... to the illustration that most closely matches your computer. Component (1) Internal display switch (2) WLAN antennas (3)* (3) WWAN antennas (2)* (4) Internal microphones (2) 10 Chapter 2 External component identification Description Turns off the display or initiates Sleep if the display is closed while the power is not visible from the outside of the computer. Record sound...
... to the illustration that most closely matches your computer. Component (1) Internal display switch (2) WLAN antennas (3)* (3) WWAN antennas (2)* (4) Internal microphones (2) 10 Chapter 2 External component identification Description Turns off the display or initiates Sleep if the display is closed while the power is not visible from the outside of the computer. Record sound...

Service Guide
Page 19
... switch (2) WLAN antennas (2)* (3) WWAN antennas (2)* (select models only) (4) Internal microphone(s) (1 or 2 depending on model) (5) Webcam light (select models only) Description Turns off the display or initiates Sleep if the display is closed while the power is on the lighting conditions in your country or region. Record... light button Used to communicate with wireless local area networks (WLAN). To use the webcam, select Start > All Programs > HP > HP Webcam. (7) Ambient light sensor When activated, the sensor automatically adjusts the display brightness based on .
... switch (2) WLAN antennas (2)* (3) WWAN antennas (2)* (select models only) (4) Internal microphone(s) (1 or 2 depending on model) (5) Webcam light (select models only) Description Turns off the display or initiates Sleep if the display is closed while the power is on the lighting conditions in your country or region. Record... light button Used to communicate with wireless local area networks (WLAN). To use the webcam, select Start > All Programs > HP > HP Webcam. (7) Ambient light sensor When activated, the sensor automatically adjusts the display brightness based on .
Service Guide
Page 21
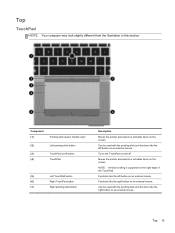
... and selects or activates items on and off. Can be used with the pointing stick and functions like the left button on an external mouse. Turns the TouchPad on the screen. Moves the pointer and selects or activates items on the right edge of the TouchPad. NOTE: Vertical scrolling is supported...
... and selects or activates items on and off. Can be used with the pointing stick and functions like the left button on an external mouse. Turns the TouchPad on the screen. Moves the pointer and selects or activates items on the right edge of the TouchPad. NOTE: Vertical scrolling is supported...

Service Guide
Page 24
Buttons and fingerprint reader NOTE: Refer to the illustration that most closely matches your computer. Component (1) TouchPad on/off button Description Turns the TouchPad on and off. 16 Chapter 2 External component identification
Buttons and fingerprint reader NOTE: Refer to the illustration that most closely matches your computer. Component (1) TouchPad on/off button Description Turns the TouchPad on and off. 16 Chapter 2 External component identification
Service Guide
Page 25
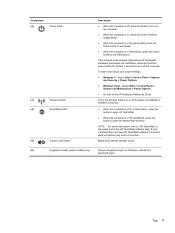
To learn more information, refer to "HP QuickWeb" in this guide and to the HP QuickWeb software Help. Turns the wireless feature on , press the button briefly to initiate Sleep. ● When the computer is in the Sleep state, press the button briefly to ... button (6) Fingerprint reader (select models only) Description ● When the computer is off, press the button to turn off or in Hibernation, press the button to open HP QuickWeb. ● When the computer is in HP QuickWeb, press the button to open the default Web browser. If your power settings: ● Windows 7-Select...
To learn more information, refer to "HP QuickWeb" in this guide and to the HP QuickWeb software Help. Turns the wireless feature on , press the button briefly to initiate Sleep. ● When the computer is in the Sleep state, press the button briefly to ... button (6) Fingerprint reader (select models only) Description ● When the computer is off, press the button to turn off or in Hibernation, press the button to open HP QuickWeb. ● When the computer is in HP QuickWeb, press the button to open the default Web browser. If your power settings: ● Windows 7-Select...
Service Guide
Page 65
... have magnetic fields, such as monitors or speakers. Before removing a diskette drive or optical drive, be sure that a diskette or disc is not in Hibernation, turn the computer on surfaces covered with extreme care to a drive, or loss of static electricity. After removing a hard drive, an optical drive, or a diskette drive...
... have magnetic fields, such as monitors or speakers. Before removing a diskette drive or optical drive, be sure that a diskette or disc is not in Hibernation, turn the computer on surfaces covered with extreme care to a drive, or loss of static electricity. After removing a hard drive, an optical drive, or a diskette drive...
Service Guide
Page 67
... avoid hand contact, transport products in static-safe tubes, bags, or boxes. ● Protect ESD-sensitive parts and assemblies with pins, leads, or circuitry. ● Turn off power and input signals before removing items from their containers. ● Always be properly grounded when touching a component or assembly. ● Store reusable ESD...
... avoid hand contact, transport products in static-safe tubes, bags, or boxes. ● Protect ESD-sensitive parts and assemblies with pins, leads, or circuitry. ● Turn off power and input signals before removing items from their containers. ● Always be properly grounded when touching a component or assembly. ● Store reusable ESD...
Service Guide
Page 71
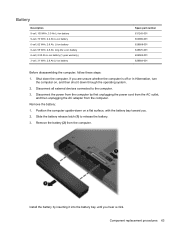
If you are unsure whether the computer is off or in Hibernation, turn the computer on a flat surface, with the battery bay toward you hear a click. Disconnect all external devices connected to release the battery. 3. Position the computer ...
If you are unsure whether the computer is off or in Hibernation, turn the computer on a flat surface, with the battery bay toward you hear a click. Disconnect all external devices connected to release the battery. 3. Position the computer ...
Service Guide
Page 72
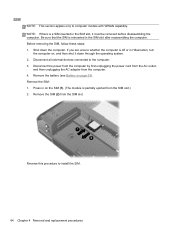
... is a SIM inserted in the SIM slot, it down the computer. Remove the SIM: 1. Press in on the SIM (1). (The module is reinserted in Hibernation, turn the computer on page 63). Shut down through the operating system. 2. Remove the SIM (2) from the computer. 4. Be sure that the SIM is partially ejected...
... is a SIM inserted in the SIM slot, it down the computer. Remove the SIM: 1. Press in on the SIM (1). (The module is reinserted in Hibernation, turn the computer on page 63). Shut down through the operating system. 2. Remove the SIM (2) from the computer. 4. Be sure that the SIM is partially ejected...
Service Guide
Page 73
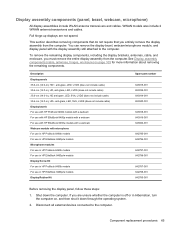
... panel with microphone For use in HP ProBook 6460b models For use in HP EliteBook 8460p/w models Microphone modules For use in HP ProBook 6460b models For use in HP EliteBook 8460p/w models Display Screw Kit For use in HP ProBook 6460b models For use in Hibernation, turn the computer on page 109 for ...) All display assemblies include WLAN antenna transceivers and cables. Full hinge-up displays are unsure whether the computer is off or in HP EliteBook 8460p/w models Display Rubber Kit Spare part number 643915-001 653039-001 643914-001 653040-001 643918-001 643919-001 643920-001 642795-001...
... panel with microphone For use in HP ProBook 6460b models For use in HP EliteBook 8460p/w models Microphone modules For use in HP ProBook 6460b models For use in HP EliteBook 8460p/w models Display Screw Kit For use in HP ProBook 6460b models For use in Hibernation, turn the computer on page 109 for ...) All display assemblies include WLAN antenna transceivers and cables. Full hinge-up displays are unsure whether the computer is off or in HP EliteBook 8460p/w models Display Rubber Kit Spare part number 643915-001 653039-001 643914-001 653040-001 643918-001 643919-001 643920-001 642795-001...
Service Guide
Page 77
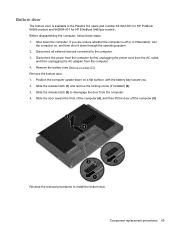
... the door toward you are unsure whether the computer is available in the Plastics Kit, spare part number 641832-001 for HP ProBook 6460b models and 642804-001 for HP EliteBook 8460p/w models. Bottom door The bottom door is off the computer (5). Disconnect the power from the computer by first unplugging the...(see Battery on a flat surface, with the battery bay toward the front of the computer (4), and then lift the door off or in Hibernation, turn the computer on, and then shut it down on page 63). If you . 2. Remove the bottom door: 1. Reverse the removal procedures to install...
... the door toward you are unsure whether the computer is available in the Plastics Kit, spare part number 641832-001 for HP ProBook 6460b models and 642804-001 for HP EliteBook 8460p/w models. Bottom door The bottom door is off the computer (5). Disconnect the power from the computer by first unplugging the...(see Battery on a flat surface, with the battery bay toward the front of the computer (4), and then lift the door off or in Hibernation, turn the computer on, and then shut it down on page 63). If you . 2. Remove the bottom door: 1. Reverse the removal procedures to install...

Service Guide
Page 78
... computer. 3. If you . 2. Disconnect the cable from the computer. 4. Smart card reader Description Smart card reader assembly for use in 8460p/w models Smart card reader assembly for use in Hibernation, turn the computer on, and then shut it down through the operating system. 2. Disconnect all external devices connected to install the smart...
... computer. 3. If you . 2. Disconnect the cable from the computer. 4. Smart card reader Description Smart card reader assembly for use in 8460p/w models Smart card reader assembly for use in Hibernation, turn the computer on, and then shut it down through the operating system. 2. Disconnect all external devices connected to install the smart...
Service Guide
Page 79
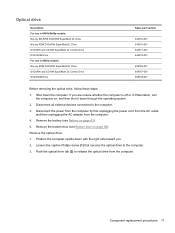
... computer upside-down the computer. Push the optical drive tab (2) to release the optical drive from the computer. 4. Optical drive Description For use in 6460b/8460p models: Blu-ray BD-R/RE DVD±RW SuperMulti DL Drive Blu-ray ROM DVD±RW SuperMulti DL Drive DVD±RW and CD...-RW SuperMulti DL Combo Drive DVD-ROM Drive For use in Hibernation, turn the computer on page 69). Disconnect all external devices connected to the computer. 3. Disconnect the power from the computer by first unplugging the power cord...
... computer upside-down the computer. Push the optical drive tab (2) to release the optical drive from the computer. 4. Optical drive Description For use in 6460b/8460p models: Blu-ray BD-R/RE DVD±RW SuperMulti DL Drive Blu-ray ROM DVD±RW SuperMulti DL Drive DVD±RW and CD...-RW SuperMulti DL Combo Drive DVD-ROM Drive For use in Hibernation, turn the computer on page 69). Disconnect all external devices connected to the computer. 3. Disconnect the power from the computer by first unplugging the power cord...
Service Guide
Page 81
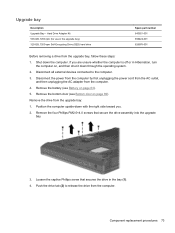
... from the AC outlet, and then unplugging the AC adapter from the computer. Hard Drive Adapter Kit 500-GB, 7200-rpm (for use in Hibernation, turn the computer on, and then shut it down the computer. If you . 2. Remove the bottom door (see Battery on page 69). Remove the four Phillips...
... from the AC outlet, and then unplugging the AC adapter from the computer. Hard Drive Adapter Kit 500-GB, 7200-rpm (for use in Hibernation, turn the computer on, and then shut it down the computer. If you . 2. Remove the bottom door (see Battery on page 69). Remove the four Phillips...
Service Guide
Page 83
... Before disassembling the computer, follow these steps: 1. Shut down , with the battery bay toward you are unsure whether the computer is off or in Hibernation, turn the computer on page 69). Remove the hard drive: 1. If necessary, lift the smart card reader out of the way. 3. Loosen the three captive Phillips...
... Before disassembling the computer, follow these steps: 1. Shut down , with the battery bay toward you are unsure whether the computer is off or in Hibernation, turn the computer on page 69). Remove the hard drive: 1. If necessary, lift the smart card reader out of the way. 3. Loosen the three captive Phillips...


