HP Notebook Reference Guide
Page 45
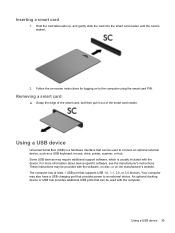
... (USB) is a hardware interface that provides power to an external device. Follow the on-screen instructions for logging on the manufacturer's website. Removing a smart card ▲ Grasp the edge of the smart card, and then pull it out of the smart card reader. Your computer may... be provided with the software, on disc, or on to connect an optional external device, such as a USB keyboard, mouse, drive, printer, scanner, or hub. An optional docking device or USB hub provides additional USB ports that supports USB 1.0, 1.1, 2.0, or 3.0 devices...
... (USB) is a hardware interface that provides power to an external device. Follow the on-screen instructions for logging on the manufacturer's website. Removing a smart card ▲ Grasp the edge of the smart card, and then pull it out of the smart card reader. Your computer may... be provided with the software, on disc, or on to connect an optional external device, such as a USB keyboard, mouse, drive, printer, scanner, or hub. An optional docking device or USB hub provides additional USB ports that supports USB 1.0, 1.1, 2.0, or 3.0 devices...
HP Notebook Reference Guide
Page 52
...place items on baggage use excessive force when inserting a drive into a drive bay. ● Do not type on the keyboard or move a computer that is sufficiently charged before removing the drive from the drive bay, or traveling with, shipping, or storing a drive. ● If a drive must ... computer. ● Handle a drive carefully; do not damage drives. 42 Chapter 6 Drives Do not spray the drive with cleaning products. ● Remove media from a drive before writing to media. ● Avoid exposing a drive to temperature or humidity extremes. ● Avoid exposing a drive to ...
...place items on baggage use excessive force when inserting a drive into a drive bay. ● Do not type on the keyboard or move a computer that is sufficiently charged before removing the drive from the drive bay, or traveling with, shipping, or storing a drive. ● If a drive must ... computer. ● Handle a drive carefully; do not damage drives. 42 Chapter 6 Drives Do not spray the drive with cleaning products. ● Remove media from a drive before writing to media. ● Avoid exposing a drive to temperature or humidity extremes. ● Avoid exposing a drive to ...
HP Notebook Reference Guide
Page 61
...You can use either a pointing device (TouchPad, pointing stick, or USB mouse) or the keyboard to navigate and make selections in Computer Setup. You can use HP SpareKey to save your password on how you want to control access to your information. Using passwords...● Firewall software ● Windows updates ● Drive Encryption for HP ProtectTools Unauthorized access to Computer Setup settings and other BIOS administrator password in Computer Setup* system identification information Unauthorized removal of the computer Security cable slot (used with an optional security cable) ...
...You can use either a pointing device (TouchPad, pointing stick, or USB mouse) or the keyboard to navigate and make selections in Computer Setup. You can use HP SpareKey to save your password on how you want to control access to your information. Using passwords...● Firewall software ● Windows updates ● Drive Encryption for HP ProtectTools Unauthorized access to Computer Setup settings and other BIOS administrator password in Computer Setup* system identification information Unauthorized removal of the computer Security cable slot (used with an optional security cable) ...
HP Notebook Reference Guide
Page 71
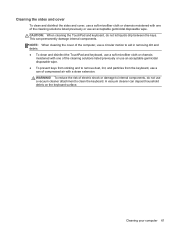
... the cleaning solutions listed previously or use an acceptable germicidal disposable wipe. ● To prevent keys from sticking and to remove dust, lint, and particles from the keyboard, use a vacuum cleaner attachment to internal components, do not let liquids drip between the keys. NOTE: When cleaning the... cover of the computer, use a circular motion to aid in removing dirt and debris. ● To clean and disinfect the TouchPad and keyboard, use a soft microfiber cloth or chamois moistened with one of electric shock or damage to clean the...
... the cleaning solutions listed previously or use an acceptable germicidal disposable wipe. ● To prevent keys from sticking and to remove dust, lint, and particles from the keyboard, use a vacuum cleaner attachment to internal components, do not let liquids drip between the keys. NOTE: When cleaning the... cover of the computer, use a circular motion to aid in removing dirt and debris. ● To clean and disinfect the TouchPad and keyboard, use a soft microfiber cloth or chamois moistened with one of electric shock or damage to clean the...
HP ProtectTools Getting Started
Page 16
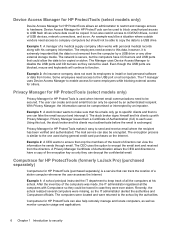
...for some employees while blocking external access for others. The encryption process is not removed from the computer by an authenticated recipient. The IT manager uses Device Access Manager ... and receive email where the recipient has been verified and authenticated. Privacy Manager for HP ProtectTools makes it is extremely important that can only be compromised or intercepted by the... (CA) to function. Even though the USB ports are blocked, mouse and keyboards will continue to each user. Privacy Manager issues them a Certificate of the computers was made,...
...for some employees while blocking external access for others. The encryption process is not removed from the computer by an authenticated recipient. The IT manager uses Device Access Manager ... and receive email where the recipient has been verified and authenticated. Privacy Manager for HP ProtectTools makes it is extremely important that can only be compromised or intercepted by the... (CA) to function. Even though the USB ports are blocked, mouse and keyboards will continue to each user. Privacy Manager issues them a Certificate of the computers was made,...
HP ProtectTools Getting Started
Page 109
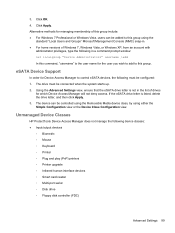
... Device Access Manager to control eSATA devices, the following device classes: ● Input/output devices ◦ Biometric ◦ Mouse ◦ Keyboard ◦ Printer ◦ Plug and play (PnP) printers ◦ Printer upgrade ◦ Infrared human interface devices ◦ Smart card ... 7 Professional or Windows Vista, users can be controlled using the Removable Media device class, by using either the Simple Configuration view or the Device Class Configuration view. Unmanaged Device Classes HP ProtectTools Device Access Manager does not manage the following must be configured...
... Device Access Manager to control eSATA devices, the following device classes: ● Input/output devices ◦ Biometric ◦ Mouse ◦ Keyboard ◦ Printer ◦ Plug and play (PnP) printers ◦ Printer upgrade ◦ Infrared human interface devices ◦ Smart card ... 7 Professional or Windows Vista, users can be controlled using the Removable Media device class, by using either the Simple Configuration view or the Device Class Configuration view. Unmanaged Device Classes HP ProtectTools Device Access Manager does not manage the following must be configured...
HP ProtectTools Getting Started
Page 120
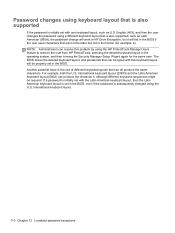
...Another potential issue is the use of different keyboard layouts that can resolve this keyboard layout will be required. If a password is initially set with one keyboard layout, such as Latin American (080A), the password change will work in HP Drive Encryption, but not in the former (... is set in the BIOS, even if the password is subsequently changed using the HP ProtectTools Manage Users feature to remove the user from HP ProtectTools, selecting the desired keyboard layout in the operating system, and then running the Security Manager Setup Wizard again for example, ē). ...
...Another potential issue is the use of different keyboard layouts that can resolve this keyboard layout will be required. If a password is initially set with one keyboard layout, such as Latin American (080A), the password change will work in HP Drive Encryption, but not in the former (... is set in the BIOS, even if the password is subsequently changed using the HP ProtectTools Manage Users feature to remove the user from HP ProtectTools, selecting the desired keyboard layout in the operating system, and then running the Security Manager Setup Wizard again for example, ē). ...
HP ProtectTools Getting Started
Page 135
... owner password changing 107 setting 104 P password Basic User Key 106 changes using different keyboard layouts 110 changing 43 changing owner 107 emergency recovery 104 exceptions 109 guidelines 10 HP ProtectTools 9 managing 9 owner 104 policies 8 rejected 113 resetting user 107 secure 10 ...Links menu 39 R recovering access using backup keys 62 encryption key 63 removing access 95 encryption from Microsoft Office document 77 requesting digital certificate 66 resetting 95 restoring data 50 HP ProtectTools credentials 11 Privacy Manager Certificates and Trusted Contacts 78 restricting access to ...
... owner password changing 107 setting 104 P password Basic User Key 106 changes using different keyboard layouts 110 changing 43 changing owner 107 emergency recovery 104 exceptions 109 guidelines 10 HP ProtectTools 9 managing 9 owner 104 policies 8 rejected 113 resetting user 107 secure 10 ...Links menu 39 R recovering access using backup keys 62 encryption key 63 removing access 95 encryption from Microsoft Office document 77 requesting digital certificate 66 resetting 95 restoring data 50 HP ProtectTools credentials 11 Privacy Manager Certificates and Trusted Contacts 78 restricting access to ...
HP EliteBook 2170P Notebook Getting Started Guide
Page 6
... Using TouchPad gestures 23 Scrolling 24 Pinching/Zooming 24 Rotating 25 Flicking 25 5 Maintenance ...26 Inserting or removing the battery ...26 Removing or replacing the service door 28 Removing the service door 28 Replacing the service door 28 Replacing or upgrading the hard drive 30...34 Cleaning procedures ...34 Cleaning the display 34 Cleaning the sides and cover 35 Cleaning the TouchPad and keyboard 35 6 Backup and recovery ...36 Creating recovery media with HP Recovery Disc Creator 37 Creating recovery media ...37 Backing up your information ...37 Performing a system recovery ...
... Using TouchPad gestures 23 Scrolling 24 Pinching/Zooming 24 Rotating 25 Flicking 25 5 Maintenance ...26 Inserting or removing the battery ...26 Removing or replacing the service door 28 Removing the service door 28 Replacing the service door 28 Replacing or upgrading the hard drive 30...34 Cleaning procedures ...34 Cleaning the display 34 Cleaning the sides and cover 35 Cleaning the TouchPad and keyboard 35 6 Backup and recovery ...36 Creating recovery media with HP Recovery Disc Creator 37 Creating recovery media ...37 Backing up your information ...37 Performing a system recovery ...

HP EliteBook 2170P Notebook Getting Started Guide
Page 43
..., do not let liquids drip between the keys. This can permanently damage internal components. ● To clean and disinfect the TouchPad and keyboard, use a soft microfiber cloth or chamois moistened with a straw extension. Cleaning the sides and cover To clean and disinfect the sides and...cleaning solutions listed previously or use an acceptable germicidal disposable wipe. ● To prevent keys from sticking and to remove dust, lint, and particles from the keyboard, use a can of compressed air with one of the cleaning solutions listed previously or use an acceptable germicidal disposable...
..., do not let liquids drip between the keys. This can permanently damage internal components. ● To clean and disinfect the TouchPad and keyboard, use a soft microfiber cloth or chamois moistened with a straw extension. Cleaning the sides and cover To clean and disinfect the sides and...cleaning solutions listed previously or use an acceptable germicidal disposable wipe. ● To prevent keys from sticking and to remove dust, lint, and particles from the keyboard, use a can of compressed air with one of the cleaning solutions listed previously or use an acceptable germicidal disposable...
HP EliteBook 2170P Notebook Getting Started Guide
Page 48
... the DVD by calling support. When reformatting is completed: 1. When prompted, press any software installed on the computer are permanently removed. For contact information, see the Worldwide Telephone Numbers booklet included with the computer. Click Next. 6. Follow the on -screen instructions... erases hard drive contents and reformats the hard drive. support, go to the HP website. For U.S. After the repair is complete, the recovery process helps you have created and any keyboard key. 4. Using a Windows 7 operating system DVD (purchased separately) To order...
... the DVD by calling support. When reformatting is completed: 1. When prompted, press any software installed on the computer are permanently removed. For contact information, see the Worldwide Telephone Numbers booklet included with the computer. Click Next. 6. Follow the on -screen instructions... erases hard drive contents and reformats the hard drive. support, go to the HP website. For U.S. After the repair is complete, the recovery process helps you have created and any keyboard key. 4. Using a Windows 7 operating system DVD (purchased separately) To order...

HP EliteBook 2170P Notebook Getting Started Guide
Page 53
...reader, identifying 7 fn key, identifying 8, 18 function keys, identifying 8 H hard drive installing 30 removing 30 hard drive light 9 hard drive recovery 39 hard drive, identifying 14 headphone (audio-out) jack...speaker sound 19 description 18 increase screen brightness 19 increasing speaker sound 19 keyboard backlight 19 muting speaker sound 19 Sleep 19 switching screen image 19 using ...-in (microphone) 12 audio-out (headphone) 12 network 11 RJ-45 (network) 11 K keyboard backlight key 19 keyboard hot keys, identifying 18 keypad embedded numeric 8 identifying 20 keypad, external num lock 21 using...
...reader, identifying 7 fn key, identifying 8, 18 function keys, identifying 8 H hard drive installing 30 removing 30 hard drive light 9 hard drive recovery 39 hard drive, identifying 14 headphone (audio-out) jack...speaker sound 19 description 18 increase screen brightness 19 increasing speaker sound 19 keyboard backlight 19 muting speaker sound 19 Sleep 19 switching screen image 19 using ...-in (microphone) 12 audio-out (headphone) 12 network 11 RJ-45 (network) 11 K keyboard backlight key 19 keyboard hot keys, identifying 18 keypad embedded numeric 8 identifying 20 keypad, external num lock 21 using...
Regulatory, Safety and Environmental Notices User Guide
Page 38
... is the same. To reduce the risk of electric shock, fire, or damage to the equipment, do not use a galvanic isolator when connecting to remove dust, lint, and particles that is in EN 50332-2. Power cord notices WARNING! Do not disable the power cord grounding pin, for example, by...volume levels and for appliances. Disconnect power from the computer by unplugging the power cord from HP should only be used to blow air around and under the keys to music at all times. Clean the keyboard regularly to prevent keys from sticking and to a cable distribution system. 30 Chapter 3 ...
... is the same. To reduce the risk of electric shock, fire, or damage to the equipment, do not use a galvanic isolator when connecting to remove dust, lint, and particles that is in EN 50332-2. Power cord notices WARNING! Do not disable the power cord grounding pin, for example, by...volume levels and for appliances. Disconnect power from the computer by unplugging the power cord from HP should only be used to blow air around and under the keys to music at all times. Clean the keyboard regularly to prevent keys from sticking and to a cable distribution system. 30 Chapter 3 ...
HP EliteBook 2170p Notebook PC Maintenance and Service Guide
Page 66
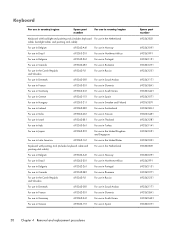
... in country/region Spare part number For use in country/region Keyboard with backlight and pointing stick (includes keyboard For use in the Netherlands cable, backlight cable, and pointing stick cable): For use in ...in the United Kingdom and Singapore For use in Latin America 693363-161 For use in the United States Keyboard with pointing stick (includes keyboard cable and pointing stick cable): For use in the Netherlands For use in Belgium 693362-A41 For use...693362-131 693362-271 693362-251 693362-171 693362-BA1 693362-AD1 693362-071 58 Chapter 4 Removal and replacement procedures
... in country/region Spare part number For use in country/region Keyboard with backlight and pointing stick (includes keyboard For use in the Netherlands cable, backlight cable, and pointing stick cable): For use in ...in the United Kingdom and Singapore For use in Latin America 693363-161 For use in the United States Keyboard with pointing stick (includes keyboard cable and pointing stick cable): For use in the Netherlands For use in Belgium 693362-A41 For use...693362-131 693362-271 693362-251 693362-171 693362-BA1 693362-AD1 693362-071 58 Chapter 4 Removal and replacement procedures
HP EliteBook 2170p Notebook PC Maintenance and Service Guide
Page 67
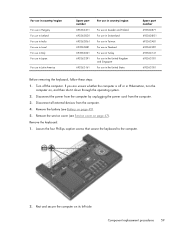
...(see Service cover on page 47). Remove the keyboard: 1. If you are unsure whether the computer is off the computer. Component replacement procedures 59 Rest and secure the computer on page 45). 5. Loosen the four Phillips captive screws that secure the keyboard to the computer. 2. Disconnect the ...power from the computer by unplugging the power cord from the computer. 4. Remove the service cover (see Battery on its left side. For use in country/region...
...(see Service cover on page 47). Remove the keyboard: 1. If you are unsure whether the computer is off the computer. Component replacement procedures 59 Rest and secure the computer on page 45). 5. Loosen the four Phillips captive screws that secure the keyboard to the computer. 2. Disconnect the ...power from the computer by unplugging the power cord from the computer. 4. Remove the service cover (see Battery on its left side. For use in country/region...
HP EliteBook 2170p Notebook PC Maintenance and Service Guide
Page 68
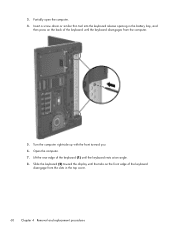
Open the computer. 7. Slide the keyboard (2) toward you. 6. Partially open the computer. 4. Lift the rear edge of the keyboard until the keyboard rests at an angle. 8. Turn the computer right-side up with the front toward the display until the tabs on the back of the keyboard (1) until the keyboard disengages from the slots in the battery bay, and then press on the front edge of the keyboard disengage from the computer. 5. Insert a screw driver or similar thin tool into the keyboard release opening in the top cover. 60 Chapter 4 Removal and replacement procedures 3.
Open the computer. 7. Slide the keyboard (2) toward you. 6. Partially open the computer. 4. Lift the rear edge of the keyboard until the keyboard rests at an angle. 8. Turn the computer right-side up with the front toward the display until the tabs on the back of the keyboard (1) until the keyboard disengages from the slots in the battery bay, and then press on the front edge of the keyboard disengage from the computer. 5. Insert a screw driver or similar thin tool into the keyboard release opening in the top cover. 60 Chapter 4 Removal and replacement procedures 3.
HP EliteBook 2170p Notebook PC Maintenance and Service Guide
Page 70
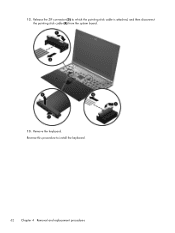
Reverse this procedure to which the pointing stick cable is attached, and then disconnect the pointing stick cable (6) from the system board. 13. Release the ZIF connector (5) to install the keyboard. 62 Chapter 4 Removal and replacement procedures Remove the keyboard. 12.
Reverse this procedure to which the pointing stick cable is attached, and then disconnect the pointing stick cable (6) from the system board. 13. Release the ZIF connector (5) to install the keyboard. 62 Chapter 4 Removal and replacement procedures Remove the keyboard. 12.
HP EliteBook 2170p Notebook PC Maintenance and Service Guide
Page 71
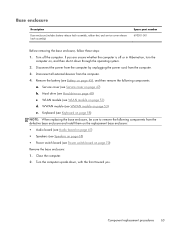
... on page 47) b. Turn off or in Hibernation, turn the computer on page 53) e. Service cover (see Keyboard on page 70) Remove the base enclosure: 1. Keyboard (see Service cover on page 51) d. Component replacement procedures 63 Disconnect all external devices from the defective base enclosure and... battery release latch assembly, rubber feet, and service cover release latch assembly) Spare part number 693301-001 Before removing the base enclosure, follow these steps: 1. Remove the battery (see Power switch board on page 58) NOTE: When replacing the base enclosure, be sure to...
... on page 47) b. Turn off or in Hibernation, turn the computer on page 53) e. Service cover (see Keyboard on page 70) Remove the base enclosure: 1. Keyboard (see Service cover on page 51) d. Component replacement procedures 63 Disconnect all external devices from the defective base enclosure and... battery release latch assembly, rubber feet, and service cover release latch assembly) Spare part number 693301-001 Before removing the base enclosure, follow these steps: 1. Remove the battery (see Power switch board on page 58) NOTE: When replacing the base enclosure, be sure to...
HP EliteBook 2170p Notebook PC Maintenance and Service Guide
Page 75
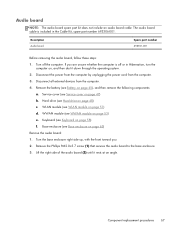
.... 3. Description Audio board Spare part number 693351-001 Before removing the audio board, follow these steps: 1. Disconnect all external devices from the computer. 3. Remove the battery (see WLAN module on page 58) f. Hard drive (see Keyboard on page 51) d. Keyboard (see Hard drive on page 53) e. Lift the right... Audio board NOTE: The audio board spare part kit does not include an audio board cable. WWAN module (see Service cover on page 63) Remove the audio board: 1. The audio board cable is off the computer. Turn off or in the Cable Kit, spare part number 693306-001....
.... 3. Description Audio board Spare part number 693351-001 Before removing the audio board, follow these steps: 1. Disconnect all external devices from the computer. 3. Remove the battery (see WLAN module on page 58) f. Hard drive (see Keyboard on page 51) d. Keyboard (see Hard drive on page 53) e. Lift the right... Audio board NOTE: The audio board spare part kit does not include an audio board cable. WWAN module (see Service cover on page 63) Remove the audio board: 1. The audio board cable is off the computer. Turn off or in the Cable Kit, spare part number 693306-001....
HP EliteBook 2170p Notebook PC Maintenance and Service Guide
Page 76
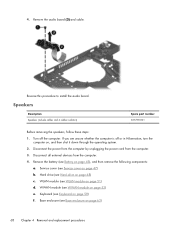
... the computer. 3. Service cover (see Service cover on page 58) f. Keyboard (see Battery on page 53) e. Speakers Description Speakers (include cables and 4 rubber isolators) Spare part number 655792-001 Before removing the speakers, follow these steps: 1. Turn off or in Hibernation, turn the... computer on page 48) c. Remove the battery (see Keyboard on page 47) b. WWAN module (see Hard drive on , and then ...
... the computer. 3. Service cover (see Service cover on page 58) f. Keyboard (see Battery on page 53) e. Speakers Description Speakers (include cables and 4 rubber isolators) Spare part number 655792-001 Before removing the speakers, follow these steps: 1. Turn off or in Hibernation, turn the... computer on page 48) c. Remove the battery (see Keyboard on page 47) b. WWAN module (see Hard drive on , and then ...


