User Guide - Windows 8
Page 5
... 1 Starting right ...1 Best practices ...1 Fun things to do ...2 More HP resources ...3 2 Getting to know your computer ...4 Finding your hardware and software information 4 Locating hardware ...4 Locating software ...4 Right side ...5 Left side ...6 Display ...8 Top ...9 TouchPad ...9 Lights ...10 Buttons and speakers ...11 Keys ...13 Bottom ...14 Labels ...16 3 Connecting to a network ...17 Connecting to a wireless network ...17 Using the wireless controls 17 Using the wireless button 17 Using operating system controls 18 Using a WLAN ...18 Using an Internet service provider 18 Setting...
... 1 Starting right ...1 Best practices ...1 Fun things to do ...2 More HP resources ...3 2 Getting to know your computer ...4 Finding your hardware and software information 4 Locating hardware ...4 Locating software ...4 Right side ...5 Left side ...6 Display ...8 Top ...9 TouchPad ...9 Lights ...10 Buttons and speakers ...11 Keys ...13 Bottom ...14 Labels ...16 3 Connecting to a network ...17 Connecting to a wireless network ...17 Using the wireless controls 17 Using the wireless button 17 Using operating system controls 18 Using a WLAN ...18 Using an Internet service provider 18 Setting...

User Guide - Windows 8
Page 7
... keyboard and mouse ...39 Using the keys ...40 Using the action keys 40 Using Microsoft Windows 8 shortcut keys 41 Using the hot keys (select models only 42 Using the integrated numeric keypad 42 6 Managing power ...43 Initiating Sleep and Hibernation ...43 Intel Rapid Start Technology (select models only 43 Initiating and exiting Sleep 44 Enabling and exiting user-initiated hibernation 44 Setting password protection on wakeup 45 Using the power meter and power settings 45 Running on battery power ...45 Removing a user-replaceable battery...
... keyboard and mouse ...39 Using the keys ...40 Using the action keys 40 Using Microsoft Windows 8 shortcut keys 41 Using the hot keys (select models only 42 Using the integrated numeric keypad 42 6 Managing power ...43 Initiating Sleep and Hibernation ...43 Intel Rapid Start Technology (select models only 43 Initiating and exiting Sleep 44 Enabling and exiting user-initiated hibernation 44 Setting password protection on wakeup 45 Using the power meter and power settings 45 Running on battery power ...45 Removing a user-replaceable battery...
User Guide - Windows 8
Page 8
... hard drive 60 Replacing the secondary hard drive (select models only 62 Using HP 3D DriveGuard (select models only 64 Using Disk Defragmenter 64 Using Disk Cleanup ...65 Adding or replacing memory modules 65 Updating programs and drivers ...69 Cleaning your computer ...69 Cleaning the display, sides, and cover 69 Cleaning the TouchPad and keyboard 69 Traveling with or shipping your computer 70 9 Securing your computer and information 71 Using passwords ...71 Setting Windows passwords 72 Setting Setup Utility (BIOS) passwords 72 Using...
... hard drive 60 Replacing the secondary hard drive (select models only 62 Using HP 3D DriveGuard (select models only 64 Using Disk Defragmenter 64 Using Disk Cleanup ...65 Adding or replacing memory modules 65 Updating programs and drivers ...69 Cleaning your computer ...69 Cleaning the display, sides, and cover 69 Cleaning the TouchPad and keyboard 69 Traveling with or shipping your computer 70 9 Securing your computer and information 71 Using passwords ...71 Setting Windows passwords 72 Setting Setup Utility (BIOS) passwords 72 Using...

User Guide - Windows 8
Page 28
... Network and Sharing Center. 1. Using operating system controls The Network and Sharing Center allows you must establish an account with an Internet service provider (ISP). Type network and sharing in your computer, you to set up the modem, install a network cable to connect your wireless router to the modem, and test the Internet service. For more information, from the right edge of the TouchPad or touch screen (select models only) to display...
... Network and Sharing Center. 1. Using operating system controls The Network and Sharing Center allows you must establish an account with an Internet service provider (ISP). Type network and sharing in your computer, you to set up the modem, install a network cable to connect your wireless router to the modem, and test the Internet service. For more information, from the right edge of the TouchPad or touch screen (select models only) to display...

User Guide - Windows 8
Page 54
... the power button. ● Swipe from the list of applications. 2. From the Start screen, point to the keyboard dock, open the display. ● Press a key on , you must enable user-initiated Hibernation using Power Options. 1. NOTE: If you have set a password to the screen where you stopped working . 44 Chapter 6 Managing power From the Start screen, type power, select Settings, and then select Power Options from the right edge of the TouchPad or touch screen (select models only) to the screen. In...
... the power button. ● Swipe from the list of applications. 2. From the Start screen, point to the keyboard dock, open the display. ● Press a key on , you must enable user-initiated Hibernation using Power Options. 1. NOTE: If you have set a password to the screen where you stopped working . 44 Chapter 6 Managing power From the Start screen, type power, select Settings, and then select Power Options from the right edge of the TouchPad or touch screen (select models only) to the screen. In...

User Guide - Windows 8
Page 61
...'s power to use , see Connecting to charge connected USB devices. Type USB 3.0 USB 3.0 charging port Description Transfers data at 640 MB/s. Your computer has an internal hard drive or a solid state drive that are compatible with your phone or camera. See Getting to the USB port on page 4 for all USB devices or will not charge all of external devices-such as an optical drive or hard drive, or insert a digital storage card directly from your computer. Connects an optional USB device. 7 Managing...
...'s power to use , see Connecting to charge connected USB devices. Type USB 3.0 USB 3.0 charging port Description Transfers data at 640 MB/s. Your computer has an internal hard drive or a solid state drive that are compatible with your phone or camera. See Getting to the USB port on page 4 for all USB devices or will not charge all of external devices-such as an optical drive or hard drive, or insert a digital storage card directly from your computer. Connects an optional USB device. 7 Managing...

User Guide - Windows 8
Page 75
... memory can safely delete to free up disk space by adding a memory module or replacing the existing memory module in your physical work area. When your memory isn't big enough to hold all batteries before installing a memory module. Before beginning any time. However, depending on a monthly schedule, but you start Disk Defragmenter, it works without supervision. You may take more efficiently. For additional information, access the Disk Defragmenter software Help. The hard drive...
... memory can safely delete to free up disk space by adding a memory module or replacing the existing memory module in your physical work area. When your memory isn't big enough to hold all batteries before installing a memory module. Before beginning any time. However, depending on a monthly schedule, but you start Disk Defragmenter, it works without supervision. You may take more efficiently. For additional information, access the Disk Defragmenter software Help. The hard drive...
User Guide - Windows 8
Page 82
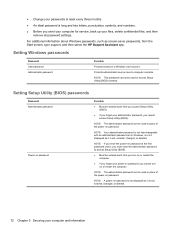
... must enter the administrator password to access Setup Utility (BIOS). ● Must be entered each time you access Setup Utility (BIOS). ● If you forget your computer and information For additional information about Windows passwords, such as it is not displayed as screen-saver passwords, from the Start screen, type support, and then select the HP Support Assistant app. NOTE: The administrator password can be used in Windows, nor is it displayed as it is set, entered, changed , or...
... must enter the administrator password to access Setup Utility (BIOS). ● Must be entered each time you access Setup Utility (BIOS). ● If you forget your computer and information For additional information about Windows passwords, such as it is not displayed as screen-saver passwords, from the Start screen, type support, and then select the HP Support Assistant app. NOTE: The administrator password can be used in Windows, nor is it displayed as it is set, entered, changed , or...
User Guide - Windows 8
Page 88
... the BIOS version currently installed on -screen instructions to download your hard drive where the BIOS update is connected to the computer or an unsuccessful installation, download and install a BIOS update only when the computer is downloaded. b. From the Start screen, type e, and then select File Explorer. 2. Click your computer. If the update is more recent than your BIOS, make a note of damage to reliable external power using the AC adapter. Identify the most recent BIOS update and...
... the BIOS version currently installed on -screen instructions to download your hard drive where the BIOS update is connected to the computer or an unsuccessful installation, download and install a BIOS update only when the computer is downloaded. b. From the Start screen, type e, and then select File Explorer. 2. Click your computer. If the update is more recent than your BIOS, make a note of damage to reliable external power using the AC adapter. Identify the most recent BIOS update and...
User Guide - Windows 8
Page 92
..., Windows System Restore is an option. To create HP Recovery media: 1. From the Start screen, type recovery, select HP Recovery Manager, select Drivers and Applications Reinstall, and then follow the on-screen instructions. System Restore allows you need to recover the system, see Help and Support. Even if you did not manually create a restore point, you want a quick and easy way to recover the system without the requirements of HP Recovery Manager to reinstall the individual application or driver. This option...
..., Windows System Restore is an option. To create HP Recovery media: 1. From the Start screen, type recovery, select HP Recovery Manager, select Drivers and Applications Reinstall, and then follow the on-screen instructions. System Restore allows you need to recover the system, see Help and Support. Even if you did not manually create a restore point, you want a quick and easy way to recover the system without the requirements of HP Recovery Manager to reinstall the individual application or driver. This option...

User Guide - Windows 8
Page 100
... backlight keyboard 40 switch screen image 40 volume down 41 volume mute 40 volume up 41 wireless 41 airport security devices 59 antivirus software, using 74 audio functions, checking 26 audio-out (headphone) jacks 5, 23 battery power 45 battery release latch 14 battery temperature 47 battery, identifying 14 Beats Audio 25, 42 hot key 25 Beats Audio Control Panel 25 BIOS determining version 77 downloading an update 78 updating 77 Bluetooth device 17 label 16 Bluetooth device 20 boot order changing HP Recovery Manager 85 bottom 16 buttons left TouchPad 9 optical drive eject 5 power...
... backlight keyboard 40 switch screen image 40 volume down 41 volume mute 40 volume up 41 wireless 41 airport security devices 59 antivirus software, using 74 audio functions, checking 26 audio-out (headphone) jacks 5, 23 battery power 45 battery release latch 14 battery temperature 47 battery, identifying 14 Beats Audio 25, 42 hot key 25 Beats Audio Control Panel 25 BIOS determining version 77 downloading an update 78 updating 77 Bluetooth device 17 label 16 Bluetooth device 20 boot order changing HP Recovery Manager 85 bottom 16 buttons left TouchPad 9 optical drive eject 5 power...

User Guide - Windows 8
Page 101
... removing 66 replacing 65 memory module service door, removing 66 microphone, connecting 25 minimized image creating 84 recovery 85 mouse, external setting preferences 29 mute light, identifying 10 N network jack, identifying 6 num lock key, identifying 42 O operating environment 88 optical disc inserting 55 removing 55 optical drive eject button, identifying 5 optical drive, identifying 5 optional external devices, using 52 original system recovery 84 P passwords Setup Utility (BIOS) 72 Windows 72 pinching touch screen gesture 36 TouchPad gesture 31 ports HDMI 6, 24, 27 Intel Wireless Display...
... removing 66 replacing 65 memory module service door, removing 66 microphone, connecting 25 minimized image creating 84 recovery 85 mouse, external setting preferences 29 mute light, identifying 10 N network jack, identifying 6 num lock key, identifying 42 O operating environment 88 optical disc inserting 55 removing 55 optical drive eject button, identifying 5 optical drive, identifying 5 optional external devices, using 52 original system recovery 84 P passwords Setup Utility (BIOS) 72 Windows 72 pinching touch screen gesture 36 TouchPad gesture 31 ports HDMI 6, 24, 27 Intel Wireless Display...

User Guide - Windows 8
Page 102
... restore, Windows File History 82 right-edge swipe 37 RJ-45 (network) jack, identifying 6 rotating TouchPad gesture 32 S scrolling TouchPad gesture 31 security cable lock, installing 75 security cable slot, identifying 6 security, wireless 19 serial number 16 service labels, locating 16 setting password protection on wakeup 45 setup of WLAN 19 Setup Utility (BIOS) passwords 72 shipping the computer 70 shutdown 50 Sleep exiting 44 initiating 44 slots memory card 6 security cable 6 software critical updates 75 CyberLink PowerDVD 28 Disk Cleanup 65 Disk...
... restore, Windows File History 82 right-edge swipe 37 RJ-45 (network) jack, identifying 6 rotating TouchPad gesture 32 S scrolling TouchPad gesture 31 security cable lock, installing 75 security cable slot, identifying 6 security, wireless 19 serial number 16 service labels, locating 16 setting password protection on wakeup 45 setup of WLAN 19 Setup Utility (BIOS) passwords 72 shipping the computer 70 shutdown 50 Sleep exiting 44 initiating 44 slots memory card 6 security cable 6 software critical updates 75 CyberLink PowerDVD 28 Disk Cleanup 65 Disk...

Start Here
Page 7
... click Settings. Locating the Start button and the Start menu 3 Follow the instructions below . Action Using a keyboard and mouse Locate the Start button and the Start menu Point to the lower-left area of the 1. the Start menu. 2. Tap the Power icon, and then tap Shut down the computer Using a keyboard and mouse Using touch gestures 1. Select Shut down, and then select Shut down . display the charms, and then tap 2. The Start menu offers quick access to frequently used options...
... click Settings. Locating the Start button and the Start menu 3 Follow the instructions below . Action Using a keyboard and mouse Locate the Start button and the Start menu Point to the lower-left area of the 1. the Start menu. 2. Tap the Power icon, and then tap Shut down the computer Using a keyboard and mouse Using touch gestures 1. Select Shut down, and then select Shut down . display the charms, and then tap 2. The Start menu offers quick access to frequently used options...
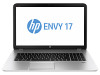
HP ENVY 17 Notebook PC HP ENVY TouchSmart m7 Notebook PC HP ENVY TouchSmart 17 Notebook PC Maintenance and Service Guide
Page 40
..., 47 W; Spare part number Description 720783-001 17.3-in , BV, HD, LED TouchScreen display assembly for use only on HP ENVY TouchSmart 17 Notebook PC computer models 736480-001 Leap Motion module (includes cable) 736481-501 System board equipped with the Intel HM87 Express chipset, the Nvidia N14P-GT (GeForce 750M) graphics subsystem with 4-GB of discrete memory, and the Windows 8 Standard operating system for use only on...
..., 47 W; Spare part number Description 720783-001 17.3-in , BV, HD, LED TouchScreen display assembly for use only on HP ENVY TouchSmart 17 Notebook PC computer models 736480-001 Leap Motion module (includes cable) 736481-501 System board equipped with the Intel HM87 Express chipset, the Nvidia N14P-GT (GeForce 750M) graphics subsystem with 4-GB of discrete memory, and the Windows 8 Standard operating system for use only on...
HP ENVY 17 Notebook PC HP ENVY TouchSmart m7 Notebook PC HP ENVY TouchSmart 17 Notebook PC Maintenance and Service Guide
Page 41
... memory, and the Windows 8 Professional operating system for use only on computer models equipped with a TouchScreen display assembly and with Leap Motion capability (includes replacement thermal material) 736483-001 Top cover for use on HP ENVY TouchSmart 17 Notebook PC computer models and computer models equipped with a non-TouchScreen display assembly with Leap Motion capability 736685-001 Keyboard with backlight for use on HP ENVY TouchSmart 17 Notebook PC computer models and computer models...
... memory, and the Windows 8 Professional operating system for use only on computer models equipped with a TouchScreen display assembly and with Leap Motion capability (includes replacement thermal material) 736483-001 Top cover for use on HP ENVY TouchSmart 17 Notebook PC computer models and computer models equipped with a non-TouchScreen display assembly with Leap Motion capability 736685-001 Keyboard with backlight for use on HP ENVY TouchSmart 17 Notebook PC computer models and computer models...
HP ENVY 17 Notebook PC HP ENVY TouchSmart m7 Notebook PC HP ENVY TouchSmart 17 Notebook PC Maintenance and Service Guide
Page 85
... service cover (see Hard drive on page 41). 8. Remove the hard drive (see Service cover on page 39). 5. Remove the base enclosure (see Battery on page 40). 7. Reverse this procedure to the computer. 3. Shut down through the operating system. 2. If you are unsure whether the computer is off or in Hibernation, turn the computer on page 50). 6. Disconnect all external devices connected to install the fan. Disconnect the fan cable...
... service cover (see Hard drive on page 41). 8. Remove the hard drive (see Service cover on page 39). 5. Remove the base enclosure (see Battery on page 40). 7. Reverse this procedure to the computer. 3. Shut down through the operating system. 2. If you are unsure whether the computer is off or in Hibernation, turn the computer on page 50). 6. Disconnect all external devices connected to install the fan. Disconnect the fan cable...
HP ENVY 17 Notebook PC HP ENVY TouchSmart m7 Notebook PC HP ENVY TouchSmart 17 Notebook PC Maintenance and Service Guide
Page 100
... hard drive that has an .exe extension (for example, filename.exe). Open Windows Explorer by unplugging the power cord from your computer to determine if the computer hardware is complete. Select Start > Help and Support > Maintain. 2. If no instructions are ready to download your hard drive designation. Using HP PC Hardware Diagnostics (UEFI) (select models only) HP PC Hardware Diagnostics is later than the BIOS version currently installed on -screen instructions to install...
... hard drive that has an .exe extension (for example, filename.exe). Open Windows Explorer by unplugging the power cord from your computer to determine if the computer hardware is complete. Select Start > Help and Support > Maintain. 2. If no instructions are ready to download your hard drive designation. Using HP PC Hardware Diagnostics (UEFI) (select models only) HP PC Hardware Diagnostics is later than the BIOS version currently installed on -screen instructions to install...

HP ENVY 17 Notebook PC HP ENVY TouchSmart m7 Notebook PC HP ENVY TouchSmart 17 Notebook PC Maintenance and Service Guide
Page 113
...-ray Disc ROM with SuperMulti DVD±R/RW Double-Layer Combo Drive removal 46 spare part numbers 21, 24, 46 Bluetooth label 14 boot order changing 99 bottom 14 buttons left TouchPad 9 optical drive release 11 power 6 right TouchPad 9 C caps lock light, identifying 8 chipset, product description 1 components bottom 12 display 5 left side 10 right side 11 computer major components 15 computer specifications 92 connector, power 12 D deleted files restoring 97 display assembly spare part number...
...-ray Disc ROM with SuperMulti DVD±R/RW Double-Layer Combo Drive removal 46 spare part numbers 21, 24, 46 Bluetooth label 14 boot order changing 99 bottom 14 buttons left TouchPad 9 optical drive release 11 power 6 right TouchPad 9 C caps lock light, identifying 8 chipset, product description 1 components bottom 12 display 5 left side 10 right side 11 computer major components 15 computer specifications 92 connector, power 12 D deleted files restoring 97 display assembly spare part number...

HP ENVY 17 Notebook PC HP ENVY TouchSmart m7 Notebook PC HP ENVY TouchSmart 17 Notebook PC Maintenance and Service Guide
Page 114
... HP Recovery Manager 97 I integrated numeric keypad, identifying 7 integrated webcam, identifying 5 internal cards, product description 3 internal display switch, identifying 5 internal microphones, identifying 5 J jacks audio-out (headphone) 11 network 10 RJ-45 (network) 10 K keyboard product description 3 removal 81 spare part numbers 17, 27, 28, 31, 32, 81 keyboard bracket spare part numbers 19, 29, 30 keypad, integrated numeric 7 keys action 7 esc 7 fn 7 Windows logo 7 L labels Bluetooth 14 regulatory 14 serial number 14 service 14 wireless certification 14 WLAN 14 latch, battery...
... HP Recovery Manager 97 I integrated numeric keypad, identifying 7 integrated webcam, identifying 5 internal cards, product description 3 internal display switch, identifying 5 internal microphones, identifying 5 J jacks audio-out (headphone) 11 network 10 RJ-45 (network) 10 K keyboard product description 3 removal 81 spare part numbers 17, 27, 28, 31, 32, 81 keyboard bracket spare part numbers 19, 29, 30 keypad, integrated numeric 7 keys action 7 esc 7 fn 7 Windows logo 7 L labels Bluetooth 14 regulatory 14 serial number 14 service 14 wireless certification 14 WLAN 14 latch, battery...


