User Guide
Page 5
...'s settings ...13 Changing your tablet's view 13 Adjusting your tablet's autorotate lock 13 Adjusting your tablet's screen brightness 13 3 Using the keyboard base ...14 Keyboard base components ...14 Top ...14 Lights ...16 Turning on the keyboard base ...17 Connecting the tablet to the keyboard base 18 Pairing the keyboard base ...19 Charging the keyboard base battery 20 Folding the keyboard base as a cover 20 Using the keyboard base keys ...20 Using the action keys ...21 Using Windows shortcut keys...
...'s settings ...13 Changing your tablet's view 13 Adjusting your tablet's autorotate lock 13 Adjusting your tablet's screen brightness 13 3 Using the keyboard base ...14 Keyboard base components ...14 Top ...14 Lights ...16 Turning on the keyboard base ...17 Connecting the tablet to the keyboard base 18 Pairing the keyboard base ...19 Charging the keyboard base battery 20 Folding the keyboard base as a cover 20 Using the keyboard base keys ...20 Using the action keys ...21 Using Windows shortcut keys...

User Guide
Page 8
...56 Installing HP and third-party software updates 56 Securing your wireless network ...57 Backing up your software applications and information 57 10 Using Setup Utility (BIOS) and HP PC Hardware Diagnostics (UEFI 58 Starting Setup Utility (BIOS) ...58 Updating the BIOS ...58 Determining the BIOS version 58 Downloading a BIOS update 59 Using HP PC Hardware Diagnostics (UEFI 60 Downloading HP PC Hardware Diagnostics (UEFI) to a USB device 60 11 Backing up, restoring, and recovering ...61 Creating recovery media and backups (select models only 61 Creating HP Recovery media (select models...
...56 Installing HP and third-party software updates 56 Securing your wireless network ...57 Backing up your software applications and information 57 10 Using Setup Utility (BIOS) and HP PC Hardware Diagnostics (UEFI 58 Starting Setup Utility (BIOS) ...58 Updating the BIOS ...58 Determining the BIOS version 58 Downloading a BIOS update 59 Using HP PC Hardware Diagnostics (UEFI 60 Downloading HP PC Hardware Diagnostics (UEFI) to a USB device 60 11 Backing up, restoring, and recovering ...61 Creating recovery media and backups (select models only 61 Creating HP Recovery media (select models...

User Guide
Page 27
... Type the PIN code and press Enter. The pairing light will be charged before using it for more information. Select Change PC Settings, select PC and device, select Bluetooth, and then select HP Wireless Bluetooth Backlight Keyboard. 6. IMPORTANT: Before you can pair your keyboard base, you can use your keyboard base through 6. TIP: If the pairing is completely charged. The battery light on page 18 for the first time. See Adjusting...
... Type the PIN code and press Enter. The pairing light will be charged before using it for more information. Select Change PC Settings, select PC and device, select Bluetooth, and then select HP Wireless Bluetooth Backlight Keyboard. 6. IMPORTANT: Before you can pair your keyboard base, you can use your keyboard base through 6. TIP: If the pairing is completely charged. The battery light on page 18 for the first time. See Adjusting...
User Guide
Page 28
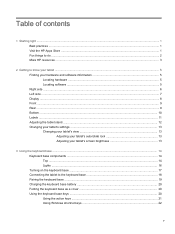
... keyboard base battery light is blinking amber, there is completely charged. Connect the keyboard base to AC power. 2. NOTE: Depending on the keyboard base allows you to type, select items, scroll and to protect the entire tablet display. Connect the tablet to the tablet. Using the keyboard base keys The keyboard base allows you to quickly return to the previous screen. TIP: The Windows key on the country or region, your keyboard...
... keyboard base battery light is blinking amber, there is completely charged. Connect the keyboard base to AC power. 2. NOTE: Depending on the keyboard base allows you to type, select items, scroll and to protect the entire tablet display. Connect the tablet to the tablet. Using the keyboard base keys The keyboard base allows you to quickly return to the previous screen. TIP: The Windows key on the country or region, your keyboard...
User Guide
Page 29
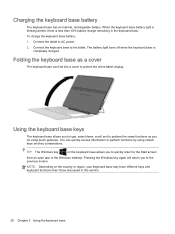
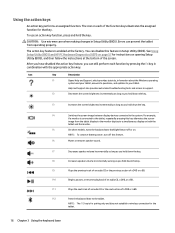
... Setup Utility (BIOS). For example, if a monitor is enabled at the bottom of an audio CD, a DVD, or a BD. f4 Switches the screen image between display devices connected to support. f8 Increases speaker volume incrementally as long as you hold down the key. Using the keyboard base keys 21 The icon on page 58 for that key. f6 Mutes or restores speaker sound. To use an action key function, press and hold down the key...
... Setup Utility (BIOS). For example, if a monitor is enabled at the bottom of an audio CD, a DVD, or a BD. f4 Switches the screen image between display devices connected to support. f8 Increases speaker volume incrementally as long as you hold down the key. Using the keyboard base keys 21 The icon on page 58 for that key. f6 Mutes or restores speaker sound. To use an action key function, press and hold down the key...

User Guide
Page 31
... Control Panel. 2. From the Start screen, type control panel, and then select Control Panel. - or - This chapter will help , and then select Help and Support. - Connecting to a wireless network 23 But even at the far right of the taskbar. 4 Connecting to a network Your tablet can travel with you wherever you can control the wireless devices in corporate offices, your tablet communicates with a wireless router or a wireless access point. ● Bluetooth device-Creates a personal area network...
... Control Panel. 2. From the Start screen, type control panel, and then select Control Panel. - or - This chapter will help , and then select Help and Support. - Connecting to a wireless network 23 But even at the far right of the taskbar. 4 Connecting to a network Your tablet can travel with you wherever you can control the wireless devices in corporate offices, your tablet communicates with a wireless router or a wireless access point. ● Bluetooth device-Creates a personal area network...
User Guide
Page 54
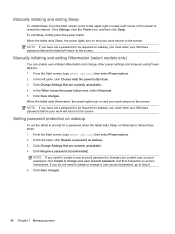
... the Start screen, type power options, then select Power options. 2. To exit Sleep, briefly press the power button. Manually initiating and exiting Hibernation (select models only) You can enable user-initiated Hibernation and change your Windows password before the tablet will return to the screen. In the When I press the power button area, select Hibernate. 5. NOTE: If you have set a password to be required on -screen instructions. NOTE: If you need to create or change a user account password, go...
... the Start screen, type power options, then select Power options. 2. To exit Sleep, briefly press the power button. Manually initiating and exiting Hibernation (select models only) You can enable user-initiated Hibernation and change your Windows password before the tablet will return to the screen. In the When I press the power button area, select Hibernate. 5. NOTE: If you have set a password to be required on -screen instructions. NOTE: If you need to create or change a user account password, go...
User Guide
Page 55
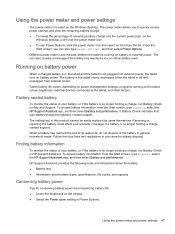
... from the Start screen, type support, select the HP Support Assistant app, and then select Battery and performance. To access battery information, from external power. Using the power meter and power settings The power meter is located on the tablet, screen brightness, external devices connected to quickly access power settings and view the remaining battery charge. ● To reveal the percentage of remaining battery charge and the current power plan, on the display. ● Select the Power saver setting in Power Options. Different power meter icons indicate whether...
... from the Start screen, type support, select the HP Support Assistant app, and then select Battery and performance. To access battery information, from external power. Using the power meter and power settings The power meter is located on the tablet, screen brightness, external devices connected to quickly access power settings and view the remaining battery charge. ● To reveal the percentage of remaining battery charge and the current power plan, on the display. ● Select the Power saver setting in Power Options. Different power meter icons indicate whether...
User Guide
Page 62
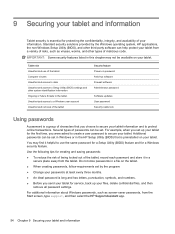
... confidential files, and then remove all password settings. Do not store passwords in a file on the tablet. ● When creating passwords, follow requirements set in Windows or in a secure place away from the Start screen, type support, and then select the HP Support Assistant app. 54 Chapter 9 Securing your tablet and information Additional passwords can be set by the Windows operating system, HP applications, the non-Windows Setup Utility (BIOS), and other system...
... confidential files, and then remove all password settings. Do not store passwords in a file on the tablet. ● When creating passwords, follow requirements set in Windows or in a secure place away from the Start screen, type support, and then select the HP Support Assistant app. 54 Chapter 9 Securing your tablet and information Additional passwords can be set by the Windows operating system, HP applications, the non-Windows Setup Utility (BIOS), and other system...

User Guide
Page 63
..., quickly press the Windows button on or restart the tablet. Your changes take effect when the tablet restarts. NOTE: The administrator password can be preinstalled on -screen instructions. NOTE: The administrator password can be entered each time you turn on or restart the tablet. ● If you forget your power-on password, you cannot access Setup Utility (BIOS). Using Internet security software When you use your tablet to access email, a network, or...
..., quickly press the Windows button on or restart the tablet. Your changes take effect when the tablet restarts. NOTE: The administrator password can be preinstalled on -screen instructions. NOTE: The administrator password can be entered each time you turn on or restart the tablet. ● If you forget your power-on password, you cannot access Setup Utility (BIOS). Using Internet security software When you use your tablet to access email, a network, or...

User Guide
Page 64
... can disable programs, utilities, or the operating system, or cause them , and in most viruses, destroy them to function abnormally. You can also register to receive automatic update notifications when they have caused. For more information about computer viruses, from the Start screen, type control panel, and then select Control Panel. There are two types of user-defined security criteria. Installing HP and third-party software updates HP recommends...
... can disable programs, utilities, or the operating system, or cause them , and in most viruses, destroy them to function abnormally. You can also register to receive automatic update notifications when they have caused. For more information about computer viruses, from the Start screen, type control panel, and then select Control Panel. There are two types of user-defined security criteria. Installing HP and third-party software updates HP recommends...

User Guide
Page 67
... Disk (C:). 3. Do not insert, remove, connect, or disconnect any software updates, especially system BIOS updates. Click your selection to the hard drive. The hard drive designation is connected to install the update. Using the hard drive path you are ready to reliable external power using the AC adapter. Complete the installation by unplugging the power cord from your BIOS, make a note of the path to the location on -screen instructions to download your hard drive designation. During the download and installation, follow these instructions...
... Disk (C:). 3. Do not insert, remove, connect, or disconnect any software updates, especially system BIOS updates. Click your selection to the hard drive. The hard drive designation is connected to install the update. Using the hard drive path you are ready to reliable external power using the AC adapter. Complete the installation by unplugging the power cord from your BIOS, make a note of the path to the location on -screen instructions to download your hard drive designation. During the download and installation, follow these instructions...
User Guide
Page 71
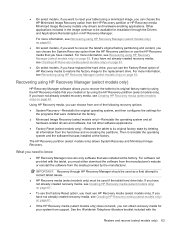
... Recovery installs only drivers and hardware-enabling applications. For more information, see Recovering using HP Recovery Manager (select models only) on page 63. If you have replaced the hard drive, you can use the Factory Reset option of the following recovery options: ● System Recovery-Reinstalls the original operating system, and then configures the settings for the programs that you have created. For more information, see Recovering using HP Recovery Manager (select models only) on page 61. ● If the HP Recovery media (select models...
... Recovery installs only drivers and hardware-enabling applications. For more information, see Recovering using HP Recovery Manager (select models only) on page 63. If you have replaced the hard drive, you can use the Factory Reset option of the following recovery options: ● System Recovery-Reinstalls the original operating system, and then configures the settings for the programs that you have created. For more information, see Recovering using HP Recovery Manager (select models only) on page 61. ● If the HP Recovery media (select models...
User Guide
Page 75
... downloading an update 59 updating 58 Bluetooth device 24 Bluetooth label 11 boot order changing 64 bottom 11 brightness adjusting 13 buttons left TouchPad button 15 power 9 right TouchPad button 15 volume 7 Windows 8 C caps lock light, identifying 16 caring for your tablet 51 cleaning your tablet 51 components bottom 10 display 8 keyboard base 14 left side 7 right side 6 connecting to a WLAN 24 connector, power 6 corporate WLAN connection 24 critical battery level 48 critical security updates, installing 56 D deleted files, restoring 62 Disk Cleanup software...
... downloading an update 59 updating 58 Bluetooth device 24 Bluetooth label 11 boot order changing 64 bottom 11 brightness adjusting 13 buttons left TouchPad button 15 power 9 right TouchPad button 15 volume 7 Windows 8 C caps lock light, identifying 16 caring for your tablet 51 cleaning your tablet 51 components bottom 10 display 8 keyboard base 14 left side 7 right side 6 connecting to a WLAN 24 connector, power 6 corporate WLAN connection 24 critical battery level 48 critical security updates, installing 56 D deleted files, restoring 62 Disk Cleanup software...
User Guide
Page 76
..., 64 HP Recovery Manager 63 media 64 starting 64 supported discs 61 system 63 USB flash drive 64 using HP Recovery media 62 recovery media creating 61 creating using HP Recovery Manager 62 regulatory information regulatory label 11 wireless certification labels 11 right TouchPad button, identifying 15 right-edge swipe 36, 41 S scrolling TouchPad gesture 33 serial number 11 serial number, tablet 11 service labels locating 11 setting password protection on wakeup 46 settings autorotate lock 13 brightness 13 changing 13 landscape view 13 portrait view 13 tablet orientation 13 Setup Utility (BIOS...
..., 64 HP Recovery Manager 63 media 64 starting 64 supported discs 61 system 63 USB flash drive 64 using HP Recovery media 62 recovery media creating 61 creating using HP Recovery Manager 62 regulatory information regulatory label 11 wireless certification labels 11 right TouchPad button, identifying 15 right-edge swipe 36, 41 S scrolling TouchPad gesture 33 serial number 11 serial number, tablet 11 service labels locating 11 setting password protection on wakeup 46 settings autorotate lock 13 brightness 13 changing 13 landscape view 13 portrait view 13 tablet orientation 13 Setup Utility (BIOS...
HP ENVY x2 Detachable PC Maintenance and Service Guide
Page 26
... you hold down the key. NOTE: To conserve battery power, turn off or on opening Setup Utility (BIOS), and then follow the instructions at the factory. f6 Mutes or restores speaker sound. f12 Pairs the keyboard base to support. To use an action key function, press and hold down the key. CAUTION: Use extreme care when making changes in combination with the appropriate action key. f4 Switches the screen image between display devices connected to your tablet...
... you hold down the key. NOTE: To conserve battery power, turn off or on opening Setup Utility (BIOS), and then follow the instructions at the factory. f6 Mutes or restores speaker sound. f12 Pairs the keyboard base to support. To use an action key function, press and hold down the key. CAUTION: Use extreme care when making changes in combination with the appropriate action key. f4 Switches the screen image between display devices connected to your tablet...

HP ENVY x2 Detachable PC Maintenance and Service Guide
Page 68
... hard drive. The BIOS installation begins. 5. Follow the on -screen instructions. 4. If the update is more recent than your tablet to a network, consult the network administrator before installing any software updates, especially system BIOS updates. You will need this path when you connect your BIOS, make a note of the date, name, or other identifier. From the Start screen, type file, and then select File Explorer. 2. Click your hard drive. 58 Chapter 7 Using Setup Utility (BIOS) and HP PC Hardware...
... hard drive. The BIOS installation begins. 5. Follow the on -screen instructions. 4. If the update is more recent than your tablet to a network, consult the network administrator before installing any software updates, especially system BIOS updates. You will need this path when you connect your BIOS, make a note of the date, name, or other identifier. From the Start screen, type file, and then select File Explorer. 2. Click your hard drive. 58 Chapter 7 Using Setup Utility (BIOS) and HP PC Hardware...

HP ENVY x2 Detachable PC Maintenance and Service Guide
Page 75
.... Restore and recover (select models only) 65 Using HP Recovery media, you need to correct tablet issues. ● HP Recovery media (select models only) must either download the software from the manufacturer's website or reinstall the software from the HP website. If you created or by using HP Recovery Manager (select models only) on page 63. ● To use the Factory Reset option, you must use the HP Recovery media that you have replaced the hard drive, you must be used if the tablet hard drive...
.... Restore and recover (select models only) 65 Using HP Recovery media, you need to correct tablet issues. ● HP Recovery media (select models only) must either download the software from the manufacturer's website or reinstall the software from the HP website. If you created or by using HP Recovery Manager (select models only) on page 63. ● To use the Factory Reset option, you must use the HP Recovery media that you have replaced the hard drive, you must be used if the tablet hard drive...

HP ENVY x2 Detachable PC Maintenance and Service Guide
Page 80
...-in (microphone) jack 5 audio/SD board removing 34 spare part number 18, 21, 34 B backups 63 battery, keyboard dock removal 35 spare part number 35 battery, tablet spare part number 18, 20 BIOS determining version 57 downloading an update 58 updating 57 Bluetooth card spare part number 41 Bluetooth label 10 boot order changing 66 bottom 10 buttons left TouchPad button 12 power 7 right TouchPad button 12 volume 5 Windows 6 docking port, identifying 7 drives preventing damage 24 E electrostatic discharge 24 esc key, identifying 11 external media cards, product description 2 C cables, service...
...-in (microphone) jack 5 audio/SD board removing 34 spare part number 18, 21, 34 B backups 63 battery, keyboard dock removal 35 spare part number 35 battery, tablet spare part number 18, 20 BIOS determining version 57 downloading an update 58 updating 57 Bluetooth card spare part number 41 Bluetooth label 10 boot order changing 66 bottom 10 buttons left TouchPad button 12 power 7 right TouchPad button 12 volume 5 Windows 6 docking port, identifying 7 drives preventing damage 24 E electrostatic discharge 24 esc key, identifying 11 external media cards, product description 2 C cables, service...

HP ENVY x2 Detachable PC Maintenance and Service Guide
Page 81
...1 product description audio 1 display panel 1 external media cards 2 graphics 1 hard drives 1 internal card 2 keyboard 2 memory module 1 microphone 1 operating system 2 pointing device 2 ports 2 power requirements 2 processors 1 product name 1 sensor 1 serviceability 3 video 1 wireless 2 product name 1 product name and number, tablet 10 R rear cover removal 29 spare part number 18, 20, 29 recess cover spare part number 18, 22, 29 recover options 64 recovery discs 63, 66 HP Recovery Manager 65 media 66 starting 66 supported discs 63 system 65 USB flash drive 66 using HP Recovery media 64 Index...
...1 product description audio 1 display panel 1 external media cards 2 graphics 1 hard drives 1 internal card 2 keyboard 2 memory module 1 microphone 1 operating system 2 pointing device 2 ports 2 power requirements 2 processors 1 product name 1 sensor 1 serviceability 3 video 1 wireless 2 product name 1 product name and number, tablet 10 R rear cover removal 29 spare part number 18, 20, 29 recess cover spare part number 18, 22, 29 recover options 64 recovery discs 63, 66 HP Recovery Manager 65 media 66 starting 66 supported discs 63 system 65 USB flash drive 66 using HP Recovery media 64 Index...


