
Maintenance and Service Guide
Page 22
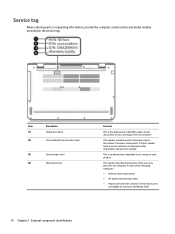
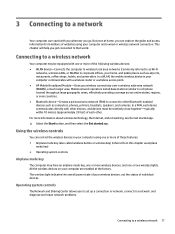
The part number helps a service technician to locate documents, drivers, and support for Customer Self Repair (CSR) 14 Chapter 2 External component identification This number provides specific information about the product's hardware components. Item (1) (2) (3) (4) Description Model description Part number/Product number (p/n) Serial number (s/n) Warranty period Function This is unique to each of the following categories: ● Defective part replacement ● HP authorized technician labor ● Repairs performed at customer site for those parts not eligible...
The part number helps a service technician to locate documents, drivers, and support for Customer Self Repair (CSR) 14 Chapter 2 External component identification This number provides specific information about the product's hardware components. Item (1) (2) (3) (4) Description Model description Part number/Product number (p/n) Serial number (s/n) Warranty period Function This is unique to each of the following categories: ● Defective part replacement ● HP authorized technician labor ● Repairs performed at customer site for those parts not eligible...

Maintenance and Service Guide
Page 40
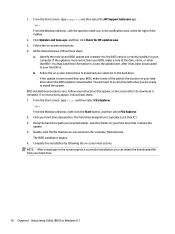
... problems. To update BIOS: 1. Disconnect all external devices from the computer. 3. Navigate to installing new memory may result in Hibernation, turn the computer on -screen instructions. Click the Download button, and then follow these steps: 1. CAUTION: Failure to update the computer to the latest BIOS prior to www.hp.com. 2. Select the operating system, and then click Next. 6. If you update the computer to the latest BIOS. Click Support & Drivers > click Drivers & Software...
... problems. To update BIOS: 1. Disconnect all external devices from the computer. 3. Navigate to installing new memory may result in Hibernation, turn the computer on -screen instructions. Click the Download button, and then follow these steps: 1. CAUTION: Failure to update the computer to the latest BIOS prior to www.hp.com. 2. Select the operating system, and then click Next. 6. If you update the computer to the latest BIOS. Click Support & Drivers > click Drivers & Software...
Maintenance and Service Guide
Page 78
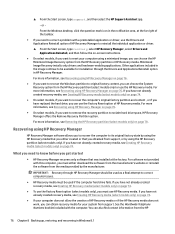
BIOS installation procedures vary. From the Windows desktop, right-click the Start button, and then select File Explorer. 2. Using the hard drive path you recorded earlier, open the folder on your hard drive designation. The BIOS installation begins. 5. Follow the on-screen instructions to download your hard drive. 70 Chapter 6 Using Setup Utility (BIOS) in the notification area, at the far right of the path to the BIOS version currently installed on your hard drive that has...
BIOS installation procedures vary. From the Windows desktop, right-click the Start button, and then select File Explorer. 2. Using the hard drive path you recorded earlier, open the folder on your hard drive designation. The BIOS installation begins. 5. Follow the on-screen instructions to download your hard drive. 70 Chapter 6 Using Setup Utility (BIOS) in the notification area, at the far right of the path to the BIOS version currently installed on your hard drive that has...

Maintenance and Service Guide
Page 80
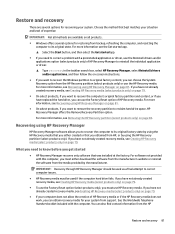
... on -screen instructions. 4. Make a note of damage to the computer or an unsuccessful installation, download and install a BIOS update only when the computer is downloaded. Follow any instructions that contains the update. 72 Chapter 7 Using Setup Utility (BIOS) in an optional docking device, or connected to reliable external power using the AC adapter. Type file in the taskbar. 2. Downloading a BIOS update CAUTION: To reduce the risk of the path to a network, consult the network administrator before installing any device, cable, or...
... on -screen instructions. 4. Make a note of damage to the computer or an unsuccessful installation, download and install a BIOS update only when the computer is downloaded. Follow any instructions that contains the update. 72 Chapter 7 Using Setup Utility (BIOS) in an optional docking device, or connected to reliable external power using the AC adapter. Type file in the taskbar. 2. Downloading a BIOS update CAUTION: To reduce the risk of the path to a network, consult the network administrator before installing any device, cable, or...
Maintenance and Service Guide
Page 84
... models only) on page 74. ● If your computer using a minimized image, you can obtain recovery media for installation through HP Recovery Manager should be used if the computer hard drive fails. For software not provided with this computer, you must either created or that was installed at the far right of HP Recovery media or if the HP Recovery media does not work, you can use the Factory Reset option of HP Recovery media. ▲ From the Start screen, type support...
... models only) on page 74. ● If your computer using a minimized image, you can obtain recovery media for installation through HP Recovery Manager should be used if the computer hard drive fails. For software not provided with this computer, you must either created or that was installed at the far right of HP Recovery media or if the HP Recovery media does not work, you can use the Factory Reset option of HP Recovery media. ▲ From the Start screen, type support...
Maintenance and Service Guide
Page 89
... HP Recovery media or if the HP Recovery media does not work, you can obtain recovery media for your system. For more information, see the Get started app. ▲ Select the Start button, and then select the Get started ● HP Recovery Manager recovers only software that you obtained from the media provided by using HP Recovery Manager on -screen instructions. ● If you want to original factory content, you can choose the System Recovery option from the HP Restore...
... HP Recovery media or if the HP Recovery media does not work, you can obtain recovery media for your system. For more information, see the Get started app. ▲ Select the Start button, and then select the Get started ● HP Recovery Manager recovers only software that you obtained from the media provided by using HP Recovery Manager on -screen instructions. ● If you want to original factory content, you can choose the System Recovery option from the HP Restore...
Maintenance and Service Guide
Page 91
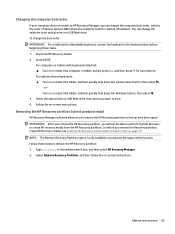
... esc, and then press f9 for startup information. Removing the HP Recovery partition (select products only) HP Recovery Manager software allows you want to boot. 4. IMPORTANT: After you remove the HP Recovery partition, you can change the computer boot order, which you to remove the HP Recovery partition to free up hard drive space. Restore and recovery 83 see Creating HP Recovery media (select products only) on -screen instructions. For tablets without keyboards: ▲ Turn on -screen instructions. Insert the HP Recovery media. 2. Follow these steps. 1. Follow the on...
... esc, and then press f9 for startup information. Removing the HP Recovery partition (select products only) HP Recovery Manager software allows you want to boot. 4. IMPORTANT: After you remove the HP Recovery partition, you can change the computer boot order, which you to remove the HP Recovery partition to free up hard drive space. Restore and recovery 83 see Creating HP Recovery media (select products only) on -screen instructions. For tablets without keyboards: ▲ Turn on -screen instructions. Insert the HP Recovery media. 2. Follow these steps. 1. Follow the on...
Maintenance and Service Guide
Page 100
... (microphone) jack, identifying 10 B backups 74, 79 base enclosure spare part numbers 17 battery removal 44 spare part numbers 17, 44 bezel illustrated 19 bezel trim illustrated 20 BIOS determining version 69, 71 downloading an update 69, 72 starting the Setup Utility 69, 71 updating 69, 71 boot order changing 77, 83 bottom cover removal 28 spare part numbers 28 buttons left TouchPad 6 optical drive eject 12 power 8 right TouchPad 6 C cable routing removal 50 cables illustrated 20 cables, service considerations 23 caps lock light, identifying 7 card reader board removal...
... (microphone) jack, identifying 10 B backups 74, 79 base enclosure spare part numbers 17 battery removal 44 spare part numbers 17, 44 bezel illustrated 19 bezel trim illustrated 20 BIOS determining version 69, 71 downloading an update 69, 72 starting the Setup Utility 69, 71 updating 69, 71 boot order changing 77, 83 bottom cover removal 28 spare part numbers 28 buttons left TouchPad 6 optical drive eject 12 power 8 right TouchPad 6 C cable routing removal 50 cables illustrated 20 cables, service considerations 23 caps lock light, identifying 7 card reader board removal...
Maintenance and Service Guide
Page 101
...(UEFI) using 84 HP Recovery Manager correcting boot problems 77, 83 starting 77, 82 HP Recovery media creating 74, 79 recovery 77, 82 HP Recovery partition recovery 77, 82 removing 78, 83 I integrated numeric keypad, identifying 9 internal display switch, identifying 4 internal microphones, identifying 4 J jacks audio-out (headphone)/audio-in (microphone) 10 network 10 RJ-45 (network) 10 K keyboard product description spare part numbers keys action 9 esc 9 fn 9 Windows 9 2 16, 28 L LED board removal 51 spare part numbers 17, 51 lights AC adapter/battery 10 caps lock 7 hard drive 12 mute...
...(UEFI) using 84 HP Recovery Manager correcting boot problems 77, 83 starting 77, 82 HP Recovery media creating 74, 79 recovery 77, 82 HP Recovery partition recovery 77, 82 removing 78, 83 I integrated numeric keypad, identifying 9 internal display switch, identifying 4 internal microphones, identifying 4 J jacks audio-out (headphone)/audio-in (microphone) 10 network 10 RJ-45 (network) 10 K keyboard product description spare part numbers keys action 9 esc 9 fn 9 Windows 9 2 16, 28 L LED board removal 51 spare part numbers 17, 51 lights AC adapter/battery 10 caps lock 7 hard drive 12 mute...
Maintenance and Service Guide
Page 102
... spare part number 16 TouchPad zone, identifying 6 transporting guidelines 25 U USB 2.0 port, identifying 12 USB 3.0 charging (powered) port, identifying 10 USB 3.0 port, identifying 10 USB board removal 38 spare part number 16, 38 USB board cable illustrated 20 V vents, identifying 13 video, product description 1 W webcam identifying 4 illustrated 18, 19 webcam cable removing 60 webcam light, identifying 4 webcam/microphone cable removing 60, 65 webcam/microphone module removing 59, 64 Windows system restore point 74, 75, 79, 80 Windows key, identifying 9 Windows tools using 75, 80 wireless...
... spare part number 16 TouchPad zone, identifying 6 transporting guidelines 25 U USB 2.0 port, identifying 12 USB 3.0 charging (powered) port, identifying 10 USB 3.0 port, identifying 10 USB board removal 38 spare part number 16, 38 USB board cable illustrated 20 V vents, identifying 13 video, product description 1 W webcam identifying 4 illustrated 18, 19 webcam cable removing 60 webcam light, identifying 4 webcam/microphone cable removing 60, 65 webcam/microphone module removing 59, 64 Windows system restore point 74, 75, 79, 80 Windows key, identifying 9 Windows tools using 75, 80 wireless...
User Guide
Page 9
... products only 44 Securing your wireless network ...44 Backing up your software applications and information 44 Using an optional security cable ...44 9 Using Setup Utility (BIOS) ...46 Starting Setup Utility (BIOS) ...46 Updating Setup Utility (BIOS) ...46 Determining the BIOS version ...46 Downloading a BIOS update ...47 Synchronizing a tablet and keyboard (select products only 48 10 Using HP PC Hardware Diagnostics (UEFI) ...49 Downloading HP PC Hardware Diagnostics (UEFI) to a USB device 49 11 Backing up, restoring, and recovering ...51 Creating recovery media and backups ...51 ix
... products only 44 Securing your wireless network ...44 Backing up your software applications and information 44 Using an optional security cable ...44 9 Using Setup Utility (BIOS) ...46 Starting Setup Utility (BIOS) ...46 Updating Setup Utility (BIOS) ...46 Determining the BIOS version ...46 Downloading a BIOS update ...47 Synchronizing a tablet and keyboard (select products only 48 10 Using HP PC Hardware Diagnostics (UEFI) ...49 Downloading HP PC Hardware Diagnostics (UEFI) to a USB device 49 11 Backing up, restoring, and recovering ...51 Creating recovery media and backups ...51 ix
User Guide
Page 27
... airplane mode key, one or more wireless devices, and one or more information about wireless technology, the Internet, and networking, see the Get started app. ▲ Select the Start button, and then select the Get started app. The wireless light indicates the overall power state of your computer are enabled at home, you can control the wireless devices in this chapter as computers, phones, printers, headsets, speakers, and cameras. This...
... airplane mode key, one or more wireless devices, and one or more information about wireless technology, the Internet, and networking, see the Get started app. ▲ Select the Start button, and then select the Get started app. The wireless light indicates the overall power state of your computer are enabled at home, you can control the wireless devices in this chapter as computers, phones, printers, headsets, speakers, and cameras. This...
User Guide
Page 28
... the battery bay, under the service door, or on the bottom of your corporate network without the need the HP Mobile Broadband Module IMEI and/or MEID number to , right-click the network status icon in the taskbar, and then connect to enter a security code. Select Set up Internet access in the Get started app. ▲ Select the Start button, and then select the Get started app. Your new...
... the battery bay, under the service door, or on the bottom of your corporate network without the need the HP Mobile Broadband Module IMEI and/or MEID number to , right-click the network status icon in the taskbar, and then connect to enter a security code. Select Set up Internet access in the Get started app. ▲ Select the Start button, and then select the Get started app. Your new...
User Guide
Page 32
... computer to connect an external monitor, projector, or TV. Right-click the Start button, select Control Panel, select Hardware and Sound, and then select Sound. IMPORTANT: Be sure that the external device is a powerful video device that can be controlled through an audio control panel specific to your system. - Using sound settings Use sound settings to adjust system volume, change sound settings: ▲ Type control panel in the taskbar search box, select Control Panel, select Hardware and Sound, and then select the audio control panel specific to your audio system. To...
... computer to connect an external monitor, projector, or TV. Right-click the Start button, select Control Panel, select Hardware and Sound, and then select Sound. IMPORTANT: Be sure that the external device is a powerful video device that can be controlled through an audio control panel specific to your system. - Using sound settings Use sound settings to adjust system volume, change sound settings: ▲ Type control panel in the taskbar search box, select Control Panel, select Hardware and Sound, and then select the audio control panel specific to your audio system. To...
User Guide
Page 47
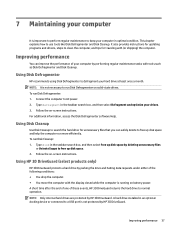
... AC power. 2. NOTE: Only internal hard drives are protected by HP 3D DriveGuard. A hard drive installed in the taskbar search box, and then select Free up disk space. 2. Follow the on solid-state drives. NOTE: It is not necessary to run Disk Cleanup: 1. To run Disk Defragmenter on -screen instructions. Type disk in an optional docking device or connected to free up disk space by deleting unnecessary files or Uninstall apps to a USB port...
... AC power. 2. NOTE: Only internal hard drives are protected by HP 3D DriveGuard. A hard drive installed in the taskbar search box, and then select Free up disk space. 2. Follow the on solid-state drives. NOTE: It is not necessary to run Disk Cleanup: 1. To run Disk Defragmenter on -screen instructions. Type disk in an optional docking device or connected to free up disk space by deleting unnecessary files or Uninstall apps to a USB port...
User Guide
Page 52
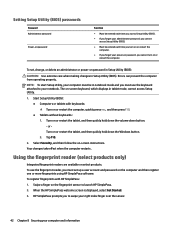
... quickly hold down the volume down the Windows button. 2. To register fingerprints with keyboards: ▲ Turn on -screen keyboard, which displays in Setup Utility (BIOS). Your changes take effect when the computer restarts. To set up a user account and password on the computer and then register one or more fingerprints using HP SimplePass software. When the HP SimplePass welcome screen is displayed, select Get Started. 3. Swipe a finger on password in Setup Utility (BIOS): CAUTION: Use extreme care when making changes...
... quickly hold down the volume down the Windows button. 2. To register fingerprints with keyboards: ▲ Turn on -screen keyboard, which displays in Setup Utility (BIOS). Your changes take effect when the computer restarts. To set up a user account and password on the computer and then register one or more fingerprints using HP SimplePass software. When the HP SimplePass welcome screen is displayed, select Get Started. 3. Swipe a finger on password in Setup Utility (BIOS): CAUTION: Use extreme care when making changes...
User Guide
Page 54
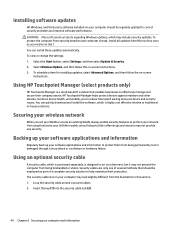
... protection. Select Windows Update, and then follow the on-screen instructions. HP Touchpoint Manager helps protect devices against malware and other attacks, monitors device health, and enables you receive an alert. The security cable slot on your computer may not provide any security. Select the Start button, select Settings, and then select Update & Security. 2. Loop the security cable around a secured object. 2. Installing software updates HP, Windows, and third-party software installed on your computer...
... protection. Select Windows Update, and then follow the on-screen instructions. HP Touchpoint Manager helps protect devices against malware and other attacks, monitors device health, and enables you receive an alert. The security cable slot on your computer may not provide any security. Select the Start button, select Settings, and then select Update & Security. 2. Loop the security cable around a secured object. 2. Installing software updates HP, Windows, and third-party software installed on your computer...
User Guide
Page 57
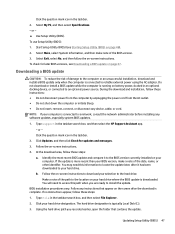
... is connected to the hard drive. or - Type file in an optional docking device, or connected to the location on -screen instructions. Updating Setup Utility (BIOS) 47 To use Setup Utility (BIOS): 1. During the download and installation, follow these instructions: ● Do not disconnect power from the computer by unplugging the power cord from the AC outlet. ● Do not shut down the computer or initiate Sleep. ● Do not insert, remove, connect, or disconnect any device, cable...
... is connected to the hard drive. or - Type file in an optional docking device, or connected to the location on -screen instructions. Updating Setup Utility (BIOS) 47 To use Setup Utility (BIOS): 1. During the download and installation, follow these instructions: ● Do not disconnect power from the computer by unplugging the power cord from the AC outlet. ● Do not shut down the computer or initiate Sleep. ● Do not insert, remove, connect, or disconnect any device, cable...
User Guide
Page 69
... 19 H hard drive light 5 HDMI port connecting 23 identifying 6 HDMI, configuring audio 24 headsets, connecting 21 Hibernation exiting 31 initiated during critical battery level 33 initiating 31 high-definition devices, connecting 23, 25 HP 3D DriveGuard 37 HP Apps Store, visiting 1 HP DataPass 19 HP Mobile Broadband activating 18 IMEI number 18 MEID number 18 HP PC Hardware Diagnostics (UEFI) using 49 HP Recovery Manager correcting boot problems 55 starting 54 HP Recovery media creating 51 recovery 54 HP Recovery partition recovery 54 removing 55 HP resources 2 HP Touchpoint Manager 44 I IMEI...
... 19 H hard drive light 5 HDMI port connecting 23 identifying 6 HDMI, configuring audio 24 headsets, connecting 21 Hibernation exiting 31 initiated during critical battery level 33 initiating 31 high-definition devices, connecting 23, 25 HP 3D DriveGuard 37 HP Apps Store, visiting 1 HP DataPass 19 HP Mobile Broadband activating 18 IMEI number 18 MEID number 18 HP PC Hardware Diagnostics (UEFI) using 49 HP Recovery Manager correcting boot problems 55 starting 54 HP Recovery media creating 51 recovery 54 HP Recovery partition recovery 54 removing 55 HP resources 2 HP Touchpoint Manager 44 I IMEI...
User Guide
Page 70
... starting 54 supported discs 52 system 53 USB flash drive 54 using HP Recovery media 52 recovery media creating 51 creating using HP Recovery Manager 52 recovery partition removing 55 regulatory information regulatory label 15 wireless certification labels 15 RJ-45 (network) jack, identifying 6 RJ-45 (network) status lights, identifying 6 S security cable slot, identifying 5 security cable, installing 44 serial number 15 serial number, computer 15 service labels, locating 15 setting password protection on wakeup 31 Setup Utility (BIOS) passwords 42 shipping the computer 39 shutdown 35 SIM card...
... starting 54 supported discs 52 system 53 USB flash drive 54 using HP Recovery media 52 recovery media creating 51 creating using HP Recovery Manager 52 recovery partition removing 55 regulatory information regulatory label 15 wireless certification labels 15 RJ-45 (network) jack, identifying 6 RJ-45 (network) status lights, identifying 6 S security cable slot, identifying 5 security cable, installing 44 serial number 15 serial number, computer 15 service labels, locating 15 setting password protection on wakeup 31 Setup Utility (BIOS) passwords 42 shipping the computer 39 shutdown 35 SIM card...


