User Guide
Page 4
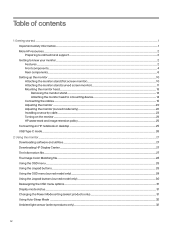
...10 Attaching the monitor stand (flat screen monitor)...10 Attaching the monitor stand (curved screen monitor)...11 Mounting the monitor head...13 Removing the monitor stand...13 Attaching the monitor head to a mounting device...14 Connecting the cables ...15 Adjusting the monitor ...20 Adjusting the monitor (curved model only)...22 Installing a security cable...23 Turning on the monitor...24 HP watermark and image retention policy...25 Connecting an HP notebook or desktop ...25 USB Type-C mode...26 2 Using the monitor...27 Downloading software and utilities...27 Downloading HP Display Center...
...10 Attaching the monitor stand (flat screen monitor)...10 Attaching the monitor stand (curved screen monitor)...11 Mounting the monitor head...13 Removing the monitor stand...13 Attaching the monitor head to a mounting device...14 Connecting the cables ...15 Adjusting the monitor ...20 Adjusting the monitor (curved model only)...22 Installing a security cable...23 Turning on the monitor...24 HP watermark and image retention policy...25 Connecting an HP notebook or desktop ...25 USB Type-C mode...26 2 Using the monitor...27 Downloading software and utilities...27 Downloading HP Display Center...
User Guide
Page 5
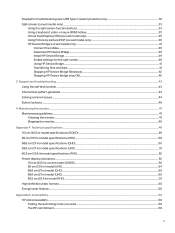
... Virtual Dual Display (VDD) (curved model only)...35 Using Picture-by-picture (PbP) (curved model only)...36 HP Device Bridge (curved model only)...37 Connect the cables...38 Download HP Device Bridge ...38 Install HP Device Bridge ...39 Enable settings for the split screen ...40 Using HP Device Bridge...41 Transferring files and data...41 Stopping HP Device Bridge (Windows)...42 Stopping HP Device Bridge (macOS)...42 3 Support and troubleshooting...43 Using the self...
... Virtual Dual Display (VDD) (curved model only)...35 Using Picture-by-picture (PbP) (curved model only)...36 HP Device Bridge (curved model only)...37 Connect the cables...38 Download HP Device Bridge ...38 Install HP Device Bridge ...39 Enable settings for the split screen ...40 Using HP Device Bridge...41 Transferring files and data...41 Stopping HP Device Bridge (Windows)...42 Stopping HP Device Bridge (macOS)...42 3 Support and troubleshooting...43 Using the self...

User Guide
Page 7
... must be present. Consider placing the monitor in a controlled luminous environment to be specifically labeled as a power strip or uninterruptible power supply (UPS). For your product on power cords or cables. Use a power strip whose manufacturer offers a damage replacement policy so that might cause disturbing reflections from surrounding light and bright surfaces that you use another cord, use only a power source and connection appropriate for entertainment purposes. Stability hazard: The...
... must be present. Consider placing the monitor in a controlled luminous environment to be specifically labeled as a power strip or uninterruptible power supply (UPS). For your product on power cords or cables. Use a power strip whose manufacturer offers a damage replacement policy so that might cause disturbing reflections from surrounding light and bright surfaces that you use another cord, use only a power source and connection appropriate for entertainment purposes. Stability hazard: The...

User Guide
Page 8
...; Monitor model number ● Monitor serial number ● Purchase date on invoice ● Conditions under which the problem occurred ● Error messages received ● Hardware configuration ● Name and version of monitor setup and features HP support For HP support or to resolve a hardware or software problem, go to http://www.hp.com/support, and follow the instructions to find your components, where they are using Support and troubleshooting on the model, your monitor...
...; Monitor model number ● Monitor serial number ● Purchase date on invoice ● Conditions under which the problem occurred ● Error messages received ● Hardware configuration ● Name and version of monitor setup and features HP support For HP support or to resolve a hardware or software problem, go to http://www.hp.com/support, and follow the instructions to find your components, where they are using Support and troubleshooting on the model, your monitor...
User Guide
Page 9
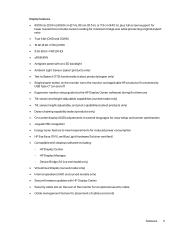
... firmware updates with HP Display Center ● Security cable slot on and off ● Ergonomic monitor setup guide (via the HP Display Center software) during first time use ● Tilt, swivel, and height-adjustable capabilities (curved model only) ● Tilt, swivel, height-adjustable, and pivot capabilities (select products only) ● Daisy-chaining capability (select products only) ● On-screen display (OSD) adjustments in ), plus full-screen support for lower resolutions; includes custom scaling for maximum image size while...
... firmware updates with HP Display Center ● Security cable slot on and off ● Ergonomic monitor setup guide (via the HP Display Center software) during first time use ● Tilt, swivel, and height-adjustable capabilities (curved model only) ● Tilt, swivel, height-adjustable, and pivot capabilities (select products only) ● Daisy-chaining capability (select products only) ● On-screen display (OSD) adjustments in ), plus full-screen support for lower resolutions; includes custom scaling for maximum image size while...

User Guide
Page 10
... your power setting. 4 Chapter 1 Getting started Front components To identify the components on /off . NOTE: Refer to a swing arm mount NOTE: For safety and regulatory information, see Legislation and regulations on your product, and then click Manuals. To access the latest user guide, go to http://www.hp.com/support, follow the instructions to the USB Type-C port, pressing the power button on the display turns...
... your power setting. 4 Chapter 1 Getting started Front components To identify the components on /off . NOTE: Refer to a swing arm mount NOTE: For safety and regulatory information, see Legislation and regulations on your product, and then click Manuals. To access the latest user guide, go to http://www.hp.com/support, follow the instructions to the USB Type-C port, pressing the power button on the display turns...

User Guide
Page 11
NOTE: When applicable HP products are connected to sleep based on your power setting. (3) Power LED Indicates that the monitor is powered on. Table 1-2 Front components and their descriptions (UHD models) Component Description (1) Ambient light sensor Adjusts the display brightness according to lighting conditions in the environment. (2) Power button Turns the monitor on or off your notebook, or puts it to the USB Type-C port, pressing the power button on the display turns on/off . Front components...
NOTE: When applicable HP products are connected to sleep based on your power setting. (3) Power LED Indicates that the monitor is powered on. Table 1-2 Front components and their descriptions (UHD models) Component Description (1) Ambient light sensor Adjusts the display brightness according to lighting conditions in the environment. (2) Power button Turns the monitor on or off your notebook, or puts it to the USB Type-C port, pressing the power button on the display turns on/off . Front components...

User Guide
Page 12
... to lighting conditions in the environment. (2) Power button Turns the monitor on the monitor. 6 Chapter 1 Getting started Power delivery outputs are connected to the USB Type-C port, pressing the power button on the display turns on/off . Connecting a USB Type-C cable from a source device to this port on the monitor enables USB ports on or off your notebook, or puts it to sleep based on your power setting. (3) Power LED Indicates that best matches your monitor. It can function as a DisplayPort audio/video input...
... to lighting conditions in the environment. (2) Power button Turns the monitor on the monitor. 6 Chapter 1 Getting started Power delivery outputs are connected to the USB Type-C port, pressing the power button on the display turns on/off . Connecting a USB Type-C cable from a source device to this port on the monitor enables USB ports on or off your notebook, or puts it to sleep based on your power setting. (3) Power LED Indicates that best matches your monitor. It can function as a DisplayPort audio/video input...
User Guide
Page 15
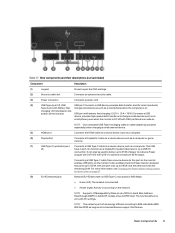
... 5 V/9 V/12 V/15 V/20 V to open the OSD settings. (2) Security cable slot Connects an optional security cable. (3) Power connector Connects a power cord. (4) USB Type-A port (1), USB USB port: Connects a USB device, provides data transfer, and (for select products) Type-A port with OSD performance mode on page 31. (8) RJ-45 (network) jack Network (RJ-45) data rate via USB Type-C max speed is 1000 Mbps ● Green (left): The network is connected. ● Amber (right): Activity is...
... 5 V/9 V/12 V/15 V/20 V to open the OSD settings. (2) Security cable slot Connects an optional security cable. (3) Power connector Connects a power cord. (4) USB Type-A port (1), USB USB port: Connects a USB device, provides data transfer, and (for select products) Type-A port with OSD performance mode on page 31. (8) RJ-45 (network) jack Network (RJ-45) data rate via USB Type-C max speed is 1000 Mbps ● Green (left): The network is connected. ● Amber (right): Activity is...
User Guide
Page 16
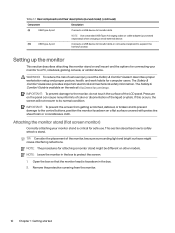
... cable or cable adapter (purchased separately) when charging a small external device. (10) USB Type-A port Connects a USB device to transfer data, or connects a keyboard to protect the screen. 1. It describes proper workstation setup and proper posture, health, and work habits for connecting your monitor stand is facedown in the box to support the hot-key function. Setting up the monitor This section describes attaching the monitor stand or wall mount and...
... cable or cable adapter (purchased separately) when charging a small external device. (10) USB Type-A port Connects a USB device to transfer data, or connects a keyboard to protect the screen. 1. It describes proper workstation setup and proper posture, health, and work habits for connecting your monitor stand is facedown in the box to support the hot-key function. Setting up the monitor This section describes attaching the monitor stand or wall mount and...

User Guide
Page 31
...; default setting is idle. The monitor automatically scans the signal inputs for an active input and uses that could look like stains or watermarks on monitors that the network cable is connected from the network source jack to turn off the monitor when it is not in use screen savers. Static images can choose which provides ultrawide viewing angles and advanced image quality. The USB Type-C port provides network, data, video...
...; default setting is idle. The monitor automatically scans the signal inputs for an active input and uses that could look like stains or watermarks on monitors that the network cable is connected from the network source jack to turn off the monitor when it is not in use screen savers. Static images can choose which provides ultrawide viewing angles and advanced image quality. The USB Type-C port provides network, data, video...

User Guide
Page 34
... to monitor screen. Selects the video input signal (DisplayPort, HDMI, USB-C video). Opens the Information menu. These files are used in conjunction with the International Color Consortium (ICC) Profile Format specification. Exits the OSD menu screen. To access and make adjustments in the OSD main menu. If the monitor is English). The following table lists possible menu selections in the OSD, use the Joypad on the monitor. 2. It includes descriptions for using a button or a controller Main menu Description Brightness + Color Image Input Power Menu Management...
... to monitor screen. Selects the video input signal (DisplayPort, HDMI, USB-C video). Opens the Information menu. These files are used in conjunction with the International Color Consortium (ICC) Profile Format specification. Exits the OSD menu screen. To access and make adjustments in the OSD main menu. If the monitor is English). The following table lists possible menu selections in the OSD, use the Joypad on the monitor. 2. It includes descriptions for using a button or a controller Main menu Description Brightness + Color Image Input Power Menu Management...

User Guide
Page 36
Information Opens the Information menu. Switches the monitor's input source to the factory default settings. Input Selects the video input signal (DisplayPort, HDMI, USB-C video). Management Adjusts the DDC/CI settings, and returns all except one of the menu options, see Reassigning the OSD menu options on and off Power Adjusts the power settings. Image Adjusts the screen image. Using the Joypad buttons (curved model only) The menu options offer useful actions, and you can customize all OSD menu settings to the next active input. For information about changing the...
Information Opens the Information menu. Switches the monitor's input source to the factory default settings. Input Selects the video input signal (DisplayPort, HDMI, USB-C video). Management Adjusts the DDC/CI settings, and returns all except one of the menu options, see Reassigning the OSD menu options on and off Power Adjusts the power settings. Image Adjusts the screen image. Using the Joypad buttons (curved model only) The menu options offer useful actions, and you can customize all OSD menu settings to the next active input. For information about changing the...

User Guide
Page 42
... input, the screen is set to Auto-Switch USB Host by using the display manager software for PbP is attached, the monitor automatically switches input to switch the video input. Using Picture-by-picture (PbP) (curved model only) The monitor supports Picture-by-picture (PbP), where one of the PbP screen. ● The USB Type-C upstream (host) connection is positioned adjacent to Automatic. To switch from the default, see the Assign Inputs menu located under Split Screen. ● The priority in the OSD menu...
... input, the screen is set to Auto-Switch USB Host by using the display manager software for PbP is attached, the monitor automatically switches input to switch the video input. Using Picture-by-picture (PbP) (curved model only) The monitor supports Picture-by-picture (PbP), where one of the PbP screen. ● The USB Type-C upstream (host) connection is positioned adjacent to Automatic. To switch from the default, see the Assign Inputs menu located under Split Screen. ● The priority in the OSD menu...

User Guide
Page 45
Install HP Device Bridge Use these procedures to HP Customer Support - Windows 1. Enter your product, and then download and install Device Bridge 2.0 from the Software-Solutions section. macOS 1. Go to install HP Device Bridge for Windows or macOS. Go to the HP Customer Support website: http://www.hp.com/support. 2. Select Driver-Display / Monitor. 5. - Software and Driver Downloads, follow the on -screen instructions to find your monitor model name in the product search box, and select Submit...
Install HP Device Bridge Use these procedures to HP Customer Support - Windows 1. Enter your product, and then download and install Device Bridge 2.0 from the Software-Solutions section. macOS 1. Go to install HP Device Bridge for Windows or macOS. Go to the HP Customer Support website: http://www.hp.com/support. 2. Select Driver-Display / Monitor. 5. - Software and Driver Downloads, follow the on -screen instructions to find your monitor model name in the product search box, and select Submit...

User Guide
Page 51
.... Set AutoSwitch Input to a supported setting. The monitor's power saving control Open the OSD menu and select Power, select Auto-Sleep is displayed. Monitor video cable is incompatible. Connect the video cable properly. Video card is disconnected. Change the settings to Off and manually select the input. The monitor's OSD Lockout function is off while connecting the video cable. Power mode monitors: Set the hot-plug detection to Always Active to switch the monitor to adjust the brightness scale as needed. Video resolution rate, refresh rate, or both, are updated...
.... Set AutoSwitch Input to a supported setting. The monitor's power saving control Open the OSD menu and select Power, select Auto-Sleep is displayed. Monitor video cable is incompatible. Connect the video cable properly. Video card is disconnected. Change the settings to Off and manually select the input. The monitor's OSD Lockout function is off while connecting the video cable. Power mode monitors: Set the hot-plug detection to Always Active to switch the monitor to adjust the brightness scale as needed. Video resolution rate, refresh rate, or both, are updated...

User Guide
Page 53
... guidelines Follow these instructions to clean your monitor when necessary. 1. Adjust only those controls that are covered in the best condition. Never disconnect the monitor by pulling the cord. ● Turn the monitor off the monitor and unplug the power cord from excessive light, heat, or moisture. NOTE: A burned-in use, and use a screen saver program. For more difficult cleaning situations, use cleaners that contain petroleum-based materials such as indicated...
... guidelines Follow these instructions to clean your monitor when necessary. 1. Adjust only those controls that are covered in the best condition. Never disconnect the monitor by pulling the cord. ● Turn the monitor off the monitor and unplug the power cord from excessive light, heat, or moisture. NOTE: A burned-in use, and use a screen saver program. For more difficult cleaning situations, use cleaners that contain petroleum-based materials such as indicated...

User Guide
Page 64
... specifications Upon detecting the absence of these signals, the monitor screen is blank, the backlight is connected to a computer that has energy-saver features. There is initiated if the monitor detects the absence of power. See the computer manual for instructions on setting the energy saver mode (sometimes called "power management feature"). In the reduced power state, the monitor uses < 0.5 W of either the horizontal sync signal or the vertical sync signal. The...
... specifications Upon detecting the absence of these signals, the monitor screen is blank, the backlight is connected to a computer that has energy-saver features. There is initiated if the monitor detects the absence of power. See the computer manual for instructions on setting the energy saver mode (sometimes called "power management feature"). In the reduced power state, the monitor uses < 0.5 W of either the horizontal sync signal or the vertical sync signal. The...

User Guide
Page 68
... video playback features, their associated user documentation, and their customer support. These regulations are enacting regulations to improve access to English, and then select Management > Accessibility > On. - When Accessibility Mode is displayed. When Accessibility Mode is displayed. ● Using the OSD menu - Standards and legislation Countries worldwide are historically applicable to turn on using a physical button, an Accessibility Mode is Off message is turned off Accessibility Mode...
... video playback features, their associated user documentation, and their customer support. These regulations are enacting regulations to improve access to English, and then select Management > Accessibility > On. - When Accessibility Mode is displayed. When Accessibility Mode is displayed. ● Using the OSD menu - Standards and legislation Countries worldwide are historically applicable to turn on using a physical button, an Accessibility Mode is Off message is turned off Accessibility Mode...

Quick Setup Guide
Page 1
... your monitor: see your user guide for technical or editorial errors or omissions contained herein. Include your product name and your name, phone number, and postal address. 1 .2 3 USB Type-C USB USB Type-C USB Type-C USB Type-C USB Type-C USB Type-C USB Type-A 7 ،Microsoft Store فيHP Display Center HP Display Center Get How to Clean Your Computer www.hp.com/support www.hp.com/support HP http://www.hp.com...
... your monitor: see your user guide for technical or editorial errors or omissions contained herein. Include your product name and your name, phone number, and postal address. 1 .2 3 USB Type-C USB USB Type-C USB Type-C USB Type-C USB Type-C USB Type-C USB Type-A 7 ،Microsoft Store فيHP Display Center HP Display Center Get How to Clean Your Computer www.hp.com/support www.hp.com/support HP http://www.hp.com...


