
Product Notice
Page 2
... connector hoods to the part, series, or model number found to comply with any interference received, including interference that to radio communications. Q Connect the equipment to an outlet on the product. This device may cause harmful interference to which can be determined by turning the equipment off and on, the user is subject to correct the interference by HP...
... connector hoods to the part, series, or model number found to comply with any interference received, including interference that to radio communications. Q Connect the equipment to an outlet on the product. This device may cause harmful interference to which can be determined by turning the equipment off and on, the user is subject to correct the interference by HP...

Product Notice
Page 31
... Stoffe HP verpflichtet sich, seinen Kunden Informationen über die in the following ways when the system is committed to providing our customers with the Wake On LAN (WOL) feature enabled, etc. Examples include the user pressing the power/sleep button, receiving an input signal from an input device, receiving an input signal from the default power setting to the Performance power setting that are...
... Stoffe HP verpflichtet sich, seinen Kunden Informationen über die in the following ways when the system is committed to providing our customers with the Wake On LAN (WOL) feature enabled, etc. Examples include the user pressing the power/sleep button, receiving an input signal from an input device, receiving an input signal from the default power setting to the Performance power setting that are...
User Guide
Page 5
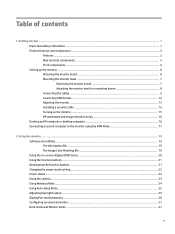
... ...7 Removing the monitor stand 7 Attaching the monitor head to a mounting device 8 Connecting the cables ...9 Connecting USB devices ...12 Adjusting the monitor ...13 Installing a security cable ...15 Turning on the monitor ...15 HP watermark and image retention policy 16 Docking an HP notebook or desktop computer 16 Connecting a second computer to the monitor using the KVM Mode 17 2 Using the monitor ...19 Software and utilities ...19 The Information file ...19 The Image Color Matching file ...19 Using the on-screen display (OSD) menu...
... ...7 Removing the monitor stand 7 Attaching the monitor head to a mounting device 8 Connecting the cables ...9 Connecting USB devices ...12 Adjusting the monitor ...13 Installing a security cable ...15 Turning on the monitor ...15 HP watermark and image retention policy 16 Docking an HP notebook or desktop computer 16 Connecting a second computer to the monitor using the KVM Mode 17 2 Using the monitor ...19 Software and utilities ...19 The Information file ...19 The Image Color Matching file ...19 Using the on-screen display (OSD) menu...
User Guide
Page 6
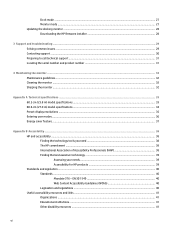
... Updating the docking monitor ...28 Downloading the HP firmware installer 28 3 Support and troubleshooting ...29 Solving common issues ...29 Contacting support ...30 Preparing to call technical support ...31 Locating the serial number and product number 31 4 Maintaining the monitor ...32 Maintenance guidelines ...32 Cleaning the monitor ...32 Shipping the monitor ...32 Appendix A Technical specifications ...33 60.5 cm (23.8 in) model specifications ...33 68.6 cm (27.0 in) model specifications ...34 Preset display resolutions ...35 Entering user modes...
... Updating the docking monitor ...28 Downloading the HP firmware installer 28 3 Support and troubleshooting ...29 Solving common issues ...29 Contacting support ...30 Preparing to call technical support ...31 Locating the serial number and product number 31 4 Maintaining the monitor ...32 Maintenance guidelines ...32 Cleaning the monitor ...32 Shipping the monitor ...32 Appendix A Technical specifications ...33 60.5 cm (23.8 in) model specifications ...33 68.6 cm (27.0 in) model specifications ...34 Preset display resolutions ...35 Entering user modes...
User Guide
Page 9
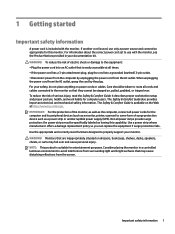
... cables connected to some form of serious injury, read the Safety & Comfort Guide. The Safety & Comfort Guide is available on dressers, bookcases, shelves, desks, speakers, chests, or carts may cause disturbing reflections from the AC outlet, grasp the cord by unplugging the power cord from the AC outlet. Not all power cords for computer users. Monitors that they cannot be specifically labeled as a power...
... cables connected to some form of serious injury, read the Safety & Comfort Guide. The Safety & Comfort Guide is available on dressers, bookcases, shelves, desks, speakers, chests, or carts may cause disturbing reflections from the AC outlet, grasp the cord by unplugging the power cord from the AC outlet. Not all power cords for computer users. Monitors that they cannot be specifically labeled as a power...
User Guide
Page 10
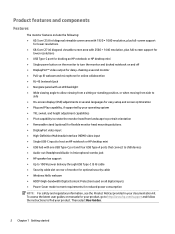
... viewing from a sitting or standing position, or when moving from side to side ● On-screen display (OSD) adjustments in several languages for easy setup and screen optimization ● Plug and Play capability, if supported by your operating system ● Tilt, swivel, and height adjustment capabilities ● Pivot capability to rotate the monitor head from landscape to portrait orientation ● Removable stand (optional) for flexible monitor head mounting solutions ● DisplayPort video input...
... viewing from a sitting or standing position, or when moving from side to side ● On-screen display (OSD) adjustments in several languages for easy setup and screen optimization ● Plug and Play capability, if supported by your operating system ● Tilt, swivel, and height adjustment capabilities ● Pivot capability to rotate the monitor head from landscape to portrait orientation ● Removable stand (optional) for flexible monitor head mounting solutions ● DisplayPort video input...

User Guide
Page 11
... place the monitor in your documentation kit. (3) Security cable slot Connects an optional security cable. (4) Master power switch Turns on or off all power to an HP notebook or desktop computer. Product features and components 3 For additional safety information, see the Product Notices provided in the lowest power state when it is not being used, turn the Master power switch to the Off position. (5) Power connector Connects a power cord. (6) HDMI port Connects the HDMI cable to a source device...
... place the monitor in your documentation kit. (3) Security cable slot Connects an optional security cable. (4) Master power switch Turns on or off all power to an HP notebook or desktop computer. Product features and components 3 For additional safety information, see the Product Notices provided in the lowest power state when it is not being used, turn the Master power switch to the Off position. (5) Power connector Connects a power cord. (6) HDMI port Connects the HDMI cable to a source device...

User Guide
Page 12
... button to initiate sleep mode. 4 Chapter 1 Getting started The function light icons indicate the default button functions. An indicator is activated above the Menu button when the OSD menu is open. (7-9) OSD buttons (assignable) When the OSD menu is on, press the button briefly to turn on or off. Table 1-1 Rear and side components and their descriptions (continued) Component Function (12) USB SuperSpeed ports (2) Connect USB cables to open the OSD menu, select a menu item from the OSD...
... button to initiate sleep mode. 4 Chapter 1 Getting started The function light icons indicate the default button functions. An indicator is activated above the Menu button when the OSD menu is open. (7-9) OSD buttons (assignable) When the OSD menu is on, press the button briefly to turn on or off. Table 1-1 Rear and side components and their descriptions (continued) Component Function (12) USB SuperSpeed ports (2) Connect USB cables to open the OSD menu, select a menu item from the OSD...

User Guide
Page 23
... power button on the computer to landscape, open the OSD menu and select Menu, and then select Menu Position. To rotate the OSD from portrait to turn it on. 2. Use the key provided to landscape. Image retention is a condition that display the same static image on the screen for a prolonged period of the monitor to a fixed object with an optional security cable available from HP. NOTE: Use the operating system's display settings...
... power button on the computer to landscape, open the OSD menu and select Menu, and then select Menu Position. To rotate the OSD from portrait to turn it on. 2. Use the key provided to landscape. Image retention is a condition that display the same static image on the screen for a prolonged period of the monitor to a fixed object with an optional security cable available from HP. NOTE: Use the operating system's display settings...

User Guide
Page 24
... connectivity for a prolonged period of power, and the need to support DisplayPort Alt Mode (video, charging, and USB 3.1) over the USB Type-C connector and must also be compatible with a computer running a Windows 10 version 1809 or higher operating system. To avoid image retention damage, either turn off the monitor when it is not suitable for applications that input for a wide variety of applications may result in use...
... connectivity for a prolonged period of power, and the need to support DisplayPort Alt Mode (video, charging, and USB 3.1) over the USB Type-C connector and must also be compatible with a computer running a Windows 10 version 1809 or higher operating system. To avoid image retention damage, either turn off the monitor when it is not suitable for applications that input for a wide variety of applications may result in use...

User Guide
Page 25
... set Auto-Switch Input to On in the OSD has been selected, the USB Type-C downstream port changes to a DisplayPort connector on the second computer. When USB Type-C input is disconnected and the second computer is connected in the monitor OSD provides the capability to connect two computers to one monitor with quick monitor access to the other by pressing one computer to either a DisplayPort cable or an HDMI cable to USB-C Video input...
... set Auto-Switch Input to On in the OSD has been selected, the USB Type-C downstream port changes to a DisplayPort connector on the second computer. When USB Type-C input is disconnected and the second computer is connected in the monitor OSD provides the capability to connect two computers to one monitor with quick monitor access to the other by pressing one computer to either a DisplayPort cable or an HDMI cable to USB-C Video input...

User Guide
Page 28
... the power button to turn on -screen display (OSD) and function button controls. Use the three function buttons to open the OSD. 3. Selects and adjusts the screen color. Selects the video input signal. Exits the OSD menu screen. 20 Chapter 2 Using the monitor Adjusts the DDC/CI settings, selects the language in which menu or submenu is active. The on-screen button labels vary depending on your viewing preferences. Using the on-screen display (OSD) menu Use the on-screen display (OSD) menu to adjust the screen image based on which the OSD menu is displayed (the factory default...
... the power button to turn on -screen display (OSD) and function button controls. Use the three function buttons to open the OSD. 3. Selects and adjusts the screen color. Selects the video input signal. Exits the OSD menu screen. 20 Chapter 2 Using the monitor Adjusts the DDC/CI settings, selects the language in which menu or submenu is active. The on-screen button labels vary depending on your viewing preferences. Using the on-screen display (OSD) menu Use the on-screen display (OSD) menu to adjust the screen image based on which the OSD menu is displayed (the factory default...

User Guide
Page 30
... Menu button to the previous monitor settings. Power states The monitor power behavior is based on , even when the monitor is in sleep mode. When the computer exits sleep or hibernation, the connected monitor returns to open the OSD menu. 2. If your monitor supports Performance mode, then to Performance mode. To change the power mode setting from Power Saver mode to keep the USB ports enabled when the monitor is in sleep state: White (blinking) 22 Chapter 2 Using the monitor Monitor power light status indicator: ● On: White ● Sleep: Amber Monitor connected...
... Menu button to the previous monitor settings. Power states The monitor power behavior is based on , even when the monitor is in sleep mode. When the computer exits sleep or hibernation, the connected monitor returns to open the OSD menu. 2. If your monitor supports Performance mode, then to Performance mode. To change the power mode setting from Power Saver mode to keep the USB ports enabled when the monitor is in sleep state: White (blinking) 22 Chapter 2 Using the monitor Monitor power light status indicator: ● On: White ● Sleep: Amber Monitor connected...

User Guide
Page 33
... either horizontal or vertical sync signal). Select Save and Return to the monitor (for the monitor. Select Cancel if you read content on sleep. ● Reading: Optimizes blue light and brightness for indoor viewing. 3. When Auto-Sleep Mode is blanked, the backlight turns off, and the power light turns amber. To disable Auto-Sleep Mode in sleep mode. In the OSD menu, select Power. 3. Adjusting blue light output Decreasing the blue light emitted by default), the monitor enters a reduced power state when the computer signals low power mode (absence of the OSD buttons...
... either horizontal or vertical sync signal). Select Save and Return to the monitor (for the monitor. Select Cancel if you read content on sleep. ● Reading: Optimizes blue light and brightness for indoor viewing. 3. When Auto-Sleep Mode is blanked, the backlight turns off, and the power light turns amber. To disable Auto-Sleep Mode in sleep mode. In the OSD menu, select Power. 3. Adjusting blue light output Decreasing the blue light emitted by default), the monitor enters a reduced power state when the computer signals low power mode (absence of the OSD buttons...

User Guide
Page 35
... Pressing the monitor power button can also access the display settings by pressing the Windows key + p. Connect the docking station to the computer. The default power mode is on power to the computer. or To set the external monitor as a copy of a monitor attached to the docking station. 1. WLAN-LAN switching is connected to a non-HP USB-C notebook. The monitor will also be in Monitor mode. Configuring an external monitor Use Windows to configure...
... Pressing the monitor power button can also access the display settings by pressing the Windows key + p. Connect the docking station to the computer. The default power mode is on power to the computer. or To set the external monitor as a copy of a monitor attached to the docking station. 1. WLAN-LAN switching is connected to a non-HP USB-C notebook. The monitor will also be in Monitor mode. Configuring an external monitor Use Windows to configure...
User Guide
Page 36
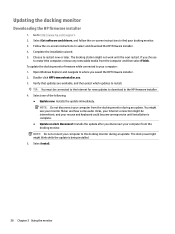
... software and drivers, and follow the on -screen instructions to your mouse and keyboard could become unresponsive until the next restart. Choose to the HP firmware installer. 4. You might see your monitor flicker and hear some audio clicks, your Internet connection might be connected to the Internet for new updates to download to restart now or later. Select Install. 28 Chapter 2 Using the monitor If you saved the HP firmware installer...
... software and drivers, and follow the on -screen instructions to your mouse and keyboard could become unresponsive until the next restart. Choose to the HP firmware installer. 4. You might see your monitor flicker and hear some audio clicks, your Internet connection might be connected to the Internet for new updates to download to restart now or later. Select Install. 28 Chapter 2 Using the monitor If you saved the HP firmware installer...
User Guide
Page 37
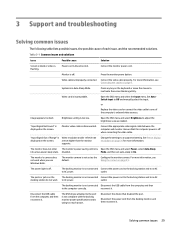
... video cable properly. or Replace the video card or connect the video cable to the port is not compliant with the docking monitor power specifications and is off . The docking monitor is not connected Connect the power cord to the docking station and to the computer correctly. Open the OSD menu and select the Input menu. See Preset display resolutions on page 35 for more information, see default. Mode, and then set higher than the monitor supports. outlet. The ports...
... video cable properly. or Replace the video card or connect the video cable to the port is not compliant with the docking monitor power specifications and is off . The docking monitor is not connected Connect the power cord to the docking station and to the computer correctly. Open the OSD menu and select the Input menu. See Preset display resolutions on page 35 for more information, see default. Mode, and then set higher than the monitor supports. outlet. The ports...
User Guide
Page 38
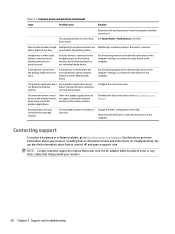
.... Set the docking monitor as the default audio device in the OSD. Contacting support To resolve a hardware or software problem, go to the docking station do not produce sound. Disconnect the USB Type-C cable and reconnect it . NOTE: Contact customer support to replace the power cord, the AC adapter (select products only), or any other audio devices connected to http://www.hp.com/support. Data transfer speeds through Multiple high-resolution monitors...
.... Set the docking monitor as the default audio device in the OSD. Contacting support To resolve a hardware or software problem, go to the docking station do not produce sound. Disconnect the USB Type-C cable and reconnect it . NOTE: Contact customer support to replace the power cord, the AC adapter (select products only), or any other audio devices connected to http://www.hp.com/support. Data transfer speeds through Multiple high-resolution monitors...

User Guide
Page 40
... not open the monitor cabinet or attempt to clean the monitor screen or cabinet. Adjust only those controls that contain any petroleum-based materials such as indicated on the power cord. If the monitor is not operating properly or has been dropped or damaged, contact an authorized HP dealer, reseller, or service provider. ● Use only a power source and connection appropriate for each device. ● Install the monitor near...
... not open the monitor cabinet or attempt to clean the monitor screen or cabinet. Adjust only those controls that contain any petroleum-based materials such as indicated on the power cord. If the monitor is not operating properly or has been dropped or damaged, contact an authorized HP dealer, reseller, or service provider. ● Use only a power source and connection appropriate for each device. ● Install the monitor near...

User Guide
Page 43
... Power source 100-240 VAC 50/60 Hz Measured power consumption Full power Typical settings Sleep Off 175 W 80 W 0.5 W 0.5 W USB Type-C power supply output 5 V DC, 5.0 A 9 V DC, 5.0 A 12 V DC, 5.0 A 15 V DC, 5.0 A 20 V DC, 5.0 A Input terminal One HDMI port, one DisplayPort connector, and one USB Type-C port Preset display resolutions The following display resolutions are the most commonly used modes and are set as factory defaults. The monitor automatically recognizes these preset modes, and they will appear properly sized...
... Power source 100-240 VAC 50/60 Hz Measured power consumption Full power Typical settings Sleep Off 175 W 80 W 0.5 W 0.5 W USB Type-C power supply output 5 V DC, 5.0 A 9 V DC, 5.0 A 12 V DC, 5.0 A 15 V DC, 5.0 A 20 V DC, 5.0 A Input terminal One HDMI port, one DisplayPort connector, and one USB Type-C port Preset display resolutions The following display resolutions are the most commonly used modes and are set as factory defaults. The monitor automatically recognizes these preset modes, and they will appear properly sized...


