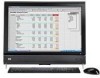
Service Reference Guide: HP dx9000 TouchSmart Business PC
Page 5
...2 Components Front and right side ...2 Left-side components ...4 Rear components ...5 Activity LED indicator lights ...6 3 Removal and Replacement Procedures Opening the HP TouchSmart PC ...7 Adding Memory ...11 Before you begin ...11 Removing a memory module 11 Installing a memory module 13 Stand assembly ...16 Back cover ... and installing the hard disk drive 20 Removing the hard disk drive 20 Installing a hard disk drive 25 Closing the HP TouchSmart PC ...31 Synchronizing the wireless keyboard or mouse 36 4 Repairing Software Problems Software Repair Overview ...37 Updating Drivers ...37...
Service Reference Guide: HP dx9000 TouchSmart Business PC
Page 7
1 Spare Parts See the following available spare parts for the HP TouchSmart PC. Description Whole unit replacement Mouse, wireless, 2.4 GHz, optical, blue Keyboard, wireless, 2.4 GHz, English Keyboard, wireless, 2.4 GHz, French Power adapter, 150W Power cord Hard drive, 320 GB, 7200 rpm, SATA SODIMM, 2 GB, PC6400, DDR2-800 Wireless USB receiver Spare Part Number 513945-001 513864-001 513862-001 513863-001 505911-001 505912-001 505914-001 505915-001 518423-001 1
Service Reference Guide: HP dx9000 TouchSmart Business PC
Page 8
... 2 Chapter 2 Components Use the built-in your webcam videos, and to use instant messenger or chat software to have video chats with HP BrightView technology. It is designed to filter out ambient noise in webcam and microphone array to have video chats online. 2 Components Front and... right side Item A B C D Item Component LCD display optimized for The HP TouchSmart PC integrates a state-of-the-art 56-cm (22-in digital microphone array to record sound for your environment, to provide a cleaner sound. ...
Service Reference Guide: HP dx9000 TouchSmart Business PC
Page 9
... card reader Use the built-in memory card reader to easily access photos and other files directly from your HP TouchSmart software. L Wireless keyboard and Sleek wireless keyboard and mouse fit under the HP TouchSmart PC. The wireless LAN supports IEEE 802.11 b/g/n (pre-n). mouse M Internal Speakers Use the built-in Sleep... Mini SD, RS MMC, Micro SD, MS-Duo, and MS Duo Pro. Or, if the TouchSmart button computer is already turned on back side panel)CD/DVD slot Read and write DVD-RAM, CD-R/RW, and DVD+/-R/RW. The diagram shows the internal location of the wireless LAN (top ...
Service Reference Guide: HP dx9000 TouchSmart Business PC
Page 13
...Replacement Procedures The following steps in order, when opening the HP TouchSmart PC. 1. Opening the HP TouchSmart PC To avoid injury and equipment damage, always complete the following sections provide information about disassembling various components of the HP TouchSmart PC. Tap the Windows Vista Start button™ , ...and then tap Shut Down. 4. Remove all media (CD, DVD, etc.) from the back of the HP TouchSmart PC. Opening the HP TouchSmart PC 7 Disconnect any external ...
Service Reference Guide: HP dx9000 TouchSmart Business PC
Page 14
Place the computer face down a blanket, towel, or other soft cloth (A) to protect the touch screen surface from scratches or other attached cables from the back of the cover (A), and then pulling gently. 6. Disconnect all other damage. 8 Chapter 3 Removal and Replacement Procedures HP recommends that you set down on the bottom-left side of the HP TouchSmart PC. 7. 5. Remove the connector cover by inserting your finger under the gap on a soft flat surface.
Service Reference Guide: HP dx9000 TouchSmart Business PC
Page 15
Using the notch on the wireless keyboard and mouse receiver, pull the receiver out of the computer. Opening the HP TouchSmart PC 9 Apply additional pressure to an upright position, about 90 degrees (B) from the back of and away from the computer, and then move the latch to the left until it will go to lift the computer stand as far as it is in the locked position (C). 9. 8.
Service Reference Guide: HP dx9000 TouchSmart Business PC
Page 17
...: Using the wrong type of memory module your computer. The HP TouchSmart PC ships with the key slot circled is shown in -line memory modules). Before you can replace. See Opening the HP TouchSmart PC on your HP TouchSmart PC uses, and for SODIMMs (small outline dual in the ...following requirements before removing and replacing the memory module. Adding Memory The HP TouchSmart PC comes with random access memory (RAM), which type and speed of memory module could damage the computer. Removing a memory module 1. A memory module with one...
Service Reference Guide: HP dx9000 TouchSmart Business PC
Page 19
... handling a memory module, be installed by using the same procedure listed below. Adding Memory 13 Remove the memory module. Store the memory module in your HP TouchSmart PC with memory of the contacts. Installing a memory module Upgrade the memory in antistatic packaging. Lift the memory module from the memory socket. Doing so...
Service Reference Guide: HP dx9000 TouchSmart Business PC
Page 21
... module is almost completely hidden in the slot, and then push down into the slot before it will not work properly. Close the HP TouchSmart PC. See Closing the HP TouchSmart PC on page 31. Remove and reinstall the memory module. Adding Memory 15 otherwise it is the wrong type of the memory module...
Service Reference Guide: HP dx9000 TouchSmart Business PC
Page 26
...the hard disk drive, you need to run System Recovery using recovery discs to do so may result in data loss. See Opening the HP TouchSmart PC on the hard disk drive to the back of personal injury from electrical shock or hot surfaces, disconnect the power cord from the ...wall outlet, and allow the internal system components to prepare the HP TouchSmart PC. WARNING! Complete the procedures to cool before touching them. 2. Removing and installing the hard disk drive You can replace or upgrade the ...
Service Reference Guide: HP dx9000 TouchSmart Business PC
Page 27
See Opening the HP TouchSmart PC on the sides of the optical drive, and three are located in place, so be careful not to the chassis. Removing and installing the ...
Service Reference Guide: HP dx9000 TouchSmart Business PC
Page 36
Follow the steps in Closing the HP TouchSmart PC on the computer, and then snapping the top edge into place. 12. Replace the optical disc drive cover by aligning the tabs on the bottom edge of the optical drive cover with the hole on page 31. 30 Chapter 3 Removal and Replacement Procedures 11.
Service Reference Guide: HP dx9000 TouchSmart Business PC
Page 37
Closing the HP TouchSmart PC CAUTION: To avoid injury and equipment damage, always complete the following steps in order after closing the HP TouchSmart PC. 1. If you removed it, replace the computer stand. Closing the HP TouchSmart PC 31 Align the four screw holes of the stand over the four holes on the back of the computer, and then replace the four screws that secure the stand to the computer.
Service Reference Guide: HP dx9000 TouchSmart Business PC
Page 39
4. Push the computer stand back slightly beyond the locked position (A), holding it with one hand so it does not snap back when the lock is released, and then release the lock on the computer stand (B) with the other hand. 5. Replace the keyboard and mouse receiver. Closing the HP TouchSmart PC 33
Service Reference Guide: HP dx9000 TouchSmart Business PC
Page 41
Reconnect all devices connected to snap it . Closing the HP TouchSmart PC 35 Reconnect external devices. 10. 8. Turn on the HP TouchSmart PC and all other cables, and then replace the connector cover by aligning the three tabs on the side edge of the cover with the holes on the computer, and then rotating inward to it into place. 9.
Service Reference Guide: HP dx9000 TouchSmart Business PC
Page 42
...blue activity LED in the bottom rear of the mouse (C) for five seconds. The blue activity LED in the bottom rear of the HP TouchSmart PC will illuminate when the synchronization command has been received and will go off when synchronization is complete. ● Mouse: Press the ...connect button on (B). You may need to manually synchronize the wireless keyboard or mouse if they are pre-synchronized for your convenience, to the HP TouchSmart PC, within 30 cm (1 foot) and away from interference from the back of the keyboard (A) for five seconds. Synchronizing the wireless keyboard...
Service Reference Guide: HP dx9000 TouchSmart Business PC
Page 51
... discs choosing 40 creating 40 recovery options 41 removal and replacement procedures 7 back cover 16 closing 31 hard drive 20 memory, adding 11 opening the TouchSmart PC 7 optical disc 18 stand 16 removing hard drive 20 optical disc 18 removing memory 11 Index 45
Service Reference Guide: HP dx9000 TouchSmart Business PC
Page 52
repairing software problems 37 restoring the system 38 right-side components 2 S security lock slot 5 SODIMM 1 software problems 37 software reinstallation 39 spare parts 1 SPDIF 5 speakers 3 stand 5 stand assembly 16 system recovery 40 system recovery options 41 T TouchSmart button 3 U updating drivers 37 USB 2.0 4, 5 USB receiver, wireless 1 V volume 3 W webcam 2 webcam light 6 whole unit replacement 1 wireless keyboard and mouse 3, 5 wireless keyboard and mouse light 6 wireless LAN 3 wireless USB receiver 1 46 Index
Getting Started: HP dx9000 TouchSmart Business PC
Page 3
... Table of Contents...iii Finding HP TouchSmart PC Information vi Getting to Know the HP TouchSmart PC 1 Features of the HP TouchSmart PC 1 Front and right side of the HP TouchSmart PC 2 Left side of the HP TouchSmart PC 4 Removing the Connector Cover 4 Back of the HP TouchSmart PC 5 Activity LED indicator lights...12 Setting up a wired network...13 Using Bluetooth Devices ...15 Adding Hardware and Software 15 Upgrading your HP TouchSmart PC hardware 15 Updating your HP TouchSmart software 15 Using the CD/DVD Drive ...16 Sound Options...16 Connecting analog speakers 17 Connecting and ...