
Bluetooth Wireless Technology Basics
Page 7
... If BWT is off, turn on HP notebook PCs; however, you can use the Bluetooth Setup wizard to Bluetooth by right-clicking the Bluetooth icon and selecting Start the Bluetooth Device. Select the check box next to configure the service and security features as follows: 1. Enable BWT functionality If the wireless light (ICON) is disabled (red logo), enable it on by pressing the wireless button on your BWT-enabled notebook PC: 1. Right-click...
... If BWT is off, turn on HP notebook PCs; however, you can use the Bluetooth Setup wizard to Bluetooth by right-clicking the Bluetooth icon and selecting Start the Bluetooth Device. Select the check box next to configure the service and security features as follows: 1. Enable BWT functionality If the wireless light (ICON) is disabled (red logo), enable it on by pressing the wireless button on your BWT-enabled notebook PC: 1. Right-click...

Bluetooth Wireless Technology Basics
Page 8
... specific printer drivers. To see the full line of the Today screen to activate BWT functionality, to create BWT connections, or to view product compatibility, visit http://www.hp.com/products/wireless/PAN/. Also, visit http://www.hp.com/products/wireless/ for each HP product. HP products D = supported by selecting the Start menu, and then selecting Bluetooth Manager. Refer to another BWT-enabled device. Table 2 describes some models of your notebook, select Start...
... specific printer drivers. To see the full line of the Today screen to activate BWT functionality, to create BWT connections, or to view product compatibility, visit http://www.hp.com/products/wireless/PAN/. Also, visit http://www.hp.com/products/wireless/ for each HP product. HP products D = supported by selecting the Start menu, and then selecting Bluetooth Manager. Refer to another BWT-enabled device. Table 2 describes some models of your notebook, select Start...
Security - Windows Vista
Page 8
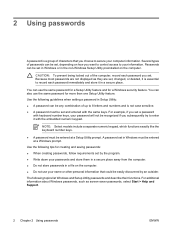
... models include a separate numeric keypad, which functions exactly like the keyboard number keys. ● A password must be entered at a Windows prompt. Use the following tips for creating and saving passwords: ● When creating passwords, follow requirements set in Windows or in Windows must be entered at a Setup Utility prompt. For additional information about Windows passwords, such as they are not displayed as screen-saver passwords, select Start > Help and Support. 2 Chapter 2 Using passwords ENWW Because most passwords are set in...
... models include a separate numeric keypad, which functions exactly like the keyboard number keys. ● A password must be entered at a Windows prompt. Use the following tips for creating and saving passwords: ● When creating passwords, follow requirements set in Windows or in Windows must be entered at a Setup Utility prompt. For additional information about Windows passwords, such as they are not displayed as screen-saver passwords, select Start > Help and Support. 2 Chapter 2 Using passwords ENWW Because most passwords are set in...
Security - Windows Vista
Page 18
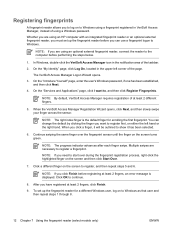
... optional external fingerprint reader, you must set up the fingerprint reader before you can change the default by clicking the finger you have registered at least 2 different fingers. 5. When the VeriSoft Access Manager Registration Wizard opens, click Next, and then slowly swipe your finger across the sensor. NOTE: If you need to start over the fingerprint sensor until the finger on the screen turns...
... optional external fingerprint reader, you must set up the fingerprint reader before you can change the default by clicking the finger you have registered at least 2 different fingers. 5. When the VeriSoft Access Manager Registration Wizard opens, click Next, and then slowly swipe your finger across the sensor. NOTE: If you need to start over the fingerprint sensor until the finger on the screen turns...
HP Pavilion dv9000 Notebook PC - Maintenance and Service Guide
Page 34
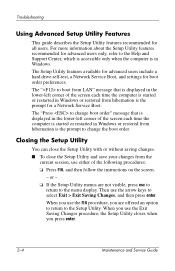
... Setup Utility with or without saving changes. ■ To close the Setup Utility and save your changes from the current session, use the arrow keys to change boot order" message that is displayed in the lower-left corner of the following procedures: ❏ Press f10, and then follow the instructions on the screen. - The Setup Utility features available for advanced users include a hard drive self-test, a Network Service Boot, and settings for all users...
... Setup Utility with or without saving changes. ■ To close the Setup Utility and save your changes from the current session, use the arrow keys to change boot order" message that is displayed in the lower-left corner of the following procedures: ❏ Press f10, and then follow the instructions on the screen. - The Setup Utility features available for advanced users include a hard drive self-test, a Network Service Boot, and settings for all users...
HP Pavilion dv9000 Notebook PC - Maintenance and Service Guide
Page 40
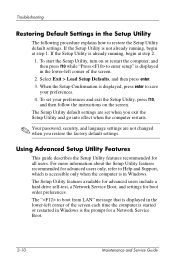
... start the Setup Utility, turn on the screen. Using Advanced Setup Utility Features This guide describes the Setup Utility features recommended for boot order preferences. The " to enter setup" is the prompt for advanced users only, refer to Help and Support, which is accessible only when the computer is displayed, press enter to restore the Setup Utility default settings. If the Setup Utility is already running , begin at step 1. Select Exit > Load Setup Defaults, and then press enter. 3. When the Setup...
... start the Setup Utility, turn on the screen. Using Advanced Setup Utility Features This guide describes the Setup Utility features recommended for boot order preferences. The " to enter setup" is the prompt for advanced users only, refer to Help and Support, which is accessible only when the computer is displayed, press enter to restore the Setup Utility default settings. If the Setup Utility is already running , begin at step 1. Select Exit > Load Setup Defaults, and then press enter. 3. When the Setup...
HP Pavilion dv9000 Notebook PC - Maintenance and Service Guide
Page 266
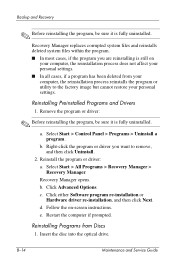
.... c. Click either Software program re-installation or Hardware driver re-installation, and then click Next. Insert the disc into the optical drive. a. b. d. Restart the computer if prompted. Reinstalling Programs from your computer, the reinstallation process reinstalls the program or utility to remove, and then click Uninstall. 2. Select Start > Control Panel > Programs > Uninstall a program. b. Select Start > All Programs > Recovery Manager > Recovery Manager. Recovery Manager opens. e. B-14 Maintenance and Service Guide Backup and Recovery ✎ Before...
.... c. Click either Software program re-installation or Hardware driver re-installation, and then click Next. Insert the disc into the optical drive. a. b. d. Restart the computer if prompted. Reinstalling Programs from your computer, the reinstallation process reinstalls the program or utility to remove, and then click Uninstall. 2. Select Start > Control Panel > Programs > Uninstall a program. b. Select Start > All Programs > Recovery Manager > Recovery Manager. Recovery Manager opens. e. B-14 Maintenance and Service Guide Backup and Recovery ✎ Before...
HP Pavilion dv9000 Notebook PC - Maintenance and Service Guide
Page 299
...troubleshooting 2-34 keyboard components 1-12 keypad keys 1-13 L LED board cable, disconnection 5-25 left-side components 1-8 logo kit, spare part numbers 3-28, 3-36 M mass storage devices, spare part numbers 3-22 media button 1-17 memory module removal 5-12 spare part numbers 3-17, 3-35, 3-37, 3-41, 5-12 memory module compartment 1-21 memory module compartment cover illustrated 3-25 removal 5-13 microphone location 1-15 removal 5-46 spare part number 3-21, 3-35, 5-46 microphone cable, disconnection 5-33 microphone jack location 1-7 pin assignments E-6 Mini Card module removal 5-16 spare part...
...troubleshooting 2-34 keyboard components 1-12 keypad keys 1-13 L LED board cable, disconnection 5-25 left-side components 1-8 logo kit, spare part numbers 3-28, 3-36 M mass storage devices, spare part numbers 3-22 media button 1-17 memory module removal 5-12 spare part numbers 3-17, 3-35, 3-37, 3-41, 5-12 memory module compartment 1-21 memory module compartment cover illustrated 3-25 removal 5-13 microphone location 1-15 removal 5-46 spare part number 3-21, 3-35, 5-46 microphone cable, disconnection 5-33 microphone jack location 1-7 pin assignments E-6 Mini Card module removal 5-16 spare part...
HP Pavilion dv9000 Notebook PC - Maintenance and Service Guide
Page 301
... security cable slot 1-8 serial number 3-1, 5-2 service considerations 4-2 Setup Utility 2-1 speaker assembly removal 5-31 spare part number 3-3, 3-36, 5-31 speaker assembly cable, disconnection 5-33 speakers 1-15 specifications battery 6-7 computer 6-1 display 6-3, 6-4 DVD/CD-RW Combo Drive 6-8 DVD±RW/R and CD-RW Combo Drive 6-9 hard drive 6-5 I/O addresses 6-13 interrupts 6-11 optical drive 6-8 system DMA 6-10 static shielding materials 4-8 stop button 1-18 S-Video and audio input cable, spare part numbers 3-28 S-Video-out jack location 1-8 pin assignments E-3 switch cover removal 5-22...
... security cable slot 1-8 serial number 3-1, 5-2 service considerations 4-2 Setup Utility 2-1 speaker assembly removal 5-31 spare part number 3-3, 3-36, 5-31 speaker assembly cable, disconnection 5-33 speakers 1-15 specifications battery 6-7 computer 6-1 display 6-3, 6-4 DVD/CD-RW Combo Drive 6-8 DVD±RW/R and CD-RW Combo Drive 6-9 hard drive 6-5 I/O addresses 6-13 interrupts 6-11 optical drive 6-8 system DMA 6-10 static shielding materials 4-8 stop button 1-18 S-Video and audio input cable, spare part numbers 3-28 S-Video-out jack location 1-8 pin assignments E-3 switch cover removal 5-22...
Software Update, Backup, and Recovery - Windows Vista
Page 5
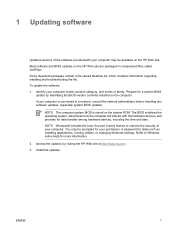
Most software and BIOS updates on the system ROM. If your computer. Some download packages contain a file named Readme.txt, which contains information regarding installing and troubleshooting the file. Prepare for tasks such as installing applications, running utilities, or changing Windows settings. NOTE Windows® includes the User Account Control feature to improve the security of the software provided with the hardware devices, and provides for more information. 2. You...
Most software and BIOS updates on the system ROM. If your computer. Some download packages contain a file named Readme.txt, which contains information regarding installing and troubleshooting the file. Prepare for tasks such as installing applications, running utilities, or changing Windows settings. NOTE Windows® includes the User Account Control feature to improve the security of the software provided with the hardware devices, and provides for more information. 2. You...
Software Update, Backup, and Recovery - Windows Vista
Page 6
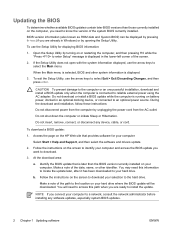
... not open with the system information displayed, use the Setup Utility for your hard drive where the BIOS update will need this path when you are ready to reliable external power using the AC adapter. CAUTION To prevent damage to the computer or an unsuccessful installation, download and install a BIOS update only when the computer is running on battery power, docked in an optional docking device, or connected to a network, consult the network administrator before installing any device, cable...
... not open with the system information displayed, use the Setup Utility for your hard drive where the BIOS update will need this path when you are ready to reliable external power using the AC adapter. CAUTION To prevent damage to the computer or an unsuccessful installation, download and install a BIOS update only when the computer is running on battery power, docked in an optional docking device, or connected to a network, consult the network administrator before installing any device, cable...

Wireless (Select Models Only) - Windows Vista
Page 11
... device from the Network adapters list. Select Start > Computer > System properties tab. 2. NOTE If no WLAN device is listed, either your computer does not have an integrated WLAN device, or the driver for the WLAN device is installed on your computer: NOTE Windows includes the User Account Control feature to Windows online Help for tasks such as installing applications, running utilities, or changing Windows settings. ENWW Identifying a WLAN device 7 Identifying a WLAN device...
... device from the Network adapters list. Select Start > Computer > System properties tab. 2. NOTE If no WLAN device is listed, either your computer does not have an integrated WLAN device, or the driver for the WLAN device is installed on your computer: NOTE Windows includes the User Account Control feature to Windows online Help for tasks such as installing applications, running utilities, or changing Windows settings. ENWW Identifying a WLAN device 7 Identifying a WLAN device...
Notebook Tour - Windows Vista
Page 7
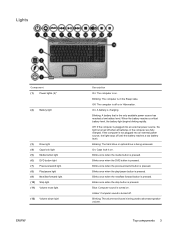
... hard drive or optical drive is pressed. Blinks once when the media button is being used to decrease speaker volume. Blue: Computer sound is pressed. Blinks once when the stop button is turned on. Off: The computer is plugged into an external power source, the light stays off when all batteries in the computer are fully charged. Top components 3 Blinking: A battery that is charging. When the battery reaches a critical battery level, the battery light...
... hard drive or optical drive is pressed. Blinks once when the media button is being used to decrease speaker volume. Blue: Computer sound is pressed. Blinks once when the stop button is turned on. Off: The computer is plugged into an external power source, the light stays off when all batteries in the computer are fully charged. Top components 3 Blinking: A battery that is charging. When the battery reaches a critical battery level, the battery light...

Notebook Tour - Windows Vista
Page 25
...16 wireless certification labels 16 release latch, battery 12 RJ-11 (modem) jack, identifying 11 RJ-45 (network) jack, identifying 11 S S-Video-out jack, identifying 11 scrolling regions, TouchPad 2 security cable slot, identifying 11 serial number, computer 16 service tag 16 slots Digital Media 11 ExpressCard 10 memory module 12 security cable 11 speakers, identifying 5 specifications operating environment 17 rated input power 18 stop button, identifying 6 stop light, identifying 3 T temperature specifications 17 TouchPad buttons 2 identifying 2 scrolling regions 2 TouchPad light, identifying...
...16 wireless certification labels 16 release latch, battery 12 RJ-11 (modem) jack, identifying 11 RJ-45 (network) jack, identifying 11 S S-Video-out jack, identifying 11 scrolling regions, TouchPad 2 security cable slot, identifying 11 serial number, computer 16 service tag 16 slots Digital Media 11 ExpressCard 10 memory module 12 security cable 11 speakers, identifying 5 specifications operating environment 17 rated input power 18 stop button, identifying 6 stop light, identifying 3 T temperature specifications 17 TouchPad buttons 2 identifying 2 scrolling regions 2 TouchPad light, identifying...
Drives - Windows Vista
Page 7
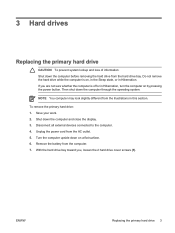
... remove the hard drive while the computer is off or in Hibernation. Turn the computer upside down the computer through the operating system. If you , loosen the 2 hard drive cover screws (1). Unplug the power cord from the hard drive bay. To remove the primary hard drive: 1. Then shut down on by pressing the power button. Save your work. 2. Remove the battery from the illustrations in this section. Disconnect all external devices connected...
... remove the hard drive while the computer is off or in Hibernation. Turn the computer upside down the computer through the operating system. If you , loosen the 2 hard drive cover screws (1). Unplug the power cord from the hard drive bay. To remove the primary hard drive: 1. Then shut down on by pressing the power button. Save your work. 2. Remove the battery from the illustrations in this section. Disconnect all external devices connected...
Multimedia
Page 13
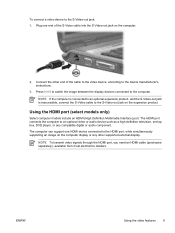
Plug one HDMI device connected to the HDMI port, while simultaneously supporting an image on the computer. 2. Using the HDMI port (select models only) Select computer models include an HDMI (High Definition Multimedia Interface) port. The HDMI port connects the computer to an optional video or audio device such as a high-definition television, set-top box, DVD player, or any other end of the S-Video cable into the S-Video-out jack on the computer display or any compatible...
Plug one HDMI device connected to the HDMI port, while simultaneously supporting an image on the computer. 2. Using the HDMI port (select models only) Select computer models include an HDMI (High Definition Multimedia Interface) port. The HDMI port connects the computer to an optional video or audio device such as a high-definition television, set-top box, DVD player, or any other end of the S-Video cable into the S-Video-out jack on the computer display or any compatible...
Multimedia - Windows Vista
Page 12
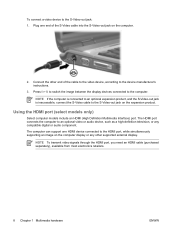
... HDMI port connects the computer to the computer. Press fn+f4 to switch the image between the display devices connected to an optional video or audio device, such as a high-definition television, or any other end of the S-Video cable into the S-Video-out jack on the computer. 2. Using the HDMI port (select models only) Select computer models include an HDMI (High Definition Multimedia Interface) port. Plug one HDMI device connected to the HDMI port, while simultaneously supporting...
... HDMI port connects the computer to the computer. Press fn+f4 to switch the image between the display devices connected to an optional video or audio device, such as a high-definition television, or any other end of the S-Video cable into the S-Video-out jack on the computer. 2. Using the HDMI port (select models only) Select computer models include an HDMI (High Definition Multimedia Interface) port. Plug one HDMI device connected to the HDMI port, while simultaneously supporting...
Multimedia - Windows Vista
Page 28
... 16 media button, identifying 6 microphone jack 1 microphones, internal 1 microphones, supported 3 monitor, connecting 7 multimedia software described 18 using 20 mute button 2, 5 O optical disc inserting 13 removing, with power 14 removing, without power 15 writing to 21 optical drive playing 21 protecting 21 P ports external monitor 7 HDMI 8 previous/rewind button 17 programs multimedia 18 using 20 projector, connecting 7 protecting playback 21 Q Quick Launch buttons, identifying 6 QuickPlay 6 R region codes, DVD 22 S S-Video-out jack connecting 7 identifying 7 S/PDIF digital audio 4 S/PDIF...
... 16 media button, identifying 6 microphone jack 1 microphones, internal 1 microphones, supported 3 monitor, connecting 7 multimedia software described 18 using 20 mute button 2, 5 O optical disc inserting 13 removing, with power 14 removing, without power 15 writing to 21 optical drive playing 21 protecting 21 P ports external monitor 7 HDMI 8 previous/rewind button 17 programs multimedia 18 using 20 projector, connecting 7 protecting playback 21 Q Quick Launch buttons, identifying 6 QuickPlay 6 R region codes, DVD 22 S S-Video-out jack connecting 7 identifying 7 S/PDIF digital audio 4 S/PDIF...

Notebook Tour
Page 7
...-battery condition, the battery light begins blinking rapidly. Blinks once when the previous/rewind button is pressed. Blue: Computer sound is plugged into an external power source, the light stays off . Amber: Computer sound is being accessed. Blinks once when the media button is pressed. Blinks once when the next/fast forward button is pressed. Blinking: The volume scroll zone is turned off until the battery reaches a low-battery condition. Blinking: The hard drive or optical drive...
...-battery condition, the battery light begins blinking rapidly. Blinks once when the previous/rewind button is pressed. Blue: Computer sound is plugged into an external power source, the light stays off . Amber: Computer sound is being accessed. Blinks once when the media button is pressed. Blinks once when the next/fast forward button is pressed. Blinking: The volume scroll zone is turned off until the battery reaches a low-battery condition. Blinking: The hard drive or optical drive...

Notebook Tour
Page 28
... wireless certification labels 17 release latch, battery 13 RJ-11 (modem) cable 16 RJ-11 (modem) jack, identifying 12 RJ-45 (network) jack, identifying 12 S S-Video-out jack, identifying 12 scrolling regions, TouchPad 2 security cable slot, identifying 12 serial number, computer 17 service tag 17 slots Digital Media 12 ExpressCard 11 memory module 13 security cable 12 speakers, identifying 5 specifications operating environment 19 rated input power 20 stop button, identifying 6 stop light, identifying 3 T temperature specifications 19 TouchPad buttons...
... wireless certification labels 17 release latch, battery 13 RJ-11 (modem) cable 16 RJ-11 (modem) jack, identifying 12 RJ-45 (network) jack, identifying 12 S S-Video-out jack, identifying 12 scrolling regions, TouchPad 2 security cable slot, identifying 12 serial number, computer 17 service tag 17 slots Digital Media 12 ExpressCard 11 memory module 13 security cable 12 speakers, identifying 5 specifications operating environment 19 rated input power 20 stop button, identifying 6 stop light, identifying 3 T temperature specifications 19 TouchPad buttons...


