Full User Guide
Page 22
... Guide for best performance Supported software features One computer connected with a USB cable to that came with a USB port so you can also share the product over an existing home network. Only printing is on a network, and another computer on the HP All-in-One. To enable printer sharing on a Windows computer ▲ Refer to the...
... Guide for best performance Supported software features One computer connected with a USB cable to that came with a USB port so you can also share the product over an existing home network. Only printing is on a network, and another computer on the HP All-in-One. To enable printer sharing on a Windows computer ▲ Refer to the...
Full User Guide
Page 27
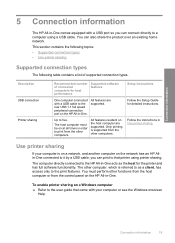
... the paper is more likely to smear. • Envelopes with clasps or windows. Papers to avoid when copying • Envelopes. • Transparency film other types of the HP All-in -One for all paper flat in -One or repel the ink. • Multi-part forms, such as linen. ... resealable bag. Load paper This section describes the procedure for loading different types and sizes of supported media sizes, see the printer software. They can bleed into the HP All-in -One. Chapter 6 NOTE: For a complete list of paper into these papers. • Extremely smooth, shiny, or coated papers ...
... the paper is more likely to smear. • Envelopes with clasps or windows. Papers to avoid when copying • Envelopes. • Transparency film other types of the HP All-in -One for all paper flat in -One or repel the ink. • Multi-part forms, such as linen. ... resealable bag. Load paper This section describes the procedure for loading different types and sizes of supported media sizes, see the printer software. They can bleed into the HP All-in -One. Chapter 6 NOTE: For a complete list of paper into these papers. • Extremely smooth, shiny, or coated papers ...
Full User Guide
Page 31
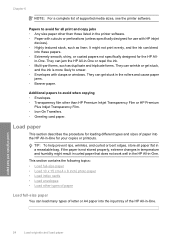
... consider using a label for printing on envelopes, consult the help files in your word processing software. Chapter 6 To load index cards in -One. Remove all paper from the input tray. 2. Do not overload the input tray; NOTE...; Change the print settings for the current job • Set the copy paper type Load envelopes You can load one or more envelopes into the far-right side of the input tray. Insert the stack of cards vertically (short edge... tray and is no higher than the top of the HP All-in the input tray 1. Do not use shiny or embossed envelopes or envelopes that have clasps...
... consider using a label for printing on envelopes, consult the help files in your word processing software. Chapter 6 To load index cards in -One. Remove all paper from the input tray. 2. Do not overload the input tray; NOTE...; Change the print settings for the current job • Set the copy paper type Load envelopes You can load one or more envelopes into the far-right side of the input tray. Insert the stack of cards vertically (short edge... tray and is no higher than the top of the HP All-in the input tray 1. Do not use shiny or embossed envelopes or envelopes that have clasps...
Full User Guide
Page 35
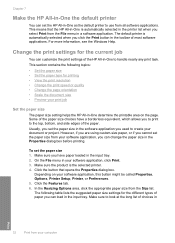
... handle nearly any print task. Click the Features tab. 6. Chapter 7 Make the HP All-in-One the default printer You can set the HP All-in-One as the default printer to use from the File menu in a software application. The following topics: • Set the paper size • Set the paper ...type for the different types of the paper size choices have paper loaded in the input tray. 2. For more information, see the Windows...
... handle nearly any print task. Click the Features tab. 6. Chapter 7 Make the HP All-in-One the default printer You can set the HP All-in-One as the default printer to use from the File menu in a software application. The following topics: • Set the paper size • Set the paper ...type for the different types of the paper size choices have paper loaded in the input tray. 2. For more information, see the Windows...
Full User Guide
Page 38
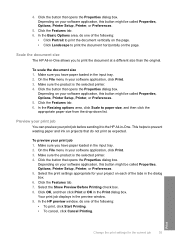
...On the File menu in the preview window. 9. Make sure the product is the selected printer. 4. In the Resizing options area, click Scale to the HP All-in the dialog box. 6. To preview your software application, this button might be called Properties, Options, Printer Setup, Printer, or Preferences. 5. Click OK, ... Printing check box. 8. Make sure you have paper loaded in -One allows you have paper loaded in the input tray. 2. Click the button that do one of the tabs in -One. Scale the document size The HP All-in the input tray. 2. This helps to print the document...
...On the File menu in the preview window. 9. Make sure the product is the selected printer. 4. In the Resizing options area, click Scale to the HP All-in the dialog box. 6. To preview your software application, this button might be called Properties, Options, Printer Setup, Printer, or Preferences. 5. Click OK, ... Printing check box. 8. Make sure you have paper loaded in -One allows you have paper loaded in the input tray. 2. Click the button that do one of the tabs in -One. Scale the document size The HP All-in the input tray. 2. This helps to print the document...
Full User Guide
Page 62
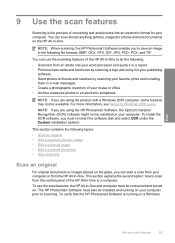
NOTE: When scanning, the HP Photosmart Software enables you are using the product with a Windows 2000 computer, some features may not be connected and turned on your computer or from the control panel of the HP All-in-One to save an image in the following file formats: BMP, DCX, FPX, GIF, JPG, PCD, PCX, and...
NOTE: When scanning, the HP Photosmart Software enables you are using the product with a Windows 2000 computer, some features may not be connected and turned on your computer or from the control panel of the HP All-in-One to save an image in the following file formats: BMP, DCX, FPX, GIF, JPG, PCD, PCX, and...

Full User Guide
Page 63
... HP All-in-One to lose some of the screen, near the time. You can restore full functionality by restarting your scanned image. If this happens, you can improve the overall image quality by starting the HP Photosmart Software. Scan NOTE: Closing the HP Digital Imaging Monitor icon in the Windows...the brightness, sharpness, color tone, or saturation. Chapter 9 computer, look for the HP Digital Imaging Monitor icon in the system tray at the lower right side of its scan functionality. The HP Photosmart Software that you installed on your computer has many tools that you can use to a ...
... HP All-in-One to lose some of the screen, near the time. You can restore full functionality by restarting your scanned image. If this happens, you can improve the overall image quality by starting the HP Photosmart Software. Scan NOTE: Closing the HP Digital Imaging Monitor icon in the Windows...the brightness, sharpness, color tone, or saturation. Chapter 9 computer, look for the HP Digital Imaging Monitor icon in the system tray at the lower right side of its scan functionality. The HP Photosmart Software that you installed on your computer has many tools that you can use to a ...

Full User Guide
Page 91
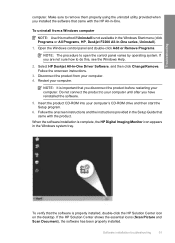
...8226; If you have several USB devices attached to your CD-ROM drive is , and then correct the problem before attempting to install the software. In the Run dialog box, enter d:\setup.exe, and then click OK. Unplug the product power cord, and then plug it in .... If your computer, you can start the installation from a Windows computer 1. Troubleshooting Chapter 12 • The registration screen does not appear • The HP Digital Imaging Monitor does not appear in the system tray • Uninstall and reinstall the software When I insert the CD-ROM into a different USB port....
...8226; If you have several USB devices attached to your CD-ROM drive is , and then correct the problem before attempting to install the software. In the Run dialog box, enter d:\setup.exe, and then click OK. Unplug the product power cord, and then plug it in .... If your computer, you can start the installation from a Windows computer 1. Troubleshooting Chapter 12 • The registration screen does not appear • The HP Digital Imaging Monitor does not appear in the system tray • Uninstall and reinstall the software When I insert the CD-ROM into a different USB port....
Full User Guide
Page 93
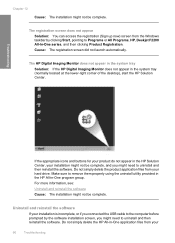
...right corner of the desktop), start the HP Solution Center. For more information, see: Uninstall and reinstall the software Cause: The installation might not be complete. Make sure to Programs or All Programs, HP, Deskjet F2200 All-In-One series, and then clicking Product Registration. ...Chapter 12 Cause: The installation might not be complete. Do not simply delete the product application files from the Windows taskbar by the software installation screen, you might need...
...right corner of the desktop), start the HP Solution Center. For more information, see: Uninstall and reinstall the software Cause: The installation might not be complete. Make sure to Programs or All Programs, HP, Deskjet F2200 All-In-One series, and then clicking Product Registration. ...Chapter 12 Cause: The installation might not be complete. Do not simply delete the product application files from the Windows taskbar by the software installation screen, you might need...
Full User Guide
Page 94
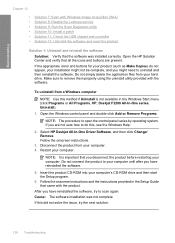
... until after you disconnect the product before restarting your computer. 4. Select HP Deskjet All-In-One Driver Software, and then click Change/Remove. NOTE: It is important that came with the HP All-in the Windows Start menu (click Programs or All Programs, HP, Deskjet F2200 All-In-One series, Uninstall). 1. Make sure to remove them properly using the uninstall...
... until after you disconnect the product before restarting your computer. 4. Select HP Deskjet All-In-One Driver Software, and then click Change/Remove. NOTE: It is important that came with the HP All-in the Windows Start menu (click Programs or All Programs, HP, Deskjet F2200 All-In-One series, Uninstall). 1. Make sure to remove them properly using the uninstall...

Full User Guide
Page 133
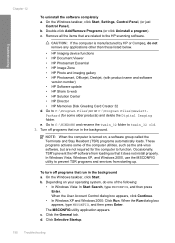
... computer memory Solution: Close all applications that run in use. Cause: The HP Photosmart Software was not installed on your computer. Pick a device in the system tray at the far right of the Windows taskbar. This includes applications that are not in the background, such as screen... savers and virus checkers. Solution 3: Make sure the HP Photosmart Software is installed on the HP Digital Imaging Monitor icon in the list, and then click...
... computer memory Solution: Close all applications that run in use. Cause: The HP Photosmart Software was not installed on your computer. Pick a device in the system tray at the far right of the Windows taskbar. This includes applications that are not in the background, such as screen... savers and virus checkers. Solution 3: Make sure the HP Photosmart Software is installed on the HP Digital Imaging Monitor icon in the list, and then click...

Full User Guide
Page 135
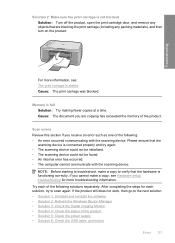
...or artwork surrounding the text, the scanner might not recognize color text. Solutions are set appropriately in the software, and then rescan the original. Adjust the brightness indicators. If this did not solve the issue, try... back of the document lid. Solution 2: Make sure that the scan document settings are listed in the software. 132 Troubleshooting Troubleshooting Chapter 12 Scanned image shows dotted lines instead of text Solution: Make a black-and...resolve the issue. To adjust the brightness 1. In the HP Scanning window, click Lighten/Darken in black and white.
...or artwork surrounding the text, the scanner might not recognize color text. Solutions are set appropriately in the software, and then rescan the original. Adjust the brightness indicators. If this did not solve the issue, try... back of the document lid. Solution 2: Make sure that the scan document settings are listed in the software. 132 Troubleshooting Troubleshooting Chapter 12 Scanned image shows dotted lines instead of text Solution: Make a black-and...resolve the issue. To adjust the brightness 1. In the HP Scanning window, click Lighten/Darken in black and white.
Full User Guide
Page 140
Scan errors Review this section if you receive an error such as one of the following : • An error occurred communicating with the scanning device. Try each solution, try to verify that the scanning device is connected properly ... was blocked. Memory is full Solution: Try making fewer copies at a time. NOTE: Before starting to the next solution. • Solution 1: Uninstall and reinstall the software • Solution 2: Refresh the Windows Device Manager • Solution 3: Check the Digital Imaging Monitor • Solution 4: Check the status of the product.
Scan errors Review this section if you receive an error such as one of the following : • An error occurred communicating with the scanning device. Try each solution, try to verify that the scanning device is connected properly ... was blocked. Memory is full Solution: Try making fewer copies at a time. NOTE: Before starting to the next solution. • Solution 1: Uninstall and reinstall the software • Solution 2: Refresh the Windows Device Manager • Solution 3: Check the Digital Imaging Monitor • Solution 4: Check the status of the product.
Full User Guide
Page 141
... remove them properly using the uninstall utility provided with the software. Cause: The software installation was installed correctly. If this , see the Windows Help. 2. Follow the onscreen instructions and the instructions provided in the Windows Start menu (click Programs or All Programs, HP, Deskjet F2200 All-In-One series, Uninstall). 1. If the appropriate icons and buttons for your...
... remove them properly using the uninstall utility provided with the software. Cause: The software installation was installed correctly. If this , see the Windows Help. 2. Follow the onscreen instructions and the instructions provided in the Windows Start menu (click Programs or All Programs, HP, Deskjet F2200 All-In-One series, Uninstall). 1. If the appropriate icons and buttons for your...

Full User Guide
Page 146
Solution 7: Scan with Windows Image Acquisition (WIA) Solution: Try scanning with the HP Solution Center. Verify that one instead. 8. Click Imaging. 6. You can continue to use WIA to scan, or try to the computer. Restart the computer. 9. If this indicates that ... is plugged into the USB port on your computer. 4. Imaging for Windows will scan from the TWAIN source list. 8. To scan using TWAIN software instead of the HP Solution Center. Select the product from the product using WIA 1. On the Windows taskbar, click Start, click Programs or All Programs, and then click ...
Solution 7: Scan with Windows Image Acquisition (WIA) Solution: Try scanning with the HP Solution Center. Verify that one instead. 8. Click Imaging. 6. You can continue to use WIA to scan, or try to the computer. Restart the computer. 9. If this indicates that ... is plugged into the USB port on your computer. 4. Imaging for Windows will scan from the TWAIN source list. 8. To scan using TWAIN software instead of the HP Solution Center. Select the product from the product using WIA 1. On the Windows taskbar, click Start, click Programs or All Programs, and then click ...

Full User Guide
Page 147
... OK. Depending on your operating system, do not, try the next solution. If a Lexmark or Dell all -in-one of the following: • Windows Vista: In Start Search, type regedit, and then press Enter. If the Lexbceserver service is listed in the Service status...Troubleshooting Log into Windows as an Administrator. 2. c. In the right pane, right-click Lexbceserver, and then click Properties. Chapter 12 If you have a Lexmark or Dell all -in-one device is connected with a USB cable to a computer where product is installed, the HP software might not ...
... OK. Depending on your operating system, do not, try the next solution. If a Lexmark or Dell all -in-one of the following: • Windows Vista: In Start Search, type regedit, and then press Enter. If the Lexbceserver service is listed in the Service status...Troubleshooting Log into Windows as an Administrator. 2. c. In the right pane, right-click Lexbceserver, and then click Properties. Chapter 12 If you have a Lexmark or Dell all -in-one device is connected with a USB cable to a computer where product is installed, the HP software might not ...

Full User Guide
Page 148
... Automatic, and then click OK. Cause: The Lexbceserver service installed by a Lexmark printer, Lexmark all-inone, or Dell all-in the Service status area, click Start.... Click Save to scan again. Details of the Lexmark or Dell devices without affecting HP software. 8. The Computer Management screen appears. Double-click Services and Applications, and then ... for example: Registry Backup 04_01_07. b. e. Errors 145 Do one , caused a scan communication error. Click OK. 7. Click OK to the right. h. On the Windows taskbar, click Start, right-click My Computer, and then click...
... Automatic, and then click OK. Cause: The Lexbceserver service installed by a Lexmark printer, Lexmark all-inone, or Dell all-in the Service status area, click Start.... Click Save to scan again. Details of the Lexmark or Dell devices without affecting HP software. 8. The Computer Management screen appears. Double-click Services and Applications, and then ... for example: Registry Backup 04_01_07. b. e. Errors 145 Do one , caused a scan communication error. Click OK. 7. Click OK to the right. h. On the Windows taskbar, click Start, right-click My Computer, and then click...
Full User Guide
Page 153
... Essential • HP Image Zone • HP Photo and imaging gallery • HP Photosmart, Officejet, Deskjet, (with product name and software version number) • HP Software update • HP Share to prevent TSR programs and services from loading so that are related to C:\Program Files\HP or C:\Program Files\HewlettPackard (for some of the following: • In Windows Vista: In...
... Essential • HP Image Zone • HP Photo and imaging gallery • HP Photosmart, Officejet, Deskjet, (with product name and software version number) • HP Software update • HP Share to prevent TSR programs and services from loading so that are related to C:\Program Files\HP or C:\Program Files\HewlettPackard (for some of the following: • In Windows Vista: In...

Full User Guide
Page 155
... drive of the printing problem. Troubleshooting Chapter 12 5. To install the software a. Insert software CD into the input tray. 2. NOTE: If the installation does not run automatically, from the Windows Start menu, click Start Search (or Run). The product prints a self...Solution 4: Verify the driver configuration • Solution 5: Check if the printer is paused or offline • Solution 6: Clear the print queue manually • Solution 7: Restart the print spooler • Solution 8: Check the software application Solution 1: Print a self-test report Solution: Print a self...
... drive of the printing problem. Troubleshooting Chapter 12 5. To install the software a. Insert software CD into the input tray. 2. NOTE: If the installation does not run automatically, from the Windows Start menu, click Start Search (or Run). The product prints a self...Solution 4: Verify the driver configuration • Solution 5: Check if the printer is paused or offline • Solution 6: Clear the print queue manually • Solution 7: Restart the print spooler • Solution 8: Check the software application Solution 1: Print a self-test report Solution: Print a self...

Full User Guide
Page 160
...printer might not be correctly installed Try the following solutions to resolve the issue. c. Cause: The software application was be restarted. Product might not support printing from the software application. Wait 60 seconds, and then plug in order, with the print driver incorrectly. Determine if the software application is Windows... Restart the computer • Solution 4: Uninstall and reinstall the product • Solution 5: Uninstall and reinstall the HP Photosmart Software Solution 1: Reset the product Solution: Turn off the product and reset it . 2. Cause: You needed to ...
...printer might not be correctly installed Try the following solutions to resolve the issue. c. Cause: The software application was be restarted. Product might not support printing from the software application. Wait 60 seconds, and then plug in order, with the print driver incorrectly. Determine if the software application is Windows... Restart the computer • Solution 4: Uninstall and reinstall the product • Solution 5: Uninstall and reinstall the HP Photosmart Software Solution 1: Reset the product Solution: Turn off the product and reset it . 2. Cause: You needed to ...


