
HP Designjet 330 and 350C Plotters - Users Guide
Page 2
... the left margin and shaded backgrounds to the HP DesignJet 350C is provided at the side of the plotter. ii These are used to identify different types of information as follows: Information specific only to the HP DesignJet 330 is applicable to help with everyday use maintenance ... Quick Reference Guide contains: selected information to both plotters. You will notice the use of symbols in the plastic pocket at the back. 330 350C Finding information This User's Guide for the HP DesignJet 330 and 350C plotters contains the following types of information: setup use of...
... the left margin and shaded backgrounds to the HP DesignJet 350C is provided at the side of the plotter. ii These are used to identify different types of information as follows: Information specific only to the HP DesignJet 330 is applicable to help with everyday use maintenance ... Quick Reference Guide contains: selected information to both plotters. You will notice the use of symbols in the plastic pocket at the back. 330 350C Finding information This User's Guide for the HP DesignJet 330 and 350C plotters contains the following types of information: setup use of...
HP Designjet 330 and 350C Plotters - Users Guide
Page 3
... the cartridge nozzles by priming them. Solve print quality problems. Order accessories. " Go to ... Install the plotter. Interpret the lights on the front panel. Configure the plotter using the Setup Sheet. Check cartridge alignment Replace a cartridge. Clear a media jam. Go to the index at the back of this manual. iii Load media...
... the cartridge nozzles by priming them. Solve print quality problems. Order accessories. " Go to ... Install the plotter. Interpret the lights on the front panel. Configure the plotter using the Setup Sheet. Check cartridge alignment Replace a cartridge. Clear a media jam. Go to the index at the back of this manual. iii Load media...
HP Designjet 330 and 350C Plotters - Users Guide
Page 5
...(Optional) Configure the plotter 1-19 Task 9: Set up the plotter in your application software 1-24 Task 10: Send a sample or demo plot 1-26 2 Working with media Caring for your media 2-2 Choosing media 2-2 Supported media types and relative costs 2-3 Physical characteristics of media types 2-4 HP DesignJet 350C: Recommended print quality... To realign the sheet manually (if necessary) 2-14 Loading roll media 2-17 To change the roll 2-17 To feed roll media into the plotter 2-21 To load a sheet with the roll-feed option installed 2-26 Unloading media 2-27 Drying time 2-27 To unload a sheet at the...
...(Optional) Configure the plotter 1-19 Task 9: Set up the plotter in your application software 1-24 Task 10: Send a sample or demo plot 1-26 2 Working with media Caring for your media 2-2 Choosing media 2-2 Supported media types and relative costs 2-3 Physical characteristics of media types 2-4 HP DesignJet 350C: Recommended print quality... To realign the sheet manually (if necessary) 2-14 Loading roll media 2-17 To change the roll 2-17 To feed roll media into the plotter 2-21 To load a sheet with the roll-feed option installed 2-26 Unloading media 2-27 Drying time 2-27 To unload a sheet at the...
HP Designjet 330 and 350C Plotters - Users Guide
Page 6
...Page size and clipped plots 3-6 Rotating a plot 3-7 Can you rotate any drawing using the Setup Sheet? 3-7 To rotate a plot using the plotter's Setup Sheet 3-7 Exactly what is rotated? 3-8 The Rotate feature and clipped plots 3-9 How does Rotate interact with your software? 3-9 Plotting a ...mirror image 3-10 Changing the treatment of overlapping lines (Merge feature) 3-11 Changing the plotter's logical pen characteristics 3-12 Printing color drawings in monochrome 3-13 To switch from color to monochrome 3-13 Important points about monochrome printing...
...Page size and clipped plots 3-6 Rotating a plot 3-7 Can you rotate any drawing using the Setup Sheet? 3-7 To rotate a plot using the plotter's Setup Sheet 3-7 Exactly what is rotated? 3-8 The Rotate feature and clipped plots 3-9 How does Rotate interact with your software? 3-9 Plotting a ...mirror image 3-10 Changing the treatment of overlapping lines (Merge feature) 3-11 Changing the plotter's logical pen characteristics 3-12 Printing color drawings in monochrome 3-13 To switch from color to monochrome 3-13 Important points about monochrome printing...

HP Designjet 330 and 350C Plotters - Users Guide
Page 7
... common applications 6-3 To change the I/O timeout setting 6-4 To upgrade your plotter with more memory 6-4 File size and memory usage 6-4 To upgrade your plotter with a network interface 6-5 To upgrade the HP DesignJet 330 plotter with color 6-5 7 Maintaining your plotter Replacing cartridges 7-2 When to replace cartridges 7-2 Using genuine HP supplies 7-3 Before replacing cartridges 7-4 To replace one or more cartridges 7-5 Cleaning...
... common applications 6-3 To change the I/O timeout setting 6-4 To upgrade your plotter with more memory 6-4 File size and memory usage 6-4 To upgrade your plotter with a network interface 6-5 To upgrade the HP DesignJet 330 plotter with color 6-5 7 Maintaining your plotter Replacing cartridges 7-2 When to replace cartridges 7-2 Using genuine HP supplies 7-3 Before replacing cartridges 7-4 To replace one or more cartridges 7-5 Cleaning...
HP Designjet 330 and 350C Plotters - Users Guide
Page 8
... 9-16 If the print quality appears to be poor just in one part of the plot Solving miscellaneous problems 9-17 If the plotter does not plot 9-17 If the plotter seems too slow 9-17 Getting help 9-18 What to do before you call 9-18 If a repair is needed 9-19 10 ...Reference Plotter specifications 10-2 Interface specifications 10-8 Parallel (Bi-Tronics/Centronics) Cable 10-9 Serial (RS-232-C) Cables 10-10 Interface cables 10-11 Regulatory notices 10-12 Ordering accessories 10-15 HP part numbers for HP DesignJet Papers and Films 10-18 HP-GL/2 and HP RTL programming information 10-19...
... 9-16 If the print quality appears to be poor just in one part of the plot Solving miscellaneous problems 9-17 If the plotter does not plot 9-17 If the plotter seems too slow 9-17 Getting help 9-18 What to do before you call 9-18 If a repair is needed 9-19 10 ...Reference Plotter specifications 10-2 Interface specifications 10-8 Parallel (Bi-Tronics/Centronics) Cable 10-9 Serial (RS-232-C) Cables 10-10 Interface cables 10-11 Regulatory notices 10-12 Ordering accessories 10-15 HP part numbers for HP DesignJet Papers and Films 10-18 HP-GL/2 and HP RTL programming information 10-19...
HP Designjet 330 and 350C Plotters - Users Guide
Page 9
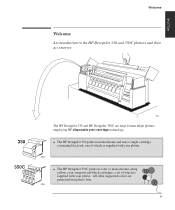
... or monochrome, using these four. 0006 ix All other supported colors are large-format inkjet plotters employing HP disposable print cartridge technology. WELCOME Welcome Welcome An introduction to the HP DesignJet 330 and 350C plotters and their accessories 330 350C 1749a The HP DesignJet 330 and HP DesignJet 350C are generated using yellow, cyan, magenta and black cartridges, a set of which is...
... or monochrome, using these four. 0006 ix All other supported colors are large-format inkjet plotters employing HP disposable print cartridge technology. WELCOME Welcome Welcome An introduction to the HP DesignJet 330 and 350C plotters and their accessories 330 350C 1749a The HP DesignJet 330 and HP DesignJet 350C are generated using yellow, cyan, magenta and black cartridges, a set of which is...
HP Designjet 330 and 350C Plotters - Users Guide
Page 10
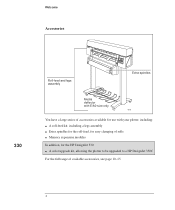
x Welcome Accessories 330 Roll-feed and legs assembly Extra spindles Media deflector with E/A0-size only 1916 You have a large series of accessories available for use with your plotter, including: A roll-feed kit, including a legs assembly Extra spindles for the roll-feed, for easy changing of rolls Memory expansion modules In addition, for the HP DesignJet 330: A color upgrade kit, allowing the plotter to be upgraded to a HP DesignJet 350C For the full range of available accessories, see page 10-15.
x Welcome Accessories 330 Roll-feed and legs assembly Extra spindles Media deflector with E/A0-size only 1916 You have a large series of accessories available for use with your plotter, including: A roll-feed kit, including a legs assembly Extra spindles for the roll-feed, for easy changing of rolls Memory expansion modules In addition, for the HP DesignJet 330: A color upgrade kit, allowing the plotter to be upgraded to a HP DesignJet 350C For the full range of available accessories, see page 10-15.

HP Designjet 330 and 350C Plotters - Users Guide
Page 11
... for color and for your plotter. For the best-quality plots, use the plotter's front panel. 1. To indicate which media type you can plot on sheet media up to E/A0 or or D/A1 width. Refer to E/A0 size or D/A1 size, depending on the HP DesignJet 350C: High-gloss film.... xi With the addition of HP media, see page 10-18 and any separate HP media literature supplied with it. For the latest information, contact your plotter's configuration is supported2: Opaque bond Translucent bond Natural tracing paper...
... for color and for your plotter. For the best-quality plots, use the plotter's front panel. 1. To indicate which media type you can plot on sheet media up to E/A0 or or D/A1 width. Refer to E/A0 size or D/A1 size, depending on the HP DesignJet 350C: High-gloss film.... xi With the addition of HP media, see page 10-18 and any separate HP media literature supplied with it. For the latest information, contact your plotter's configuration is supported2: Opaque bond Translucent bond Natural tracing paper...

HP Designjet 330 and 350C Plotters - Users Guide
Page 12
... marking your changes on the Setup Sheet and feeding it shows the plotter's latest configuration - To select a print quality option, use either the keys on the plotter's front panel or the printer driver in monochrome, for both the HP DesignJet 330 and the HP DesignJet 350C, is temporarily inoperable. * For a definition of "addressable", see page 10-3. The...
... marking your changes on the Setup Sheet and feeding it shows the plotter's latest configuration - To select a print quality option, use either the keys on the plotter's front panel or the printer driver in monochrome, for both the HP DesignJet 330 and the HP DesignJet 350C, is temporarily inoperable. * For a definition of "addressable", see page 10-3. The...
HP Designjet 330 and 350C Plotters - Users Guide
Page 13
... and the maximum size of 4MB. Two types of your application software and your plotter. If you use the correct driver for -one -for the combination of HP drivers are available; 4MB, 8MB, 16MB, and 32MB. However, in terms of MicrosoftR Windows applications. Note that ... following memory expansion modules are supplied with a basic memory of file that your plotter: AutoCAD™ users, for users of size, position, orientation, color and quality - Memory Your plotter comes with your plotter prints exactly what you install and configure them correctly. in case you need to...
... and the maximum size of 4MB. Two types of your application software and your plotter. If you use the correct driver for -one -for the combination of HP drivers are available; 4MB, 8MB, 16MB, and 32MB. However, in terms of MicrosoftR Windows applications. Note that ... following memory expansion modules are supplied with a basic memory of file that your plotter: AutoCAD™ users, for users of size, position, orientation, color and quality - Memory Your plotter comes with your plotter prints exactly what you install and configure them correctly. in case you need to...
HP Designjet 330 and 350C Plotters - Users Guide
Page 15
SETUP 1 1 Fast track 1-2 Setup checklist 1-3 Task 1: Check that you have all the items required 1-4 Task 2: (Optional) Install a memory expansion module 1-6 Task 3: Position the plotter 1-8 Task 4: Switch on 1-9 Task 5: Load the print cartridge(s) 1-10 Task 6: (Optional) Change the language 1-14 Task 7: Connect the plotter to your computer 1-17 Task 8: Configure the plotter 1-19 Task 9: Set up the plotter in your application software 1-24 Task 10: Send a sample or demo plot 1-26 Setting up your plotter 1-1
SETUP 1 1 Fast track 1-2 Setup checklist 1-3 Task 1: Check that you have all the items required 1-4 Task 2: (Optional) Install a memory expansion module 1-6 Task 3: Position the plotter 1-8 Task 4: Switch on 1-9 Task 5: Load the print cartridge(s) 1-10 Task 6: (Optional) Change the language 1-14 Task 7: Connect the plotter to your computer 1-17 Task 8: Configure the plotter 1-19 Task 9: Set up the plotter in your application software 1-24 Task 10: Send a sample or demo plot 1-26 Setting up your plotter 1-1
HP Designjet 330 and 350C Plotters - Users Guide
Page 16
... of a stable platform (see page 1-10). 2 Connect the power cord and switch the plotter on. 3 Open the cover and load the supplied print cartridge(s) into the carriage on the plotter near the carriage and the documentation in the cartridge box. just follow the printed instructions that... were shipped with English as the language for the plotter's internal plots. For help, use a parallel connection. ... That's all the following requirements: If you are happy with the driver. Setting...
... of a stable platform (see page 1-10). 2 Connect the power cord and switch the plotter on. 3 Open the cover and load the supplied print cartridge(s) into the carriage on the plotter near the carriage and the documentation in the cartridge box. just follow the printed instructions that... were shipped with English as the language for the plotter's internal plots. For help, use a parallel connection. ... That's all the following requirements: If you are happy with the driver. Setting...
HP Designjet 330 and 350C Plotters - Users Guide
Page 17
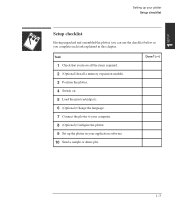
Task 1 Check that you complete each task explained in your computer. 8 (Optional) Configure the plotter. 9 Set up the plotter in this chapter. Done? (n) 1-3 SETUP 1 Setting up your plotter Setup checklist Setup checklist Having unpacked and assembled the plotter, you can use the checklist below as you have all the items required. 2 (Optional) Install a memory expansion module. 3 Position the plotter. 4 Switch on. 5 Load the print cartridge(s). 6 (Optional) Change the language. 7 Connect the plotter to your application software. 10 Send a sample or demo plot.
Task 1 Check that you complete each task explained in your computer. 8 (Optional) Configure the plotter. 9 Set up the plotter in this chapter. Done? (n) 1-3 SETUP 1 Setting up your plotter Setup checklist Setup checklist Having unpacked and assembled the plotter, you can use the checklist below as you have all the items required. 2 (Optional) Install a memory expansion module. 3 Position the plotter. 4 Switch on. 5 Load the print cartridge(s). 6 (Optional) Change the language. 7 Connect the plotter to your application software. 10 Send a sample or demo plot.
HP Designjet 330 and 350C Plotters - Users Guide
Page 18
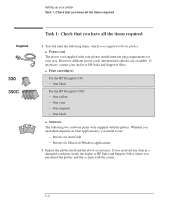
... required 1 You will need them depends on what application(s) you intend to use. - One cyan - One magenta - Whether you purchased the plotter, and file a claim with the plotter. Print cartridge(s): For the HP DesignJet 330: - Drivers for your area. However, different power cords (international options) are available. Power cord The power cord supplied with the...
... required 1 You will need them depends on what application(s) you intend to use. - One cyan - One magenta - Whether you purchased the plotter, and file a claim with the plotter. Print cartridge(s): For the HP DesignJet 330: - Drivers for your area. However, different power cords (international options) are available. Power cord The power cord supplied with the...

HP Designjet 330 and 350C Plotters - Users Guide
Page 19
HP JetDirect EX print server This is required if you can use either roll media or cut sheets. For configuration details, see page 10-16. If you have fitted the optional roll-feed assembly, you intend to connect your plotter directly to three A-size or A4-size sheets, plus ... not, you will also need the following items, which were not supplied with the plotter. For details of suitable cables, see page 2-3. Interface cable For details of the latest HP JetDirect EX products, contact your local HP Sales and Support Office. SETUP 1 Setting up to a network. As part of the...
HP JetDirect EX print server This is required if you can use either roll media or cut sheets. For configuration details, see page 10-16. If you have fitted the optional roll-feed assembly, you intend to connect your plotter directly to three A-size or A4-size sheets, plus ... not, you will also need the following items, which were not supplied with the plotter. For details of suitable cables, see page 2-3. Interface cable For details of the latest HP JetDirect EX products, contact your local HP Sales and Support Office. SETUP 1 Setting up to a network. As part of the...

HP Designjet 330 and 350C Plotters - Users Guide
Page 20
You may install only one. 1 Make sure that the plotter is switched OFF and that neither the power cord nor an interface cable is connected. X X 1736a 2 Unscrew the cover plate at the back of the memory modules available, see page 10-16. Setting up your plotter Task 2: (Optional) Install a memory expansion module Task 2: (Optional) Install a memory expansion module For details of the plotter, and remove it. 1737 1-6
You may install only one. 1 Make sure that the plotter is switched OFF and that neither the power cord nor an interface cable is connected. X X 1736a 2 Unscrew the cover plate at the back of the memory modules available, see page 10-16. Setting up your plotter Task 2: (Optional) Install a memory expansion module Task 2: (Optional) Install a memory expansion module For details of the plotter, and remove it. 1737 1-6

HP Designjet 330 and 350C Plotters - Users Guide
Page 21
.... 1-7 Otherwise, static electricity from you, load the module into the slot nearest to you 1 Push until it clicks into place vertically. SETUP 1 Setting up your plotter Task 2: (Optional) Install a memory expansion module CAUTION Before handling a memory module, either put on the left and the metallic edge away from your body could... the module only by the edges. 4 With the module's small notch on a grounding wrist strap and attach the end to the metal chassis of the plotter, or touch the outer metal surface of the...
.... 1-7 Otherwise, static electricity from you, load the module into the slot nearest to you 1 Push until it clicks into place vertically. SETUP 1 Setting up your plotter Task 2: (Optional) Install a memory expansion module CAUTION Before handling a memory module, either put on the left and the metallic edge away from your body could... the module only by the edges. 4 With the module's small notch on a grounding wrist strap and attach the end to the metal chassis of the plotter, or touch the outer metal surface of the...
HP Designjet 330 and 350C Plotters - Users Guide
Page 22
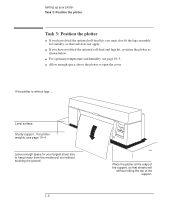
... you have fitted the optional roll-feed kit, you have not fitted the optional roll-feed and legs kit, position the plotter as shown below. Setting up your largest sheet size to open the cover. Level surface. Sturdy support. If you must also fit the legs assembly ...for stability, so this task does not apply. Allow enough space above the plotter to hang freely from the media exit slot without touching the ground. 1-8 1739 Place the plotter at the edge of the support, so that sheets exit without legs ... If the...
... you have fitted the optional roll-feed kit, you have not fitted the optional roll-feed and legs kit, position the plotter as shown below. Setting up your largest sheet size to open the cover. Level surface. Sturdy support. If you must also fit the legs assembly ...for stability, so this task does not apply. Allow enough space above the plotter to hang freely from the media exit slot without touching the ground. 1-8 1739 Place the plotter at the edge of the support, so that sheets exit without legs ... If the...
HP Designjet 330 and 350C Plotters - Users Guide
Page 23
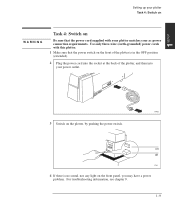
... (extended). 2 Plug the power cord into the socket at the back of the plotter is no sound, nor any light on Be sure that the power switch on the front of the plotter, and then into your power outlet. 1740a 3 Switch on the plotter, by pushing the power switch. SETUP 1 Setting up your... plotter Task 4: Switch on WARNING Task 4: Switch on the front panel, you may have a power problem...
... (extended). 2 Plug the power cord into the socket at the back of the plotter is no sound, nor any light on Be sure that the power switch on the front of the plotter, and then into your power outlet. 1740a 3 Switch on the plotter, by pushing the power switch. SETUP 1 Setting up your... plotter Task 4: Switch on WARNING Task 4: Switch on the front panel, you may have a power problem...


