
Service Manual
Page 40
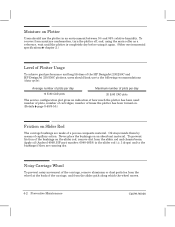
...: number of plots, number of cartridges, number of times the plotter has been turned on. (Details ' page 8Ć49/8Ć50.) Friction on the slider rod, remove dirt from moisture condensation, turn the plotter off, and, using the main roller as a reference, wait until ...the plotter is completely dry before using it again. (Other environmental specifications ' chapter 2.) Level of Plotter Usage To achieve good performance and long lifetime of the HP DesignJet 230/250C and HP DesignJet 330/350C...
...: number of plots, number of cartridges, number of times the plotter has been turned on. (Details ' page 8Ć49/8Ć50.) Friction on the slider rod, remove dirt from moisture condensation, turn the plotter off, and, using the main roller as a reference, wait until ...the plotter is completely dry before using it again. (Other environmental specifications ' chapter 2.) Level of Plotter Usage To achieve good performance and long lifetime of the HP DesignJet 230/250C and HP DesignJet 330/350C...

Service Manual
Page 42
... area of the plotter with a soft lintĆfree cloth. Cleaning the Plotter To maintain the plotter in the enclosure, as this can be cleaned. 5 Turn the plotter OFF, and disconnect it from the ac power source. 6 Apply IPA (alcohol) to a soft, lintĆfree rag. 7 Use the rag to ... or injury. Cleaning intervals are determined by the plotter environment and by ink, repeat the above steps. 10 Reconnect the plotter to the ac source, turn the plotter on, and load paper to performing any ink from the roller, perform the following : 1 Blow away dust accumulation with compressed air if available...
... area of the plotter with a soft lintĆfree cloth. Cleaning the Plotter To maintain the plotter in the enclosure, as this can be cleaned. 5 Turn the plotter OFF, and disconnect it from the ac power source. 6 Apply IPA (alcohol) to a soft, lintĆfree rag. 7 Use the rag to ... or injury. Cleaning intervals are determined by the plotter environment and by ink, repeat the above steps. 10 Reconnect the plotter to the ac source, turn the plotter on, and load paper to performing any ink from the roller, perform the following : 1 Blow away dust accumulation with compressed air if available...
Service Manual
Page 111
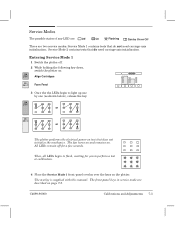
...or calibration. 4 Place the Service Mode 1 frontĆpanel overlay over the keys on the plotter. The fan turns on and remains on. The frontĆpanel keys in service mode are : Off On Flashing ? All LEDs remain... off . 2 While holding the following key down, switch the plotter on: 230 250C Align Cartridges 330 350C Form Feed 3 Once the the LEDs begin to light up one by one (as... shown below), release the key. 230 250C or 330 350C or The plotter performs the electrical powerĆon tests but does not ...
...or calibration. 4 Place the Service Mode 1 frontĆpanel overlay over the keys on the plotter. The fan turns on and remains on. The frontĆpanel keys in service mode are : Off On Flashing ? All LEDs remain... off . 2 While holding the following key down, switch the plotter on: 230 250C Align Cartridges 330 350C Form Feed 3 Once the the LEDs begin to light up one by one (as... shown below), release the key. 230 250C or 330 350C or The plotter performs the electrical powerĆon tests but does not ...

Service Manual
Page 137
What You Should See and Hear The sequence given below is what should happen when you turn on the plotter in the plotter, the following will occur: 230 250C The LEDs light up one by one as follows, until all nine LEDs are : Off On Flashing ? CAUTION To observe movement of the cartridge...
What You Should See and Hear The sequence given below is what should happen when you turn on the plotter in the plotter, the following will occur: 230 250C The LEDs light up one by one as follows, until all nine LEDs are : Off On Flashing ? CAUTION To observe movement of the cartridge...
Service Manual
Page 139
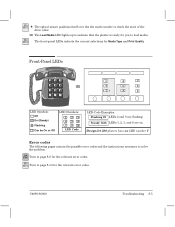
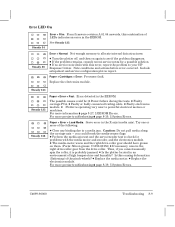
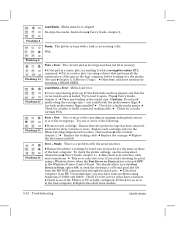
... codes The following pages contain the possible error codes and the instructions necessary to solve the problem. 230 250C Turn to page 8Ć6 for the relevant error codes. 330 350C Turn to load media. 330 350C The frontĆpanel LEDs indicate the current selections for the relevant error...123 4 56 78 9 LED Code LEDĆCode Examples: Flashing 29 LEDs 2 and 9 are on. Steady 1236 LEDs 1, 2, 3, and 6 are flashing. DesignJet 230 plotters have no LED number 7. 330 350C 9 The optical sensor positions itself over the the mark encoder to check the start of the drive roller...
... codes The following pages contain the possible error codes and the instructions necessary to solve the problem. 230 250C Turn to page 8Ć6 for the relevant error codes. 330 350C Turn to load media. 330 350C The frontĆpanel LEDs indicate the current selections for the relevant error...123 4 56 78 9 LED Code LEDĆCode Examples: Flashing 29 LEDs 2 and 9 are on. Steady 1236 LEDs 1, 2, 3, and 6 are flashing. DesignJet 230 plotters have no LED number 7. 330 350C 9 The optical sensor positions itself over the the mark encoder to check the start of the drive roller...
Service Manual
Page 142
... for print using baudrates of the carriage cover, and not above them. Instead, load the media so that the correct media size is an HP 712 workstation, you may also occur if you load the media too slowly. D Replace the carriage. The roller is badly configured. D Reconnect...Do not pull media along the carriage axis - D Replace the electronics module. 8Ć8 Troubleshooting C4699Ć90000 Try one brisk movement. Neither should either turn the Fast Direct to Print option ON, or send the drawing to load media and push it again. (Tips ' User's Guide, chapter 4, and...
... for print using baudrates of the carriage cover, and not above them. Instead, load the media so that the correct media size is an HP 712 workstation, you may also occur if you load the media too slowly. D Replace the carriage. The roller is badly configured. D Reconnect...Do not pull media along the carriage axis - D Replace the electronics module. 8Ć8 Troubleshooting C4699Ć90000 Try one brisk movement. Neither should either turn the Fast Direct to Print option ON, or send the drawing to load media and push it again. (Tips ' User's Guide, chapter 4, and...
Service Manual
Page 143
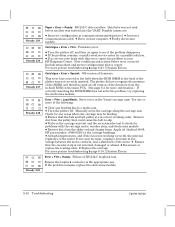
... break the mediaĆsensor flags. Try one or more precise troubleshooting ' page 8Ć19, w System Errors. D Replace the media motor. D Turn the plotter off, and then on them. (Parts: Silicon grease: C3190Ć60155) D If necessary, remove the right driveĆroller gear from the... C4699Ć90000 Troubleshooting 8Ć9 Then, if you could be: D Power failure during the tests. Error + Normal: Not enough memory to your HP Response Center. Error LED On Steady 34 Steady 38 Error + Film: From firmware revision A.01.04 onwards, this causing deformation (flattening) of the ...
... break the mediaĆsensor flags. Try one or more precise troubleshooting ' page 8Ć19, w System Errors. D Replace the media motor. D Turn the plotter off, and then on them. (Parts: Silicon grease: C3190Ć60155) D If necessary, remove the right driveĆroller gear from the... C4699Ć90000 Troubleshooting 8Ć9 Then, if you could be: D Power failure during the tests. Error + Normal: Not enough memory to your HP Response Center. Error LED On Steady 34 Steady 38 Error + Film: From firmware revision A.01.04 onwards, this causing deformation (flattening) of the ...
Service Manual
Page 144
...are in Ćbuilt ROM on again to slip. D If the problem remains, consult recent service notes for any binding due to your HP Response Center. Include setup sheet and service configuration plot in the YĆaxis (carriage axis). Error + Film + Load Media: Servo ...346 Steady 349 Paper + Error + Ready: RSĆ232ĆC data overflow. D Incorrect communications cable. Cartridges + Error + Film: Firmware error. D Turn the plotter off . Cartridges + Error + Special: Old version of RSĆ232ĆC loopback test. D Remove dirt from the in correct working correctly...
...are in Ćbuilt ROM on again to slip. D If the problem remains, consult recent service notes for any binding due to your HP Response Center. Include setup sheet and service configuration plot in the YĆaxis (carriage axis). Error + Film + Load Media: Servo ...346 Steady 349 Paper + Error + Ready: RSĆ232ĆC data overflow. D Incorrect communications cable. Cartridges + Error + Film: Firmware error. D Turn the plotter off . Cartridges + Error + Special: Old version of RSĆ232ĆC loopback test. D Remove dirt from the in correct working correctly...
Service Manual
Page 145
D Are the marks visible on again to your HP Response Center. D Faulty carriage PCA. D Faulty electronics module. D Turn the plotter off, and then on the plot? D If the problem remains, consult recent service notes for the sensor data structure. Include setup sheet and ...
D Are the marks visible on again to your HP Response Center. D Faulty carriage PCA. D Faulty electronics module. D Turn the plotter off, and then on the plot? D If the problem remains, consult recent service notes for the sensor data structure. Include setup sheet and ...
Service Manual
Page 146
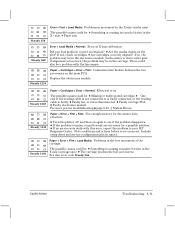
... or badly connected. D Replace cartridges. Include setup sheet and service configuration plot in motors. D Use the bail cycle test to your HP Response Center. Firmware error or faulty electronics module. For more precise troubleshooting ' page 8Ć19, w System Errors. 8Ć12 Troubleshooting...For more information ' page 8Ć27, w EEROM Errors. Possible causes are : Steady 3456 D Incorrect routing of the following: Steady 12345 D Turn the plotter off, and then on again to see whether the bail is working correctly. D Electrical noise in report. D Don't rule out the...
... or badly connected. D Replace cartridges. Include setup sheet and service configuration plot in motors. D Use the bail cycle test to your HP Response Center. Firmware error or faulty electronics module. For more precise troubleshooting ' page 8Ć19, w System Errors. 8Ć12 Troubleshooting...For more information ' page 8Ć27, w EEROM Errors. Possible causes are : Steady 3456 D Incorrect routing of the following: Steady 12345 D Turn the plotter off, and then on again to see whether the bail is working correctly. D Electrical noise in report. D Don't rule out the...
Service Manual
Page 148
... MSĆDOS command line through the serial port. ReĆalign the media. Flashing 6 Flashing 13 Flashing 23 Plain + Error: The current plot is turned OFF in memory. D Cover open during startĆup. Caution: Do not pull media along the carriage axis - Flashing 2 Ready: The plotter is receiving a ... or wear. D Are both mediaĆsensor flags installed? Try one or more of the cartridges is missing, making bad contact or is an HP 712 workstation, you could break the mediaĆsensor flags. Ensure that performs all the rasterization of the wrong type. Wait. Try to load it...
... MSĆDOS command line through the serial port. ReĆalign the media. Flashing 6 Flashing 13 Flashing 23 Plain + Error: The current plot is turned OFF in memory. D Cover open during startĆup. Caution: Do not pull media along the carriage axis - Flashing 2 Ready: The plotter is receiving a ... or wear. D Are both mediaĆsensor flags installed? Try one or more of the cartridges is missing, making bad contact or is an HP 712 workstation, you could break the mediaĆsensor flags. Ensure that performs all the rasterization of the wrong type. Wait. Try to load it...
Service Manual
Page 149
... on Ćboard) or SIMM DRAM failure. C4699Ć90000 Troubleshooting 8Ć15 For more precise troubleshooting ' page 8Ć23, w System Errors. D Faulty carriage PCA. D Turn the plotter off, and then on again to your HP Response Center. D Replace the media motor.
... on Ćboard) or SIMM DRAM failure. C4699Ć90000 Troubleshooting 8Ć15 For more precise troubleshooting ' page 8Ć23, w System Errors. D Faulty carriage PCA. D Turn the plotter off, and then on again to your HP Response Center. D Replace the media motor.
Service Manual
Page 150
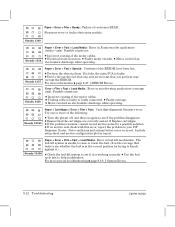
..., and a shutdown of the motor. D Replace the carriage. If so, the problem may be binding. if alignment is not working order. D Turn the plotter off . D Ensure that the belt and belt pulley are : D Incorrect configuration in the YĆaxis (carriage axis). Apply oil (Anderol 4068...? Ensure the loopback connector is not inverted, damaged or absent. D Error in XĆaxis calibration. D Turn the plotter off , and then on the plot? Check for any binding due to your HP Response Center. Remove dirt from the slider rod and chassis beam. Load Media + Error + Normal: Error ...
..., and a shutdown of the motor. D Replace the carriage. If so, the problem may be binding. if alignment is not working order. D Turn the plotter off . D Ensure that the belt and belt pulley are : D Incorrect configuration in the YĆaxis (carriage axis). Apply oil (Anderol 4068...? Ensure the loopback connector is not inverted, damaged or absent. D Error in XĆaxis calibration. D Turn the plotter off , and then on the plot? Check for any binding due to your HP Response Center. Remove dirt from the slider rod and chassis beam. Load Media + Error + Normal: Error ...

Service Manual
Page 151
.... D The carriage touches the bail as it moves. Steady 1345 Plain + Error + Film + Fast: Not enough memory for a possible solution. D Turn the plotter off, and then on the main PCA. D If no service note deals with the: D MediaĆmotor encoder cable D Media motor D ... Faulty fan, or fan is faulty. Steady 1359 Plain + Error + Fast + Roll: Communication broken between the two processors on again to your HP Response Center. D Faulty carriage PCA. D Faulty main PCA. Note conditions and actions before error occurred. Replace the electronics module. The possible causes ...
.... D The carriage touches the bail as it moves. Steady 1345 Plain + Error + Film + Fast: Not enough memory for a possible solution. D Turn the plotter off, and then on the main PCA. D If no service note deals with the: D MediaĆmotor encoder cable D Media motor D ... Faulty fan, or fan is faulty. Steady 1359 Plain + Error + Fast + Roll: Communication broken between the two processors on again to your HP Response Center. D Faulty carriage PCA. D Faulty main PCA. Note conditions and actions before error occurred. Replace the electronics module. The possible causes ...

Service Manual
Page 152
...Troubleshooting C4699Ć90000 Try one or more of the motor cables. D If no service note deals with this error, report the problem to your HP Response Center. Steady 12345 Plain + Load Media + Error + Film + Fast: Error in report. D If the problem remains, consult recent service ...quadrature (Carriage axis). Steady 2345 Load Media + Error + Film + Fast : Error in report. D Incorrect routing of the following: Steady 13459 D Turn the plotter off , and then on again to see if the problem disappears. D Electrical noise in the correct position by trying to knock against it...
...Troubleshooting C4699Ć90000 Try one or more of the motor cables. D If no service note deals with this error, report the problem to your HP Response Center. Steady 12345 Plain + Load Media + Error + Film + Fast: Error in report. D If the problem remains, consult recent service ...quadrature (Carriage axis). Steady 2345 Load Media + Error + Film + Fast : Error in report. D Incorrect routing of the following: Steady 13459 D Turn the plotter off , and then on again to see if the problem disappears. D Electrical noise in the correct position by trying to knock against it...

Service Manual
Page 161
... error when you need to reproduce a Steady 135 error, then try one or all the information is incorrect. D The plotter was turned off the plotter during the initialization sequence, and the carriage does not begin to detect if the EEROM is an EEROM error? C4699&#... the correct model ID (instructions ' page 8Ć28). 2 Ensure that the failure occurred just after an electricity powerĆcut, or after turning off while a test was writing to the EEROM, thus leaving corrupt information (or a communication cable was disconnected while sending information to the carriage and...
... error when you need to reproduce a Steady 135 error, then try one or all the information is incorrect. D The plotter was turned off the plotter during the initialization sequence, and the carriage does not begin to detect if the EEROM is an EEROM error? C4699&#... the correct model ID (instructions ' page 8Ć28). 2 Ensure that the failure occurred just after an electricity powerĆcut, or after turning off while a test was writing to the EEROM, thus leaving corrupt information (or a communication cable was disconnected while sending information to the carriage and...

Service Manual
Page 162
...up as follows: 1 Remove the left cover ' page 6Ć10. 2 Disconnect the media motor encoder cable from the main PCA (connector ENC X). 3 Turn the plotter ON in Service Mode 1. 4 Hold the ALT key down and press the Deconfiguration Mode key. 5 Once in Deconfiguration Mode, the first and second... LED columns should light up . 330 350C EEROM Model ID Configuration Procedure for the DesignJet 330 and 350C The EEROM model ID configuration procedure only needs to be carried out if: D A preĆconfigured board is very rare that...
...up as follows: 1 Remove the left cover ' page 6Ć10. 2 Disconnect the media motor encoder cable from the main PCA (connector ENC X). 3 Turn the plotter ON in Service Mode 1. 4 Hold the ALT key down and press the Deconfiguration Mode key. 5 Once in Deconfiguration Mode, the first and second... LED columns should light up . 330 350C EEROM Model ID Configuration Procedure for the DesignJet 330 and 350C The EEROM model ID configuration procedure only needs to be carried out if: D A preĆconfigured board is very rare that...

Service Manual
Page 163
.... To perform the accuracy calibration ' page 7Ć8. If the plotter is to be configured as a DesignJet 350C (Color) plotter, hold the SHIFT key down and press the two Color Configuration keys at the same time. 10 Turn the plotter OFF. If the plotter is no indication that it was successful. C4699Ć...
.... To perform the accuracy calibration ' page 7Ć8. If the plotter is to be configured as a DesignJet 350C (Color) plotter, hold the SHIFT key down and press the two Color Configuration keys at the same time. 10 Turn the plotter OFF. If the plotter is no indication that it was successful. C4699Ć...

Service Manual
Page 170
... press ENTER. 11 Perform the service tests on the plotter. To view the information on an HP Palmtop PC, perform the procedure below. 1 Turn the plotter and Palmtop off. 2 Use HP cable number F1015Ć80002 and adapter number 5181Ć6640 to connect the Palmtop to the... plotter's serial port. Service Mode 1 (230/250C) (Details ' page 7-3.) Align Cartridges + Service Mode 1 (330/350C) (Details ' page 7-3.) Form Feed + ...
... press ENTER. 11 Perform the service tests on the plotter. To view the information on an HP Palmtop PC, perform the procedure below. 1 Turn the plotter and Palmtop off. 2 Use HP cable number F1015Ć80002 and adapter number 5181Ć6640 to connect the Palmtop to the... plotter's serial port. Service Mode 1 (230/250C) (Details ' page 7-3.) Align Cartridges + Service Mode 1 (330/350C) (Details ' page 7-3.) Form Feed + ...
Service Manual
Page 171
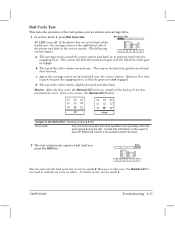
..., in , to indicate an error as above. C4699Ć90000 Troubleshooting 8Ć37 Bail Cycle Test All LEDs turn off. This causes the bailĆlift mechanism gear and the left driveĆroller gear to be fixed. 2...the operation of the roller rotates towards you Shift press the Shift key. After the first cycle, the Normal LED turns on (steady) if the bailĆcycle test has not found an error. b The top of the bail system...lever, so that the gears are not engaged. It's better to your HP Response Center, if the problem cannot be gently raised and then lowered.
..., in , to indicate an error as above. C4699Ć90000 Troubleshooting 8Ć37 Bail Cycle Test All LEDs turn off. This causes the bailĆlift mechanism gear and the left driveĆroller gear to be fixed. 2...the operation of the roller rotates towards you Shift press the Shift key. After the first cycle, the Normal LED turns on (steady) if the bailĆcycle test has not found an error. b The top of the bail system...lever, so that the gears are not engaged. It's better to your HP Response Center, if the problem cannot be gently raised and then lowered.


