
Service Manual
Page 6
...262;12 Using the Plotter (more ' Quick Reference Guide 3Ć12 DesignJet 230 Front Panel 3Ć12 DesignJet 250C Front Panel 3Ć12 DesignJet 330 Front Panel 3Ć13 DesignJet 350C Front Panel 3Ć13 ThirdĆParty Inks and OffĆ...DesignJet 350C 3Ć16 4 Preventive Maintenance Moisture on Plotter 4Ć2 Level of Plotter Usage 4Ć2 Friction on Slider Rod 4Ć2 Noisy Carriage Wheel 4Ć2 Ink Spilling 4Ć3 Belt Swelling 4Ć3 Cleaning the RollĆfeed Assembly 4Ć3 Cleaning the Plotter 4Ć4 General Cleaning 4Ć4 Cleaning the Drive...
...262;12 Using the Plotter (more ' Quick Reference Guide 3Ć12 DesignJet 230 Front Panel 3Ć12 DesignJet 250C Front Panel 3Ć12 DesignJet 330 Front Panel 3Ć13 DesignJet 350C Front Panel 3Ć13 ThirdĆParty Inks and OffĆ...DesignJet 350C 3Ć16 4 Preventive Maintenance Moisture on Plotter 4Ć2 Level of Plotter Usage 4Ć2 Friction on Slider Rod 4Ć2 Noisy Carriage Wheel 4Ć2 Ink Spilling 4Ć3 Belt Swelling 4Ć3 Cleaning the RollĆfeed Assembly 4Ć3 Cleaning the Plotter 4Ć4 General Cleaning 4Ć4 Cleaning the Drive...
Service Manual
Page 7
5 Functional Overview (more ' HP DesignJet 200/220 Service Manual) Introduction 5Ć2 Loading Sheet Media 5Ć2 Loading Roll Media on the DesignJet 330 and 350C 5Ć4 Roll Media 5Ć5 Removing Static Charge from the Media 5Ć5 Gripping ...the Media 5Ć5 PinchĆArm Sensor 5Ć5 Providing a Force on Top of the Media 5Ć6 Bail 5Ć6 BailĆLift Mechanism 5Ć6 Moving the Carriage 5Ć6 CarriageĆDrive Mechanics 5Ć6 Motor, Belt...
5 Functional Overview (more ' HP DesignJet 200/220 Service Manual) Introduction 5Ć2 Loading Sheet Media 5Ć2 Loading Roll Media on the DesignJet 330 and 350C 5Ć4 Roll Media 5Ć5 Removing Static Charge from the Media 5Ć5 Gripping ...the Media 5Ć5 PinchĆArm Sensor 5Ć5 Providing a Force on Top of the Media 5Ć6 Bail 5Ć6 BailĆLift Mechanism 5Ć6 Moving the Carriage 5Ć6 CarriageĆDrive Mechanics 5Ć6 Motor, Belt...
Service Manual
Page 8
... 6Ć21 Removing the Spittoon 6Ć23 Removing the Spittoon 6Ć24 Removing the PinchĆArm Sensor 6Ć25 Removing the DriveĆRoller Gear 6Ć25 Removing the Media Motor 6Ć26 Removing the PinchĆArmĆLever Linkage 6Ć27 Removing the... the TrailingĆCable Guide 6Ć36 Removing the Cartridge Carriage 6Ć37 Removing the Drive Belt 6Ć39 Removing the DriveĆBelt Pulley 6Ć40 Removing the Drive Roller 6Ć41 Reinstalling the Drive Roller 6Ć42 Removing the PinchĆArm Lift Mechanism 6Ć44 Reinstalling the Pinch...
... 6Ć21 Removing the Spittoon 6Ć23 Removing the Spittoon 6Ć24 Removing the PinchĆArm Sensor 6Ć25 Removing the DriveĆRoller Gear 6Ć25 Removing the Media Motor 6Ć26 Removing the PinchĆArmĆLever Linkage 6Ć27 Removing the... the TrailingĆCable Guide 6Ć36 Removing the Cartridge Carriage 6Ć37 Removing the Drive Belt 6Ć39 Removing the DriveĆBelt Pulley 6Ć40 Removing the Drive Roller 6Ć41 Reinstalling the Drive Roller 6Ć42 Removing the PinchĆArm Lift Mechanism 6Ć44 Reinstalling the Pinch...
Service Manual
Page 48
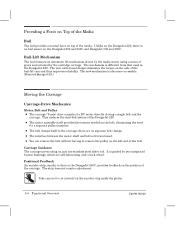
...driving a single belt and the carriage. there are selfĆlubricating, and a back wheel. Positional Feedback An encoder strip, similar to cut yourself on the position of the carriage. Providing a Force on Top of the Media Bail The bail provides a normal force on the DesignJet 230 and 250C and DesignJet... 330 and 350C. The new mechanism is different from that on the DesignJet 650C, provides feedback on the encoder strip inside the plotter. 5Ć6 Functional Overview...
...driving a single belt and the carriage. there are selfĆlubricating, and a back wheel. Positional Feedback An encoder strip, similar to cut yourself on the position of the carriage. Providing a Force on Top of the Media Bail The bail provides a normal force on the DesignJet 230 and 250C and DesignJet... 330 and 350C. The new mechanism is different from that on the DesignJet 650C, provides feedback on the encoder strip inside the plotter. 5Ć6 Functional Overview...
Service Manual
Page 97
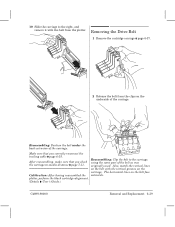
... 10 Slide the carriage to Ćmedia distance ' page 7Ć11. Reassembling: Position the belt under the back extrusion of the carriage. originally used. Reassembling: Clip the belt to the carriage, After reassembling, make sure that you check using the same part of the...the carriage. Also, match the vertical lines on the belt with the belt from the clips on the belt face Calibration: After having reassembled the outwards. Removing the Drive Belt 1 Remove the cartridge carriage ' page 6Ć37. 2 Release the belt from the plotter. plotter, perform the black cartridgeĆ...
... 10 Slide the carriage to Ćmedia distance ' page 7Ć11. Reassembling: Position the belt under the back extrusion of the carriage. originally used. Reassembling: Clip the belt to the carriage, After reassembling, make sure that you check using the same part of the...the carriage. Also, match the vertical lines on the belt with the belt from the clips on the belt face Calibration: After having reassembled the outwards. Removing the Drive Belt 1 Remove the cartridge carriage ' page 6Ć37. 2 Release the belt from the plotter. plotter, perform the black cartridgeĆ...
Service Manual
Page 98
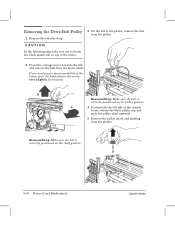
A 4 Underneath the left , and remove the belt from the motor shaft. Removing the DriveĆBelt Pulley 1 Remove the encoder strip. If you need greater maneuverability of the chassis beam, release the black plastic clip and push the pulley shaft upwards. 5 ... to break the black plastic tab on the shaft grooves. 6Ć40 Removal and Replacement C4699Ć90000 Reassembling: Make sure the belt is correctly positioned on top very slightly downwards. B Reassembling: Make sure the belt is correctly positioned on top of the motor. 3 On the left of the plotter, remove the...
A 4 Underneath the left , and remove the belt from the motor shaft. Removing the DriveĆBelt Pulley 1 Remove the encoder strip. If you need greater maneuverability of the chassis beam, release the black plastic clip and push the pulley shaft upwards. 5 ... to break the black plastic tab on the shaft grooves. 6Ć40 Removal and Replacement C4699Ć90000 Reassembling: Make sure the belt is correctly positioned on top very slightly downwards. B Reassembling: Make sure the belt is correctly positioned on top of the motor. 3 On the left of the plotter, remove the...
Service Manual
Page 150
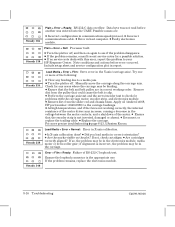
... working correctly, the internal resistance of the following: D Clear any areas where the carriage may be in the electronics module, media motor or driveĆroller gear; Plain + Error + Roll: Processor fault. D If the problem remains, consult recent service notes for any binding due to...overflow. D Error in correct orientation? D Perform the carriageĆaxis test and the servo/encoder test to your HP Response Center. D Ensure that could cause the belt to the carriage bushings. For more of the motor driver may be in communications speed/protocol. if alignment is not ...
... working correctly, the internal resistance of the following: D Clear any areas where the carriage may be in the electronics module, media motor or driveĆroller gear; Plain + Error + Roll: Processor fault. D If the problem remains, consult recent service notes for any binding due to...overflow. D Error in correct orientation? D Perform the carriageĆaxis test and the servo/encoder test to your HP Response Center. D Ensure that could cause the belt to the carriage bushings. For more of the motor driver may be in communications speed/protocol. if alignment is not ...
Service Manual
Page 165
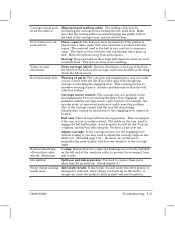
... to itself and jam the plotter. CĆclips: Ensure that uses ammonia to install them . C4699Ć90000 Troubleshooting 8Ć31 Drive belts wear out prematurely. Bail mechanism fails. Move the plotters away from the slider path along which is very sensitive to replace these parts when... the slider rod. (Details ' page 7Ć11.) However, be located. Media jam. Also, if the carriage cannot find the true left driveĆroller gear even though the carriage is actuating the engaging lever. Perform a bail cycle test. The vapor is very corrosive and can cause...
... to itself and jam the plotter. CĆclips: Ensure that uses ammonia to install them . C4699Ć90000 Troubleshooting 8Ć31 Drive belts wear out prematurely. Bail mechanism fails. Move the plotters away from the slider path along which is very sensitive to replace these parts when... the slider rod. (Details ' page 7Ć11.) However, be located. Media jam. Also, if the carriage cannot find the true left driveĆroller gear even though the carriage is actuating the engaging lever. Perform a bail cycle test. The vapor is very corrosive and can cause...

Service Manual
Page 169
Service Tests Which Service Test to Perform Use the following table as a rough guide: Assembly/Feature Bail system Carriage Carriage motor and drive system (including belt, pulley and slider rod) Cartridge identification Cartridge nozzles Communication between computer and plotter Cover sensor DRAM SIMM EEROM Electronics module Encoder strip Front-panel keys ...
Service Tests Which Service Test to Perform Use the following table as a rough guide: Assembly/Feature Bail system Carriage Carriage motor and drive system (including belt, pulley and slider rod) Cartridge identification Cartridge nozzles Communication between computer and plotter Cover sensor DRAM SIMM EEROM Electronics module Encoder strip Front-panel keys ...

Service Manual
Page 172
...leaves the manufacturing site. ALT CarriageĆAxis Test This tests the operation of the carriage motor, belt, tensioner, and encoder strip. 1 Ensure that the carriage is parked in the center of the ... wrong during the test. Test The carriage moves towards the rightĆhand side of the drive roller. If the carriage starts somewhere in the service station. Maximum PWM: For each carriage ...a routine that could have an early breakdown due to a fault in the report to your HP Response Center, if the problem cannot be able to run is performed at the customer site ...
...leaves the manufacturing site. ALT CarriageĆAxis Test This tests the operation of the carriage motor, belt, tensioner, and encoder strip. 1 Ensure that the carriage is parked in the center of the ... wrong during the test. Test The carriage moves towards the rightĆhand side of the drive roller. If the carriage starts somewhere in the service station. Maximum PWM: For each carriage ...a routine that could have an early breakdown due to a fault in the report to your HP Response Center, if the problem cannot be able to run is performed at the customer site ...

Service Manual
Page 253
connections flex circuit, testing DesignJet 230/250C, 8Ć39 DesignJet 330/350C, 8Ć40 main PCA, 5Ć13 consumption, power, 2Ć2 continue plotting, key, 3Ć13 copiers, diazo, wearing belt, 8Ć31 country of manufacture, 9Ć2 cover sensor, 5Ć13, 8Ć35, 8Ć..., 10Ć28 drive belt premature wearing, 8Ć31 removing, 6Ć39 drive roller, 7Ć8, 8Ć35, 8Ć57, GlossaryĆ3 bearings, 8Ć57 correction factor, DesignJet 230/250C, 8Ć49 faulty, 8Ć57 gear, GlossaryĆ3 problem DesignJet 230/250C, 8Ć11 DesignJet 330/350C, 8Ć...
connections flex circuit, testing DesignJet 230/250C, 8Ć39 DesignJet 330/350C, 8Ć40 main PCA, 5Ć13 consumption, power, 2Ć2 continue plotting, key, 3Ć13 copiers, diazo, wearing belt, 8Ć31 country of manufacture, 9Ć2 cover sensor, 5Ć13, 8Ć35, 8Ć..., 10Ć28 drive belt premature wearing, 8Ć31 removing, 6Ć39 drive roller, 7Ć8, 8Ć35, 8Ć57, GlossaryĆ3 bearings, 8Ć57 correction factor, DesignJet 230/250C, 8Ć49 faulty, 8Ć57 gear, GlossaryĆ3 problem DesignJet 230/250C, 8Ć11 DesignJet 330/350C, 8Ć...
Service Manual
Page 261
...38, 8Ć53, GlossaryĆ5 carriage axis, service configuration plot DesignJet 230/250C, 8Ć49 DesignJet 330/350C, 8Ć50 media axis, service configuration plot DesignJet 230/250C, 8Ć49 DesignJet 330/350C, 8Ć50 mediaĆaxis, 8Ć44 R radius of drive roller, 8Ć49 RAM, 1Ć3, GlossaryĆ5 connection to main...;32 release, firmware, 8Ć49, 8Ć50 removing back cover, 6Ć33 bail, 6Ć5 bailĆlift mechanism, 6Ć29 belt, 6Ć39 carriage motor, 6Ć21 cartridge caps, 6Ć6 cartridge carriage, 6Ć37 C4699Ć90000 IndexĆ13
...38, 8Ć53, GlossaryĆ5 carriage axis, service configuration plot DesignJet 230/250C, 8Ć49 DesignJet 330/350C, 8Ć50 media axis, service configuration plot DesignJet 230/250C, 8Ć49 DesignJet 330/350C, 8Ć50 mediaĆaxis, 8Ć44 R radius of drive roller, 8Ć49 RAM, 1Ć3, GlossaryĆ5 connection to main...;32 release, firmware, 8Ć49, 8Ć50 removing back cover, 6Ć33 bail, 6Ć5 bailĆlift mechanism, 6Ć29 belt, 6Ć39 carriage motor, 6Ć21 cartridge caps, 6Ć6 cartridge carriage, 6Ć37 C4699Ć90000 IndexĆ13
Service Manual
Page 262
drive belt, 6Ć39 drive roller, 6Ć41 driveĆbelt pulley, 6Ć40 driveĆroller gear, 6Ć25 electronics module, 6Ć13 encoder strip, 6Ć17 engagingĆlever support, 6Ć31 entry platen, 6Ć48 left ...;12, 8Ć10, 8Ć16, 8Ć43, GlossaryĆ5 communication failure, 8Ć32 interface, 2Ć2, 5Ć14 cables, 10Ć29 loopback test failure DesignJet 230/250C, 8Ć10 DesignJet 330/350C, 8Ć16 RTL, 5Ć15, 8Ć7, 8Ć14, GlossaryĆ5 S safety precautions, 6Ć2 symbols, x warnings, AĆ2, 5Ć15, 6Ć2 scatter ...
drive belt, 6Ć39 drive roller, 6Ć41 driveĆbelt pulley, 6Ć40 driveĆroller gear, 6Ć25 electronics module, 6Ć13 encoder strip, 6Ć17 engagingĆlever support, 6Ć31 entry platen, 6Ć48 left ...;12, 8Ć10, 8Ć16, 8Ć43, GlossaryĆ5 communication failure, 8Ć32 interface, 2Ć2, 5Ć14 cables, 10Ć29 loopback test failure DesignJet 230/250C, 8Ć10 DesignJet 330/350C, 8Ć16 RTL, 5Ć15, 8Ć7, 8Ć14, GlossaryĆ5 S safety precautions, 6Ć2 symbols, x warnings, AĆ2, 5Ć15, 6Ć2 scatter ...


