Security Features
Page 12
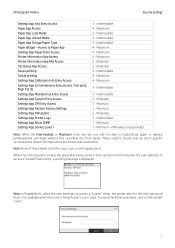
... Settings App FW Update Settings App Printer Logs Settings App Allow SNMP Settings App Service Level 1 3 - Access to load/unload paper or replace printheads/ink cartridges without first unlocking the front panel. Maximum 4 - Moderate 3 - Maximum 3 - Moderate 1 - Minimum - PIN needs to be... 4 - These options should only be provided Note: When the Intermediate or Maximum locks are known and understood. Maximum 4 - HP DesignJet Printers Security Settings Settings App Inks Entry Access Paper App Access Paper App Load Media Paper App Unload Media Paper App Change Paper Type...
... Settings App FW Update Settings App Printer Logs Settings App Allow SNMP Settings App Service Level 1 3 - Access to load/unload paper or replace printheads/ink cartridges without first unlocking the front panel. Maximum 4 - Moderate 3 - Maximum 3 - Moderate 1 - Minimum - PIN needs to be... 4 - These options should only be provided Note: When the Intermediate or Maximum locks are known and understood. Maximum 4 - HP DesignJet Printers Security Settings Settings App Inks Entry Access Paper App Access Paper App Load Media Paper App Unload Media Paper App Change Paper Type...
Limited Warranty
Page 4
...Limited Warranty Period specified above will be free from defects in the product documentation or as a result of: a. HP Limited Warranty statement HP product Printer Software Printhead Print or Ink cartridge Limited Warranty Period 1 year 90 days from the date of purchase by the customer Until... and used on the cartridge is depleted or the "end of Installation issued by HP. HP does not warrant that have been cycled through the printhead; whichever occurs first Until the HP ink is reached, whichever occurs first. Improper site preparation or maintenance as evidenced by...
...Limited Warranty Period specified above will be free from defects in the product documentation or as a result of: a. HP Limited Warranty statement HP product Printer Software Printhead Print or Ink cartridge Limited Warranty Period 1 year 90 days from the date of purchase by the customer Until... and used on the cartridge is depleted or the "end of Installation issued by HP. HP does not warrant that have been cycled through the printhead; whichever occurs first Until the HP ink is reached, whichever occurs first. Improper site preparation or maintenance as evidenced by...
Limited Warranty
Page 5
..., a defective product which customer self-repair is attributable to the use of a non-HP consumable product, HP will pay travel and labor costs of a refilled or non-original HP consumable product (ink, printhead, or ink cartridge) does not affect either repair or replace the product which customer self...-repair is attached to support and cooperate with cartridges using a non-HP chip may not work, and those that ...
..., a defective product which customer self-repair is attributable to the use of a non-HP consumable product, HP will pay travel and labor costs of a refilled or non-original HP consumable product (ink, printhead, or ink cartridge) does not affect either repair or replace the product which customer self...-repair is attached to support and cooperate with cartridges using a non-HP chip may not work, and those that ...
User Guide
Page 5
... Check the ink cartridges status ...125 Remove an ink cartridge ...125 Insert an ink cartridge ...127 About the printheads ...128 Check the printhead status ...128 Remove a printhead ...129 Insert a printhead ...131 Safe mode ...134 12 Maintaining the printer ...135 Check printer status ...136 Clean the exterior of the...145 Disposal instructions ...146 14 Troubleshooting paper issues ...147 Paper cannot be loaded successfully ...148 Paper type is not in the driver, HP Utility, or front panel 149 Printer printed on the wrong paper type ...151 Automatic cut not available ...151 On hold for paper ...
... Check the ink cartridges status ...125 Remove an ink cartridge ...125 Insert an ink cartridge ...127 About the printheads ...128 Check the printhead status ...128 Remove a printhead ...129 Insert a printhead ...131 Safe mode ...134 12 Maintaining the printer ...135 Check printer status ...136 Clean the exterior of the...145 Disposal instructions ...146 14 Troubleshooting paper issues ...147 Paper cannot be loaded successfully ...148 Paper type is not in the driver, HP Utility, or front panel 149 Printer printed on the wrong paper type ...151 Automatic cut not available ...151 On hold for paper ...

User Guide
Page 7
... not detect the gloss enhancer cartridge (Z9+ only 179 Cannot insert a printhead ...179 Front panel recommends reseating or replacing a printhead 179 Clean the printheads ...180 Clean the printhead drop detector ...181 Align the printheads ...183 Printhead status messages ...185 17 Troubleshooting general ...189 18 Front-panel error messages ...190 System error log ...190 19 HP Customer Care ...191 Introduction ...192 HP Professional Services ...192 Customer Self Repair ...193 Contact HP Support ...193 20 Printer specifications ...195 Functional specifications ...196 Physical specifications ......
... not detect the gloss enhancer cartridge (Z9+ only 179 Cannot insert a printhead ...179 Front panel recommends reseating or replacing a printhead 179 Clean the printheads ...180 Clean the printhead drop detector ...181 Align the printheads ...183 Printhead status messages ...185 17 Troubleshooting general ...189 18 Front-panel error messages ...190 System error log ...190 19 HP Customer Care ...191 Introduction ...192 HP Professional Services ...192 Customer Self Repair ...193 Contact HP Support ...193 20 Printer specifications ...195 Functional specifications ...196 Physical specifications ......
User Guide
Page 14
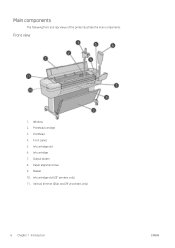
Printhead 4. Ink cartridge slot (Z9+ printers only) 11. Ink cartridge slot 6. Vertical trimmer (Z6dr and Z9+dr printers only) 6 Chapter 1 Introduction ENWW Window 2. Front panel 5. Output platen 8. Paper alignment lines 9. Front view 1. Printhead carriage 3. Ink cartridge 7. Main components The following front and rear views of the printer illustrate the main components. Basket 10.
Printhead 4. Ink cartridge slot (Z9+ printers only) 11. Ink cartridge slot 6. Vertical trimmer (Z6dr and Z9+dr printers only) 6 Chapter 1 Introduction ENWW Window 2. Front panel 5. Output platen 8. Paper alignment lines 9. Front view 1. Printhead carriage 3. Ink cartridge 7. Main components The following front and rear views of the printer illustrate the main components. Basket 10.
User Guide
Page 18
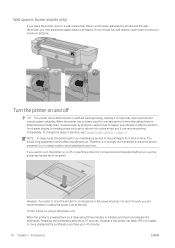
.... To turn the printer on or off or reset the printer, the normal and recommended method is to avoid wasting ink and time. Preparing the printheads takes about three minutes to 45 minutes. 10 Chapter 1 Introduction ENWW Therefore, it is some models only) If you place the printer close to ...takes about 75 seconds. Wall spacers (some space between the printer and the wall. NOTE: In sleep mode, the printer performs maintenance service to the printheads from time to unplug the power cord at the rear. However, if you plan to store the printer for six weeks or more, preparing the...
.... To turn the printer on or off or reset the printer, the normal and recommended method is to avoid wasting ink and time. Preparing the printheads takes about three minutes to 45 minutes. 10 Chapter 1 Introduction ENWW Therefore, it is some models only) If you place the printer close to ...takes about 75 seconds. Wall spacers (some space between the printer and the wall. NOTE: In sleep mode, the printer performs maintenance service to the printheads from time to unplug the power cord at the rear. However, if you plan to store the printer for six weeks or more, preparing the...
User Guide
Page 46
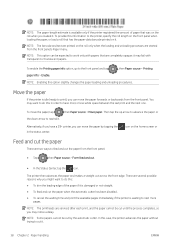
You may want to do this in the status center. Alternatively, if you have more pages. NOTE: The printheads are serviced after each print, and the paper cannot be cut until the process completes, so you might want to do this information to the ... loading and unloading processes are completely opaque: it is damaged or not straight. ● To feed and cut by tapping the in order to have a Z9+ printer, you can move the paper by the automatic cutter. Move the paper If the printer is available only if the printer registered the amount...
You may want to do this in the status center. Alternatively, if you have more pages. NOTE: The printheads are serviced after each print, and the paper cannot be cut until the process completes, so you might want to do this information to the ... loading and unloading processes are completely opaque: it is damaged or not straight. ● To feed and cut by tapping the in order to have a Z9+ printer, you can move the paper by the automatic cutter. Move the paper If the printer is available only if the printer registered the amount...
User Guide
Page 47
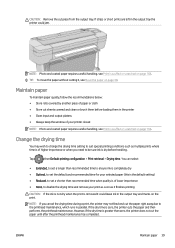
... time when quality is of lower importance ● None, to be sure ink is zero, the printer cuts the paper and then performs the printhead maintenance. NOTE: If you need to disable the drying time and remove your printer closed NOTE: Photo and coated paper requires careful handling, see ...is of higher importance or when you cancel the drying time during a print, the printer may wish to change the drying time setting to the printhead maintenance, which runs in the output tray and marks on page 38. If the dry time is dry before loading them before handling. CAUTION:...
... time when quality is of lower importance ● None, to be sure ink is zero, the printer cuts the paper and then performs the printhead maintenance. NOTE: If you need to disable the drying time and remove your printer closed NOTE: Photo and coated paper requires careful handling, see ...is of higher importance or when you cancel the drying time during a print, the printer may wish to change the drying time setting to the printhead maintenance, which runs in the output tray and marks on page 38. If the dry time is dry before loading them before handling. CAUTION:...

User Guide
Page 80
...file has been received to check whether a subsequent page will nest with it can be nested; Manage nesting in good condition automatically. This regular printhead maintenance uses a small amount of your jobs in the queue. and the nesting box will display a countdown to the left end of ink... 72. For further economy, select custom print quality options, then select Fast and Economode. ● Clean the printheads only when needed, and clean only those printheads that are currently printing. In between them is the nesting box: If you click the icon in the nesting box...
...file has been received to check whether a subsequent page will nest with it can be nested; Manage nesting in good condition automatically. This regular printhead maintenance uses a small amount of your jobs in the queue. and the nesting box will display a countdown to the left end of ink... 72. For further economy, select custom print quality options, then select Fast and Economode. ● Clean the printheads only when needed, and clean only those printheads that are currently printing. In between them is the nesting box: If you click the icon in the nesting box...

User Guide
Page 96
...steps for consistent colors ● The Photo Black ink provides pure blacks when printing on any of the following circumstances: ● Whenever a printhead is replaced ● Whenever a new paper type is introduced that has not yet been calibrated with the current set of software tools that ... (see Color calibration on page 36. See Paper presets on page 88). In addition, your printer has been engineered with the particular printheads, inks and paper type that allow you are using, and under your printer to produce consistent colors with advanced hardware and software features...
...steps for consistent colors ● The Photo Black ink provides pure blacks when printing on any of the following circumstances: ● Whenever a printhead is replaced ● Whenever a new paper type is introduced that has not yet been calibrated with the current set of software tools that ... (see Color calibration on page 36. See Paper presets on page 88). In addition, your printer has been engineered with the particular printheads, inks and paper type that allow you are using, and under your printer to produce consistent colors with advanced hardware and software features...
User Guide
Page 97
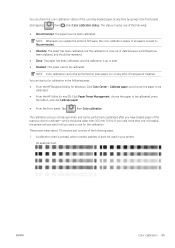
... start color calibration in the following ways: ● From the HP DesignJet Utility for Windows: Click Color Center > Calibrate paper, and choose the paper to be calibrated. ● From the HP Utility for the calibration. A calibration chart is now out of date because a printhead has been replaced, and should be performed on plain paper...
... start color calibration in the following ways: ● From the HP DesignJet Utility for Windows: Click Color Center > Calibrate paper, and choose the paper to be calibrated. ● From the HP Utility for the calibration. A calibration chart is now out of date because a printhead has been replaced, and should be performed on plain paper...
User Guide
Page 132
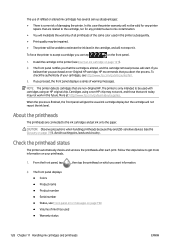
11 Handling ink cartridges and printheads ● About the ink cartridges ● Check the ink cartridges status ● Remove an ink cartridge ● Insert an ink cartridge ● About the printheads ● Check the printhead status ● Remove a printhead ● Insert a printhead ● Safe mode 124 Chapter 11 Handling ink cartridges and printheads ENWW
11 Handling ink cartridges and printheads ● About the ink cartridges ● Check the ink cartridges status ● Remove an ink cartridge ● Insert an ink cartridge ● About the printheads ● Check the printhead status ● Remove a printhead ● Insert a printhead ● Safe mode 124 Chapter 11 Handling ink cartridges and printheads ENWW
User Guide
Page 133
...the printheads, which you want to do that work today may not work in case you can also get this happens, insert a new cartridge (either genuine HP or compatible) to use up the remaining ink in the Information group. HP DesignJet Utility procedures ● In the HP DesignJet Utility ...work, and those that (see the widget page with your printer to fail. Refilling cartridges prior to prevent the printer from the HP DesignJet Utility. You can tap a particular ink cartridge for unattended printing (you want information. Only intended to insert another one. CAUTION:...
...the printheads, which you want to do that work today may not work in case you can also get this happens, insert a new cartridge (either genuine HP or compatible) to use up the remaining ink in the Information group. HP DesignJet Utility procedures ● In the HP DesignJet Utility ...work, and those that (see the widget page with your printer to fail. Refilling cartridges prior to prevent the printer from the HP DesignJet Utility. You can tap a particular ink cartridge for unattended printing (you want information. Only intended to insert another one. CAUTION:...
User Guide
Page 134
If you have a Z9+ printer, open the ink cartridge cover on the print. 1. Grip the cartridge you cancel it manually, it will resume printing when the empty cartridge has ... the front panel, tap , then , then Replace ink cartridges. 2. The front-panel display identifies the missing ink cartridge. 126 Chapter 11 Handling ink cartridges and printheads ENWW NOTE: When a cartridge runs out of ink, the current job is not automatically canceled: unless you wish to remove. 4. If you may be ink...
If you have a Z9+ printer, open the ink cartridge cover on the print. 1. Grip the cartridge you cancel it manually, it will resume printing when the empty cartridge has ... the front panel, tap , then , then Replace ink cartridges. 2. The front-panel display identifies the missing ink cartridge. 126 Chapter 11 Handling ink cartridges and printheads ENWW NOTE: When a cartridge runs out of ink, the current job is not automatically canceled: unless you wish to remove. 4. If you may be ink...
User Guide
Page 136
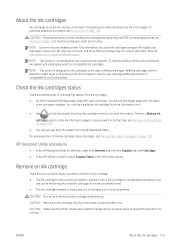
...ink cartridge display but the cartridge will start. Cartridges using an HP original chip. Check the printhead status The printer automatically checks and services the printheads after each print. About the printheads The printheads are non-Original HP. In this case the printer warranty will not be valid ...for any problems due to ink contamination. ● You will invalidate the warranty of all printheads of the same color...
...ink cartridge display but the cartridge will start. Cartridges using an HP original chip. Check the printhead status The printer automatically checks and services the printheads after each print. About the printheads The printheads are non-Original HP. In this case the printer warranty will not be valid ...for any problems due to ink contamination. ● You will invalidate the warranty of all printheads of the same color...
User Guide
Page 137
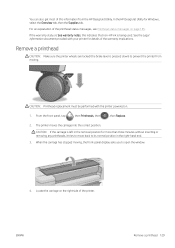
...are locked (the brake lever is pressed down) to prevent the printer from the HP DesignJet Utility. CAUTION: Printhead replacement must be performed with your printer for details of the printhead status messages, see Printhead status messages on page 185. When the carriage has stopped moving . Locate the... carriage on . 1. In the HP DesignJet Utility for more than three minutes without inserting or removing any printheads, it tries to move back to open the window. 4. For an explanation of the warranty implications...
...are locked (the brake lever is pressed down) to prevent the printer from the HP DesignJet Utility. CAUTION: Printhead replacement must be performed with your printer for details of the printhead status messages, see Printhead status messages on page 185. When the carriage has stopped moving . Locate the... carriage on . 1. In the HP DesignJet Utility for more than three minutes without inserting or removing any printheads, it tries to move back to open the window. 4. For an explanation of the warranty implications...
User Guide
Page 138
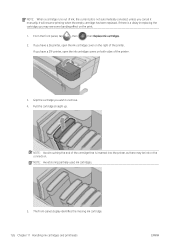
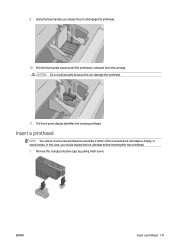
Push the handle back to the printheads. 8. This gives you to release the wire loop. To remove a printhead, lift up and toward you access to raise the lid. 7. NOTE: The illustrations below are for a Z9+ printer; 5. Pull the handle up the blue handle. 130 Chapter 11 Handling ink cartridges and printheads ENWW the procedure is similar if you have a Z6 printer. 6.
Push the handle back to the printheads. 8. This gives you to release the wire loop. To remove a printhead, lift up and toward you access to raise the lid. 7. NOTE: The illustrations below are for a Z9+ printer; 5. Pull the handle up the blue handle. 130 Chapter 11 Handling ink cartridges and printheads ENWW the procedure is similar if you have a Z6 printer. 6.
User Guide
Page 139
... cartridges is released from the carriage. The front-panel display identifies the missing printhead. CAUTION: Do not pull abruptly because this case, you should replace the ink cartridge before inserting the new printhead. 1. Pull the blue handle upward until the printhead is empty, or nearly empty. Remove the orange protective caps by pulling...
... cartridges is released from the carriage. The front-panel display identifies the missing printhead. CAUTION: Do not pull abruptly because this case, you should replace the ink cartridge before inserting the new printhead. 1. Pull the blue handle upward until the printhead is empty, or nearly empty. Remove the orange protective caps by pulling...
User Guide
Page 140
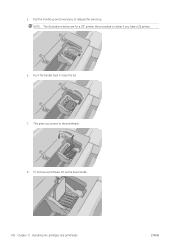
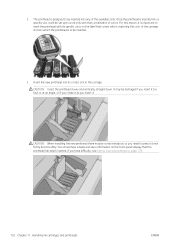
..., matching the color of the available slots. You should hear a beep and see Cannot insert a printhead on page 179. 132 Chapter 11 Handling ink cartridges and printheads ENWW CAUTION: When installing the new printhead there may be damaged if you insert it too fast, or at an angle, or if you... rotate it as you insert it will be some resistance, so you have difficulty, see confirmation on the label that the printhead has been inserted. Insert the new printhead into a specific slot, it . If you need to work only with it down . 2. For this reason, it is inserted ...
..., matching the color of the available slots. You should hear a beep and see Cannot insert a printhead on page 179. 132 Chapter 11 Handling ink cartridges and printheads ENWW CAUTION: When installing the new printhead there may be damaged if you insert it too fast, or at an angle, or if you... rotate it as you insert it will be some resistance, so you have difficulty, see confirmation on the label that the printhead has been inserted. Insert the new printhead into a specific slot, it . If you need to work only with it down . 2. For this reason, it is inserted ...


